By: Alejandro Cobar | Updated: 2021-03-19 | Comments | Related: > Availability Groups
Problem
While searching for information on setting up SQL Server Availability Groups, I was surprised most articles show how to do this using the SSMS GUI. In this article, we cover the simple steps to follow to setup Availability Groups using just TSQL.
Solution
In this tip I'm going to cover the steps required to deploy an Availability Group using purely TSQL code, without having the need to use the GUI from SSMS.
Initial considerations
Before diving right into the execution of the TSQL code to create the Availability Group, there are definitely some factors that you should check within your own environment for a successful implementation.
Here's a checklist of what I will cover to help you be prepared:
- I'm covering Windows based on-premises setups (not Linux nor Azure, although parts can definitely be used to some extent).
- If dealing with SQL Server 2012 or SQL 2014
- Make sure to use either Developer, Evaluation or Enterprise Edition.
- If dealing with SQL Server 2016 or later
- You can use Standard Edition to create a Basic Availability Group.
- You can use Developer, Evaluation or Enterprise Edition for normal Availability Groups.
- Make sure that there's connectivity between the replicas you will be working with (i.e. ports open in the firewall).
- Make sure that the Availability Groups feature is enabled in the SQL Server Configuration Manager (requires instance restart to be applied).
- Make sure to have properly setup the Failover Cluster that will house the Availability Group resource.
- If using a file share witness in the cluster, make sure that all the nodes can interact with it.
- For peace of mind, make sure that the exact same disks layout is present in all replicas you will be working with.
- Make sure that the database(s) that will be part of the Availability Group are in the Full Recovery Model.
TSQL Script and steps to create an Availability Group
Once the above is in place, these are the steps to follow to create a new Availability Group and add databases to the Availability Group.
Step 1 - Create Endpoint in Each Replica
You can use any endpoint name that you want. You can use any port number that you want, just make sure that it's available and open.
USE master
GO

CREATE ENDPOINT Hadr_endpoint STATE = STARTED
    AS TCP (LISTENER_PORT = 5022)
    FOR DATABASE_MIRRORING (ROLE = ALL);
GO
Step 1.a - Enable Endpoint, If Necessary
If the endpoint is already created, for whatever reason, but it's in a disabled state, then simply run the following code to start it. Make sure to specify the correct endpoint name for your implementation.
USE master
GO

IF (SELECT state FROM sys.endpoints WHERE name = N'Hadr_endpoint') <> 0
BEGIN
   ALTER ENDPOINT [Hadr_endpoint] STATE = STARTED
END
GO
Step 2 - Grant Connect Permission to Endpoint
In each replica grant the connect permission to the endpoint for the service account running the DB engine service. Use the endpoint name and service account that applies to your own particular case. If the service accounts are different in each replica, then make sure to create the logins on the other replicas and grant connect permission to each.
USE master
GO

GRANT CONNECT ON ENDPOINT::[Hadr_endpoint] TO [NT Service\MSSQLSERVER]
GO
Step 3 - Enable Extended Event for Monitoring
In each replica, run the following TSQL code to create the extended event that collects data related to the health of your Availability Group.
USE master
GO

IF EXISTS(SELECT * FROM sys.server_event_sessions WHERE name = 'AlwaysOn_health')
BEGIN
   ALTER EVENT SESSION [AlwaysOn_health] ON SERVER WITH (STARTUP_STATE=ON);
END

IF NOT EXISTS(SELECT * FROM sys.dm_xe_sessions WHERE name = 'AlwaysOn_health')
BEGIN
   ALTER EVENT SESSION [AlwaysOn_health] ON SERVER STATE=START;
END
GO
Step 4 - Perform Database Backups
Go to the instance you will want to act as the Primary Replica and perform full and log backups of the database(s) that will be part of the Availability Group. Use a path for the backups that works for you.
USE master
GO

BACKUP DATABASE [test] TO DISK = 'C:\temp\test.bak' WITH COMPRESSION
GO

BACKUP LOG [test] TO DISK = 'C:\temp\test.trn' WITH COMPRESSION
GO
Step 5 - Copy Backup Files to Replicas
Copy the backup files to each server that will act as a Secondary Replica and restore the backup files as follows. Again, update script for the correct file location.
USE master
GO

RESTORE DATABASE [test] FROM DISK = 'C:\temp\test.bak' WITH NORECOVERY
GO

RESTORE LOG [test] FROM DISK = 'C:\temp\test.trn' WITH NORECOVERY
GO
Step 6 - Create Availability Group on Primary
From the replica that will be the initial Primary Replica, run the following TSQL code to create the Availability Group.
Here are some notes:
- I'm naming the Availability Group TestAG for demonstration purposes, choose yours accordingly.
- Choose the AUTOMATED_BACKUP_PREFERENCE, DB_FAILOVER, DTC_SUPPORT values accordingly.
- I'm creating the Availability Group with a database called test.
- Make sure to correctly specify the values you want for the parameters FAILOVER_MODE, AVAILABILITY_MODE, BACKUP_PRIORITY, SEEDING_MODE and SECONDARY_ROLE.
- In this particular example, I have 1 Primary Replica and 1 Secondary Replica, and I'm preparing the setup for automatic failover mode with synchronous commit mode, also instructing the Availability Group to prefer to take backups of my test database from my Secondary Replica.
USE master
GO

CREATE AVAILABILITY GROUP [TestAG]
WITH (AUTOMATED_BACKUP_PREFERENCE = SECONDARY, DB_FAILOVER = ON, DTC_SUPPORT = NONE)
FOR DATABASE [test]
REPLICA ON
N'YourSecondaryReplicaNameHere!!!'
WITH (ENDPOINT_URL = N'TCP:// YourSecondaryReplicaNameHere.domain.com:5022',
      FAILOVER_MODE = AUTOMATIC,
      AVAILABILITY_MODE = SYNCHRONOUS_COMMIT,
      BACKUP_PRIORITY = 75,
      SEEDING_MODE = MANUAL,
      SECONDARY_ROLE(ALLOW_CONNECTIONS = ALL)
     ),
N'YourPrimaryReplicaNameHere!!!'
WITH (ENDPOINT_URL = N'TCP:// YourPrimaryReplicaNameHere.domain.com:5022',
      FAILOVER_MODE = AUTOMATIC,
      AVAILABILITY_MODE = SYNCHRONOUS_COMMIT,
      BACKUP_PRIORITY = 25,
      SEEDING_MODE = MANUAL,
      SECONDARY_ROLE(ALLOW_CONNECTIONS = ALL)
     );
GO
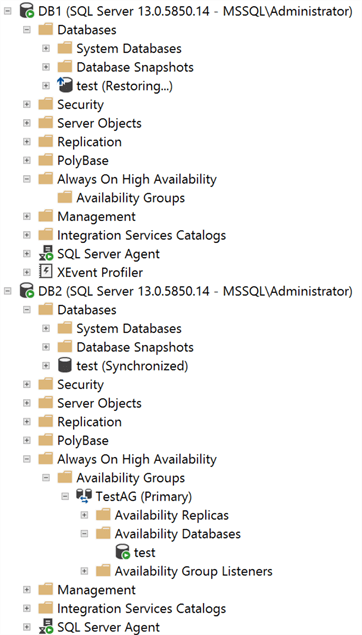
In the following screenshot you can see that in my Primary Replica (DB2), the Availability Group has been created successfully and the state of the test database is "Synchronized", while in the Secondary Replica (DB1), the Availability Group is not set and the state of the test database is "Restoring…".

Step 7 - Enable Availability Group on Secondary
Within each Secondary Replica, execute the following TSQL code to join it to the Availability Group. Use the same Availability Group name that you specified in the previous section.
USE master
GO

ALTER AVAILABILITY GROUP [TestAG] JOIN;
GO
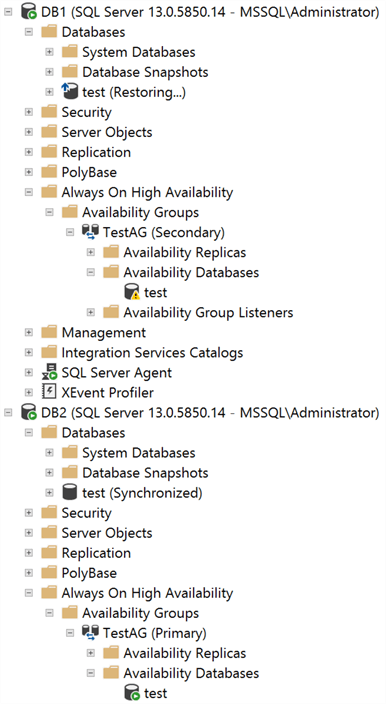
After executing this code in my Secondary Replica (DB1), you can see that the Availability Group has been correctly set, but my test database is still in "Restoring…" state and has a warning icon in the "Availability Databases" section. This is because we must execute one more piece of code to start the data synchronization process.

Step 8 - Add Database to Availability Group on Secondary
Within each Secondary Replica, execute the following TSQL code to add the desired database(s) to the Availability Group. Use the same Availability Group and database(s) name that you specified in the previous sections.
USE master
GO

ALTER DATABASE [test] SET HADR AVAILABILITY GROUP = [TestAG];
GO
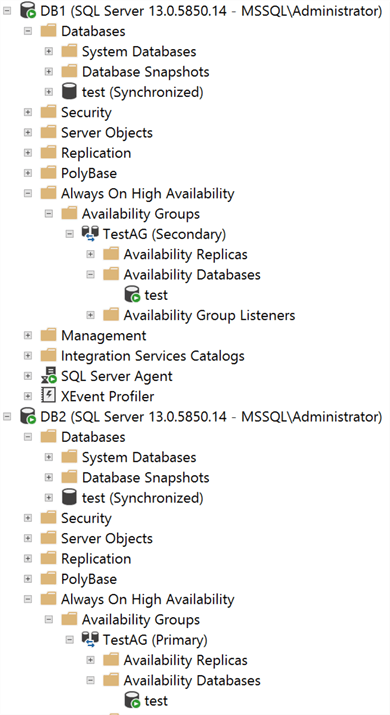
With this code executed in my Secondary Replica (DB1), you can see that the test database is now fully synchronized and receiving data from the Primary Replica.

Next Steps
- Although configuring an Availability Group using SSMS is more user friendly, perhaps you'll find yourself in a scenario where you have to deploy multiple Availability Groups or work with multiple databases in several Availability Groups, so interacting with TSQL can save time and help you automate the work.
- Starting with SQL Server 2017 and beyond, you can have Availability Groups in Linux, so you definitely will need to use TSQL to work with those. Perhaps it won't be the exact same code I explained in this article, but the basic elements are definitely the same.
About the author
 Alejandro Cobar is an MCP, SQL Server DBA and Developer with 10+ years of experience working in a variety of environments.
This author pledges the content of this article is based on professional experience and not AI generated.
View all my tips
Article Last Updated: 2021-03-19


