By: Koen Verbeeck | Updated: 2021-04-12 | Comments | Related: > TSQL
Problem
When storing data in different tables in a SQL database, at some point in time you will want to retrieve some of that data. This is where the SELECT statement of the SQL language comes in. This tutorial will teach you how you can use SELECT to read, aggregate and sort data from one or more database tables.
Solution
All queries in this SQL tutorial are written on the Adventure Works sample database. You can install it on your machine so you can execute the queries yourself to see the results. You can also take the example queries and swap out the table names and column names with names from your own database. Since we’ll only by using SQL SELECT statement to read data, there’s no risk in changing or deleting data. The examples in this tip use the AdventureWorks2017 database.
SQL SELECT Statement Examples
In its most simple form, the SELECT clause has the following SQL syntax for a Microsoft SQL Server database:
SELECT *
FROM <TableName>;
This SQL query will select all columns and all rows from the table. For example:
SELECT *
FROM [Person].[Person];
This query selects all data from the Person table in the Person schema.

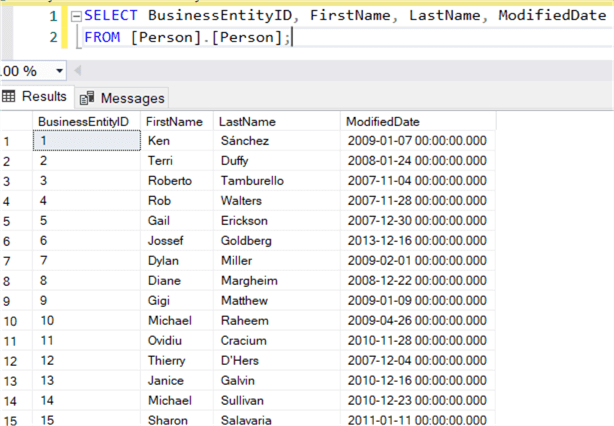
If we want only a subset of the columns, we can explicitly list each column separated by a comma, instead of using the asterisk symbol which includes all columns.
SELECT BusinessEntityID, FirstName, LastName, ModifiedDate
FROM [Person].[Person];
Syntax for Sorting the Results
Sometimes you want to display the rows in a different order than the order SQL Server returns the results in. You can do this using the SQL ORDER BY clause.
SELECT column1, column2, column3, …
FROM <tablename>
ORDER BY columnX ASC | DESC
You can sort on one or more columns and you can choose to sort either ascending (ASC) or descending (DESC). Let’s return rows with ascending modified date:
SELECT BusinessEntityID, FirstName, LastName, ModifiedDate
FROM [Person].[Person]
ORDER BY [ModifiedDate] ASC;
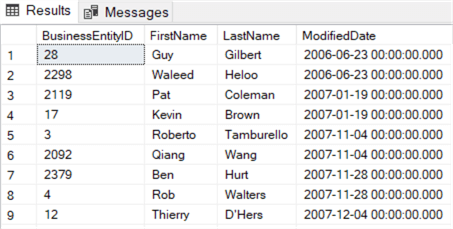
Ascending is the default, so you don’t need to specify ASC explicitly.
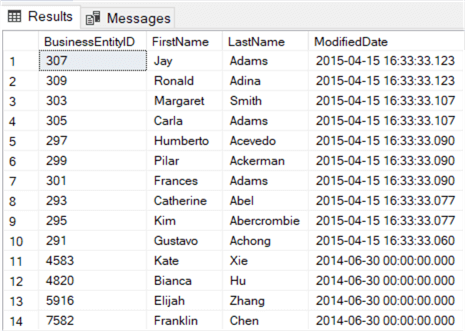
Now with descending modified date:
SELECT BusinessEntityID, FirstName, LastName, ModifiedDate
FROM [Person].[Person]
ORDER BY [ModifiedDate] DESC;
You can sort on multiple columns, so let’s sort on descending modified date first, then on ascending first name.
SELECT BusinessEntityID, FirstName, LastName, ModifiedDate
FROM [Person].[Person]
ORDER BY [ModifiedDate] DESC, FirstName;
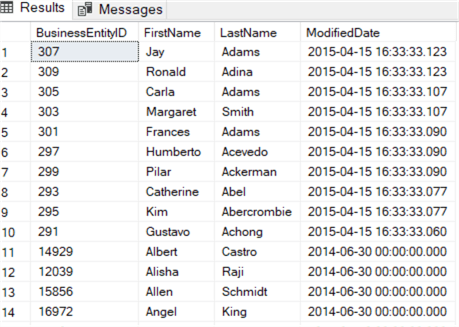
You can see for example how the third and fourth row of the result set (Carla and Margaret) have swapped.
Filtering data from a table
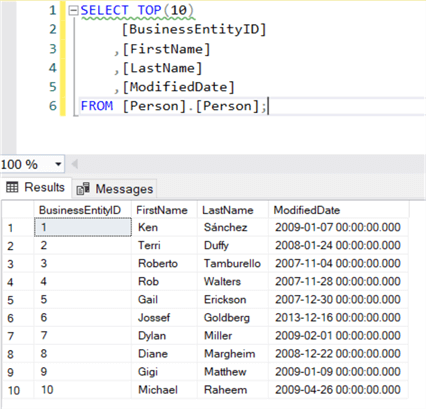
Sometimes you’ll want to limit the number of rows being returned by the query, especially if you have a table with a large number of rows. If you’re just interested in taking a look at the data, you can use the TOP clause. This will for example return the first 10 rows of the table:
SELECT TOP(10)
     [BusinessEntityID]
    ,[FirstName]
    ,[LastName]
    ,[ModifiedDate]
FROM [Person].[Person];
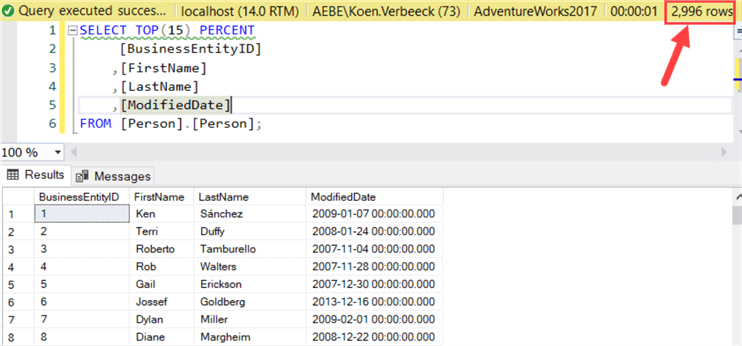
Instead of using a number, you can also use a percentage. This query returns the number of rows equal (or almost equal) to 15% of the total row number:
SELECT TOP(15) PERCENT
     [BusinessEntityID]
    ,[FirstName]
    ,[LastName]
    ,[ModifiedDate]
FROM [Person].[Person];
In the case of this table (with a total of 19,972 rows), the query returns 2,996 rows.
If you want to filter rows using a condition, the WHERE clause can be used. It generally has the following structure:
SELECT column1, column2, …
FROM <TableName>
WHERE <Boolean expression>;
Every row where the expression returns true is returned by the query. The following query returns all persons with the name "Rob".
SELECT
     [BusinessEntityID]
    ,[FirstName]
    ,[LastName]
    ,[ModifiedDate]
FROM [Person].[Person]
WHERE [FirstName] = 'Rob';

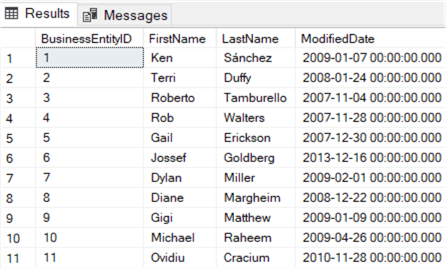
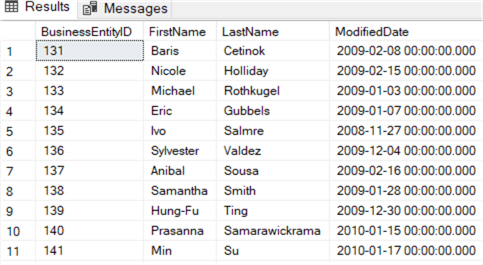
The following example three queries return rows where BusinessEntityID is equal, smaller or bigger than 130.
SELECT
     [BusinessEntityID]
    ,[FirstName]
    ,[LastName]
    ,[ModifiedDate]
FROM [Person].[Person]
WHERE [BusinessEntityID] = 130;

SELECT
     [BusinessEntityID]
    ,[FirstName]
    ,[LastName]
    ,[ModifiedDate]
FROM [Person].[Person]
WHERE [BusinessEntityID] < 130;
SELECT
     [BusinessEntityID]
    ,[FirstName]
    ,[LastName]
    ,[ModifiedDate]
FROM [Person].[Person]
WHERE [BusinessEntityID] > 130;
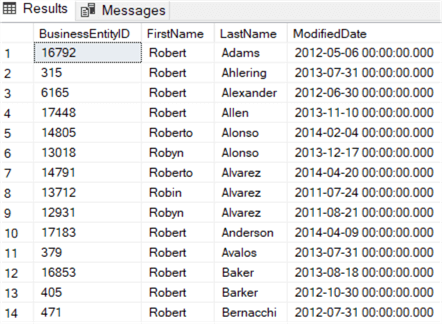
You can use different functions and operators, such as the LIKE operator for more advanced string searching. In this example, we search all person where the name starts with "Rob".
SELECT
     [BusinessEntityID]
    ,[FirstName]
    ,[LastName]
    ,[ModifiedDate]
FROM [Person].[Person]
WHERE [FirstName] LIKE 'Rob%';
For more LIKE examples, check out the tip SQL Server LIKE Syntax with Wildcard Characters. An example using the YEAR function:
SELECT
     [BusinessEntityID]
    ,[FirstName]
    ,[LastName]
    ,[ModifiedDate]
FROM [Person].[Person]
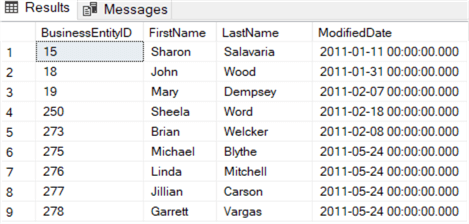
WHERE YEAR([ModifiedDate]) = 2011;
Only rows where the row was modified in the year 2011 are now returned:
You can use the Boolean operators AND, OR and NOT to combine different Boolean expressions with each other. The following query selects all rows where the firstname equals "Rob" and the modified date was in the year 2011:
SELECT
     [BusinessEntityID]
    ,[FirstName]
    ,[LastName]
    ,[ModifiedDate]
FROM [Person].[Person]
WHERE  [FirstName]           = 'Rob'
    AND YEAR([ModifiedDate]) = 2011;

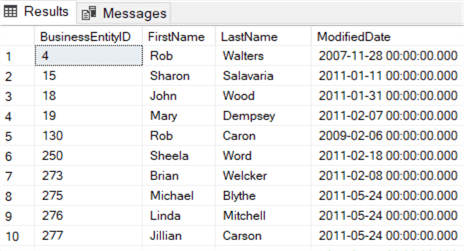
We get a whole different result set when we replace the AND by OR. Now all rows are returned where the first name equals to Rob or where the row was modified in 2011.
SELECT
     [BusinessEntityID]
    ,[FirstName]
    ,[LastName]
    ,[ModifiedDate]
FROM [Person].[Person]
WHERE  [FirstName]          = 'Rob'
    OR YEAR([ModifiedDate]) = 2011;
Grouping data from a SQL Server table
If you don’t want to return individual detail rows from a table, but rather aggregated results, you can use the GROUP BY clause. The query takes the following format:
SELECT column1, column2, <aggregationfunction>(column3)
FROM <TableName>
GROUP BY column1, column2
There are many different aggregation functions in SQL Server, such as SUM, AVG, MIN, MAX and so on. You can find a list here. If you only use aggregations, you don’t need to use the GROUP BY clause. For example, we can return the number of rows in a table with the COUNT function:
SELECT COUNT(1) AS RowCnt
FROM [Person].[Person];

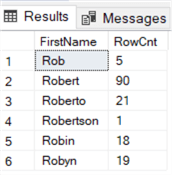
A new name – RowCnt – has been assigned to the result using the AS keyword. This is also called "assigning an alias". By adding a GROUP BY on the first name and a WHERE clause (see the previous section), we can count the number of times a name starts with "Rob".
SELECT
     [FirstName]
    ,COUNT(1) AS RowCnt
FROM [Person].[Person]
WHERE [FirstName] LIKE 'Rob%'
GROUP BY [FirstName];
Every column that is not used inside an aggregation function and that is not a constant, should be put in the GROUP BY clause. For example, if we add LastName to the SELECT but not to the GROUP BY, we get an error:

Filtering Aggregated Results
Using the WHERE clause you can filter out individual rows. But what if you want to filter on the result of an aggregated function? This is not possible in the WHERE clause, since those results don’t exist in the original table. We can do this with the HAVING clause. Using the previous example, we want to return only first names – starting with "Rob" – where the row count is at least 20. The query becomes:
SELECT
     [FirstName]
    ,COUNT(1) AS RowCnt
FROM [Person].[Person]
WHERE [FirstName] LIKE 'Rob%'
GROUP BY [FirstName]
HAVING COUNT(1) >= 20;

Selecting data from multiple SQL Server tables
Often you don’t need data from one single table, but you’ll need to combine different tables to get the result you want. In SQL, you do this by "joining" tables. You take one table, and you define which columns need to match with columns of another table. There are different join types in SQL:
- INNER JOIN – only rows matching between both tables are returned.
- LEFT OUTER JOIN – all rows from the first table are returned, along with any matching rows from the second table. There’s also a RIGHT JOIN, which reverses the relationship.
- FULL OUTER JOIN – this returns all rows from both tables. If there’s no match, the missing side will have NULL values instead of actual column values.
- CROSS JOIN – this is the cartesian product of all rows of both tables. There’s no matching. If you have 100 rows in the first table and 10 in the second, the result set will contain 100 * 10 = 1000 rows. This join type should be used carefully because it can potentially return a lot of rows. We won’t discuss it further in this tip.
The blog post A Visual Explanation of SQL Joins illustrates each join type with a Venn diagram. Let’s illustrate each join type with a query example.
INNER JOIN
The following query uses INNER JOIN to return all rows and all columns of the Person table and the Employee table, but only if they have matching BusinessEntityIDs. In other words, the query returns the persons who are employees of AdventureWorks.
SELECT *
FROM       [Person].[Person]
INNER JOIN [HumanResources].[Employee] ON [Employee].[BusinessEntityID] = [Person].[BusinessEntityID];

If you don’t want to type the table names each time you reference a column, you can alias those as well. Here the Person table is aliased with "p" and the Employee table with "e".
SELECT *
FROM       [Person].[Person]            p
INNER JOIN [HumanResources].[Employee]  e ON e.[BusinessEntityID] = p.[BusinessEntityID];
When you have columns with the same name between the tables, you need to prefix them with the table name or with the respective alias. In the following query, we return the BusinessEntityID of both tables, so they need to be prefixed.
SELECT
     p.[FirstName]
    ,p.[LastName]
    ,p.[BusinessEntityID]
    ,e.[BusinessEntityID]
    ,e.[HireDate]
FROM       [Person].[Person]            p
INNER JOIN [HumanResources].[Employee]  e ON e.[BusinessEntityID] = p.[BusinessEntityID];
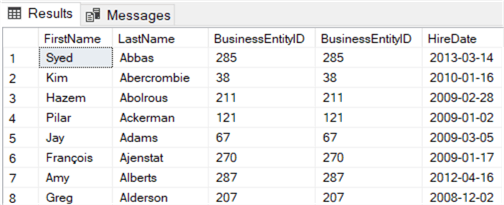
It’s a best practice to prefix al the columns in the SELECT statement with the table alias, as it will make clear of which table each column comes from. This avoids any confusion by people reading your query, especially if they’re not familiar with the database design.
LEFT OUTER JOIN
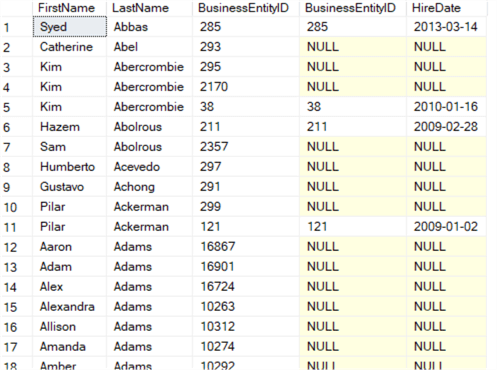
When we change the join type to a LEFT OUTER JOIN, all rows from the Person table will be returned. It doesn’t matter if there’s a match with the Employee table. If there’s a match, the value of the HireDate column will be returned. If not, NULL will be returned instead.
SELECT
     p.[FirstName]
    ,p.[LastName]
    ,p.[BusinessEntityID]
    ,e.[BusinessEntityID]
    ,e.[HireDate]
FROM            [Person].[Person]           p
LEFT OUTER JOIN [HumanResources].[Employee] e ON e.[BusinessEntityID] = p.[BusinessEntityID];
In the result set, you can see that there’s no HireDate returned for the persons who are not an employee:
RIGHT OUTER JOIN uses the exact same principle, but it will return all rows from the second table and only matching results from the first table. It typically isn’t used much, as LEFT OUTER JOIN is easier to read.
FULL OUTER JOIN
To illustrate the concept of FULL OUTER JOIN, we are involving the JobCandidate table as well. This table contains 13 rows. Only 2 of those 13 candidates have actually been hired, and those have a BusinessEntityID that is not NULL.
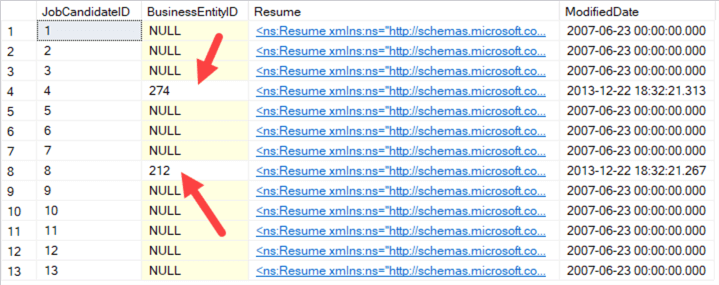
In the following query, we are first joining Person and Employee together, to find all Employees. Then we are using FULL OUTER JOIN to get all job candidates in the query result set as well.
SELECT
     p.[FirstName]
    ,p.[LastName]
    ,p.[BusinessEntityID]
    ,e.[BusinessEntityID]
    ,j.[BusinessEntityID]
    ,e.[HireDate]
    ,j.[JobCandidateID]
FROM            [Person].[Person]               p
INNER JOIN      [HumanResources].[Employee]     e ON p.[BusinessEntityID] = e.[BusinessEntityID]
FULL OUTER JOIN [HumanResources].[JobCandidate] j ON e.[BusinessEntityID] = j.[BusinessEntityID];
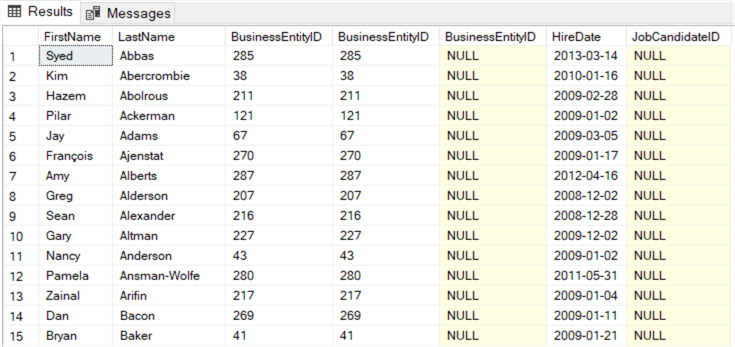
There are 290 employees and 13 job candidates. Two job candidates have been hired, so they’re employees as well. This means the grand total of rows returned should be 301 (290 + 13 – 2).
The first rows are employees who cannot be found in the JobCandidate table. The JobCandidateID column is NULL.
At the end of the result set, the job candidates are added:
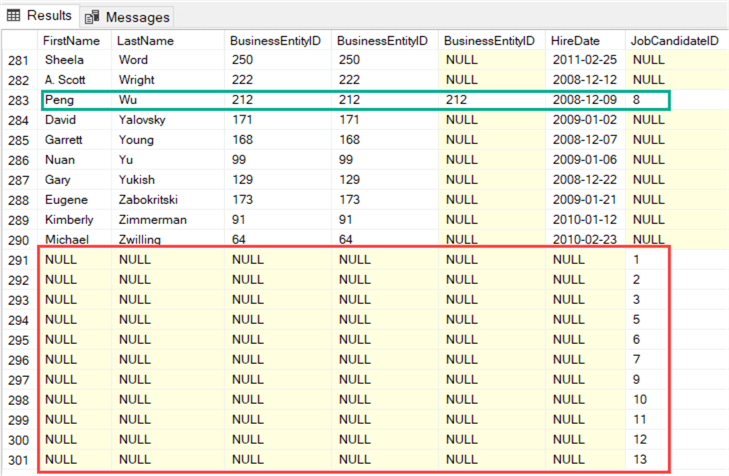
In the red square, we have the 11 job candidates who have not been hired. All columns are NULL except the JobCandidateID column. In the green square, we have an example of a job candidate which has been hired. All columns have values in this case.
The tip SQL Server Join Example goes a bit more into detail about the different join types.
Conclusion
Let’s wrap all the previous sections together into one single query. This query returns the count of all employees which name starts with "Rob", sorted on this count ascending.
SELECT
     p.[FirstName]
    ,COUNT(1) AS RowCnt
FROM       [Person].[Person]           p
INNER JOIN [HumanResources].[Employee] e ON e.[BusinessEntityID] = p.[BusinessEntityID]
WHERE p.[FirstName] LIKE 'Rob%'
GROUP BY [p].[FirstName]
ORDER BY [RowCnt] ASC;
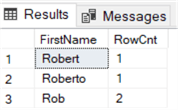
As the query shows, you can also sort on aliases (RowCnt in this example) and not only on actual physical columns from a table.
Next Steps
- In this tip, we’ve only scratched the surface of what the SELECT statement
can do. Here are some more complex constructs:
- Combining result sets with UNION (ALL): UNION vs. UNION ALL in SQL Server
- Using subqueries - SQL Server Subquery Example - and correlated subqueries: SQL Server Uncorrelated and Correlated Subquery.
- Creating correlated queries or using table functions with APPLY: SQL Server CROSS APPLY and OUTER APPLY
- More advanced grouping using CUBE, ROLLUP and GROUPING SETS.
- Additional articles to review:
About the author
 Koen Verbeeck is a seasoned business intelligence consultant at AE. He has over a decade of experience with the Microsoft Data Platform in numerous industries. He holds several certifications and is a prolific writer contributing content about SSIS, ADF, SSAS, SSRS, MDS, Power BI, Snowflake and Azure services. He has spoken at PASS, SQLBits, dataMinds Connect and delivers webinars on MSSQLTips.com. Koen has been awarded the Microsoft MVP data platform award for many years.
This author pledges the content of this article is based on professional experience and not AI generated.
View all my tips
Article Last Updated: 2021-04-12


