By: Koen Verbeeck | Updated: 2021-05-20 | Comments (1) | Related: > TSQL
Problem
A database engine without any data in it doesn’t seem to be very useful. In this tutorial, we’ll show you, with examples, how you can insert data into tables using the INSERT INTO statement.
Solution
To follow along with the examples, you need an empty SQL database. You can create one – if you have sufficient permissions – with the following SQL statement:
CREATE DATABASE TEST;
Of course, you can choose another name than "Test". To execute SQL script on a SQL Server engine, you might want to use SQL Server Management Studio, also known as SSMS. You can download this tool for free. We will also use the AdventureWorks2017 sample database to select data.
INSERT INTO SELECT Examples
There are different methods to insert data into a table, but in this tip we’re only focusing on the INSERT INTO statement followed by a SELECT statement. For a general overview of the different options to insert rows into a table, check out the tip INSERT INTO SQL Server Command. The general syntax of the INSERT statement looks like this:
INSERT INTO [database].[schema].[table]
(column1
,column2
,column3
…
)
SELECT
     expression1
    ,expression2
    ,expression3
…
FROM myTable
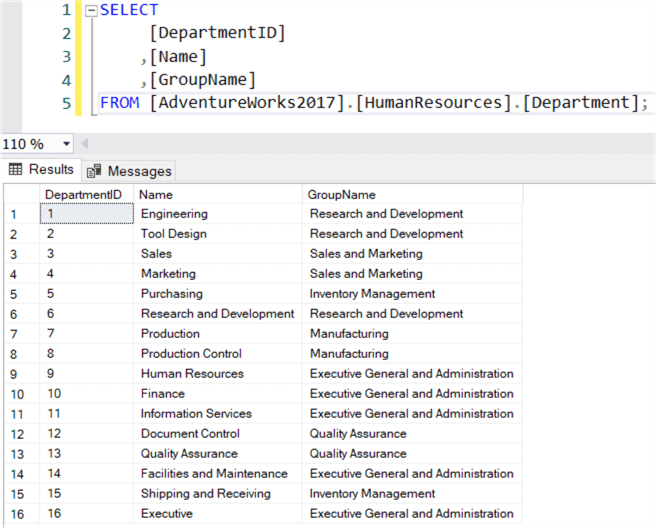
The SELECT statement can be as simple or as complex as you want specifying the column names, join tables (INNER JOIN, LEFT JOIN, RIGHT JOIN), GROUP BY, ORDER BY, WHERE clause and so on from the source table. For an introduction to the SELECT statement, check out SQL Server SELECT Examples. Let’s start off with an example. We will use the following SELECT statement to read some data from the AdventureWorks database:
SELECT
     [DepartmentID]
    ,[Name]
    ,[GroupName]
FROM [AdventureWorks2017].[HumanResources].[Department];

Next, we need a table to insert the data into. In our test database, we create the following table:
CREATE TABLE Test.[dbo].[SimpleInsert](
   [DepartmentID] [SMALLINT] NOT NULL,
   [Name] [NVARCHAR](50) NOT NULL,
   [GroupName] [NVARCHAR](50) NOT NULL
);
With the table created, we can now insert data into the target table:
INSERT INTO Test.dbo.SimpleInsert
(    [DepartmentID]
    ,[Name]
    ,[GroupName]
)
SELECT
     [DepartmentID]
    ,[Name]
    ,[GroupName]
FROM [AdventureWorks2017].[HumanResources].[Department];
When the statement succeeds, SSMS will show the number of inserted rows in the messages window:

You can also retrieve the number of rows inserted using @@rowcount. Now let’s try a more complex SELECT statement:
SELECT
     TerritoryName  = [t].[Name]
    ,SalesAmount    = SUM(sh.[TotalDue])
FROM [AdventureWorks2017].[Sales].[SalesOrderHeader] sh
JOIN [AdventureWorks2017].[Sales].[SalesTerritory]   t ON [t].[TerritoryID] = [sh].[TerritoryID]
WHERE [sh].[OrderDate] >= '2011-01-01' AND sh.[OrderDate] < '2012-01-01'
GROUP BY [t].[Name]
HAVING SUM(sh.[TotalDue]) > 1000000;
With this SQL script, we retrieve all territories which had more than one million in sales in the year 2011. The following script creates the destination table:
CREATE TABLE Test.[dbo].[ComplexInsert](
   [TerritoryName] [NVARCHAR](50) NOT NULL,
   [SalesAmount] [MONEY] NULL
);
Putting it all together, we have the following INSERT statement:
INSERT INTO Test.dbo.[ComplexInsert]
(
    [TerritoryName]
   ,[SalesAmount]
)
SELECT
     TerritoryName  = [t].[Name]
    ,SalesAmount    = SUM(sh.[TotalDue])
FROM [AdventureWorks2017].[Sales].[SalesOrderHeader] sh
JOIN [AdventureWorks2017].[Sales].[SalesTerritory]   t ON [t].[TerritoryID] = [sh].[TerritoryID]
WHERE [sh].[OrderDate] >= '2011-01-01' AND sh.[OrderDate] < '2012-01-01'
GROUP BY [t].[Name]
HAVING SUM(sh.[TotalDue]) > 1000000;
Keep in mind the column list in the INSERT statement is actually optional, so the statement can also be written as:
INSERT INTO Test.dbo.[ComplexInsert]
SELECT
     TerritoryName  = [t].[Name]
    ,SalesAmount    = SUM(sh.[TotalDue])
FROM [AdventureWorks2017].[Sales].[SalesOrderHeader] sh
JOIN [AdventureWorks2017].[Sales].[SalesTerritory]   t ON [t].[TerritoryID] = [sh].[TerritoryID]
WHERE [sh].[OrderDate] >= '2011-01-01' AND sh.[OrderDate] < '2012-01-01'
GROUP BY [t].[Name]
HAVING SUM(sh.[TotalDue]) > 1000000;
This will only work when the SELECT statement has the same number of columns that are present in the table and in the same order. It’s a good idea to always specify the column list, as to avoid any mistakes. When you do specify the columns, you can change the column order, as long as the SELECT statement follows the same order. The following statement would work as well:
INSERT INTO Test.dbo.[ComplexInsert]
(
    [SalesAmount]
   ,[TerritoryName]
)
SELECT
     SalesAmount    = SUM(sh.[TotalDue])
    ,TerritoryName  = [t].[Name]
FROM [AdventureWorks2017].[Sales].[SalesOrderHeader] sh
JOIN [AdventureWorks2017].[Sales].[SalesTerritory]   t ON [t].[TerritoryID] = [sh].[TerritoryID]
WHERE [sh].[OrderDate] >= '2011-01-01' AND sh.[OrderDate] < '2012-01-01'
GROUP BY [t].[Name]
HAVING SUM(sh.[TotalDue]) > 1000000;
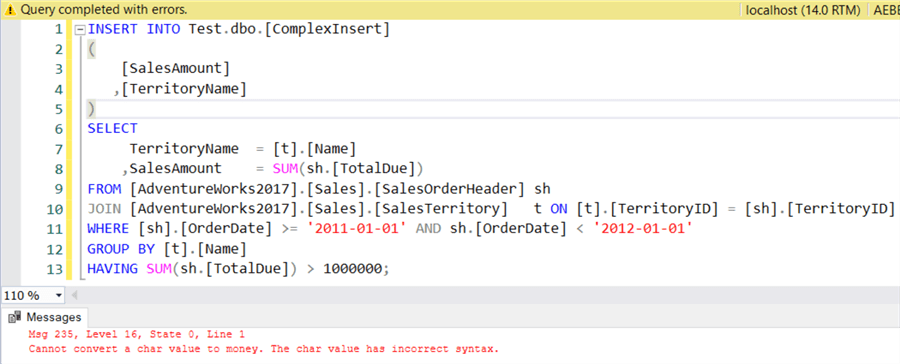
A common bug is when the column order in the INSERT statement is different from the one in the SELECT statement. If the data types don’t match, or if data is truncated, you will get an error:

However, if the data types are compatible (for example when you try to insert integers into a varchar column, it will work), the INSERT statement will succeed and the mistake might go unnoticed.
SQL INSERT INTO SELECT for a temp table or table variable
You can also insert data into a temporary table or into a table variable. Just like with regular tables, the object has to exist first. Let’s modify the first example to work with a temp table with this SQL syntax:
CREATE TABLE #SimpleInsert(
   [DepartmentID] [SMALLINT] NOT NULL,
   [Name] [NVARCHAR](50) NOT NULL,
   [GroupName] [NVARCHAR](50) NOT NULL
);

INSERT INTO #SimpleInsert
(    [DepartmentID]
    ,[Name]
    ,[GroupName]
)
SELECT
     [DepartmentID]
    ,[Name]
    ,[GroupName]
FROM [AdventureWorks2017].[HumanResources].[Department];
Or a table variable with this SQL syntax:
DECLARE @SimpleInsert TABLE(
   [DepartmentID] [SMALLINT] NOT NULL,
   [Name] [NVARCHAR](50) NOT NULL,
   [GroupName] [NVARCHAR](50) NOT NULL
);

INSERT INTO @SimpleInsert
(    [DepartmentID]
    ,[Name]
    ,[GroupName]
)
SELECT
     [DepartmentID]
    ,[Name]
    ,[GroupName]
FROM [AdventureWorks2017].[HumanResources].[Department];
Testing the INSERT Statement
After you’ve written your statement, you of course want to test if it works as expected. You can just execute the SQL script in a development environment, but unfortunately, it’s possible you don’t have the "luxury" of having such an environment. You can execute the SELECT statement to view the exact rows that will be inserted, but the insert can still fail due to constraints (primary key violation for example), a data type mismatch or other reasons. The "advantage" of an INSERT statement is that if it fails, no harm is done, since no rows are inserted and thus there are no changes at all. But what if you need to test your statement, but the data shouldn’t change just yet? For example, you need to insert a new product into a table that will be sold on your website, but the sale should start next week?
Here are a couple of methods to test your INSERT statement.
Take a backup with SELECT … INTO
- Before you execute your statement, you can first take a backup of the original table using SELECT … INTO. To test your statement, you can then insert the new data into this new table, to verify if it succeeds. You might have to recreate indexes and constraints on the table to make sure you are testing the exact same scenario as with the actual destination table. Even though SELECT INTO is quite fast, it is not recommended for large tables, or complex tables with many indexes, constraints and so on.
Insert the data into a temp table
- A similar method as the previous one, but with a temp table instead of a backup of the actual destination table. You can create a temp table with the exact same structure and insert into this table first. If it succeeds, you have tested that there are no data type mismatches or that data will be truncated. However, to test if there are no constraint violations you still need data in this table. This would mean you need to copy data over. The advantage of the SELECT INTO is that it is faster, but it doesn’t initially create all indexes and constraints. The advantage of the temp table is that you can just script out the original table (see screenshot below) and replace the table name with the name of the temp table, but copying data over can be a slow process.

Use explicit transactions
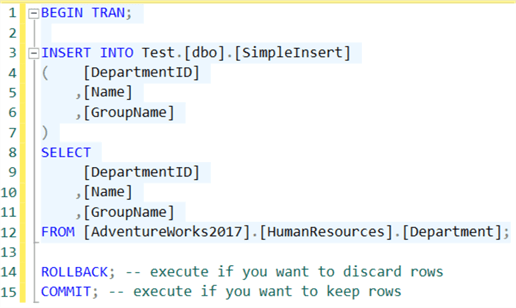
- Perhaps the most elegant way to test the INSERT statement is to use explicit transactions. You wrap the statement into a transaction, and you execute the INSERT statement, but don’t commit it. If the statement fails, nothing has happened to the table. If it succeeds, you can either commit or rollback the transaction, depending if you want to keep the inserted rows or not. Using our simple example, here’s what you should execute to test the statement:

- Here’s the full script:
BEGIN TRAN;

INSERT INTO Test.[dbo].[SimpleInsert]
(    [DepartmentID]
    ,[Name]
    ,[GroupName]
)
SELECT
     [DepartmentID]
    ,[Name]
    ,[GroupName]
FROM [AdventureWorks2017].[HumanResources].[Department];

ROLLBACK; -- execute if you want to discard rows
COMMIT; -- execute if you want to keep rows
Reasons why INSERT can fail
There are many cases where an INSERT statement can fail to insert the data into the table. Here are a couple of common reasons, assuming the SELECT statement on itself executes successfully:
- You don’t have write permissions on the database or the table. Another possibility is that there’s not enough space on disk for the new data. Check with the person who’s responsible for the database administration.
- You get a data type mismatch. For example, you try to insert a string into an integer column. Not all data types have to match exactly, SQL Server is capable of doing implicit data type conversion. You can find more information about this in the documentation. When implicit casting is not possible, you have to use the CAST or CONVERT function to convert the data type of the column to the correct data type. Of course, you will never be able to put a string into an integer column. In that case you either need to modify the SELECT statement, or change the data type of the destination column.

- When string or binary data is too long for the destination column, you get the dreaded "String or binary data would be truncated" error. The problem with this error is that there’s no indication of which column contains the offending data. This might be an issue if you have a large INSERT with dozens of string columns. Brent Ozar explains how you can solve the issue in his blog post.

- When there’s a primary key or a unique index defined on the table, trying to insert duplicate rows will result in an error. Either the definition of uniqueness is wrong for the table and you need to modify these constraints to accept the new business definitions, or the data itself is wrong. In the last case, you need to figure out where the SELECT statement returns duplicate rows. Is a JOIN incorrectly defined? Or does the source data contain duplicate rows? You can remove duplicate rows by either fixing the JOINS or by using window functions to filter out rows. You can find an example of this pattern in the tip T-SQL Tips and Tricks. In the case of true duplicate rows, where every column of one row has the exact same values as in the other row, you can remove duplicates by using the DISTINCT keyword or by using a GROUP BY clause.
- When the table has an IDENTITY constraint on a column, it generates a new number for this column every time a row is inserted. It’s possible to insert directly into this column, if SET IDENTITY_INSERT is set to ON for the table. If this isn’t the case, an error is thrown. You can find an example in the tip INSERT INTO SQL Server table with IDENTITY column.

- A column can have constraints defined, such as a CHECK constraint (or the deprecated RULE) or a NULL constraint (every column has a specification if it can allow NULL values or not). When you try to insert data that violates a constraint, an error will be returned. When a column doesn’t allow NULL values, you either need to specify an explicit value/expression in the SELECT clause, or a DEFAULT needs to be defined on the column. You can find more info in the tip Working with DEFAULT constraints in SQL Server. In the case of a CHECK constraint, you’ll need to modify the expression in the SELECT so that it matches the defined business rule. See also Enforcing business rules using SQL Server CHECK constraints.

Next Steps
- Some interesting resources:
- The tip INSERT INTO SQL Server Command explains other methods of inserting data into a table.
- Learn the DML statements - SELECT, INSERT, UPDATE and SQL DELETE.
- TRUNCATE vs. DELETE in SQL Server
About the author
 Koen Verbeeck is a seasoned business intelligence consultant at AE. He has over a decade of experience with the Microsoft Data Platform in numerous industries. He holds several certifications and is a prolific writer contributing content about SSIS, ADF, SSAS, SSRS, MDS, Power BI, Snowflake and Azure services. He has spoken at PASS, SQLBits, dataMinds Connect and delivers webinars on MSSQLTips.com. Koen has been awarded the Microsoft MVP data platform award for many years.
This author pledges the content of this article is based on professional experience and not AI generated.
View all my tips
Article Last Updated: 2021-05-20


