By: Alejandro Cobar | Updated: 2021-05-25 | Comments (1) | Related: > PowerShell
Problem
As SQL Server DBAs, we have always heard that database backups are crucial and extremely valuable for the company. Every now and then you face some odd situation where you have a backup file, but nobody knows anything about the backup contents, so having a way to retrieve information from the backup file could be very helpful.
We have also heard that backups must be tested, because in an unfortunate event, a database restore of a backup might not work. Now, with this said, I invite you to ask yourself a question: are you sure you are properly testing your backups? Some might think that since the backup was successfully made is enough; others would take a step further and run a VERIFYONLY operation against it, others would add a CHECKSUM to their backups, and others would go as far as to restore them to confirm that they are good to go. Regardless, the intention of this PowerShell script is to give you a tool that will let you test your backup files properly, without you even knowing if you have been doing it right or wrong up to this point.
Solution
As a part of a series of articles, called PowerShell tools for the DBA, I’m presenting a PowerShell tool that can help any SQL Server DBA properly test and obtain valuable information from their database backup files. I will be explaining, as best as I can, how to properly use this tool and what to expect.
Initial considerations
Here are some assumptions before diving into the details of the script:
- The script heavily uses the Invoke-Sqlcmd cmdlet, that’s part of the SQLPS module. If you don’t have it installed, Google it and it’ll come up right away. The script will also let you know if you don’t the module installed in your system.
- It would be better if you have control of a test environment where you can use the script.
- Within the same test environment, you should also have access to a test SQL Server instance that will be used by the script to run several operations.
- For all the tests to work flawlessly, please make sure to grant the "sysadmin" server role to the account that will be executing the operations. It might seem as "too much", but since it is a test environment (hopefully), it shouldn’t be that big of a deal.
- Make sure you copy the backup file you want to test to the test environment that you are going to use.
- If your backup is encrypted, make sure you have already loaded the certificate in the SQL Server instance that you are going to use. Otherwise, the VERIFYONLY and RESTORE operations will fail.
- This is v1.0 of the script, so the complete experience will be against a full database backup.
Using the PowerShell script
General Note: If you run the script from PowerShell ISE, then you will see pop-ups asking you to choose among several options. However, if you run it directly from a PowerShell console, then instead of a pop-up you will see the options presented to you in the command line interface itself (you will see the difference in the screenshots I will show below).
The script, based on the input you specify when prompted, will perform the following steps:
- It will present you the metadata of the backup file.
- It will present you the list of files and sizes that the backup houses, so that you can get a sense of the amount of space that it will require to be restored.
- It will run a VERIFYONLY operation (with CHECKSUM if the backup was created with it) against the file.
- If the conditions are met, then the backup file will be restored in the instance you specify.
- After being restored, it will run a DBCC CHECKDB command against the database.
- Depending on your choice, the restored database will be deleted (or not) from the instance as the last step.
Running the Script
Go to the location where you have placed the PowerShell script file and run it like this:
I’m using C:\temp to store the file.
PS C:\temp> .\Verify-Backup.ps1
The script, in its current state, accepts only 1 parameter (called $dropDatabase). If no value is passed, then 1 is assigned by default.
- 1 = The restored database will be deleted at the end of the execution of the script.
- 0 = The restored database will be kept on the SQL Server instance; in case you need to use the database.
You will be prompted with the name of the SQL Server instance that will be used to test the backup, so make sure to specify a valid instance.

If you specify an invalid instance name or if the script has issues connecting (unreachable, bad supplied credentials, etc.), then it will let you know and will end execution.

After specifying the name of the instance, you will be given 3 choices of how you want to connect to the SQL Server instance (Trusted, Windows Login, SQL Login).
- Trusted = the connection to the SQL Server instance will be made with the same user being used for the execution of the PowerShell script (basically, you don’t have to specify any credentials, it will assume them based on the context).
- Windows Login = A Windows login has to be provided for the correct authentication.
- SQL Login = A SQL login has to be provided for the correct authentication.
Below I show the differences in display based on if you use the PowerShell ISE or not. This will be the case for other screens as well.

PowerShell ISE variant

PowerShell non-ISE variant
I’m choosing SQL Login for demonstration purposes.

If you specify a bad set of credentials, then the authentication will fail and the script will stop.

With the proper credentials provided (for Windows/SQL options), then you’ll be prompted to specify the full path of the backup file.
If the file doesn’t exist, then the script will notify you and it will end its execution.

If the path of the file is correct, then you’ll be prompted with the path where you want the data files of the restored database to be placed. If the path doesn’t exist, then the script will notify you and it will end execution.

If the user establishing the connection doesn’t have the correct privileges assigned, then the backup validation operation will fail. For demonstration purposes, I have removed all privileges for the SQL Login.

Granting "sysadmin" server role privilege to the "backup" login, will allow the backup operations to complete. It probably will look like granting "sysadmin" is a bit too much, but since it is a test instance (hopefully), it shouldn’t be a big deal (you can remove the privilege when you are not planning to use the script).
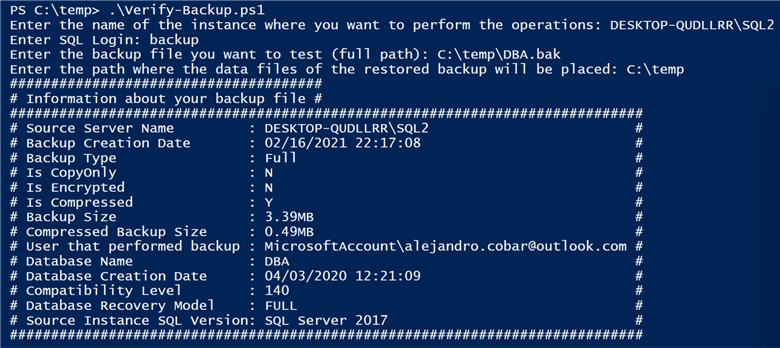
The first block of information presented is metadata about the backup file.
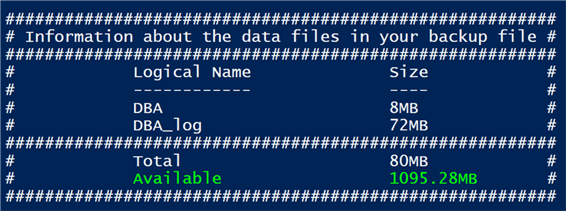
The second block will be information about the data files inside the backup files. With this you can get a sense of how much data the backup actually houses, and if you have enough available disk space in the specified destination drive. As a visual aid, the "Available" size will be green if there’s enough space to restore the backup and red otherwise.
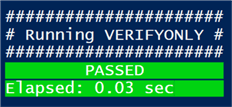
After this, the VERIFYONLY test is executed against the backup file. If it succeeds it will display "PASSED" in green and will tell you how many seconds it took for it to complete. If it fails, it will show this in red.
After this, the actual restore of the backup will take place. If it succeeds it will display "PASSED" in green and will tell you how many seconds it took for it to complete. If it fails, it will show in red.

After this, DBCC CHECKDB is executed against the restored database. If it succeeds it will display "PASSED" in green and will tell you how many seconds it took for it to complete. If it fails, it will show you in red.

After all the checks have concluded, the database will be deleted from the instance (if you passed 1 as the parameter or if you didn’t pass a parameter value).

Special Cases
If the SQL Server version of the instance where the backup was taken is higher than the one where you are going to perform the tests, then the script will only show you up to the metadata section. No tests will be made against the backup file until you either match the SQL Server version of the test instance, or you move stuff to another server that has an appropriate instance to work with.
Here’s how the tool will react if you feed it with a backup type other than a full backup (i.e. Differential, Transaction Log). Since it is a Transaction Log backup, after running the VERIFYONLY operation, the script will end execution.
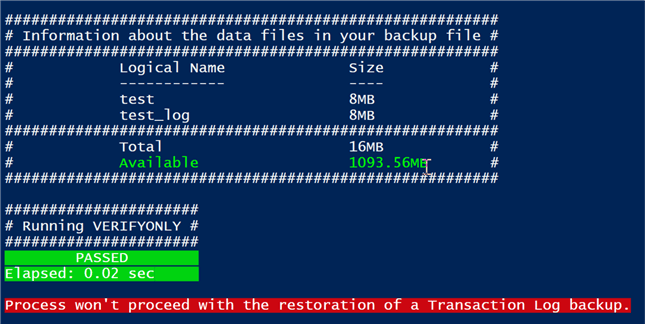
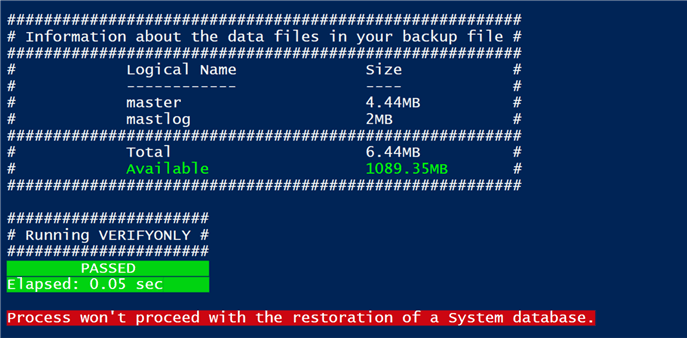
Here’s how the tool will react if you feed it with a full backup of any of the system databases and the process will stop after the VERIFYONLY section.
Download the PowerShell Script
Next Steps
In its current state (v1.0), the functionality of the tool will be exactly as shown above using only full database backups. In future releases, I’m planning to take it to another level by adding functionality such as:
- Being able to test a sequence of backups (i.e. Full + Diff + Transaction Log).
- Being able to test backups that are comprised of multiple files.
To me, the best way to properly test the database backups is by actually restoring them in a SQL Server instance and running a DBCC CHECKDB against the restored database. If both operations succeed, then that will definitely grant the DBA the certainty that the backup file can be used in case an emergency arises.
I hope that you not only find this useful, but also that it can add value to your work as a proactive DBA.
About the author
 Alejandro Cobar is an MCP, SQL Server DBA and Developer with 10+ years of experience working in a variety of environments.
This author pledges the content of this article is based on professional experience and not AI generated.
View all my tips
Article Last Updated: 2021-05-25


