By: Mohammed Moinudheen | Updated: 2021-09-21 | Comments | Related: > Restore
Problem
In an earlier tip about SQL Server file snapshot backups, we covered how to perform SQL database backups using file snapshot backups. In this article we will look at how to perform SQL Server database restores using file snapshot backups.
Solution
This tutorial assumes that you already have resources in your Azure environment and you are familiar with the Azure portal. If you are new to Azure, you can subscribe to a trial account here, which will give you access to Azure services for a year and a credit of USD $200. It is assumed, that you already have file snapshot database backups on Azure storage. If you don't have one, you can refer to this tip for setting up a sample database that uses file snapshot backups.
In this article, we will perform a demo by restoring SQL Server databases using the file snapshot backups. You can use the same scripts from the earlier tip for performing all the snapshot backups as similar scripts will be used for restore.
Restore SQL Server database using traditional streaming backup
Before we proceed to performing a restore using the file snapshot backups, we can try to understand the restore options using the traditional steaming backup method.
As you know in the traditional streaming backup, we will need to make use of the full database backup, differential backup if any and a sequence of transaction log backup in order to perform a point in time restore. And if any of the transaction log backups is missing due to some reason, then it will not be possible to restore to a point in time as the log chain is broken. You can imagine, the number of backup files that may be needed for complex environments where transaction log backups may occur quite frequently and it is possible to miss out on the sequence of the transaction log backups thereby causing issues during restore. However, with the file snapshot restore option, all of these issues can be overcome and we can see that for ourselves in this demo.
Restore SQL Server database using file snapshot full database backup as a new database
From the earlier tip, you would have performed a full database backup using the file snapshot option. In order to perform a database restore using a file snapshot backup, you don't really have to use the full database backup as the restore can be performed using the transaction log file snapshot backup itself. As you know from the previous tip, a transaction log backup will include a snapshot of all the database files which includes the data files as well as the log files. However, in this section, we will try a restore using the full file snapshot database backup itself. In order to perform a restore as a new database, you can use the 'with move' option.
 -- Make sure to update the correct paths
RESTORE DATABASE motest1 FROM URL = 'https://sqldbcontainermo.blob.core.windows.net/moh/motestdb.bak'
with move 'motest_data' to 'https://sqldbcontainermo.blob.core.windows.net/moh/motest_data1.mdf',
     move 'motest_log' to 'https://sqldbcontainermo.blob.core.windows.net/moh/motest_log1.ldf',
stats
GO
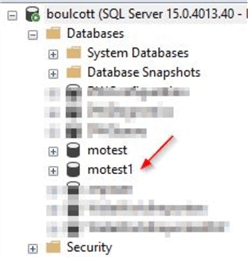
This will complete the restore and a new database 'motest1' will be created.
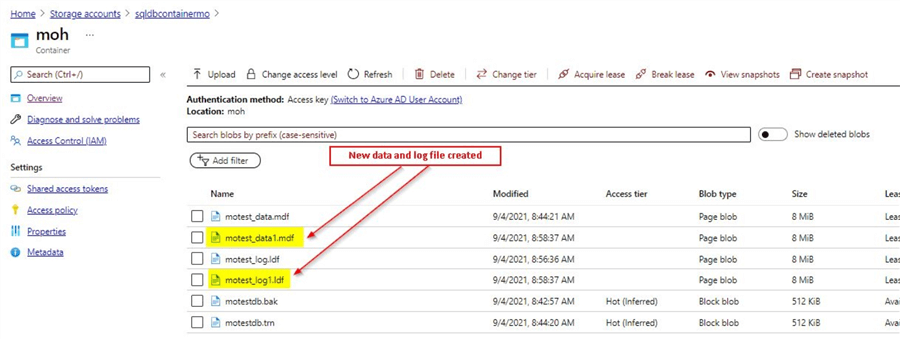
You can confirm the new database files are created on the Azure storage container as shown below.
Restore and replace existing SQL Server database using file snapshot full database backup
In order to perform a restore and replace an existing database, you can use the replace option.
-- Make sure to update the correct paths
RESTORE DATABASE motest FROM URL = 'https://sqldbcontainermo.blob.core.windows.net/moh/motestdb.bak'
with replace, stats
GO
Make sure, there are no connections to the database during the restore. As you can see the process is straight forward and is similar to standard restore operations. As shown previously, you can validate the storage accounts to review the data and log files of the database.
Restore SQL Server database using file snapshot transaction log backup as a new database
As you know by now, there is no need to really use a full database file snapshot backup for performing a database restore. We can use the file snapshot transaction log backup itself as it contains a snapshot of all the database files including the data and log files. In this section, we will perform a restore to a new database using an available transaction log snapshot backup.
-- Make sure to update the correct paths
RESTORE DATABASE motest2 FROM URL = 'https://sqldbcontainermo.blob.core.windows.net/moh/motestdb.trn'
with move 'motest_data' to 'https://sqldbcontainermo.blob.core.windows.net/moh/motest_data2.mdf',
     move 'motest_log' to 'https://sqldbcontainermo.blob.core.windows.net/moh/motest_log2.ldf',
stats
GO
Here, you can see the process is similar to how you perform a regular database restore. The only difference is you are performing a full database restore using a single transaction log snapshot file backup.
You can see how simple and quick the process is as you are only required to take the last transaction log backup that is available and perform a restore. There is no need to look for the last full database backup, differential backup or a sequence of transaction log backups like you would need to perform a normal restore using the regular streaming backup process.
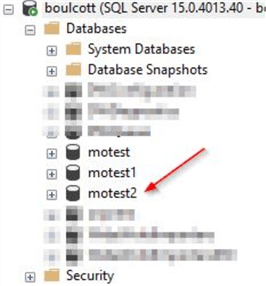
You can see the new restored database created below.
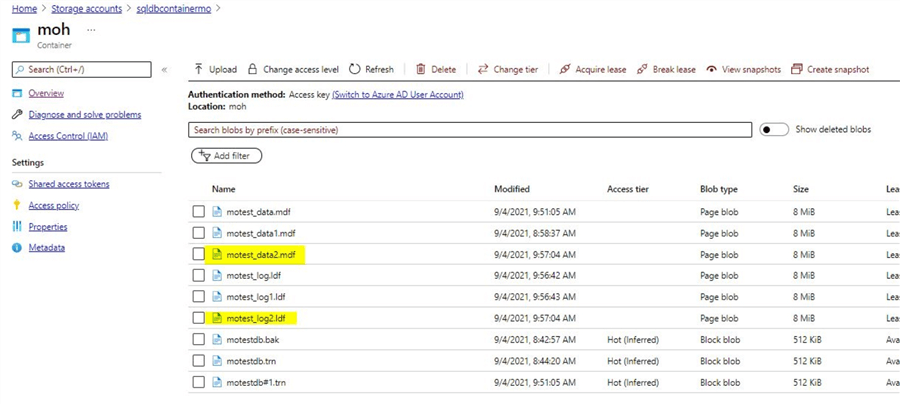
You can also view the new data and log files that gets created in the Azure storage container.
Restore and replace existing SQL Server database using file snapshot transaction log backup
This is similar to the section discussed previously for performing a restore of the existing database. We will need to use the 'replace' option for performing a restore.
-- Make sure to update the correct paths
RESTORE DATABASE motest FROM URL = 'https://sqldbcontainermo.blob.core.windows.net/moh/motestdb.trn'
with replace, stats
GO
In this case, we only replaced the .bak file with details of a transaction log snapshot backup (.trn) file. The key is to use the 'replace' option to overwrite the existing database. Always use the 'replace' option with caution as accidental issues can occur like replacing the wrong database.
Perform a point in time SQL Server database restore using transaction log snapshot backups
In the earlier sections, database restores were performed using a single full database snapshot backup or a transaction log snapshot backup. Basically, it restores everything to the end of the backup, whether it is a full database snapshot backup or a transaction log snapshot backup.
In this scenario, the requirement is to perform a point in time database restore. For performing a point in time restore, we will need only two transaction log snapshot backups. The first transaction log snapshot backup should be before the point in time and the second transaction log snapshot backup should be after the point in time.
We can make use of the STOPAT option to restore to a specified point in time. You can refer this article to learn more about point in time restores.
In this example, we will try to perform a point in time restore to 5:02 PM, September 4, 2021. We can review the transaction log snapshot backups available in the Azure storage container for the 'motest' database. From the screenshot you can see there are two transaction log snapshot backup files we can use for this purpose.
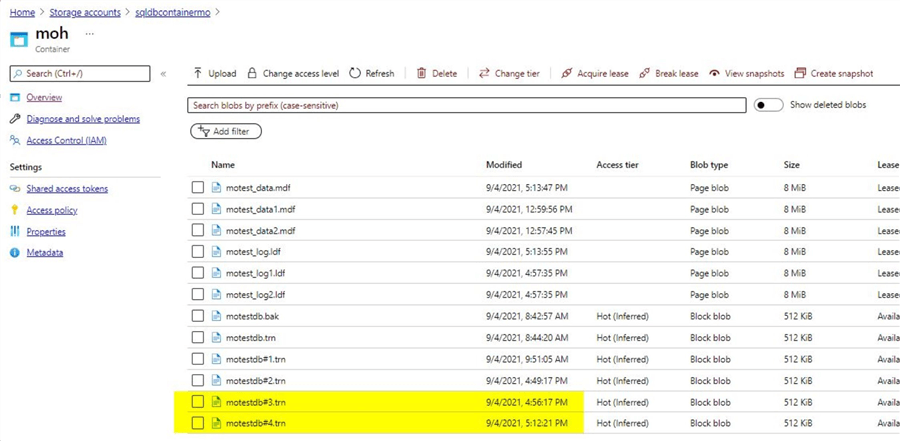
As the point in time requirement is for restoring to 5:02 PM, September 4, 2021, the transaction log snapshot backup performed at 4:56 PM, September 4, 2021 and the one performed at 5:12 PM, September 4, 2021 can be used.
So, to be clear, we need one backup before the time required and one backup after the time required to restore. If searching or scanning for these backup files directly on the Azure storage container is confusing, we can also use scripts to query from the msdb database. This will give details of the backups that are available for the specific database.
--Query to find details of the database backups available
SELECT
     database_name as DB_Name,
     backup_finish_date,
     CASE bs.type
         WHEN 'D' THEN 'Database'
         WHEN 'L' THEN 'Log'
     END AS backup_type,
     physical_device_name,
     device_type
FROM msdb.dbo.backupmediafamily bmf
INNER JOIN msdb.dbo.backupset bs ON bmf.media_set_id = bs.media_set_id
WHERE bs.database_name='motest' – provide your database name
ORDER BY backup_finish_date
Output of this query is below.
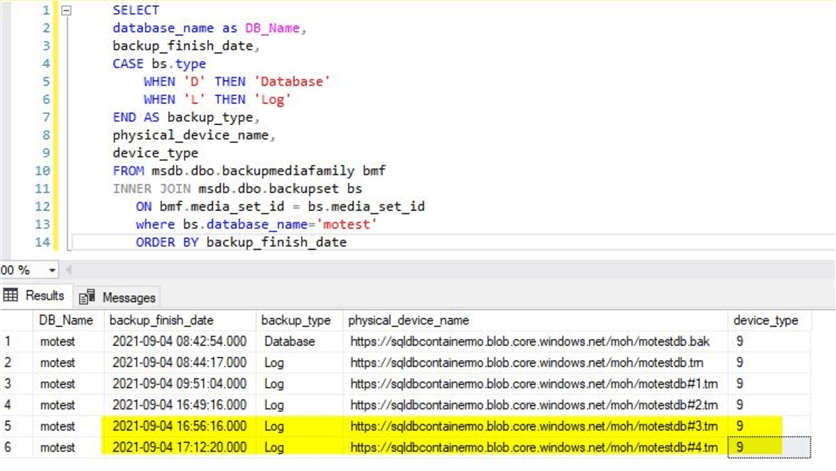
From the output, you can clearly see the details of the transaction log snapshot backups that are required for the purpose of performing a point in time restore. Once you have the details required, you can use the below sample script for performing a point in time restore.
-- Query to perform point in time restore using stop at option
-- Make sure to provide correct path in the URL and replace correct transaction log snapshot files
RESTORE DATABASE motest FROM URL='https://sqldbcontainermo.blob.core.windows.net/moh/motestdb#3.trn'
with norecovery, replace;
go

RESTORE LOG motest FROM URL='https://sqldbcontainermo.blob.core.windows.net/moh/motestdb#4.trn'
with recovery, STOPAT ='September 4, 2021 05:02 PM';
go
With this option, you would have performed a point in time restore using few simple commands and just by making use of two transaction log snapshot backup files.
Restore SQL Server database to point in time using file snapshot transaction log backups as a new database
Similar to the previous section, we can perform a point in time restore using the existing transaction log snapshot backups in order to create a new database instead of overwriting existing database.
The scripts are similar to the ones used earlier. The only thing is to use the 'move' option and remove the 'replace' option from the scripts. This is the sample script for this.
-- Query to perform point in time restore using stop at option and restore as a new database
-- Make sure to provide correct path in the URL and replace correct transaction log snapshot files
RESTORE DATABASE motest3 FROM URL='https://sqldbcontainermo.blob.core.windows.net/moh/motestdb#3.trn'
with move 'motest_data' to 'https://sqldbcontainermo.blob.core.windows.net/moh/motest_data#3.mdf',
     move 'motest_log' to 'https://sqldbcontainermo.blob.core.windows.net/moh/motest_log#3.ldf', norecovery, stats
GO

RESTORE LOG motest3 FROM URL='https://sqldbcontainermo.blob.core.windows.net/moh/motestdb#4.trn'
with recovery, STOPAT ='September 4, 2021 05:02 PM';
GO
Next Steps
- Once the database is created, you can perform few file snapshot backups
- Make use of the scripts provided in this tip to test the various restore scenarios
- You will see how quickly restore operations can be performed using file snapshot backups
About the author
 Mohammed Moinudheen is a SQL Server DBA with over 6 years experience managing production databases for a few Fortune 500 companies.
This author pledges the content of this article is based on professional experience and not AI generated.
View all my tips
Article Last Updated: 2021-09-21


