By: Fikrat Azizov | Updated: 2021-11-26 | Comments (2) | Related: 1 | 2 | 3 | 4 | 5 | 6 | 7 | 8 | 9 | 10 | 11 | 12 | 13 | 14 | 15 | 16 | 17 | > Azure Synapse Analytics
Problem
This tutorial is part of a series of posts, dedicated to the building of a Lakehouse solution, based on Delta Lake and Azure Synapse Analytics technologies. In the previous post (see Data Ingestion Into Landing Zone Using Azure Synapse Analytics), we've built a Synapse Analytics pipeline, that deposits JSON and Parquet files into the landing zone. The next logical step in this ingestion will read from the landing zone and push the data into the Bronze layer Delta Lake tables, and this is what we'll be covering here.
Solution
Bronze Ingestion Design Considerations
Just like Landing Zone ingestion, Bronze Delta Lake ingestion doesn't involve many transformations. However, I'd like to discuss a few design considerations that are part of any Data warehousing project:
- Metadata capture. It's a good practice to include metadata info, like ingestion timestamp, source file names in the Bronze tables.
- The tooling considerations. The pipeline should be able to read from the sources and write into the destination locations. Although some data sources can be accessed by many tools, there're some (like Delta Lake sources) that can be accessed by only a few tools.
- Re-usability and modular design. Typically, ingestion pipelines operate on many tables with wit similar ingestion requirements. Therefore, it's worth creating nested parameterized pipelines, that can reduce the development efforts.
- Change history maintenance.
The ingestion pipelines should handle the rows changed in the source on repetitive
ingestions. There're a few common approaches to handle that:
- Updating changed target rows. This approach requires upsert (merge) functionality to update the changed rows. As a result, the target table will contain a single version of each row, reflecting the latest state of the corresponding source row. This approach also requires a slightly more complex ingestion design, as you'd need to provide primary keys for each table.
- Appending changed source rows into the target table as new versions. Preserving change history is one of the key requirements when building a solution that is subject to strict financial and security restrictions. The Bronze ingestion pipelines designed with this approach are simpler in comparing the ones that require updates. However, because the destination table will contain multiple versions of each row, this approach requires some kind of deduplication in the next phases of ingestion. Optionally, this approach allows you to choose whether or not to truncate the target table.
The Data Mapping Flow is capable of addressing all of the above mentioned needs, so we'll use it extensively throughout the next few posts. Although I'll explain all of the configuration steps in great detail, familiarity with the basics of the Data Mapping Flow, as well as Azure Synapse Studio would certainly help you understand further material better, so I encourage you to review the material included at the end of this post.
Our pipeline will have two layers:
- Child layer, based on Data Mapping Flow technologies. We'll create two data flows-one for each data format. These flows will be parameterized, with the source/destination table names as parameters.
- Parent layer, based on Synapse Data Integration technologies. We'll create a single pipeline, which will loop through required table lists and call the child mapping flow.
As to the change history maintenance, I've chosen an append approach, to keep Bronze ingestion simple. I'll also demonstrate deduplicating technics from Bronze tables when we discuss the next transformation phases.
Building the first child data flow
Now that we've made design choices, let's get our hands dirty and start building the first child flow to ingest JSON files! Open Synapse Analytics Studio, and add a new data flow:

Figure 1
Let's add the following parameters, that will be supplied by the parent flow:
- SourceTableName
- TargetTableName
Here's the screenshot:

Figure 2
Before we proceed, let's turn on the debugging option, so that we could interactively validate the output from each component, as we add them into the data flow. Once it's turned on, the Debug settings button will be available:

Figure 3
Open Debug settings, switch to the Parameters tab and enter following sample parameter values:
- SourceTableName: "SalesLTAddress"
- TargetTableName: "Address"
These parameters will be needed only for debugging purposes, as we build our data flow.

Figure 4
Next, navigate to the design surface and add a source named JsonRaw. Create a new dataset of Azure Blob Storage type, as follows:

Figure 5
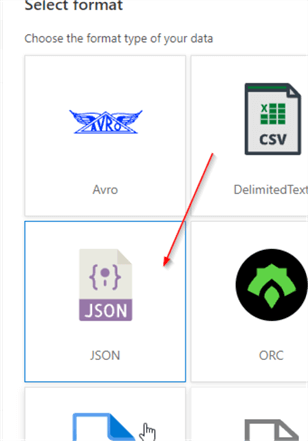
Next, select JSON as a file format:

Figure 6
Next, assign the name to the data source and create Azure Blob Storage linked service (I've named it AzureBlobStorage1), pointing to the storage account created earlier. Click a folder button and navigate to the raw/json folder that contains JSON source files:

Figure 7
Next, switch to the Source options tab, open expression builder for Wildcard paths textbox and add following expression:
concat("raw/json/",$SourceTableName,".json")
This expression will construct a file path to the source files, based on the table name parameter.
Next add SourceFileName in the Column to store file name textbox, to allow capturing the source file paths. Select Delete source files button, to ensure the source files are removed after successful ingestion. Here's the screenshot with the required settings:

Figure 8
Now that the source component is configured, let's switch to the Data preview window and validate the data:

Figure 9
Next, let's add a derived column transformation and name it MetadataColumns. Add calculated column DateInserted with the following expression:
currentTimestamp()
Here's the screenshot with the required settings:

Figure 10
Switch to Data preview tab again, to ensure that newly added columns are good:

Figure 11
Finally, add a sink component and name it Delta.Select Inline sink type, then Delta as Inline dataset type, and select the linked service AzureBlobStorage1, as follows:

Figure 12
Navigate to the Settings tab, open expression builder for Folder path field and enter the following expression:
concat("delta/bronze/",$TargetTableName,"/")
This expression will construct the destination path for the Delta Lake table, based on the TargetTableName parameter.
Here's the relevant screenshot:

Figure 13
Notice that I've selected Allow insert checkbox as an update method.
This concludes the data flow for JSON files, so navigate to the Data preview tab to ensure data looks good and commit your work.
Building the second child data flow
Our second data flow to fetch parquet files will be similar to the first one. So, let's clone DataflowLandingBronzeJson flow and rename it as DataflowLandingBronzeParquet. Create a new dataset of Parquet format:

Figure 14
Navigate to the Source options tab and enter the following expression in the Wildcard paths textbox:
concat("raw/parquet/",$SourceTableName,".parquet")
Building the parent pipeline
Let's navigate to Synapse Studio's Data Integration design page, add a pipeline and name it CopyRawToDelta.
Next, add array type pipeline variable, and name it JsonTables.This variable will contain source/destination parameter values for each JSON file. Assign the following value to the JsonTablesvariable.
This string contains one set of parameters for each table, with their respective source/destination parts. Similarly, add a variable ParquetTables with the following value, to handle Parquet file parameter sets:
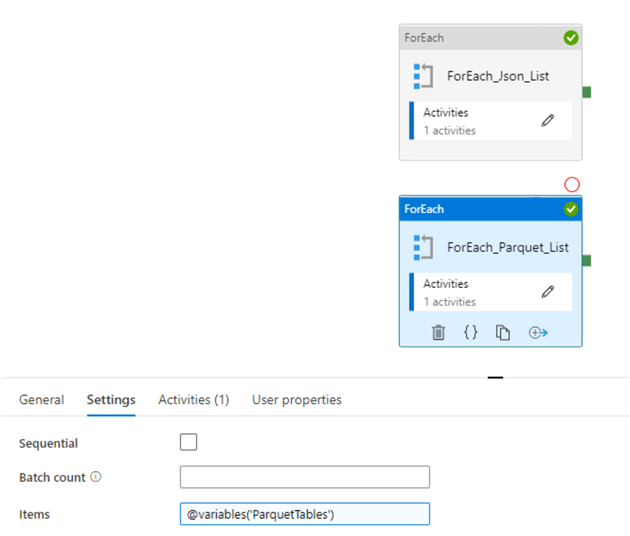
Next, add ForEach activity and enter the following expression in the Items field:
@variables('JsonTables')
Here's the screenshot with the required settings:

Figure 15
Open the configuration of the ForEach activity, add a data flow activity and select DataflowLandingBronzeJson flow, as follows:

Figure 16
Navigate to the Parameters tab and enter following expressions for data flow parameters:
- SourceTableName: @item().source
- TargetTableName: @item().destination
These expressions will extract the source/destination parts for each set of the table-specific parameter set.
Here's the screenshot:

Figure 17
Now, let's add ForEach activity with similar steps to call DataflowLandingBronzeParquet data flow. Here's the screenshot with the final design:

Figure 18
This concludes the parent pipeline configuration. Let's execute the pipeline in debug mode and ensure that it succeeds:

Figure 19
Registering Delta Lake tables
The Delta Lake tables can be read and written using Delta Lake APIs, and that's the method used by Data Flow. However, we can also register these tables in the Hive meta store, which can help us to query these tables using Spark SQL. So, we'll create Spark tables, to browse and validate our tables.
Let's navigate to the Develop tab and create a notebook:

Figure 20
Select Spark SQL as a language, attach the Spark pool created earlier and enter the following command in the first cell, to create a Bronze database:
CREATE DATABASE IF NOT EXISTS bronze LOCATION "/delta/bronze/"
Here's a related screenshot:

Figure 21
Add the following commands in the next cell, to create Spark tables on top of the data folders, where we've ingested the Bronze data:
USE bronze;
CREATE TABLE IF NOT EXISTS Address USING DELTA LOCATION "/delta/bronze/Address/";
CREATE TABLE IF NOT EXISTS Customer USING DELTA LOCATION "/delta/bronze/Customer/";
CREATE TABLE IF NOT EXISTS CustomerAddress USING DELTA LOCATION "/delta/bronze/CustomerAddress/";
CREATE TABLE IF NOT EXISTS Product USING DELTA LOCATION "/delta/bronze/Product/";
CREATE TABLE IF NOT EXISTS ProductCategory USING DELTA LOCATION "/delta/bronze/ProductCategory/";
CREATE TABLE IF NOT EXISTS ProductDescription USING DELTA LOCATION "/delta/bronze/ProductDescription/";
CREATE TABLE IF NOT EXISTS ProductModel USING DELTA LOCATION "/delta/bronze/ProductModel/";
CREATE TABLE IF NOT EXISTS SalesOrderDetail USING DELTA LOCATION "/delta/bronze/SalesOrderDetail/";
CREATE TABLE IF NOT EXISTS SalesOrderHeader USING DELTA LOCATION "/delta/bronze/SalesOrderHeader/";
Finally, add following query in the next cell, to browse the table content:
Select * from bronze.SalesOrderDetail
Let's execute both cells and examine the sample data:

Figure 22
We can also run some basic validation queries, to ensure that row counts match in the source and destination:

Figure 23
Next Steps
- Read: Mapping data flows in Azure Data Factory
- Read: Azure Synapse Analytics Overview
- Read: Building Scalable Lakehouse Solutions using Azure Synapse Analytics
- Read: Common Data Warehouse Development Challenges
About the author
 Fikrat Azizov has been working with SQL Server since 2002 and has earned two MCSE certifications. Heís currently working as a Solutions Architect at Slalom Canada.
This author pledges the content of this article is based on professional experience and not AI generated.
View all my tips
Article Last Updated: 2021-11-26


