By: Nai Biao Zhou | Updated: 2021-12-22 | Comments | Related: > SQL Server Agent
Problem
We often want to automatically launch some Python scripts at scheduled times and monitor their executions at a central place. The SQL Server Agent services allow us to schedule jobs on a SQL Server instance and provide powerful features to manage these jobs (Das, 2020). Using a SQL Server Agent job to run Python scripts can expand the range of office automation (OA). However, even though SQL Server Machine Learning Services enable us to run Python scripts on a SQL Server machine with the stored procedure "sp_execute_external_script" (Ericson et al., 2021), sometimes we need to execute Python scripts in multiple, independent virtual environments. In this tutorial, the author explains how to create a Python virtual environment, how to employ the SQL Server Agent to execute Python scripts in the virtual environment, and how to access job execution history to check Python script execution status.
Solution
Recently, Python has been proliferating to automate simple tasks such as scraping data from web pages, updating SharePoint lists, performing data cleansing, and scanning log files. However, when using a virtual environment, we may need to run multiple terminal commands to execute Python scripts. A convenient approach is to run a batch script, a small text file with the .bat file extension (Sweigart, 2020). Moving forward a single step, to run Python scripts at scheduled times, we use SQL Server Agent, a Microsoft Windows service, to execute a batch script.
To explain how to create a SQL Server Agent job to run Python scripts in a virtual environment, let us look at a real-world project. We want to use Python to download data from an HTML table to an SQL Server database table (Zhou, 2021), and the downloading process should start at 2:00 AM every morning. To accomplish this, we construct a Python virtual environment, create a SQL Server job to perform this task at scheduled times, and check the Python script execution record through the job history log. Here is the complete code to perform the downloading task.
This article consists of two sections. Section 1 covers the steps to install Python on Windows. Then, the section provides a step-by-step process to create a virtual environment, activate the virtual environment, install packages, run a Python script, and deactivate the virtual environment. In addition to manually typing commands in the command window, we create a batch script to run the Python script.
Section 2 starts with a brief demonstration of creating a SQL Server Agent job and specifying a job step to run the Python script. We then create and attach a schedule to the agent job. Next, we manually run the job. We then let the agent service run the job automatically. Finally, we check the execution record of the Python script and the batch script through the job execution history.
We test Python scripts with Python 3.10.0 (64-bit) on Windows 10 Pro 10.0 <X64>. The DBMS is the Microsoft SQL Server 2019 Developer Edition (64-bit). We use SQL Server Management Studio 15.0.18338.0 to manage the SQL Server Agent jobs. In addition, we use Notepad++ v8.1.9.2 (64-bit) to edit the batch script.
1 – Running the Python Script in a Virtual Environment
Every Python distribution contains hundreds of modules, called the Python standard library. In addition, there is a growing collection of several thousand third-party packages maintained by the Python community worldwide. All these packages make the programming job more convenient. However, these packages are evolving, and they usually have several versions in use. For example, one Python program uses version 1.0 of a module while the other program imports version 2.0. If these two versions are incompatible, these two Python programs cannot run successfully in one Python environment. It is a good practice to run each Python program in its individual environment (Zhou, 2020).
1.1 Installing Python on Windows
When enabling Machine Learning Services on a SQL Server instance, we can choose to install Python on the server. However, we may prefer to install another version of Python to run non-ML-related tasks, for example, web scarping. At the time of writing, the latest version is Python 3.10.0. We download a Python installer from the official Python download website: https://www.python.org/downloads/. We use the following steps to install the latest version of Python.
1.1.1 Download the Python Installer
Head to the download page and grab the version we need. Figure 1 shows the landing page of the official Python download website at the time of this writing. Click on the "Download Python 3.10.0" button to download the Python installer. We can then find the file "python-3.10.0-amd64.exe" in the downloads folder.
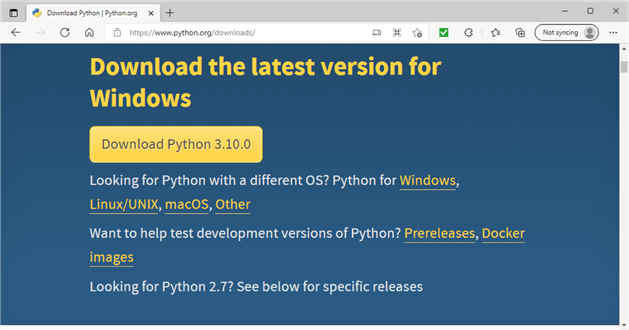
Figure 1 The Landing page of the Official Python Download Website
1.1.2 Run the Python Installer
Click on the installer "python-3.10.0-amd64.exe" in the downloads folder to install Python. The first screen, shown in Figure 2, allows us to determine how to install Python. Note that we do not need to check the "Add Python 3.10 to PATH" checkbox. We install this version to a SQL Server machine, and the machine may have multiple versions of Python. We may not need to run this version in the command prompt (Shalewa, 2020). Since we want to specify an installation folder, click on the "Customize installation" link button to continue the installation process.
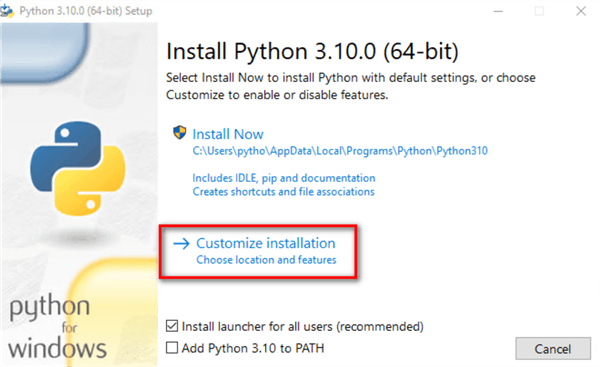
Figure 2 Run the Python Installer
1.1.3 Select Optional Features
The second screen, shown in Figure 3, allows us to enable or disable features. We may uncheck some features. However, for simplicity’s sake, we go ahead with default settings. Click on the "Next" button to continue installing Python.
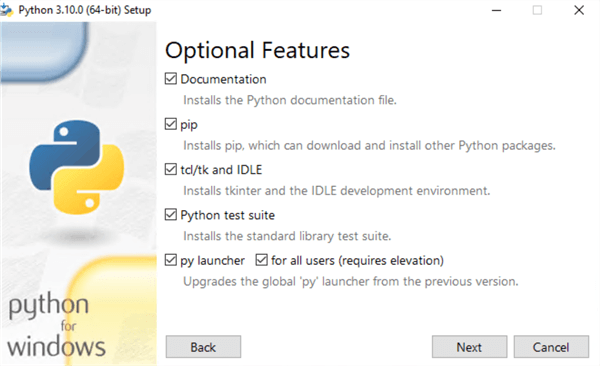
Figure 3 Select Optional Features
1.1.4 Select Advanced Options
As shown in Figure 4, the screen allows us to select some advanced options. First, check the "install for all users" checkbox. We then select an install location, such as the "c:\Python310" folder. Finally, click on the "Install" button to install Python.
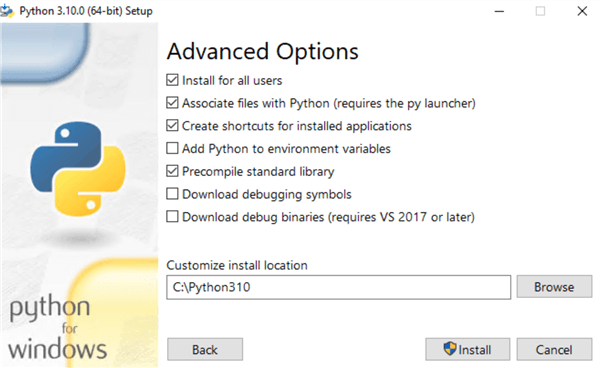
Figure 4 Select Advanced Options
1.1.5 Watch the Setup Progress
The Setup Progress screen appears, as shown in Figure 5. The progress bar on the screen visualizes the progression of the setup process. This step may take a few minutes. We should not see any warning or error message at this step. After this step is complete, the confirmation window shows up automatically.
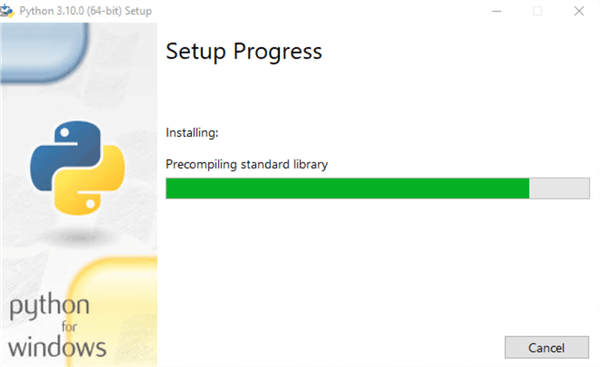
Figure 5 The Progress Bar Shows the Setup Progress
1.1.6 Confirm the Installation
As shown in Figure 6, the conformation window automatically displays after the setup process is complete. Click on the "Close" button to finish the Python installation.

Figure 6 The Installation Confirmation
1.1.7 Verify the Installation
Let us check if we install Python successfully by executing a Python command. We want to run the "python --version" command on a prompt window. First, open the Python install location folder. We can see a python.exe file in the folder, as shown in Figure 7.

Figure 7 Python Install Location Folder
Next, type the command "cmd" into the location bar, as shown in Figure 8. Then, press the "Enter" key on the keyboard. A command prompt window appears, and the "cmd" command takes the path of this folder.

Figure 8 Type the "cmd" Command into the Location Bar
On the command prompt window, we run the command "python --version" to check the Python version. As shown in Figure 9, the command's output indicates that the version is 3.10.0. Therefore, the Python installation worked. Before we construct a virtual environment, let us prepare the Python script and the database table.

Figure 9 Check the Python Version
We created a folder "C:\pyapps" to store all those application files in the author’s testing environment. Under this folder, we create a sub-folder "C:\pyapps\htmltablescraping" and download the Python script to this folder. The downloaded package should include a "requirements.txt" file, which contains a list of items for running this project. The "requirements.txt" file should have the following lines:
beautifulsoup4==4.10.0
certifi==2021.10.8
charset-normalizer==2.0.6
idna==3.2
pyodbc==4.0.32
requests==2.26.0
setuptools==57.4.0
soupsieve==2.2.1
urllib3==1.26.7
To prepare for running the Python script, we need to configure the database connection string in the script and create the database table using the following SQL script:
CREATE TABLE [dbo].[stg_language_self_study_programs](
   [self_study_program] [nvarchar](50) NOT NULL,
   [number_of_languages_taught] [nvarchar](50) NOT NULL,
   [interface_languages] [nvarchar](500) NOT NULL,
   [media] [nvarchar](100) NOT NULL,
   [business_model] [nvarchar](250) NOT NULL,
   [date_extracted] [datetime] NOT NULL DEFAULT getdate(),
CONSTRAINT [PK_stg_language_self_study_programs] PRIMARY KEY CLUSTERED ([self_study_program] ASC)
)
1.2 Using a Virtual Environment
The author created another folder, "C:\pyvirtuals," to store all virtual environments. We recommend using the "venv" module to create lightweight virtual environments. The virtual environments created by this module are sandboxed, fresh, user-installable library capable, and multi-python safe (Anand, 2020). We use the following steps to create a virtual environment on the SQL Server machine.
1.2.1 Create a Virtual Environment
If the command prompt window is closed, we open the window in the Python install location again. We then run the following command to create a Python virtual environment in the "C:\pyvirtuals\htmltablescraping" folder, which corresponds to the location of the Python program in the application folder:
python -m venv C:\pyvirtuals\htmltablescraping
Figure 10 illustrates how to run the command on the command prompt window. Opening the folder "C:\pyvirtuals," we see a new sub-folder "C:\pyvirtuals\htmltablescraping" that was created by the command. There is a copy of the Python interpreter and many supporting files inside this sub-folder.

Figure 10 Create a Virtual Environment
1.2.2 Activate the Virtual Environment
To run Python programs in this virtual environment, activate the environment by running the "activate.bat" batch script in the "C:\pyvirtuals\htmltablescraping\Scripts" folder. First, open the command prompt window in the folder where the batch script is located. Next, run the batch script. As shown in Figure 11, activating the virtual environment changes the shell’s prompt to indicate the virtual environment we are using.

Figure 11 Activate the Virtual Environment
1.2.3 Install the Necessary Packages
The Python script needs some packages, for example, beautifulsoup4, requests, and pyodbc, to scrape raw data from the web page and save formatted data into the database table. We use the following command to install all these necessary packages from the "requirements.txt" file:
pip install -r C:\pyapps\htmltablescraping\requirements.txt
Figure 12 shows that the installation is in progress. We may see some error messages because the version of pyodbc used in this Python script is 4.0.32, and we want to install the package to Python 3.10. Unfortunately, as of this writing, the pyodbc version does not have pre-built wheel files for Python 3.10. Thompson provided a workaround to resolve this issue on the Stack Overflow platform (Thompson, 2021).

Figure 12 Install the Necessary Packages
1.2.4 Run the Python Script
Let us run the Python script in the folder "C:\pyapps\htmltablescraping" in this virtual environment. This environment should be active now. If not, we must activate the virtual environment. Then, we use the following command to run the Python script:
python C:\pyapps\htmltablescraping\HTML_Table_Scraping.py
Figure 13 shows the output in the command window. At the time of this writing, the output displays the warning message from the Python script execution. In addition, the database table "[dbo].[stg_language_self_study_programs]" should have rows, which indicates we run the Python script successfully.

Figure 13 Run the Python Script
1.2.5 Deactivate the Virtual Environment
After using the virtual environment to run the Python script, we can deactivate a virtual environment by typing "deactivate" in the command window, as shown in Figure 14. The "deactivate" invokes the batch script "deactivate.bat" in the "C:\pyvirtuals\htmltablescraping\Scripts" folder. Deactivating the virtual environment changes the shell’s prompt back to the default.

Figure 14 Deactivate the Virtual Environment
1.3 Creating a Batch File to Run the Python Script
Let us recap those steps to run the Python script in the virtual environment. First, we manually opened the command prompt window in the folder where the batch script "activate.bat" was located. Then, after we activated the virtual environment, we ran the Python script. Finally, we deactivated the virtual environment after the execution was complete. We can use a batch file to include all these steps; then, we can run the batch file to implement the process.
1.3.1 The %ERRORLEVEL% Variable and the Exit Code
When we run a Python program, the interpreter exits the program when it reaches the end of the script. In this case, the exit code is 0, which indicates successful execution of the program. On the other hand, the non-zero exit code indicates a failure in execution of the program. When we use window command prompt to run an external command, the command prompt detects the exit code and set the %ERRORLEVEL% variable to match. In most cases the %ERRORLEVEL% variable will be the same as the exit code.
We can conduct a test to check the value of the %ERRORLEVEL% variable. In the sample project, the primary key of the database table is "[self_study_program]." Therefore, we receive the primary key constraint violation error when re-running the Python script. We make this error for testing purposes. Let us use the following SQL command to truncate the table.
truncate table [dbo].[stg_language_self_study_programs]
We then run the Python program twice. The program runs to the end the first time but throws an exception in the second run. At each execution, we check the value of the %ERRORLEVEL% variable. As shown in Figure 15, the variable has a value of 0 and 1 when the program execution is successful or failed, respectively.
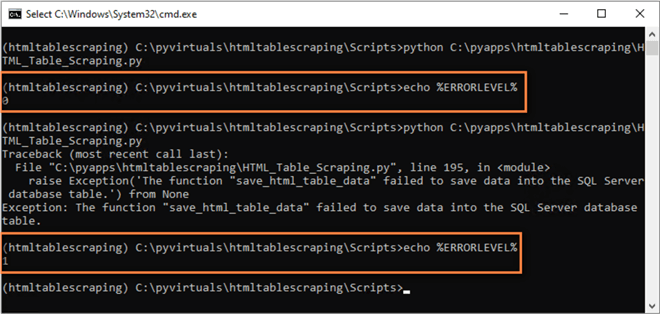
Figure 15 The Window Command Prompt Detects the Exit Code
1.3.2 The Batch Script
We use the following script to include all steps to run the Python script in the virtual environment. When we use the batch script to run the Python script, the variable %ERRORLEVEL% contains the return code of the preceding external command execution. We then return 0 or 1 to the batch script’s caller according to the values in the variable %ERRORLEVEL%.
@echo off
REM remember the initial folder location
set original_dir=%CD%
REM the location of the virtual environment
set venv_root_dir="C:\pyvirtuals\htmltablescraping"
REM the location of the Python script
set app_root_dir="C:\pyapps\htmltablescraping"
REM activate the virtual environment
call %venv_root_dir%\Scripts\activate.bat
REM change to the folder of the Python script
cd %app_root_dir%
REM run the python script
python HTML_Table_Scraping.py
REM handling exit code from Python script
if %errorlevel% == 0 (
   call :rollback_setting
   echo "Python script execution succeeded."
   REM terminate the current script,
   REM but leaves the parent window/script/calling label open.
   exit /b 0
) else (
   call :rollback_setting
   echo "Python script execution failed."
   REM terminate the current script,
   REM but leaves the parent window/script/calling label open.
   exit /b 1
)

REM define a function
:rollback_setting
	REM deactivate the virtual environment
	call %venv_root_dir%\Scripts\deactivate.bat
	REM change to the initial folder location
	cd %original_dir%
	REM ensure that the function exits properly.
	exit /b 0
We create a batch file and place it in the "C:\pyapps\htmltablescraping" folder. Note that we should truncate the table before running this batch file. We run the batch file twice, and the batch file's output should look like Figure 16.

Figure 16 Run the Batch Script Twice
When the batch script runs successfully, the value of the variable %ERRORLEVEL% is 0. The batch script prints the statement "Python script execution succeeded" and returns the code 0 to its caller. When the Python script throws an exception, the value of the variable %ERRORLEVEL% is 1. The batch script prints the statement "Python script execution failed" and returns code 1 to its caller.
2 – Run the Python Script in SQL Server Agent
SQL Server Agent defines several subsystems that allow us to run different types of tasks (Ghanayem et al., 2021). However, as of this writing, we cannot use any subsystem to execute Python scripts directly. Nevertheless, the "Operating System (CmdExec)" subsystem supports executing an executable program. For example, we can use this subsystem to run a batch file. Moreover, the subsystem can read the return code and errors from the executable programs. These features allow us to run the Python script in SQL Server Agent.
2.1 Creating a SQL Server Agent Job
Microsoft SQL Server Management Studio (SSMS) provides a user-friendly graphic interface to create SQL Server Agent jobs, specify job steps, set schedules, fire alerts, and deliver notifications. SSMS also allows us to access job steps execution history that includes details on the success and failure of executing individual job steps over the last seven days as recorded in MSDB. On the MSSQLTips platform, many tutorials introduce creating scheduled SQL Server Agent Jobs and monitoring job activities. This section briefly covers steps to create a job to run the Python script and attach a schedule to the job.
2.1.1 Navigate to the SQL Server Agent
To create a SQL Server Job, we first need to ensure that the SQL Server Agent service is running. We use the "Windows + R" keyboard shortcut to access the "Run" command dialog box. We then enter the command "services.msc" to open the services window, as shown in Figure 17. The SQL Server Agent service should have a "Running" status.
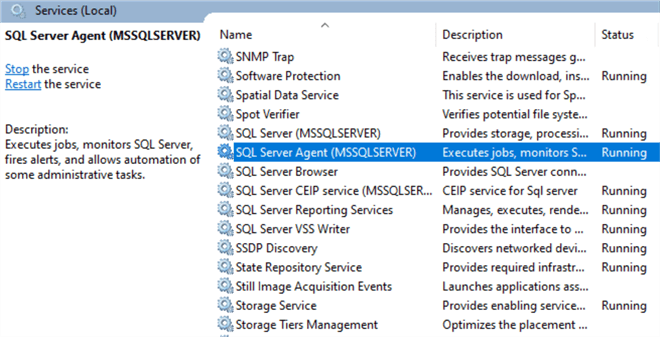
Figure 17 Access the Service Window
Open the SSMS and connect to a SQL Server instance. Then, on the Object Explorer pane, navigate to SQL Server Agent -> Jobs, as shown in Figure 18.
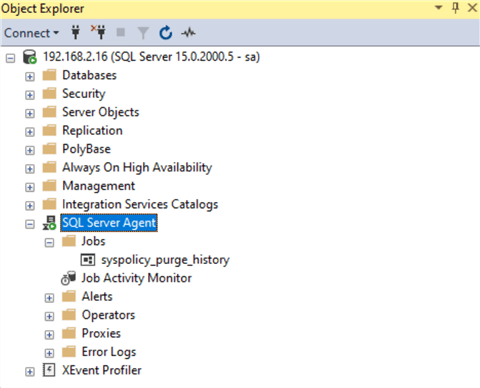
Figure 18 Expand SQL Server Agent in the Object Explorer Pane
2.1.2 Define a New Job
Right-click on the "Jobs" node and select the "New Job…" menu item from the connect menu. The "New Job" window appears. The window should look like Figure 19. In the general tab, we enter a name for the new job and select the category as "Uncategorized(local)."
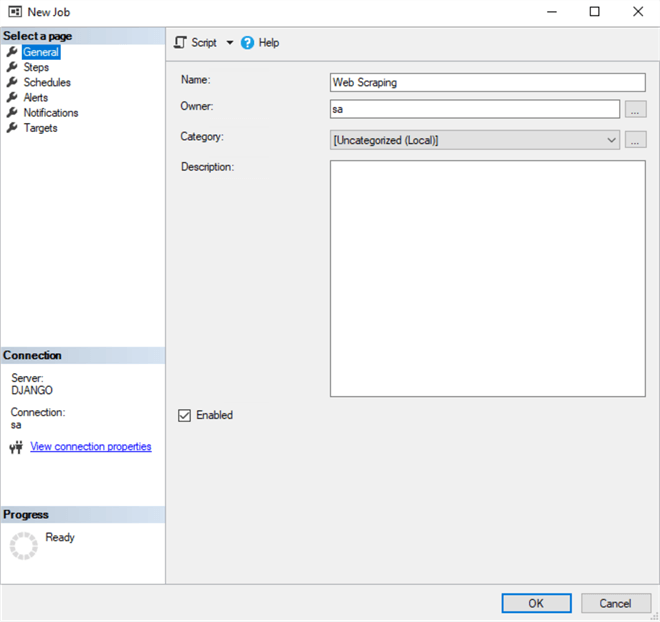
Figure 19 Create a New Job
2.1.3 Create a Job Step
Move to the "Steps" tab and click on the "New…" button. The window "New Job Step" should show up. We fill the form, as shown in Figure 20. The textbox of "Process exit code of a successful command" defaults to a "0" value. The exit code "0" already represents success in the batch and Python scripts. We must use the identical definition of exit codes in every place. In addition, by default, "CmdExec" job steps run under the context of the SQL Server Agent service account. If any permission issue occurs during the testing, we should use a proxy account that has permission to run the batch script. In the Command box, we enter the following command:
cmd.exe /c "C:\pyapps\htmltablescraping\batch.bat"
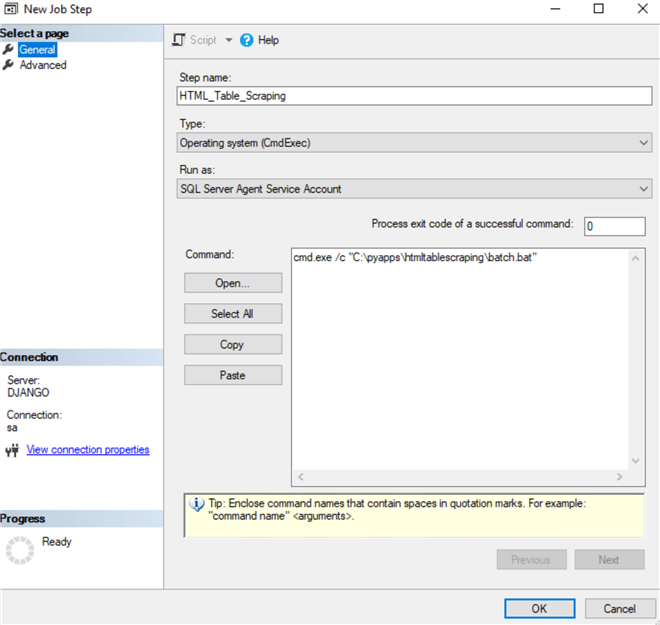
Figure 20 Create a New Job Step to Run the Batch Script
Click on the "OK" button to close the "New Job Step" window. We stay focused on the "New Job" window.
2.1.4 Create a Job Schedule
Now let us create and attach a schedule to the job. Move to the "Schedules" tab and click on the "New" button to open a "New Job Schedule" window. For testing purposes, we want the job to run every hour. We define scheduling rules, as shown in Figure 21.

Figure 21 Create and Attach a Schedule to the New Job
Click on the "OK" button to close the "New Job Schedule" window. Then, we go back to the "New Job" window. Click on the "OK" button to save the job definition and close the "New Job" window. The new job appears in the "Object Explorer" pane, as shown in Figure 22.

Figure 22 A New Job in the Object Explorer Pane
2.2 Running the SQL Server Job
After we attach a schedule to a job, the job runs automatically according to the predefined rules. In addition, we can run a job manually for troubleshooting or testing purposes. We check the Python script execution status through the Log File Viewer, which provides detailed information about job step executions. Before running the job, we need to truncate the table so that the Python script can run successfully for the first time.
2.2.1 Run the Job Manually
To run the job, right-click on the job name and select the "Start Job at Step…" menu item from the context menu, as shown in Figure 23.

Figure 23 Run the Agent Job Manually
After the job is complete, a confirmation dialog, like Figure 24, should show up to confirm the success.
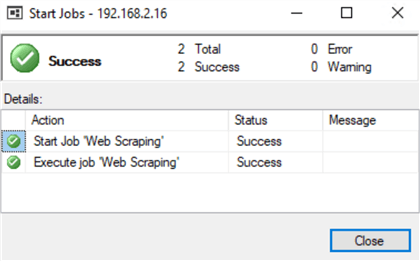
Figure 24 The Agent Job Ran Successfully
The error occurs when we run the job a second time because of the primary key constraint violation error. Figure 25 illustrates the confirmation window when the job fails.
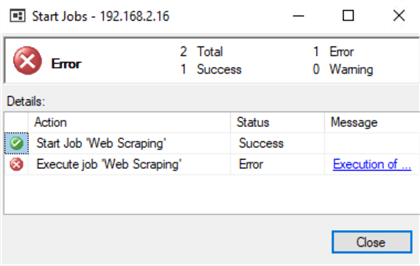
Figure 25 The Agent Job Failed
2.2.2 View the Job Execution History
We can use the Log File Viewer in SSMS to access job execution history. To open the Log File Viewer window, navigate to the new job in the Object Explorer pane again, right-click on the job name, and select the "View History" item from the context menu, as shown in Figure 26.
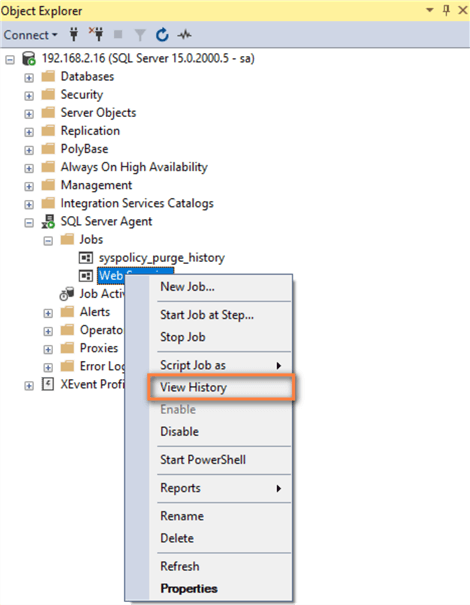
Figure 26 Access Job Execution History
The Log File Viewer window appears, as shown in Figure 27. Since we have run the job twice, there are two entries in the Log file summary section. Expanding the first entry from bottom to top, we can view detailed information about the job step execution. For example, we see a warning message from the Python script execution and a short statement from the echo command in the batch file in the message section. The text in the message section also indicates that the process exit code is 0.
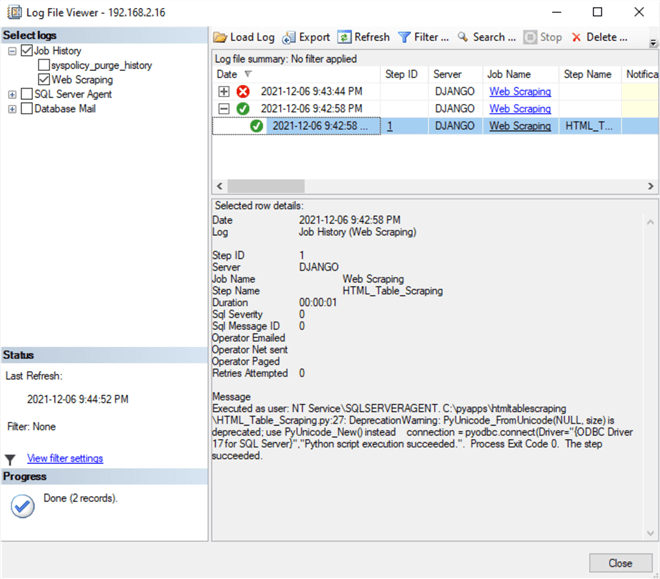
Figure 27 The Details of the Successful Job Execution
We already know that the job failed the second time. Let us check the details. Navigate to the second entry from the bottom to the top. Expanding the entry, we access the detailed information about the job step execution. We see the error message raised in the Python script execution and an assertion from the echo command in the batch file in the message section, as shown in Figure 28. The history data also indicates that the process exit code is 1, which means a failure.
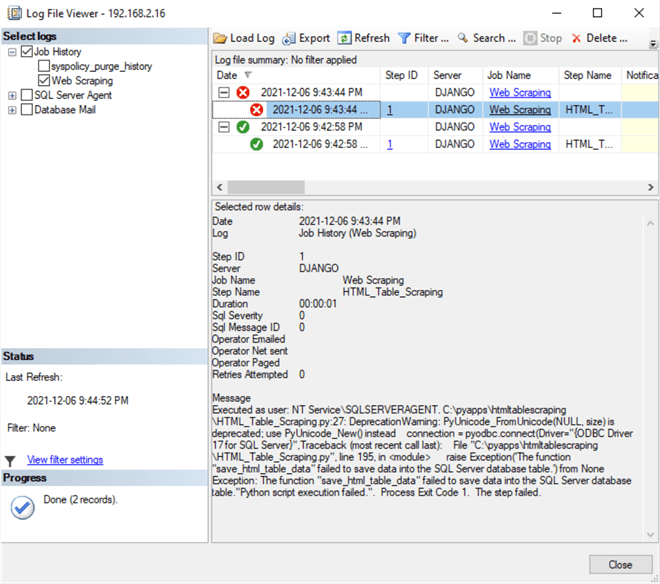
Figure 28 The Details of the Failed Job
2.2.3 Run the Job Automatically
SQL Server Agent can run a job on a schedule, responding to a specific event or on-demand (Ghanayem et al., 2021). We created a schedule and attached it to the job. Therefore, the job runs every hour. We truncate the table so that the job execution at 10:00 PM will succeed and the execution at 11:00 PM will fail. Let us log out of the database server now. We log in after 11:00 PM and check the log. As shown in Figure 29, there are two more entries in the Log File Viewer window. Expand the execution record at 10:00 PM. We see detailed information about the automatic execution. The successful message in this log is the same as the successful message in the manual execution.
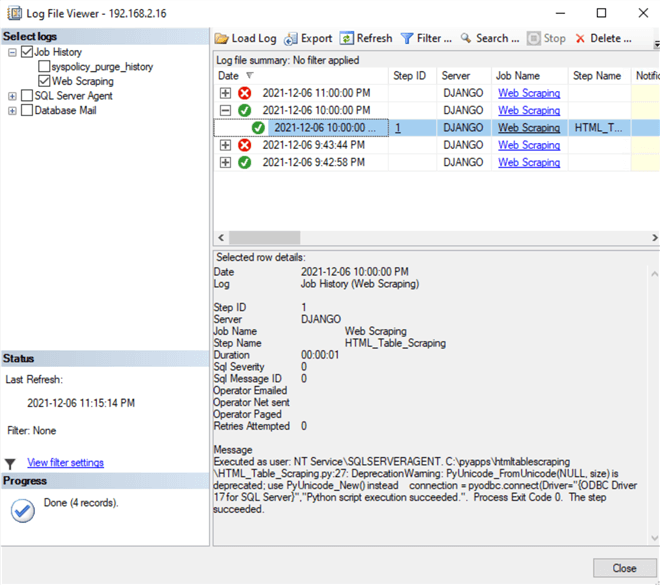
Figure 29 The Job Succeeded at 10:00 PM
Let us check the log of the execution at 11:00 PM. First, expand the execution record, as shown in Figure 30. We then examine detailed information about the failed execution. The unsuccessful message in this log is the same as the unsuccessful message in the manual execution. Even though we can use the Log File Viewer provided by SQL Server Agent to check Python script executions, the Python script should maintain a log file that records more detailed execution information for troubleshooting.

Figure 30 The Job Failed at 11:00 PM
Summary
Python, described as a glue language, has become one of the most popular programming languages worldwide. In addition, SQL Server Agent can manage scheduled tasks. Taking advantage of these two tools enables us to automate many routine tasks. This article introduced running a Python script through the SQL Server Agent.
We started with a gentle introduction to run a Python script in a virtual environment. Then, we went through every step to install Python on a SQL Server machine. Next, we covered the steps to create a virtual environment. Finally, after exploring commands to run a Python script in a virtual environment, we created a batch file to automate some manual steps.
We then briefly explored creating a SQL Server Agent job and a job step. We also created a schedule and attached it to the job. Next, we moved to job execution. We ran the job manually and automatically. Finally, we checked the job execution history. We observed that the Python and batch scripts could transport script execution information to SQL Server Agent.
Reference
Anand A. (2020). Venvs & Pyenvs & Pipenvs, OH MY! https://towardsdatascience.com/venvs-pyenvs-pipenvs-oh-my-2411149e2f43.
Das, A. (2020). Introduction to the SQL Server Agent. https://www.sqlshack.com/introduction-to-the-sql-server-agent.
Ericson, G., Buck, A. Dphansen, Coulter, D. & Ray, M. (2021). What is SQL Server Machine Learning Services with Python and R? https://docs.microsoft.com/en-us/sql/machine-learning/sql-server-machine-learning-services?view=sql-server-ver15.
Ghanayem, M., Ray, M., Coulter, D., Rabeler, C., Roth, J., Cai, S., & Guyer, C. (2021). SQL Server Agent. https://docs.microsoft.com/en-us/sql/ssms/agent/sql-server-agent?view=sql-server-ver15.
Shalewa (2020). Why You Should Add Python to PATH and How. https://medium.com/@omoshalewa/why-you-should-add-python-to-path-and-how-58693c17c443.
Sweigart, A. (2020). Automate the Boring Stuff with Python, 2nd Edition, San Francisco, CA: No Starch Press, Inc.
Thompson, G. (2021). unable to install pyodbc using python 3.10 in windows 10. https://stackoverflow.com/questions/69943254/unable-to-install-pyodbc-using-python-3-10-in-windows-10.
Zhou, N. (2020). Learning Python in Visual Studio 2019, https://www.mssqltips.com/sqlservertip/6442/learning-python-in-visual-studio-2019/.
Zhou, N. (2021). Using Python to Download Data from an HTML Table to an SQL Server Database. https://www.mssqltips.com/sqlservertip/7041/python-example-web-scraping-project/.
Next Steps
- We used the Log File Viewer to check the job execution status in this article. However, there may be many agent jobs in practice, and we must constantly monitor their execution status. Therefore, we may need to know other tools and learn SQL Server Agent more deeply. Several MSSQLTips authors shared their experience and knowledge about SQL Server Agent. We can access their tips through this link. In addition, Richard Waymire explains many uses of SQL Server Agent. We can access his articles through this link. The job step has sufficient privileges to run the Python script when its owner is the "sa" account. Nevertheless, other database users may receive this error, "Non-SysAdmins have been denied permission to run CmdExec job steps without a proxy account. The step failed." In this case, we should create a SQL Server Agent proxy account to run the job step. Moreover, a server usually hosts multiple Python applications. In practice, we do not store application data on the "C" drive. Instead, we usually employ a data drive that contains all application-related files.
- Check out these related tips:
- Run Python Scripts in SQL Server Agent
- SQL Server Agent Job Schedule Reporting
- Script out SQL Server Credentials and Proxies
- Accessing SQL Server Agent Data
- Learning Python in Visual Studio 2019
- CRUD Operations in SQL Server using Python
- Generate SQL Agent Job Schedule Report
- Query SQL Server Agent Jobs, Job Steps, History and Schedule System Tables
- Using Python to Download Data from an HTML Table to an SQL Server Database
About the author
 Nai Biao Zhou is a Senior Software Developer with 20+ years of experience in software development, specializing in Data Warehousing, Business Intelligence, Data Mining and solution architecture design.
This author pledges the content of this article is based on professional experience and not AI generated.
View all my tips
Article Last Updated: 2021-12-22


