By: Hristo Hristov | Updated: 2022-01-13 | Comments | Related: > Python
Problem
Python is a powerful, general use interpreted programming language. As a data professional, Python can be a handy tool for you to wrangle, analyze, transform and/or visualize data. Here is how to get started with Python from scratch using one the most popular distributions out there – Anaconda.
Solution
If you have read my Python tip on why you would want to use Python and it got you excited, then follow along for different ways to get started.
General installation and setup
Anaconda
There are several distributions that you can install. Anaconda is the easiest way to get started in your journey. This is very much the preferred way for data professionals, as compared with installing the standard Python distribution. The core difference is that Anaconda comes bundled with two package managers (pip and conda). Some packages are even pre-installed and the Anaconda Navigator gives you convenient access to several other tools, e.g. Spyder IDE. The purpose is to put you on a speed track when starting out. You can download Anaconda Individual for Windows here.
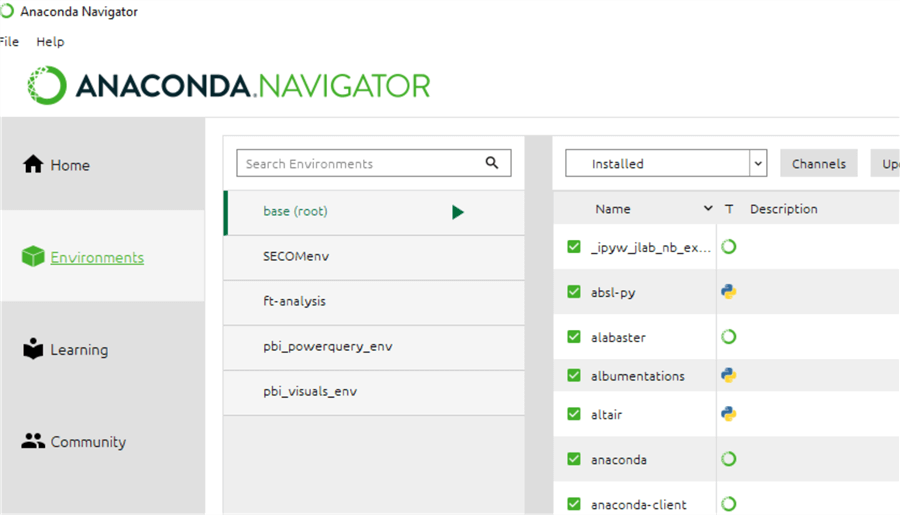
Once installed, you can see the main page of the Anaconda Navigator. From there you can go to Environments:

On the left you can see a list of the environments on your system. The base (root) is the default one created during the installation of the Anaconda distribution. On the right is a list of the packages available for the selected environment. To create a new environment, open the start menu, find, and start the Anaconda prompt:

Then type in conda create –name MSSQLtips_env python
numpy. This command instructs Anaconda you want to create a new environment
with a Python interpreter and the numpy package included from the get-go. You will
be prompted to confirm. Do so by typing in y and hit enter. Then again
you must confirm the package installation:

Your new environment will be ready for use after all packages are installed:

Finally, you can activate your new environment typing in conda activate MSSQLTips_env. If you go back to the Anaconda Navigator, you will also notice the new environment in the environment list.
IDE
To work efficiently with your installed Anaconda distribution of Python and a target environment, you need an IDE (integrated development environment). There are many choices out there, but I will mention VS Code. Head to the VS Code download page and grab the installer for your system. Once installed, go to the extensions tab. Search for "Python" and install the Python extension by Microsoft. It will allow you to select a Python interpreter and give you some goodies such as intellisense.

Then click on the python interpreter section in the bottom status bar (or hit Ctrl + Shift + P, type in "Python" and select Python Interpreter):

A dropdown will appear, so you can choose or alternate among the various environments on your system:

There is a small chance your environment will not be shown in this dropdown. If it does not show up after you hit the refresh button in the top right-hand corner of the dropdown, it could be an issue with a local configuration. You could solve it by restarting VS Code and/or recreating the environment. Check this article for more help. In the majority of cases, as soon as the environment is installed with a python interpreter and at least one package, it will be visible in VS Code.
Now that you have the correct environment selected, you can run a Python script inside VS Code:

From here you can continue your journey developing with Python in VS Code. A next step would be to install additional packages – that you can do from the Python terminal. While you can use both conda and pip to install packages, you should not attempt to update conda packages with pip, as doing so can lead to environment problems. When using Anaconda or Miniconda, it’s best to first try updating with conda.
Getting started with the Interpreter
If you are looking to use Python in a more plain, generic way, then the default interpreter could be also suitable. From the Environments menu in Anaconda, you can start the Terminal:

You can do the same if you have the generic Python interpreter downloaded from python.org:

You will get a plain Python prompt from where you can execute scripts or write a program yourself:

IPython
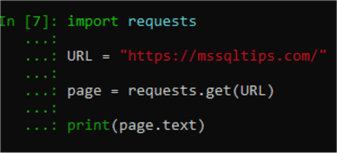
It is fair to mention IPython here too. This is an enhanced interactive shell, providing additional tools for using and getting the most out of Python. To put it simply, if you want to avoid using an IDE while writing relatively simple programs, then IPython is way more comfortable than the default shell. For example, it would be easy to do this:

This basic script will scrape the contents of the homepage of MSSQLTips and return them as a string. From there, you could look for certain html tags and/or keywords (I will leave that for another tip).
Power BI and Python
Power BI allows the use of Python to import and transform data (at design time) or draw complex custom visualizations (at both design and report time). To ensure your Power BI desktop can run a Python script, open the application, then go to File > Options and settings > Options. Then select the Python scripting tab. In the Python home directory input field, you can browse for a folder containing a Python interpreter. In this case, I have chosen the root folder of my newly created MSSQLTips environment:

Saving this configuration will ensure you can run a Python script locally, through Power BI desktop. Here too there are other intricacies involved worthy of another discussion.
SQL Server and Python
Thanks to libraries such as pyodbc, there is a way to programmatically query and generally interact with SQL databases. You first must install the pyodbc package in your environment:
Once installed, you can write a script to access a database. In the following example, I have connected to AdventureWorks on my localhost and I have written a method that accepts one integer as argument. Then I select the top n rows from the Vendor table accordingly:

In blue you see first the connection string and then the string representation of the query we want to have executed. In red you can see the invocation of the method with the argument and the top n number placeholder in green.
There are many points to note about this script, which I will also leave for another tip. Most importantly though:
- Queries can be parameterized by using the question mark symbol as a placeholder and then passing the values required after the query.
- Both DDL and DML statements are supported.
- Complex queries can be hard to handle as special characters all need to be escaped.
Conclusion
And here we are – if you have followed along by installing Anaconda and VS Code and have also configured Power BI - you are all set to start your journey with Python. Enjoy and stay tuned for more tips where we will delve deeper into Python programming.
Next Steps
- Manage Environments
- Python environments and VS Code
- IPython: Interactive Computing
- Python driver for SQL Server
About the author
 Hristo Hristov is a Data Scientist and Power Platform engineer with more than 12 years of experience. Between 2009 and 2016 he was a web engineering consultant working on projects for local and international clients. Since 2017, he has been working for Atlas Copco Airpower in Flanders, Belgium where he has tackled successfully multiple end-to-end digital transformation challenges. His focus is delivering advanced solutions in the analytics domain with predominantly Azure cloud technologies and Python. Hristo's real passion is predictive analytics and statistical analysis. He holds a masters degree in Data Science and multiple Microsoft certifications covering SQL Server, Power BI, Azure Data Factory and related technologies.
This author pledges the content of this article is based on professional experience and not AI generated.
View all my tips
Article Last Updated: 2022-01-13


