By: John Miner | Updated: 2022-01-24 | Comments | Related: > Azure Data Factory
Problem
Azure Data Factory is a very popular extract, load and translate (ELT) tool. The copy activity is at the center of this design paradigm. However, communication of changes to the source systems do not always flow to data engineer. Thus, a schema change in the source system might suddenly result in a production runtime issue. How can we defensively program the copy activity to reduce the chances of a runtime issue?
Solution
Microsoft Azure has two services, Data Factory and Synapse, that allow the developer to create a pipeline that uses the copy activity. Today, we are going to talk how the tabular translator (JSON mapping document) can be used to reduce the exposure to schema drift (source system tuple changes).
Business Problem
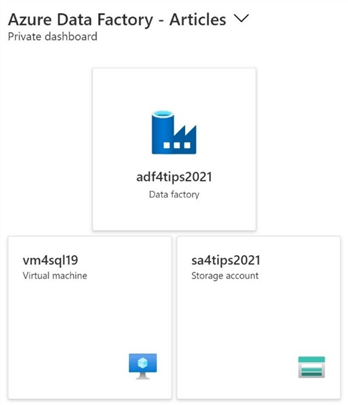
The image below depicts a typical hybrid solution using Azure Data Factory. The self-hosted runtime is installed on the virtual machine named vm4sql19. This machine happens to have a file share that contains files from the Adventure Works 2014 sample database in comma separated value (CSV) format. The pipeline inside the data factory named adf4tips2021 will read the file from the share and write the file to a data lake storage container underneath the storage account named sa4tips2021.
While this business problem is simple, it does relate to typical data processing that companies perform daily. The problem with CSV files is that the format can change at the whim of the end users that create and maintain the files.
Linked Service and Dataset
Before we can start developing a pipeline, we must define both the source and target linked services and data sets. I am going to re-use the linked service I have used in a previous article named DS_ADLS2_DATALAKE_STORAGE for the destination. The image below shows how objects are built upon each other to provide the final pipeline solution.

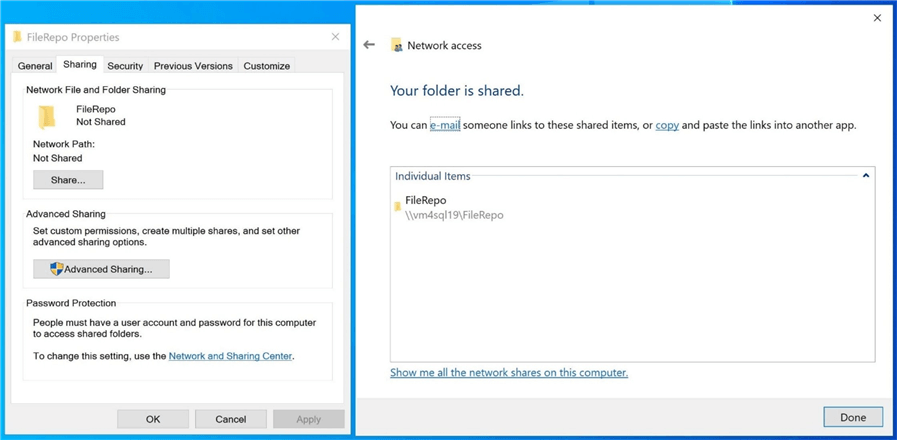
Since this is a brand-new file share, I need to create the directory on the Azure Virtual Machine (VM) named vm4sql19; and I need to share the folder named filerepo to a user (application) account that has rights to the virtual machine. The image below shows the shared folder. Make sure you place the files from the Adventure Works installation into this directory.
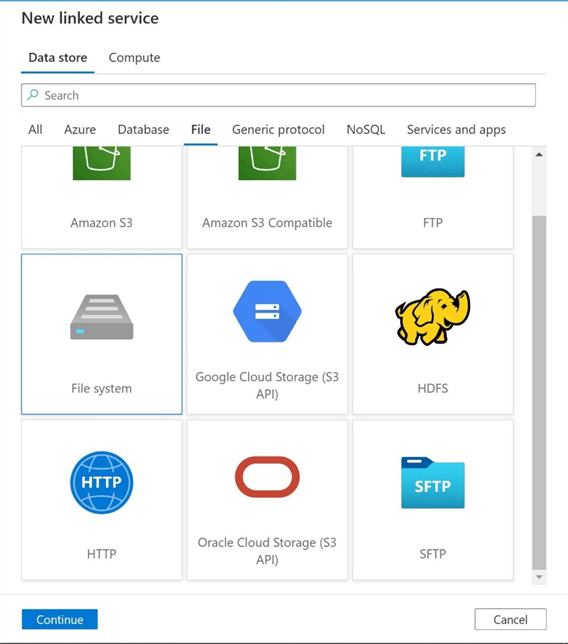
The first step is to define the source linked service. Use the manage icon within the Data Factory Studio to get access to the linked services screen. Please hit the new + icon to create the new definition. The image below shows that the file system is the correct object to create. It is important to note that only a self-hosted integration runtime can access a local file system. This will not work with the default Azure Integration Runtime.
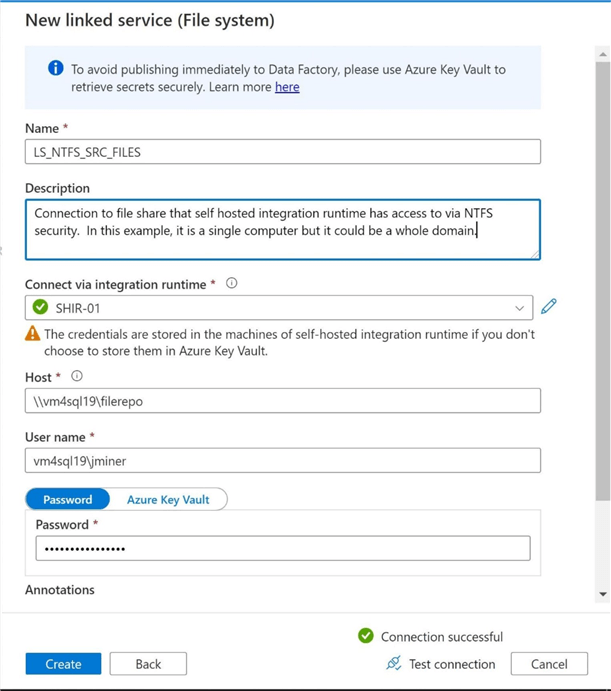
I am following a naming convention when defining the objects with Data Factory. The image below shows the newly created linked service called LS_NTFS_SRC_FILES. I am using the local Active Directory Account named jminer to access the local file share call filerepo. Use the test connection icon to validate the linked service.
To make the article shorter, I am just entering in the password. In the real world, I would enter this password into the key vault. This would make the key vault a centralized place to change passwords.
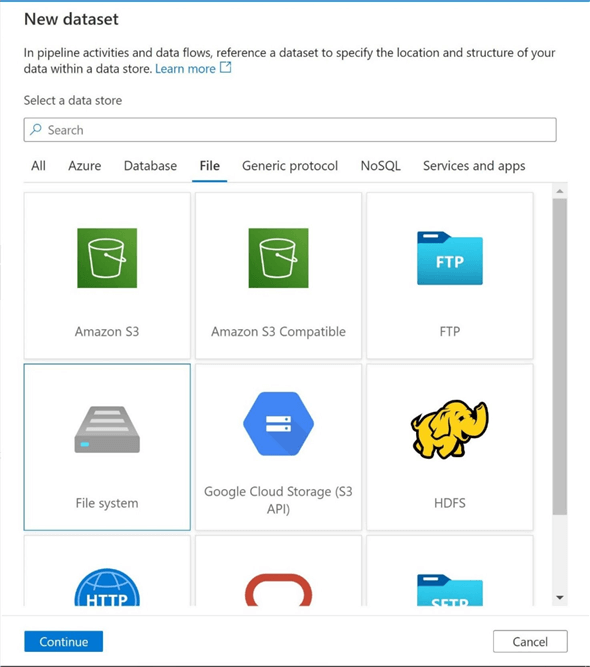
The second step is to define the source data set. Use the author icon to access the factory resources. Click the new + icon to create a new dataset. Please select the file system as the source type.
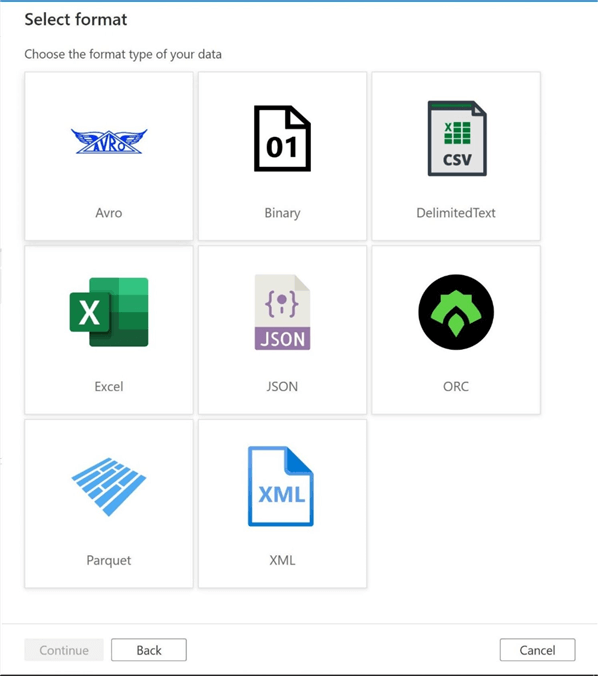
We need to select a file format when using any storage related linked service. Please choose the delimited format.
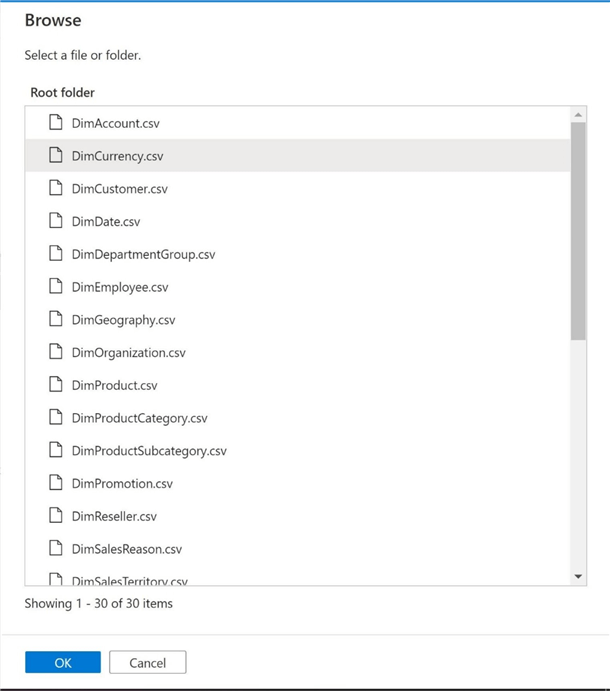
Setting the properties of the dataset is the next step in the task. The image below shows the results of browsing to the file share. Again, I made the article a little shorter by placing all files in the root directory. This is generally not the case. We are going to select the currency file for use within our proof of concept.
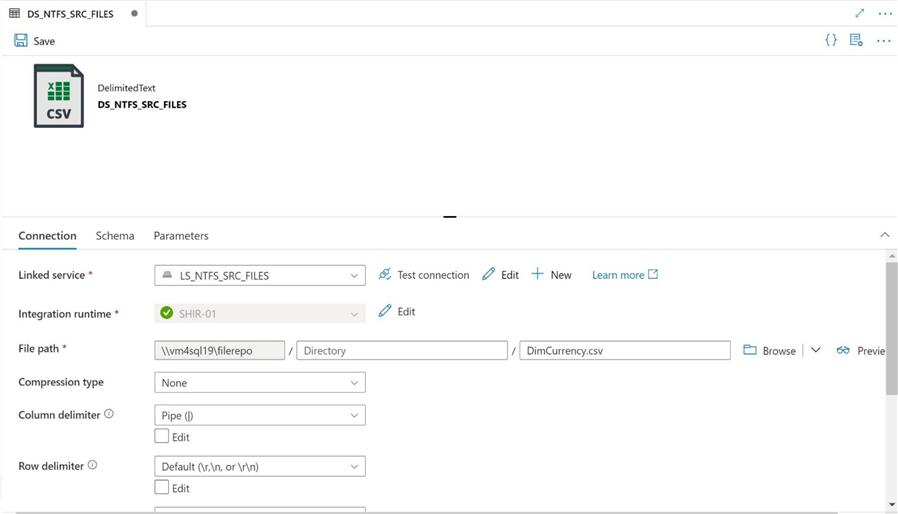
The key part of defining the dataset is selecting the linked service and naming the object. The image below shows the final definition of the dataset called DS_NTFS_SRC_FILES.
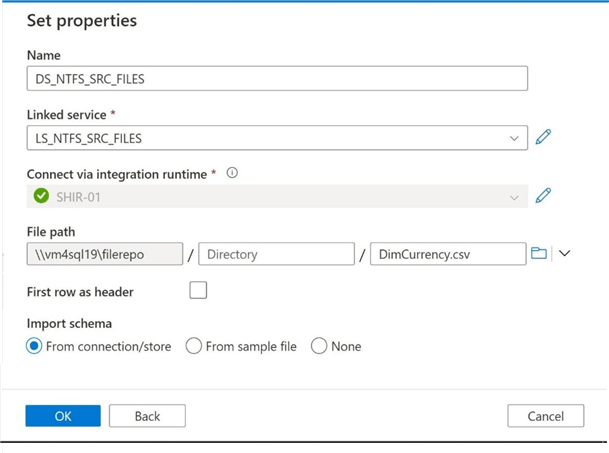
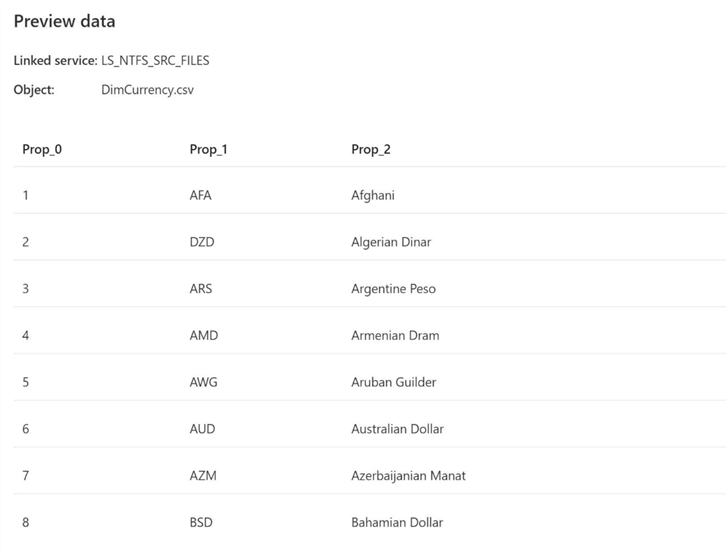
Click the okay button to create the new dataset object. The object has not been saved or published at this time. Usually, I like to preview the data within the file at this current time. Please note that the file does not have column headers. Also, the data within the file is in a pipe delimited format.
Finally, the image shows the first 8 records in the delimited file. We can see a generic column header being added to the preview pane.
Right now, the data set can only be used with a single file called "DimCurrency.csv".
Dataset Parameters
Let’s turn the static dataset into a dynamic dataset using a parameter named FILE_NAME. The image below shows the definition of the new parameter.
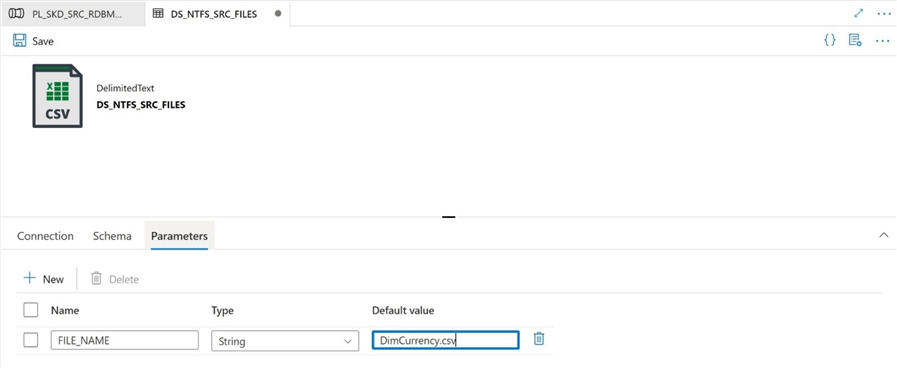
We must go back to the definition of the file location and replace the file name with the new parameter. Again, I would have to create an additional parameter if we stored the files in sub directories. We will add this enhancement to the dataset later in the article.
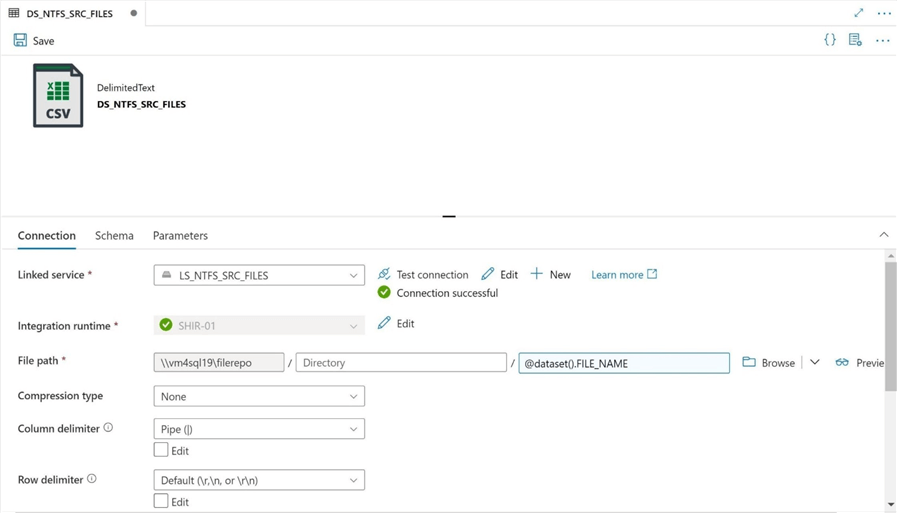
When possible, use parameters to make your Data Factory objects dynamic in nature.
First Pipeline
Use the author icon to access the factory resources. Click the new + icon to create a new pipeline named PL_COPY_DEL_FILE_2_ADLS_GEN2. Please drag the copy activity over to the pipeline canvas. I chose to name the copy activity as ACT_MT_CPY_NTFS2ADLS_DEL_FILE. Now that we have created the framework of the extract and translate program, let’s dive into the details.
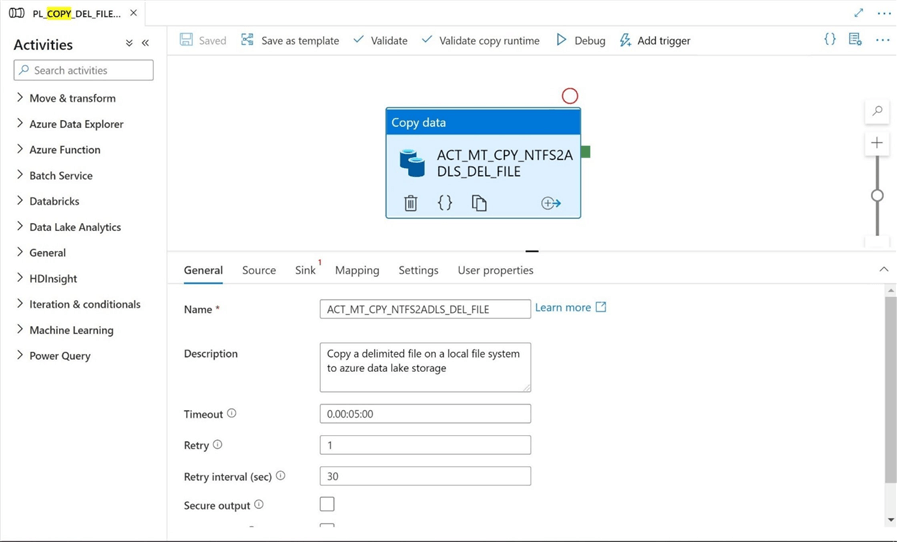
There are several options on the general page that most developers overlook. Please see the above image for details.
First, please add a description so that the future maintainer of your code understands what the purpose of the object was. Second, the default timeout is set to 7 days. I usually change this to a value that is reasonable. I put down 5 minutes to complete the copy activity. This is to account for very large files that I might encounter. Third, how does the activity handle a failure? By default, it fails. I usually try to add a retry action. Maybe there was a network issue that interrupted the copy action?
The image below shows the definition of the source dataset. Just because the dataset is dynamic does not mean the pipeline has to be dynamic. I am going to play the role of a bad developer by hard coding the first pipeline. We will go back and fix this issue in the second pipeline.
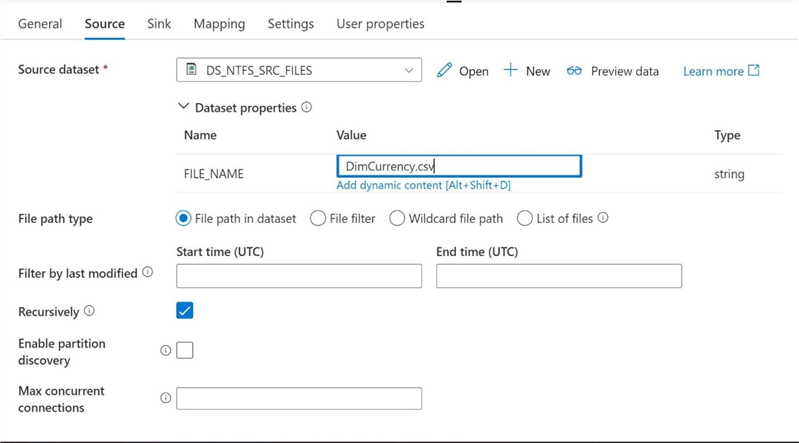
The image below shows the definition of the destination dataset. Again, the target directory name and target file name are hard coded at this point.
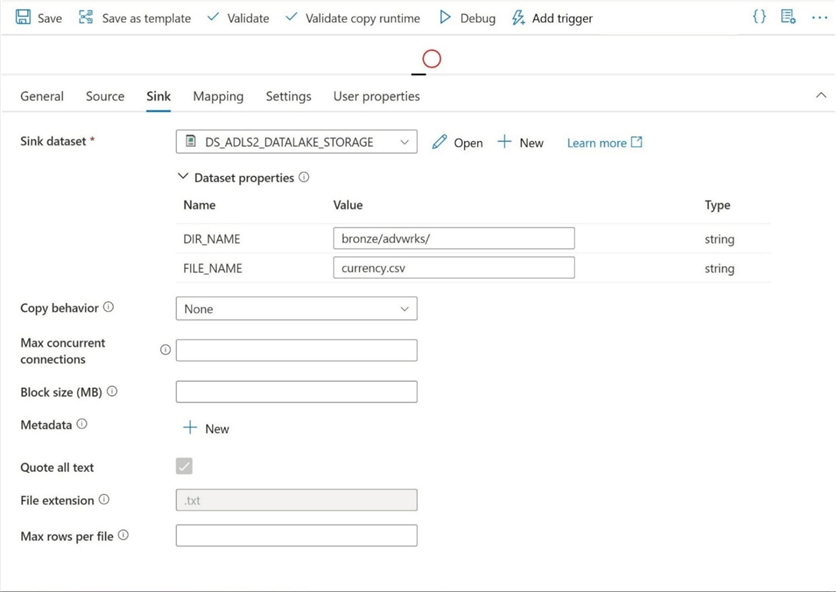
By default, the integration runtime will try to determine the schema and mapping at runtime. It is best to import the schema by clicking the icon. Please note, there is an option for dynamic content. It is a hover over action link. This link will be important when we define and pass a tabular translator (JSON mapping document) to the copy activity in the future.
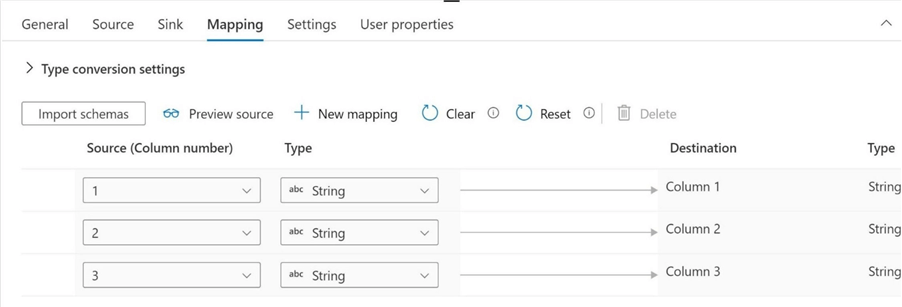
Looking at the schema mapping, we can see that both the source and destination do not support column headings. Also, all data is defined as strings. If we execute the program at this time, it will successfully copy the file from the file share to the data lake folder.
Let’s try breaking the program right now by adding a new column to the file and fill the column with the work "break". The image below shows the change made in my favorite editor. Does the pipeline program fail with a runtime error?
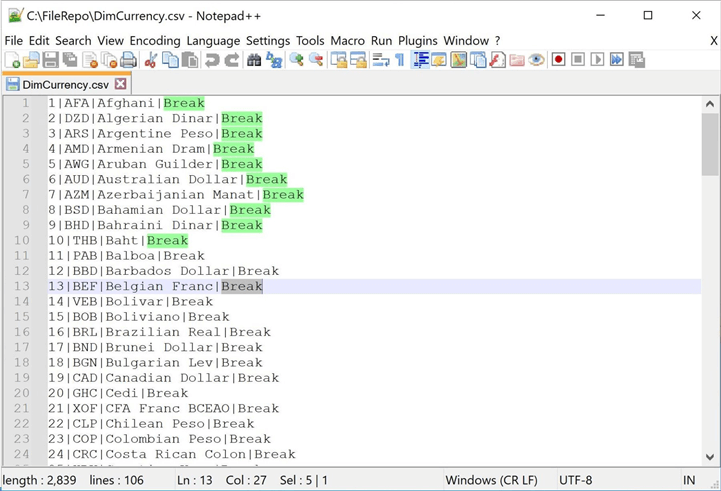
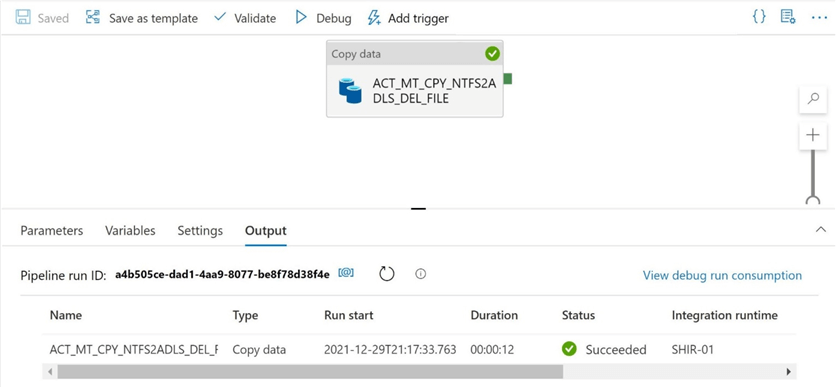
The program executes without any failures! How is that so?
If we look at the code behind the pipeline using the {}icon, we can see that is a tabular translator (JSON mapping document). Because we do not have column headings, it uses ordinal positions. This mapping prevents the pipeline from breaking. It just ignores additional columns that it finds in the source dataset.
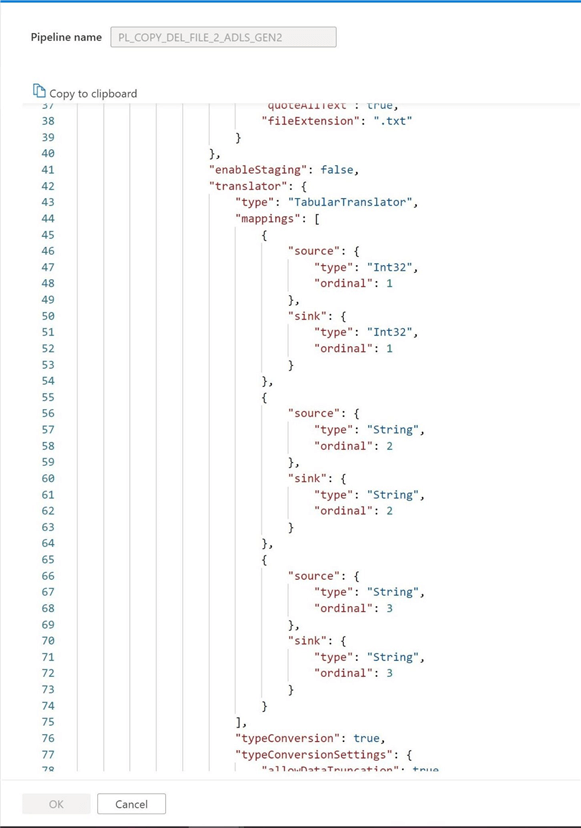
In a nutshell, the schema mapping prevents the program from breaking if one of the two conditions are true: all new columns are added to the end of the row or any new columns inserted in the middle of the file does not cause type conversion issues. The last condition is not optimal since we might have data landing in the wrong target column.
In the next section, we will work on adding a column header to the source file as well as making the final pipeline dynamic in nature.
Second Pipeline
The image below shows the TSQL definition associated with the DimCurrency.csv file. The first column contains numeric data. We can make this change in the mapping document.
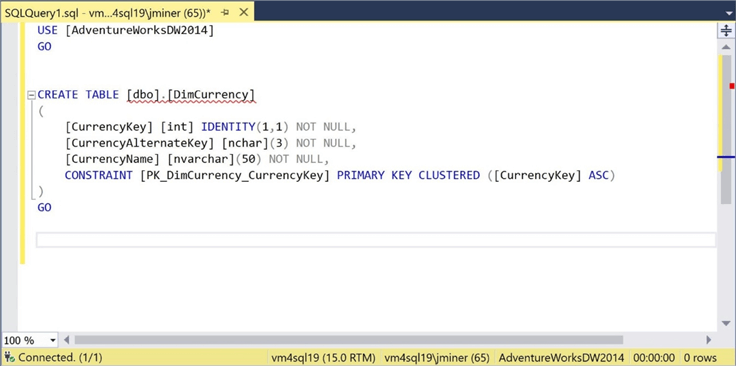
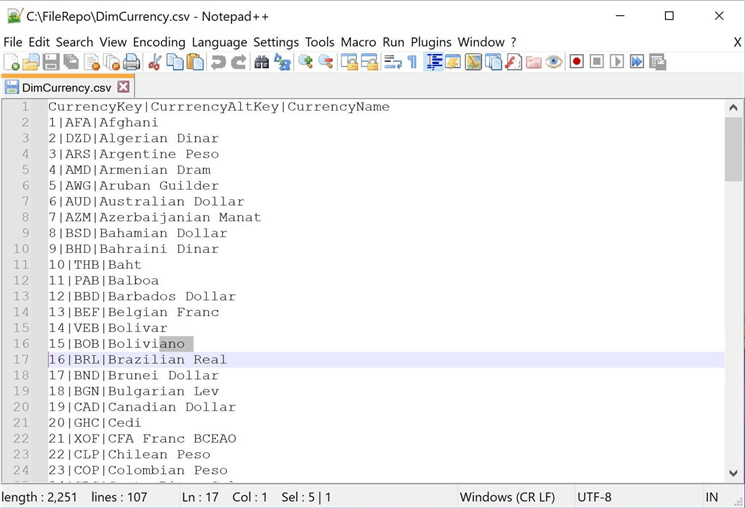
Let’s modify the file to add column headings right now. I choose to use the notepad++ application to make the required changes to the source file.
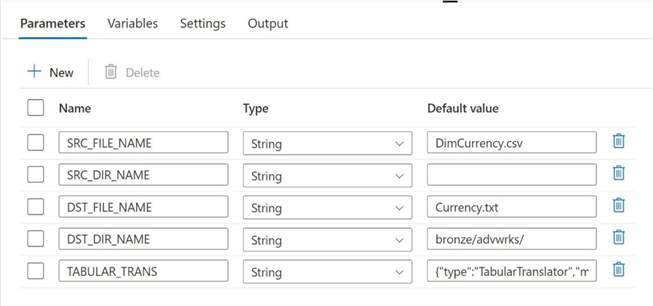
The second pipeline program will be using parameters for both the source file, destination file and file schema mapping. Please note that we are passing a space as a parameter to the source dataset. I will explain the resource behind this value shortly.
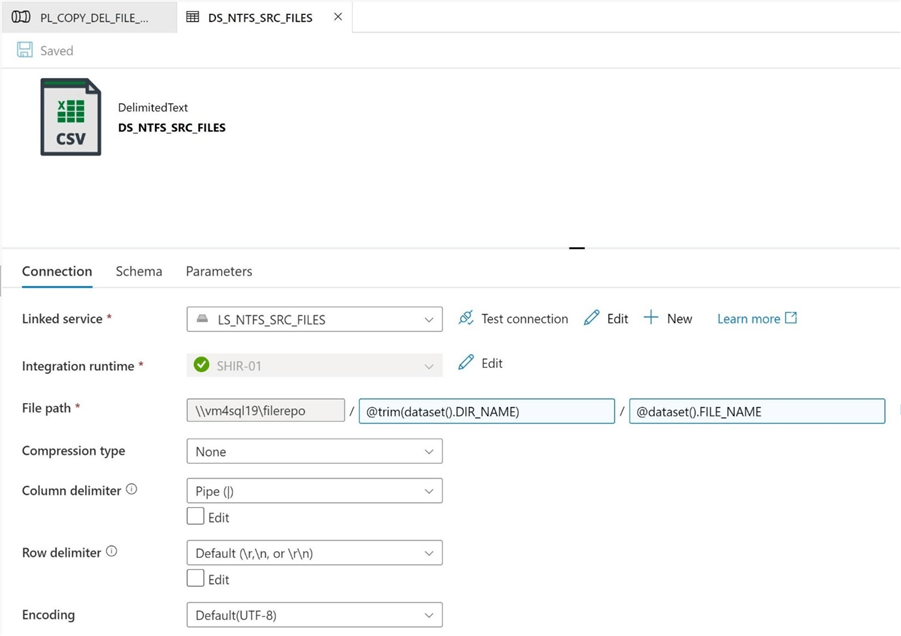
The first task is to modify the source dataset to have an additional parameter for the directory. Passing a null value to the dataset does not work. Therefore, save a single space as the value. However, a space within the file path definition will cause a runtime issue. A solution to this problem is to use the trim function within the expression definition.
Please make sure you change the definition of the dataset to look for column headings in the first row of the file. Optionally, you can define the delimiter so that other characters can be used. I choose to hard code the value as a | in the dataset.
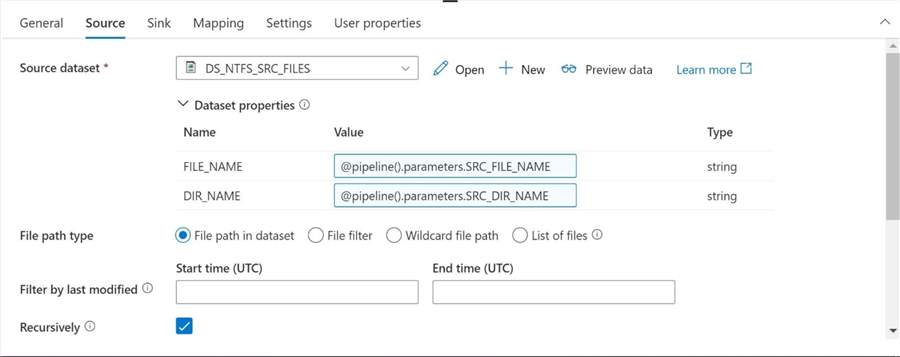
The second task is to pass the pipeline parameters to the newly updated source dataset within the copy activity.
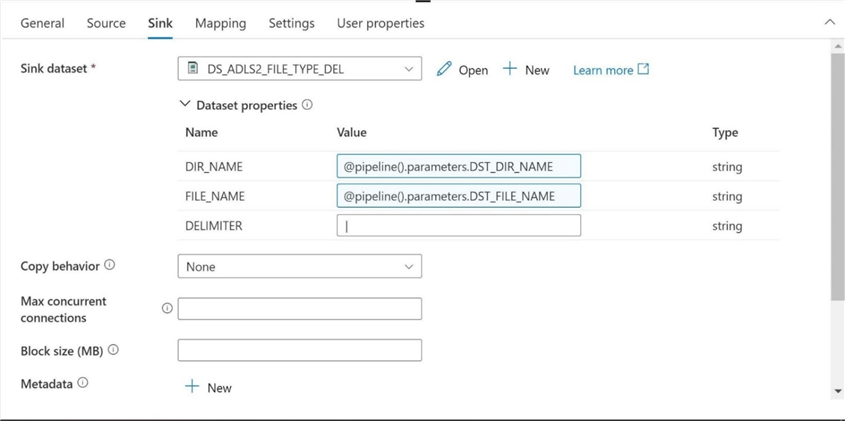
Again, I choose to reuse an existing destination dataset named DS_ADLS2_FILE_TYPE_DEL from a previous article. I am passing both the destination directory name and destination file name as pipeline parameters. The file delimited is hard coded as a pipe character |.
Wow! That was a lot of work to get to the final and most important change. Clear the import schema definition. Find the dynamic content hyperlink button. Since the pipeline parameter is an object, we must first cast it to a string. But the mapping needs to be in a JSON format. Therefore, we must cast it an additional time for this expression to validate.
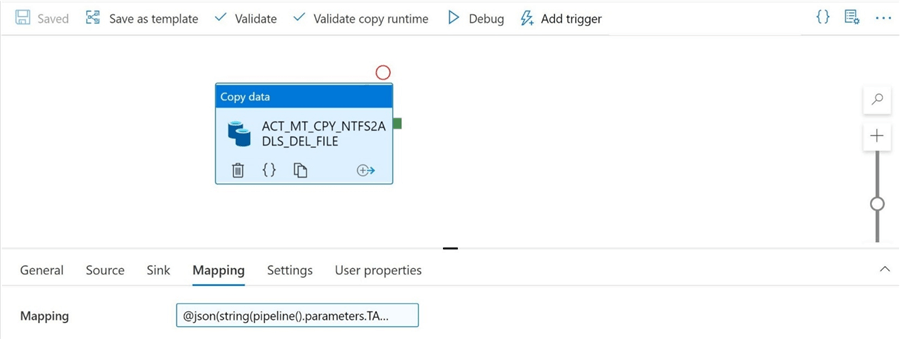
I want to cover one important item that I glossed over when I defined the pipeline parameters. The tabular translator JSON document was copied from the code behind the pipeline for the copy activity. I did this action before clearing the final mapping. You could repeat this process for every file that is part of Adventure Works 2014 database if we want to pull all files into the data lake.
{
  "type": "TabularTranslator",
  "mappings": [
   {
      "source": {
         "name": "CurrencyKey",
         "type": "String",
         "physicalType": "String"
      },
      "sink": {
         "name": "CurrencyKey",
         "type": "Int32",
         "physicalType": "Int32"
      }
   },
   {
      "source": {
         "name": "CurrrencyAltKey",
         "type": "String",
         "physicalType": "String"
      },
      "sink": {
         "name": "CurrrencyAltKey",
         "type": "String",
         "physicalType": "String"
      }
   },
   {
      "source": {
         "name": "CurrencyName",
         "type": "String",
         "physicalType": "String"
      },
      "sink": {
         "name": "CurrencyName",
         "type": "String",
         "physicalType": "String"
      }
   }
  ]
}
Please use parameters, when possible, to define linked services, datasets, and pipelines. In the next chapter, we will review the final design and do some unit testing.
Unit Testing
The following components were used in the final solution.
| Name | Description |
|---|---|
| LS_NTFS_SRC_FILES | Source linked service. NTFS file share. |
| LS_ADLS2_DATALAKE_STORAGE | Destination linked service. ADLS folder. |
| DS_NTFS_SRC_FILES | Source dataset. Delimited file. |
| DS_ADLS2_FILE_TYPE_DEL | Destination dataset. Delimited file. |
| PL_COPY_DEL_FILE_2_ADLS_GEN2 | Dynamic pipeline to copy data from NTFS file share to ADLS folder with schema drift protection. |
If we execute the pipeline program, we see a successful execution.
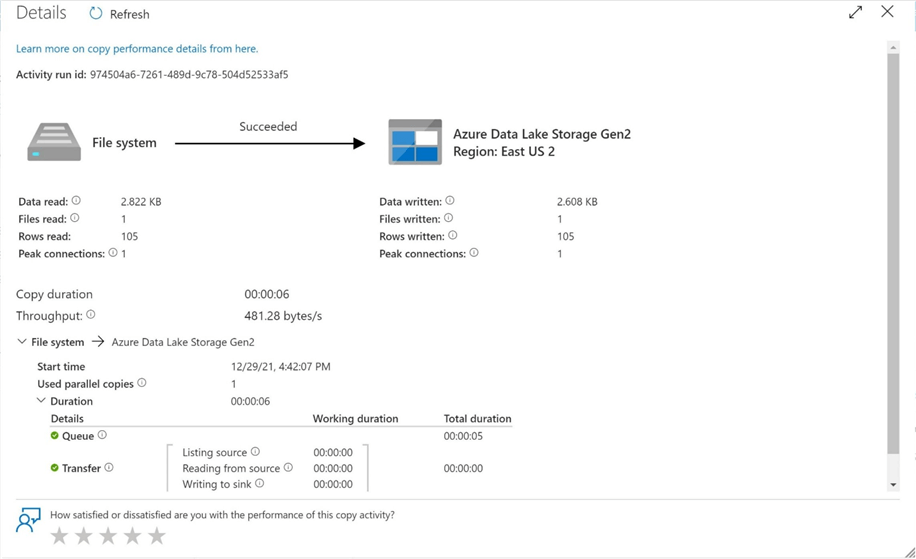
As a developer, I always want to verify the output of any program that is executed during testing. The image below shows the delimited file was created in the correct ADLS folder.
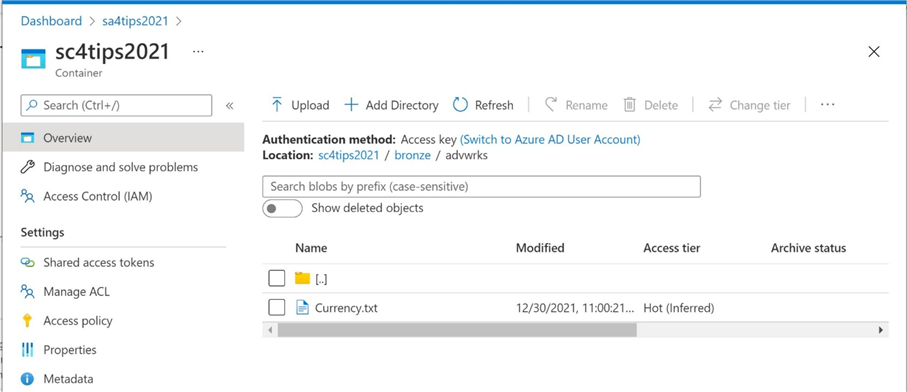
Since Azure Data Lake Storage is a service, we can not edit or view files. Therefore, download the file and examine the contents in your favorite text editor such as notepad++.
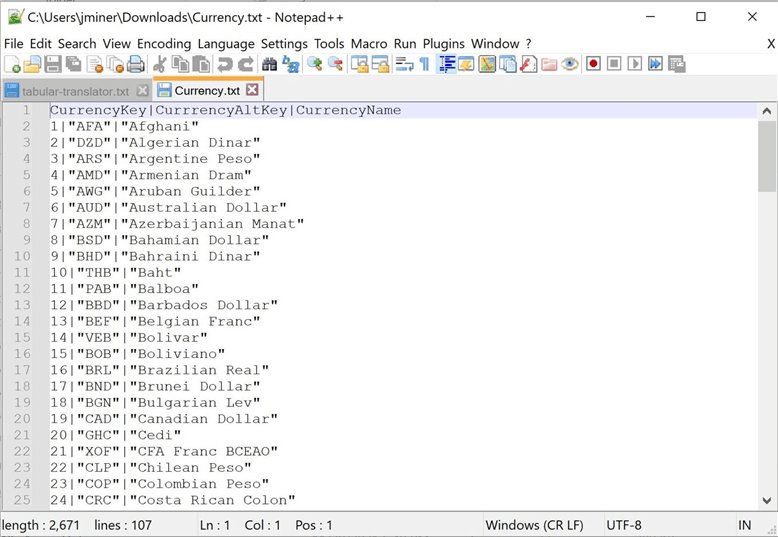
The above image shows the file has been slightly changed from the original. The destination format tells the pipeline to quote all strings. If this is not the desired condition, go back and modify the destination dataset and retest the final pipeline.
Summary
As a data engineer, you must plan for the worst case and hope for the best case. Thus, any defensive programming that prevents failure from schema drift is a good to have. Who wants to be woken up in the middle of the night when they’re on support for a failed pipeline? Today, we covered how a mapping schema can be defined when copying file data from one location to another. The code behind the pipeline is using a tabular translator (JSON mapping document). If we capture this information for each file and pass it as a pipeline parameter, we can add defensive programming to all executions of the pipeline. I leave repeating the process for each Adventure Works file as an exercise that you can try.
Does this defensive programming technique for schema drift apply to other data sources in Azure Data Factory? The answer to this question is YES!
When copying data from a relational data source to a data lake, always define the column list instead of using * (all). This will all for the addition of columns to the source table without breaking the pipeline.
Can upstream changes break this defensive programming? The answer to this question is YES!
Data engineering programs can not automatically adapt to upstream changes. For instance, changing the name of the field in a source table will break a copy activity involving a relational database source. Also, inserting columns in a delimited format that is casting to a final data type might also fail in a type-translation error.
In a nutshell, program for schema drift when developing your ADF pipelines. Educate the producers (owners) of the flat files or database tables about schema drift. If a change is required, then ask them to please notify the data engineering team. A coordinated change to a production system is the ultimate solution!
Next Steps
- Partitioning source data tables for faster transfer times.
- Using incremental loads to decrease daily processing time of large data sources.
- Custom execution, error, and catalog logging with Azure Data Factory.
- Creating a meta data driven framework for Azure Data Factory
- How to scale parallel processing with Azure Data Factory
- Wrangling data flows for transformations in ADF
About the author
 John Miner is a Data Architect at Insight Digital Innovation helping corporations solve their business needs with various data platform solutions.
This author pledges the content of this article is based on professional experience and not AI generated.
View all my tips
Article Last Updated: 2022-01-24


