By: Daniel Calbimonte | Updated: 2022-04-07 | Comments (5) | Related: More > Import and Export
Problem
There are several ways to import data into SQL Server from Excel. In this tutorial, we will take a look at how this could be accomplished by creating an Excel macro with some VBA code to import data from an Excel spreadsheet into SQL Server.
Solution
Below is a sample of what we will put together. We will have data entered into the spreadsheet and then create a button to import the data into SQL Server.

When we press Save the data will be saved in SQL Server in a table that is already created.

We will use Excel 2017 in this example, but other versions will work but may require a few changes.
Create the table in SQL Server
First, we will create a table named email in SQL Server. The following code will create the table.
CREATE TABLE [dbo].[email](
   [id] [smallint] NULL,
   [email] [varchar](50) NULL
) ON [PRIMARY]
GO
Working with Excel
Create an Excel file with some data. In this example, we add the id and the email.

To create the button in Excel, we need to add the developer menu. If you do not see the Developer menu, go to File > Options.
In Excel Options, click on Customize Ribbon and check the Developer checkbox and press OK.

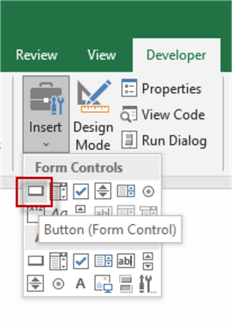
Now, you will see the Developer in the Menu. Click on Developer and select the option Insert and drag and drop the Button to the Excel sheet.

You can Edit the text button by right-clicking the button and selecting Edit Text. And change the text to "Save".

Right-click the button and select Assign Macro.

The Macro is the code that we will use to export the Excel data to SQL Server.
In the Assign Macro window, click the Edit button.

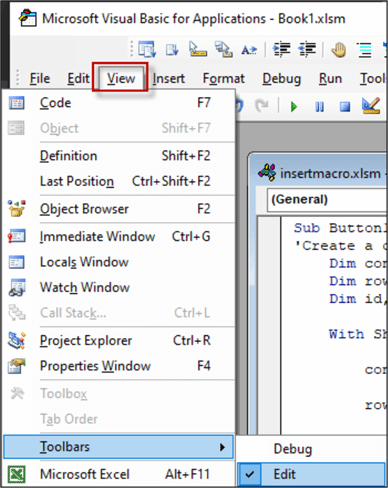
This will open the Microsoft Visual Basic for Application software. This allows to create Visual Basic code for Applications (VBA). By default, you do not have the Edit toolbars. To view it, go to View > Toolbars > Edit.

The Edit Toolbar allows commenting code and increasing or decreasing indentation and other options.

Now, it is time to add the code. The following code will do what we need.
Sub Button1_Click()
'Create a connection
    Dim id, email As String
    Dim row As Integer
    Dim connection As New ADODB.connection

    With Sheets("Sheet1")
'        Connection to SQL Server
        connection.Open "Provider=SQLOLEDB;Data Source=.;Initial Catalog=Adventureworks2019;Integrated Security=SSPI;"
'        Start in the second row because row 1 is the header
        row = 2

'Run until the row is empty
        Do Until IsEmpty(Cells(row, 1))
'        Get the id from column 1 and the row is dynamic
            id = .Cells(row, 1)
'            Get the email from column 2 and the row is dynamic
            email = .Cells(row, 2)

'          Insert the cell values into the email table
            connection.Execute "insert into dbo.email (id, email) values ('" & id & "', '" & email & "')"
' increase the row by 1
            row = row + 1
        Loop

'   Close and clean the connection
        connection.Close
        Set connection = Nothing

    End With
End Sub
Code Explanation
In the first part of the code, we create the variables for the columns id and email and a row to insert row by row. We will also create the connection variable.
Sub Button1_Click()
'Create a connection
    Dim id, email As String
    Dim row As Integer
    Dim connection As New ADODB.connection
We will work with Sheet1 of the Excel file.
The connection will connect to SQL Server. Data Source is the name of the server. In this case, is the local server so a . means to use the local server. You can use the name of the SQL Server as well. Initial Catalog is the database name. In this example, we created the table in the Adventureworks2019 database. You can use any database in your SQL Server. Just make sure that your table is in that database. Finally, Integrated Security means using Windows Authentication. So, the user that runs the code needs to have permissions to SQL Server.
Finally, we will start in row 2, because row 1 has the column headers.
    With Sheets("Sheet1")
'        Connection to SQL Server
        connection.Open "Provider=SQLOLEDB;Data Source=.;Initial Catalog=Adventureworks2019;Integrated Security=SSPI;"
'        Start in the second row because the row 1 is the header
        row = 2
Finally, we will do a loop for each row of the Excel sheet until the row is empty and insert the data from the Excel cells into the SQL Server table.
'Run until the row is empty
        Do Until IsEmpty(Cells(row, 1))
'        Get the id from column 1 and the row is dynamic
            id = .Cells(row, 1)
'            Get the email from column 2 and the row is dynamic
            email = .Cells(row, 2)

'          Insert the cell values into the email table
            connection.Execute "insert into dbo.email (id, email) values ('" & id & "', '" & email & "')"
' increase the row by 1
            row = row + 1
        Loop
The last part will just close the connection.
'   Close and clean the connection
        connection.Close
        Set connection = Nothing

    End With
Execute the Code
Once saved, if you execute the code by clicking Save, you might receive the following error message in Excel.
User-defined type not defined
This is because you do not have the libraries to create the SQL Server connection. To fix this problem, go to the menu and click Tools > References.

In this example I checked Microsoft ActiveX Data Object 6.1 Library. If you do not have that version, you can use a lower or higher version.

Now, if you press the Save button in Excel in should save the data to the table.
I you do a query in SQL Server we should be able to see the data.
select * from dbo.email

Next Steps
If you ask me, to export data from Excel into SQL Server, my first option would be to use the SQL Server import and export wizard. It is easier to export the data. The second option, if you need more transformations and the Export wizard is not enough, I would use SSIS in a project to customize the export process. Finally, as a third option, I would use a Linked Server to Excel. I would use VBA only if I have a lot of code in Macros and I love to use Macros.
This is a good option if you need to create a simple utility for end users and don't want to give them access to SSIS or SSMS.
Use the links below to review other ways to import data into SQL Server:
- Simple way to import data into SQL Server
- Using a SQL Server Linked Server to Query Excel Files
- Export SQL Server Data to Multiple Excel Worksheets using SQL Server Integration Services
About the author
 Daniel Calbimonte is a Microsoft SQL Server MVP, Microsoft Certified Trainer and 6-time Microsoft Certified IT Professional. Daniel started his career in 2001 and has worked with SQL Server 6.0 to 2022. Daniel is a DBA as well as specializes in Business Intelligence (SSIS, SSAS, SSRS) technologies.
This author pledges the content of this article is based on professional experience and not AI generated.
View all my tips
Article Last Updated: 2022-04-07


