By: Rajendra Gupta | Updated: 2022-05-18 | Comments | Related: > Azure Data Studio
Problem
Developers and DBAs run multiple queries while connecting to a SQL Server, so how can you view a history of the queries executed? Similarly, you might be familiar with table designers in SSMS. How can we design tables graphically using Azure Data Studio to work with SQL Server or an Azure database?
Solution
Azure Data Studio can be installed on Windows, Linux, and macOS for both on-premises and cloud databases. Azure Data Studio or ADS offers the following valuable features:
- Cross-platform support
- Modern editor experience including IntelliSense, Source Control, SQL Code Snippets
- Built-in graphical result sets and customizable server, database dashboards
- Extensions support enhancing tool features
- Integrated Bash, PowerShell, sqlcmd, BCP, and ssh terminal
- Jupyter Notebooks, HDFS integration, and external data wizard
Let's explore how Azure Data Studio can help retain query history and design tables graphically for SQL Server and Azure databases.
Azure Data Studio Query History Extension
Azure Data Studio marketplace provides several extensions for enhancing its features and function. These extensions are free to download and install.
I am working with the latest Azure Data Studio version 1.35.1, released on March 17, 2022.

You can navigate to Microsoft and download the latest version of Azure Data Studio before proceeding with this article.
Launch ADS and click on the Extension icon as highlighted in the following screenshot. It shows you the marketplace with a list of available extensions. These can be Microsoft recommended or third-party custom extensions. If you have installed any extensions, it shows under Installed.

Query History Extension
Azure Data Studio provides a Query History extension to add a Query History panel that captures the past executed queries. ADS recommends installing this tool.

Now, search for the Query History extension in the extension marketplace and click on it and click Install.

Note: Query History extension is in the preview phase and it might change significantly before its general availability release.
It quickly adds the query history extension to Azure Data Studio. Once installed, the user can either disable or uninstall it.

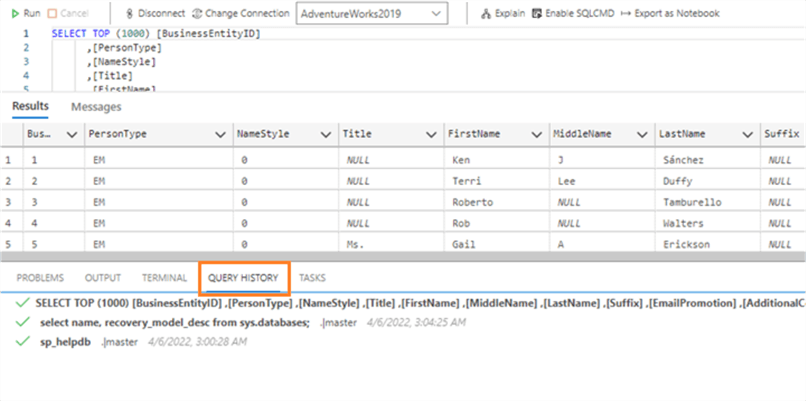
To see the query history, go to the View menu and click on Query History as shown below.

Let's connect to the SQL Server instance and test the query history extension by executing a few sample queries. The query store tab shows the query, connection information, and the timestamp at which the query was executed.

You can select any query from the query history and right-click on it to get a few options.

- Open Query: click on Open Query and it opens a new query window with the query and connection.
- Run Query: it opens and runs the query in a new query window on the existing database connection.
- Delete: if you want to remove a query from the query history, click on the delete option.
- Clear All History: if you want to reset the query history, click on Clear All History, and it clears all queries from history.
- Pause Query History Capture: suppose we want to pause capturing query history temporarily. We can click on the option – Pause Query History Capture. If you paused the capture process, you get another option – Start Query History Capture to recapture query histories.
You can also use shortcuts to clear all history, pause or resume query history capturing, maximize the query history window and close it.

Table Designer in Azure Data Studio
Developers need to create new tables in SQL databases. If you are not familiar with T-SQL, table designer in SQL Server Management Studio is useful for deploying tables with constraints, indexes, and identities. However, with the Azure SQL Database, how do we create tables.
It is helpful for developers to learn to write CREATE TABLE statements with customized objects, i.e., constraints and indexes, but Azure Data Studio provides a table designer for designing tables and viewing the T-SQL script.
Connect to a SQL instance in Azure Data Studio, expand Databases, and right-click on the Tables folder.

Click on New Table, and it opens a new window with the following sections.

- Table name: specify the table name.
- Columns: specify the required columns, their data types, length, precision, allow null or not, and the default value.
- Foreign key: if you want to create a foreign key, click on it and define the key.
- Check constraints: you can put check constraints to specify valid values for the columns.
- Indexes: you can define indexes and their properties in the indexes section.
- General: in the general section, you can define the table name and choose schema and description.
- Scripts: this shows the equivalent T-SQ script once you change the table properties, columns, and indexes.
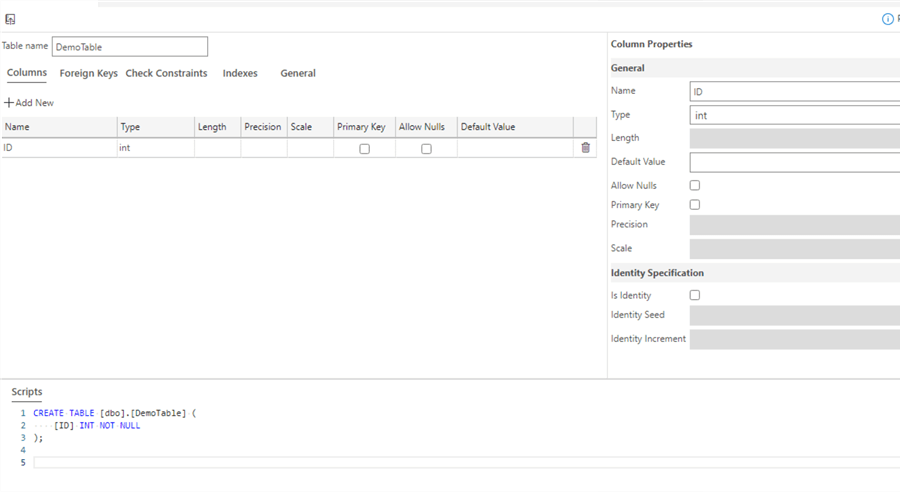
Let's define the table "DemoTable" and add a new ID column with an integer data type. Once you add the column, you can modify the column properties as below.
- Whether it is a primary key column
- Does it allow NULL values
- Is there a default value for this column
- Is the column an identity - if yes, specify the identity seed and increment

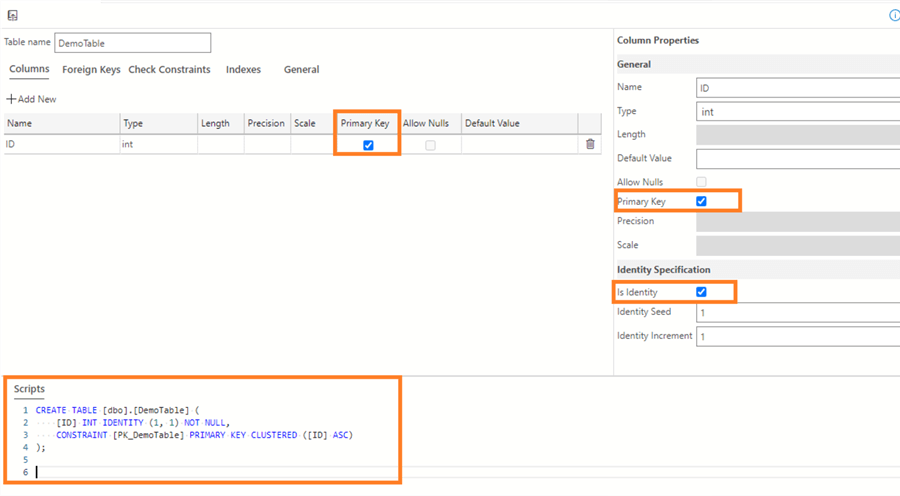
Let's add the column as a primary key and enable the identity property. As shown below, the table script shows the changes for the primary key and identity columns.

Similarly, you can add required columns and change their properties. For this demo, I added the columns [FirstName] and [LastName].

For deploying the new table in the SQL database, you can use the following ways.
- Copy the script and run it in a new query window
- Click on Publish Changes

Let's click on publish changes, and it shows the Preview Database Updates window.

You can generate the scripts from the option – Generate Script or click on Update Database to deploy it directly. It creates the new table in the designated database and shows a pop-up that the changes have been successfully published.
Refresh the tables folder in Azure Data Studio to see the new table.

If we want to make changes to the table, we can also do that in Azure Data Studio. For example, suppose I want to add a non-clustered index on the [FirstName] column. For this purpose, right-click on the table and choose Design.

It opens the table-designer window that we used earlier to create the table.

Let's go to the indexes section and add a non-clustered index on the [FirstName] column. You can enter an index name in the index properties and choose its properties as below.
- Enabled or disabled
- Is it a clustered index
- Is it a unique index
Choose the column from the drop-down and specify if it is ascending or descending. It modifies the create table script as well.

Click on publish changes, verify the change and choose Update Database.

Refresh the table and expand indexes to see that the new non-clustered index is created.

Next Steps
- Explore Azure Data Studio for retaining query history and designing tables.
- Read more SQL Server Azure tips
About the author
 Rajendra Gupta is a Consultant DBA with 14+ years of extensive experience in database administration including large critical OLAP, OLTP, Reporting and SharePoint databases.
This author pledges the content of this article is based on professional experience and not AI generated.
View all my tips
Article Last Updated: 2022-05-18


