By: John Miner | Updated: 2022-10-14 | Comments (2) | Related: > Azure Data Factory
Problem
Azure Data Factory (ADF) is a popular extract, load, and translate tool (ELT). This same engine is part of the Azure Synapse suite of tools. However, using this technology to deploy and populate a standard SQL database is not possible. Two popular ways to call Transact SQL (T-SQL) are the lookup and stored procedure activities. The lookup activity returns the result set from a given query, and the stored procedure activity only works with an existing SQL Server database.
How can we execute data manipulation language (DML), data definition language (DDL), or data control language (DCL) statements within a standard ADF pipeline?
Solution
Microsoft announced the general availability of the Script activity in March 2022. This activity supports the following data sources:
- Azure SQL Database
- Azure Synapse Analytics
- SQL Server Database
- Oracle
- Snowflake
Today, we will explore using the Script activity in a pipeline to deploy and populate the SalesLT schema for the AdventureWorks database. We will work with DDL, DCL, and DML statements during this exercise.
Business Problem
Our boss has asked us to explore the new Script activity using the AdventureWorks database deployment script as a basis. This is a good use case since we can explore the three types of language statements.
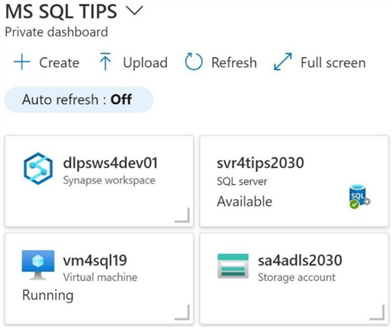
The image below shows the four key services we will use in the proof of concept. The sa4adls2030 storage account has a container named sc4adls2030 which contains the CSV files that will populate the SalesLT schema. The Azure SQL Server named svr4tips2030 is the logical server in which we will create a brand-new database. The Azure Synapse workspace called dlpsws4dev01 is where we will create the data engineering pipelines. Finally, the virtual machine labeled vm4sql19 will be used to test the results of our system.
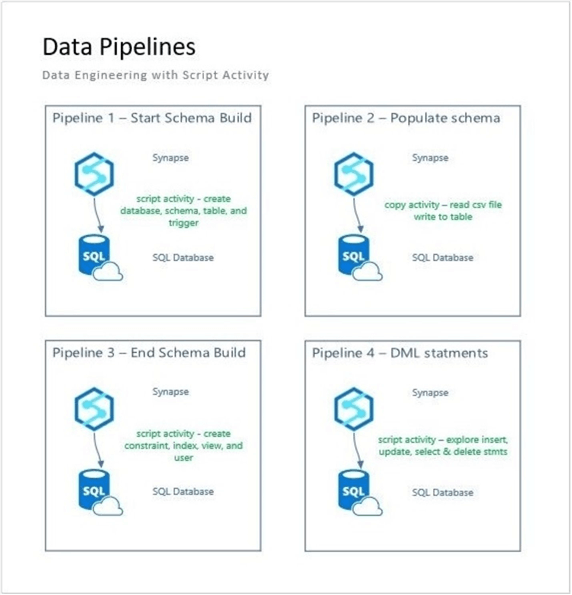
The following diagram shows the four pipelines to be built during this article. Three out of the four pipelines will be showcasing the new Script activity. The first pipeline builds a new database called mssqltips and a new schema called saleslt. The second pipeline loads the tables with data. The third pipeline finishes the database with constraints, indexes, views, and users. The fourth pipeline compares the non-query versus query option of the script activity.
Now that we have our infrastructure deployed and the logic of the pipelines defined, let's build our solution.
Data Lake Source
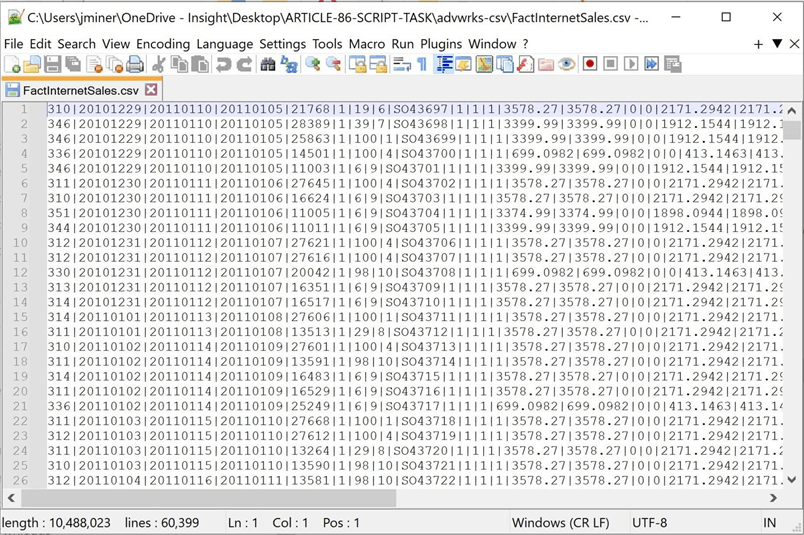
To successfully create a linked service in Azure Data Factory and Azure Synapse, we need to give the Azure service access to the data lake. The first step is to examine the files we will be working within the lake. The image below shows the file named “FactInternetSales.csv” that contains pipe delimited data. This file has been downloaded from the cloud to a local laptop.
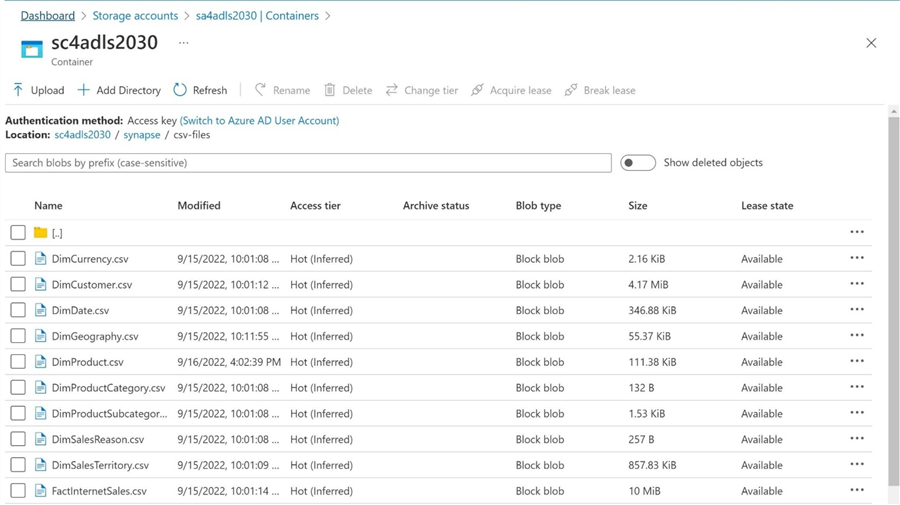
The next step is ensuring the correct number of files exist in the input directory. 11 files can be used to load the saleslt schema.
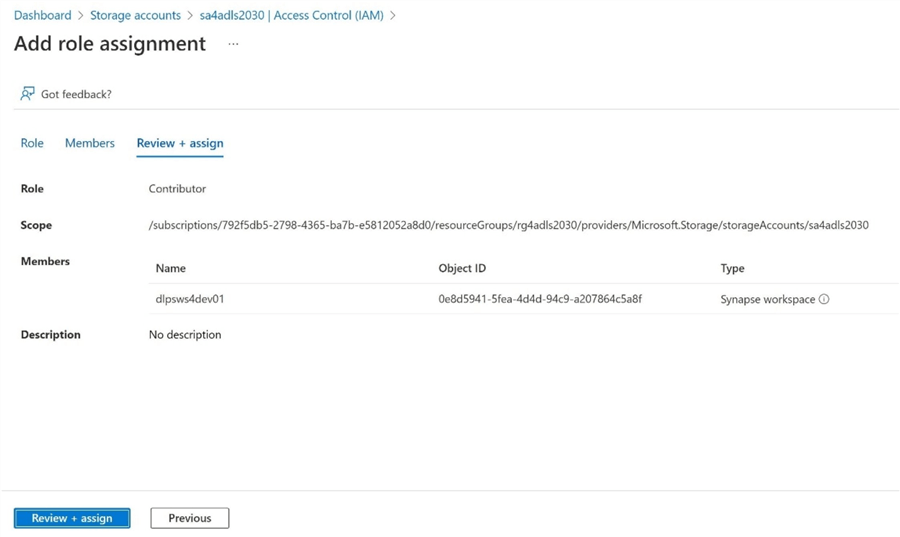
Two layers of security need to be addressed with Azure Data Lake storage. First, the managed identity (MI) of the Azure Synapse workspace needs to be given role-based access control (RBAC) rights. The image below shows that the contributor access has been given to the Azure Synapse Managed Identity.
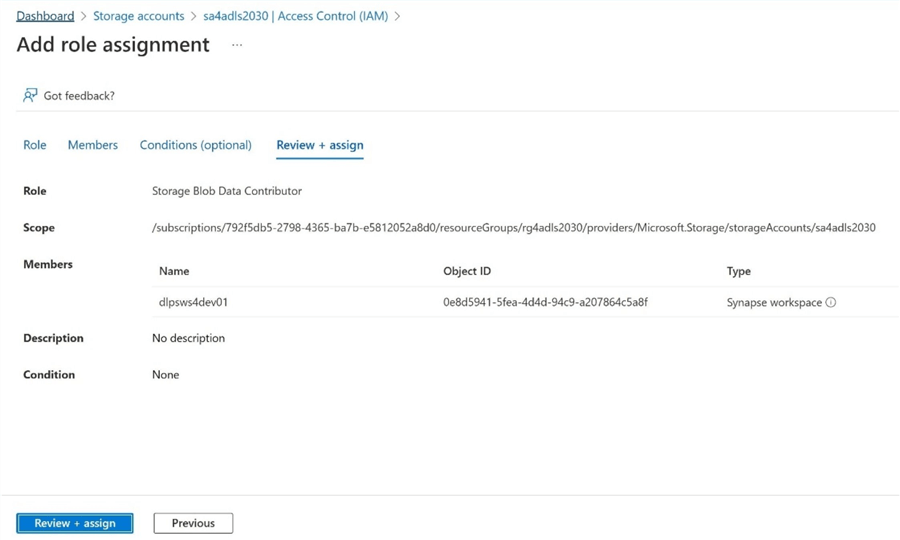
The image below shows the storage blob data contributor access has been given to the Azure Synapse MI.
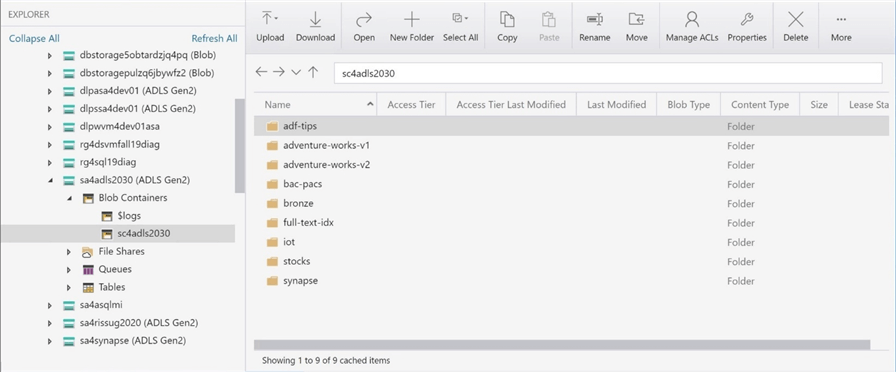
Second, the managed identity (MI) of the Azure Synapse workspace needs to be given access control list (ACL) rights. These rights are given out at the container, folder, and file levels. The image below, taken from Azure Storage Explorer, shows many different directories. However, we are only interested in the 11 files in the “\synapse\csv-files\” directory.
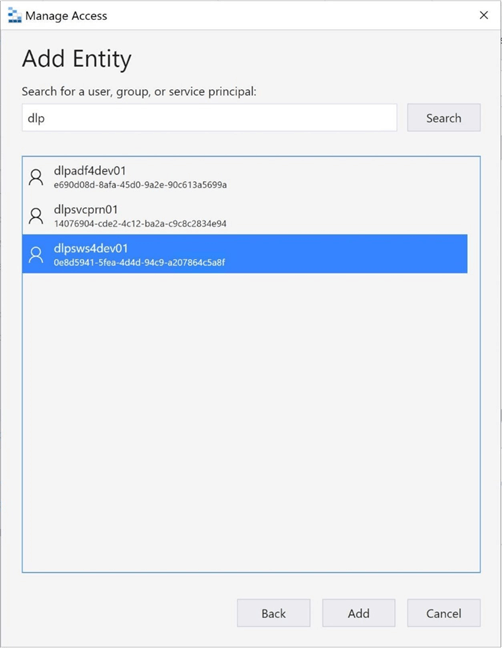
Right-click on the storage container named sc4adls2030 and choose the manage access menu item. Search for the Azure Synapse Managed Identity called dlpsws4dev01.
We want to give this MI read (r), write (w), and execute (x) rights to not only the existing directory but any new child objects.
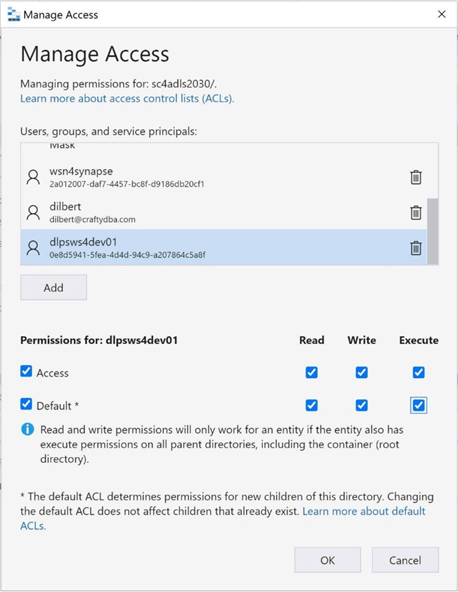
At this point, we only have access to the root container. Right-click the container and choose the propagate access control lists. This will take the security at the root container and apply it to all child objects.
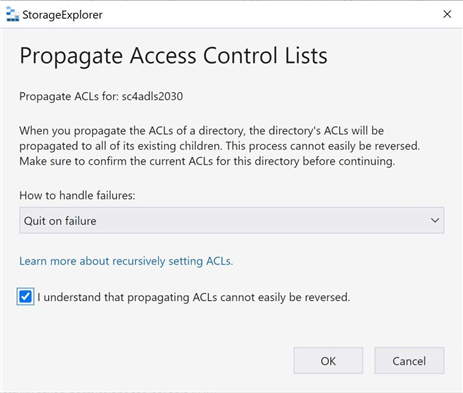
In summary, it is a best practice to use a MI since there is no need to worry about maintaining a username and password. Since this is a very common step during deployment, I will be referring to it again in the future.
SQL Database Target
We need to give Azure Data Factory and/or Azure Synapse access to the logical Azure SQL database server. First, the managed identity of the Azure Synapse Workspace will need access to the database. The easiest way to achieve this task is to add the managed identity as an Azure Active Directory admin. Since only one administrator can be defined in the portal, another way to accomplish this task is to create an external AD user for the MI in the master database and give the MI server-level rights. I leave reading up on these articles for you, the reader.
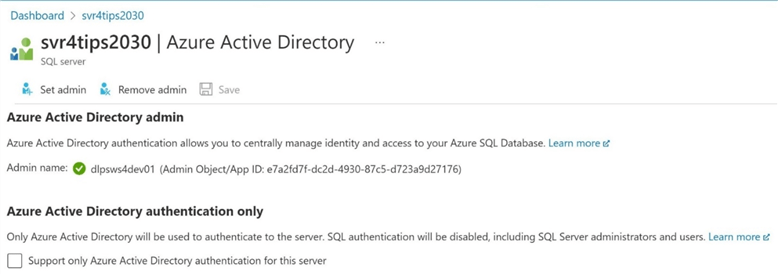
The above image assigns the active directory admin rights to the Azure Synapse MI. The below image creates two holes in the default firewall. First, we want the virtual machine to have access to connect to the database, and we want any Azure service to have the same rights.
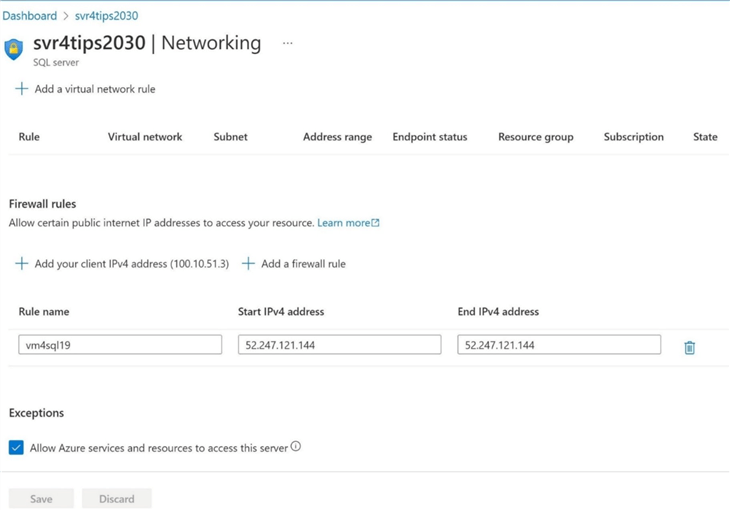
To recap, the Azure SQL database's security and networking features can be managed via the Azure portal.
Define Linked Service
Before developing a pipeline, we must define the source and target linked services and data sets. The image below shows how objects are built upon each other to provide the final pipeline solution.

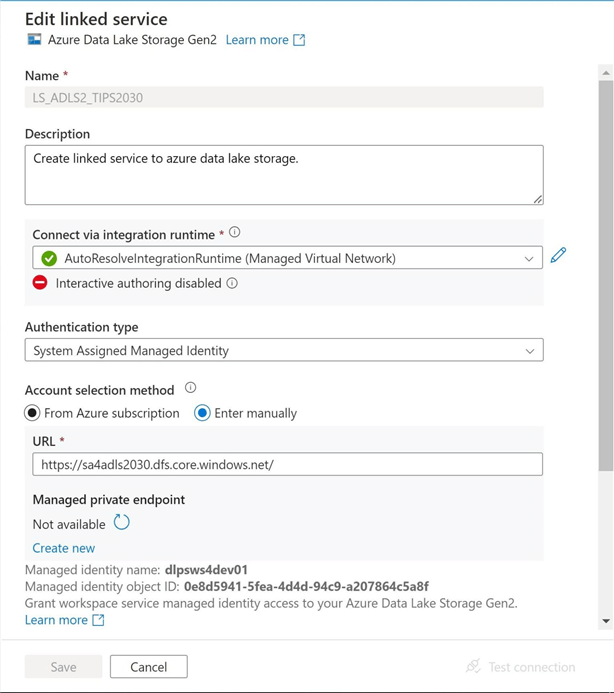
Find the menu option in Azure Synapse and/or Azure Data Factory to add a linked service. The image below shows the data lake storage. Note: In Synapse, you have to enable interactive authoring. It is not enabled by default.
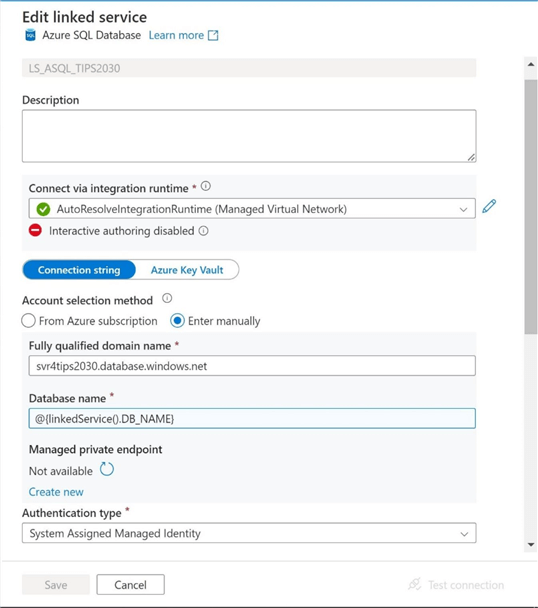
The image below shows the Azure SQL database. Since we will be working with the master and mssqltips databases, we need to parameterize this entry with a string. Use the dynamic entry feature to search for the previously defined parameter.
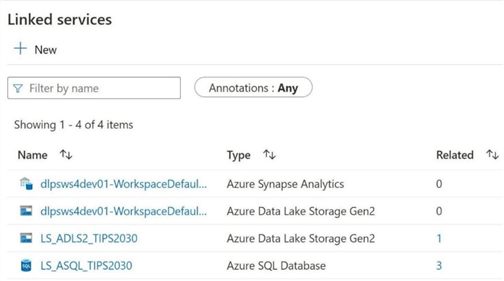
The difference with Azure Synapse is that one or two linked services might already be defined. First, data lake storage is defined if you create a modern data platform. Second, a multiple parallel processing (MPP) database can be deployed with the product.
In a nutshell, linked services are the foundation of any data pipeline.
Define Integration Datasets
We want to define a delimited data set for the Adventure Work files. While the storage container is static, we want the directory and file name entries to be parameterized. Another difference with Azure Synapse is that the menu for datasets does not show up until the first one is defined. A workaround to this fact is to create a simple pipeline with a simple source.
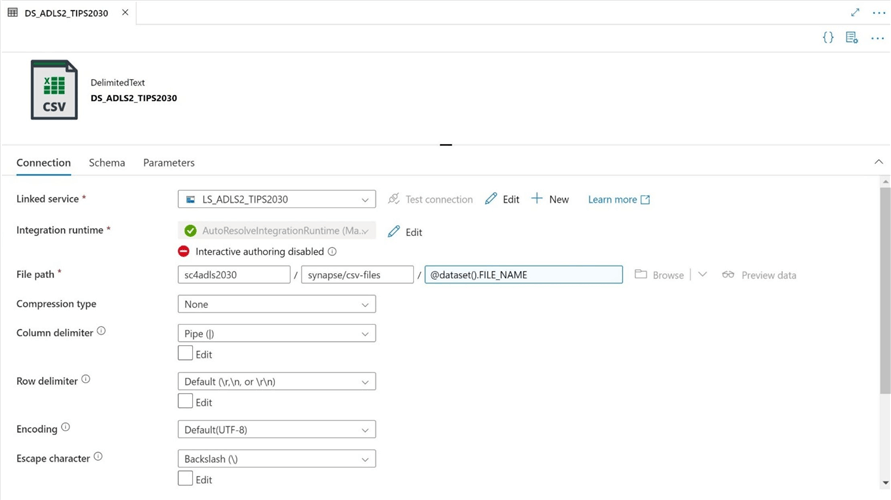
The above image shows the data set for Azure Data Lake, while the image below shows the data set for Azure SQL Database. It is a best practice to parameterize the schema and table name for flexibility.
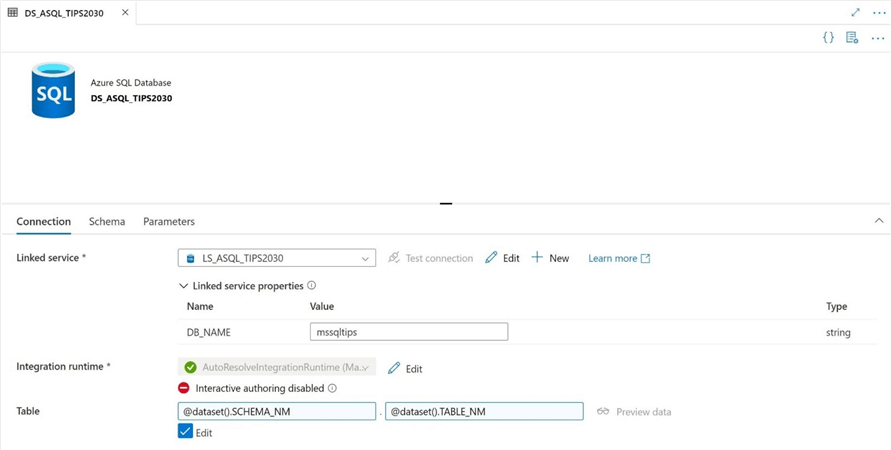
The image below shows the linked services and data sets that are defined.
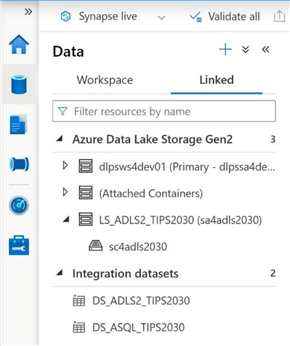
Now that we have defined both linked services and data sets and given the service access to these data sources, we can start building our pipelines.
Pipeline #1 – Start Schema Build
The image below shows the five script activities. Why use that many activities?
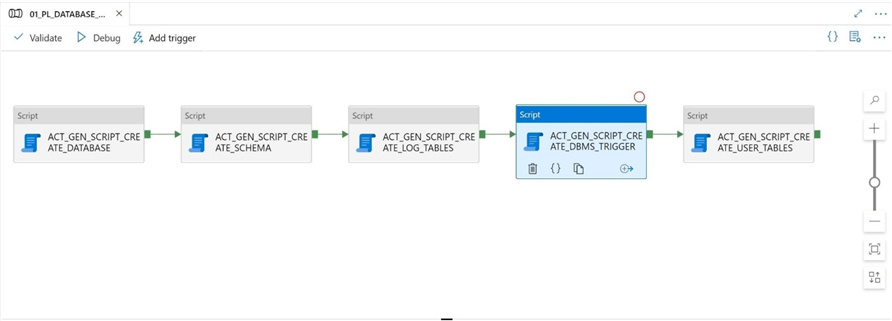
First, we need to call the create database statement from the master database. Since the Azure Synapse MI has administrator privileges, we can execute the code without any rights issues. The snippet below creates a premium database with a service level of p1.
--
-- D1 - Create database
--

DROP DATABASE IF EXISTS [mssqltips];
CREATE DATABASE [mssqltips]
(
  EDITION = 'Premium',
  SERVICE_OBJECTIVE = 'P1'
);
The image below shows the details of the first activity.
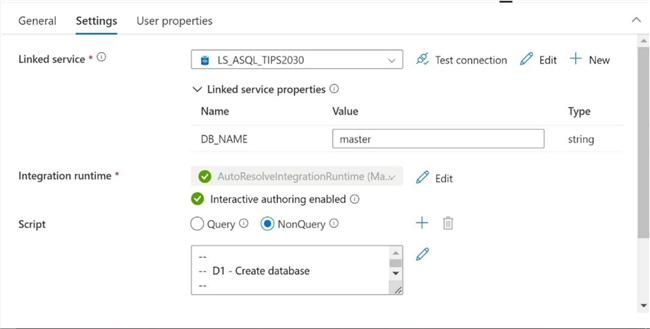
Next, we need to change the dataset connection to the mssqltips database to deploy the user-defined schema from Adventure Works. The snippet below creates the saleslt schema.
--
-- D2 - Create schema
--

CREATE SCHEMA [SalesLT] AUTHORIZATION [dbo];
The image below shows the details of the second activity.
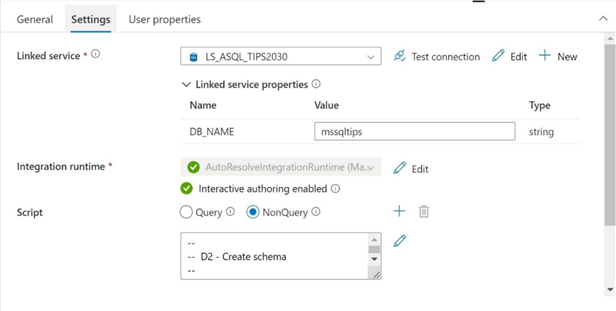
I would have broken the remaining tasks into deploy logging objects and deploy user-defined tables. However, a database trigger has to be the first statement in a given script. A workaround could have been dynamic T-SQL code. But, I am trying to keep this demo extremely simple. Thus, there are two script activities instead of one. The code below deploys the logging tables.
--
-- S1 - Create logging table
--

CREATE TABLE [dbo].[DatabaseLog](
    [DatabaseLogID] [int] IDENTITY (1, 1) NOT NULL,
    [PostTime] [datetime] NOT NULL,
    [DatabaseUser] [sysname] NOT NULL,
    [Event] [sysname] NOT NULL,
    [Schema] [sysname] NULL,
    [Object] [sysname] NULL,
    [TSQL] [nvarchar](max) NOT NULL,
    [XmlEvent] [xml] NOT NULL
);


--
-- S2 - Create build version table
--

CREATE TABLE [dbo].[BuildVersion](
   [Version] [nvarchar](50) NULL,
   [Description] [nvarchar](150) NULL,
   [VersionDate] [datetime] NULL
);
One last T-SQL code block to review before displaying the results of executing the pipeline.
--
-- TR1 - Create logging trigger
--

CREATE TRIGGER [trgDatabaseLog] ON DATABASE
FOR DDL_DATABASE_LEVEL_EVENTS AS
BEGIN
SET NOCOUNT ON;

DECLARE @data XML;
DECLARE @schema sysname;
DECLARE @object sysname;
DECLARE @eventType sysname;

SET @data = EVENTDATA();
SET @eventType = @data.value('(/EVENT_INSTANCE/EventType)[1]', 'sysname');
SET @schema = @data.value('(/EVENT_INSTANCE/SchemaName)[1]', 'sysname');
SET @object = @data.value('(/EVENT_INSTANCE/ObjectName)[1]', 'sysname')

IF @object IS NOT NULL
    PRINT '  ' + @eventType + ' - ' + @schema + '.' + @object;
ELSE
    PRINT '  ' + @eventType + ' - ' + @schema;

IF @eventType IS NULL
    PRINT CONVERT(nvarchar(max), @data);

INSERT [dbo].[DatabaseLog]
    (
    [PostTime],
    [DatabaseUser],
    [Event],
    [Schema],
    [Object],
    [TSQL],
    [XmlEvent]
    )
VALUES
    (
    GETDATE(),
    CONVERT(sysname, CURRENT_USER),
    @eventType,
    CONVERT(sysname, @schema),
    CONVERT(sysname, @object),
    @data.value('(/EVENT_INSTANCE/TSQLCommand)[1]', 'nvarchar(max)'),
    @data
    );
END;
So far, we have coded for the following data definition language statements: create database, create schema, create table, and create database trigger. I will enclose the final T-SQL script at the end of the article. The fifth pipeline creates all user-defined tables in the SalesLT schema.
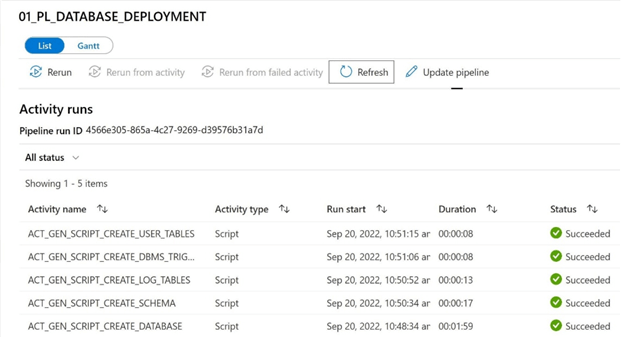
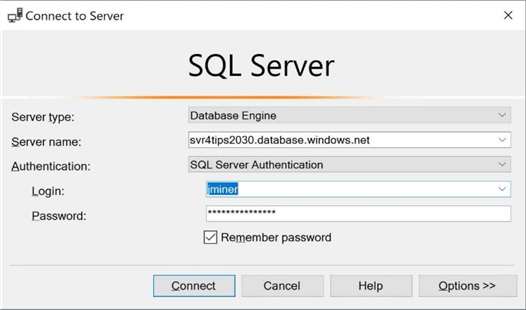
The above image shows the successful execution of the pipeline via a manual trigger. I am using standard SQL Server security authentication, with the admin account named jminer, to log into the Azure SQL Server database.
The image below shows the objects (schema) deployed with the first pipeline.
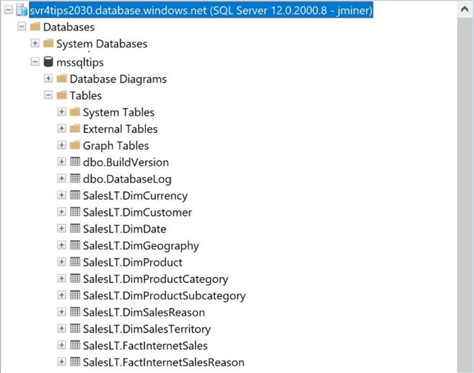
The cool thing about the database trigger is that it logs both the T-SQL and XML events captured after we deployed the trigger. Thus, any DML events are captured in the DatabaseLog table.
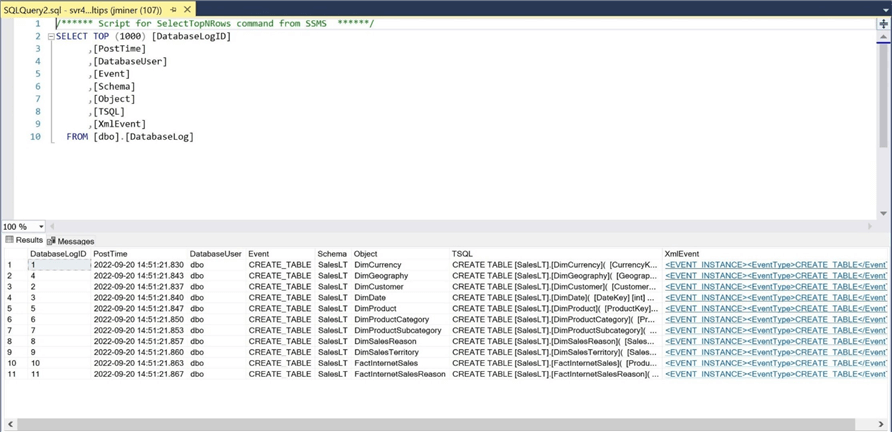
Now that we have the schema deployed without any constraints that will cause loading issues, we will design the second pipeline to load the tables with data from the data lake.
Pipeline #2 – Populate Schema
The SalesLT schema in the AdventureWorks database has 11 separate tables. Therefore, we need one copy activity per each pipe-delimited file. The image below shows how I decided to schedule the activities to run. Logically, there are two work streams. The precedence constraint ensures the prior copy activity completes successfully before the next one is started.
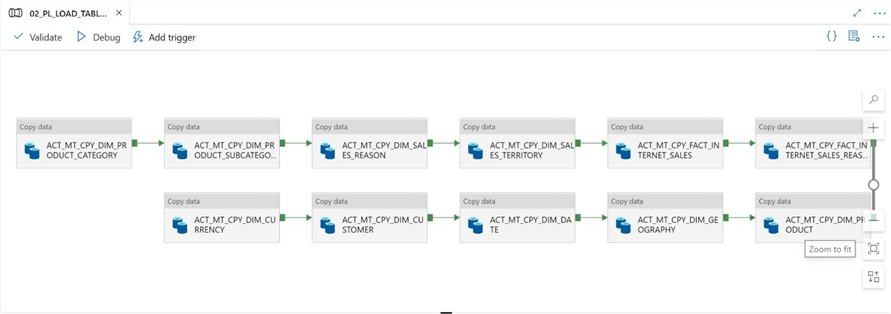
Why does it matter how the copy activity is scheduled? It boils down to controlled versus uncontrolled parallelism. If I created all the copy activities, all 11 activities would try to run in parallel. That might work fine for Azure Data Factory with a scalable framework, but how about SPARK, which might have a fixed cluster size? When designing pipelines consider how the activities will execute.
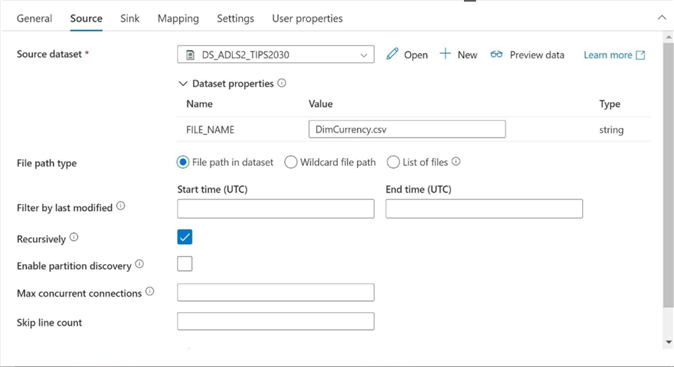
Let's look at the details of the copy activity. The image below shows the source definition. For each copy, we need to supply the FILE_NAME as a parameter. In this proof of concept, all delimited files reside in the same directory.
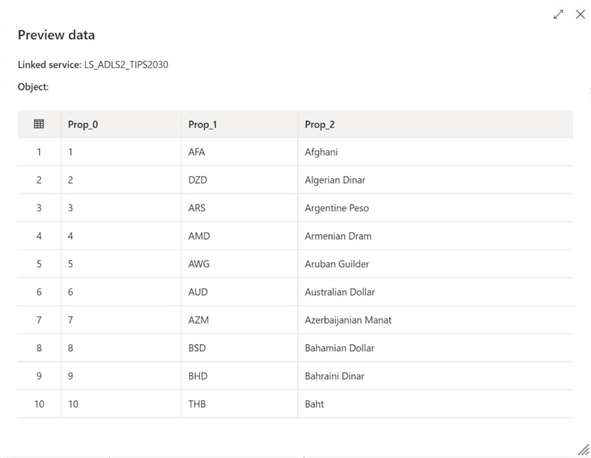
It is always best practice to preview the data. With Synapse, we need to have interactive authoring enabled. The image below shows the data from the currency data file. Note: The data does not have column headings.
The destination (sink) requires two parameters—one for the schema name and one for the table name. The default behavior is to use an insert action. If we run this copy command multiple times, we will duplicate data. Make sure to add a TRUNCATE TABLE statement as a pre-copy script.
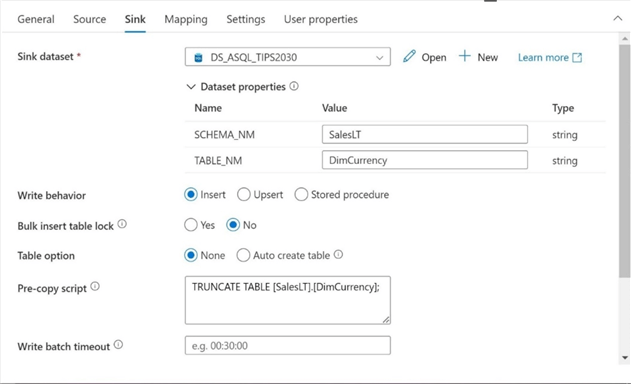
Also, make sure to clear and import the schema to generate an automated mapping from the generic column headings to the named columns in the SQL Database table.

The above image shows the mapping automatically defined by the “import schemas” action. The image below shows the 105 different currencies defined in the table.
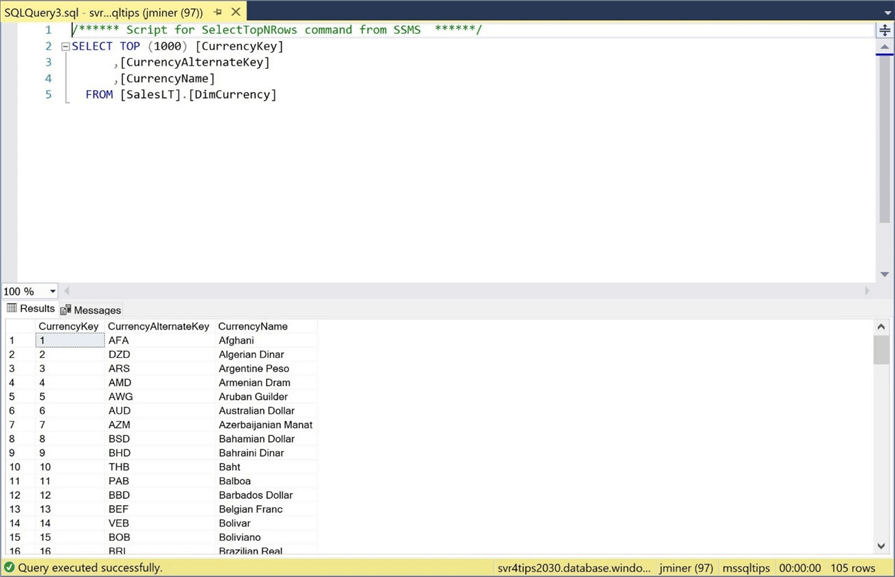
If you are manually following along with this article, the next 10 tables can be defined using this technique. Just change the source file name and destination table name.
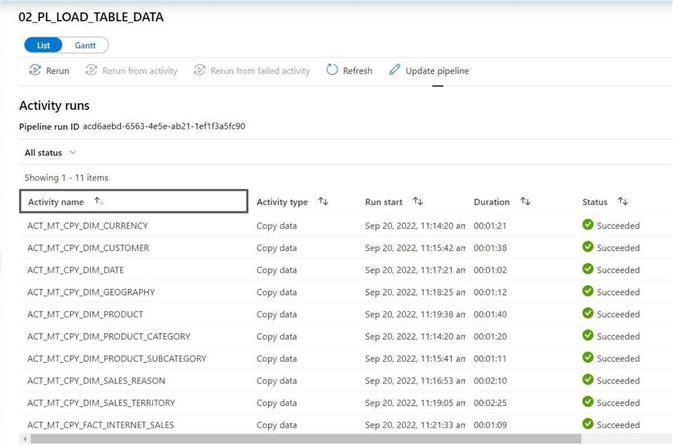
Last but not least, trigger the second pipeline to complete the loading of the tables with data.
Pipeline #3 – End Schema Build
The image below shows the execution of a pipeline that creates primary keys, indexes, foreign keys, reporting view, and contained database user. Again, please see the bottom of the article for the complete T-SQL code and Synapse pipelines. I am going to focus on the database user. Can they see the view that is published as well as the schema?
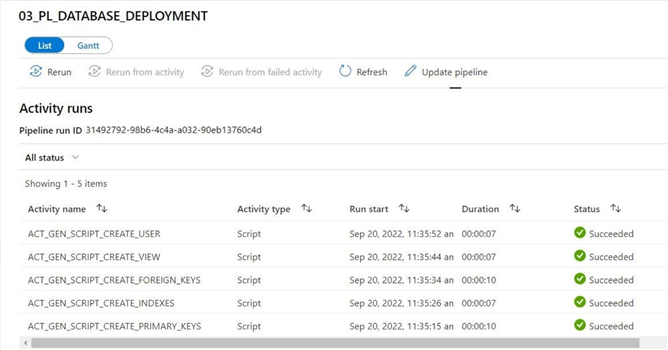
I created a user account after a famous person in this field. Donald Ervin Knuth is an American computer scientist, mathematician, and professor emeritus at Stanford University. He presented in 1974 the ACM Turing Award, informally considered the Nobel Prize in computer science. Knuth has been called the "father of the analysis of algorithms".
--
-- U01 - Create contained user
--

CREATE USER [DonaldKnuth] WITH PASSWORD = 'atDaMRmTdG6yjDuc';
GO

--
-- U02 - Give read rights
--

ALTER ROLE db_datareader ADD MEMBER [DonaldKnuth];
GO
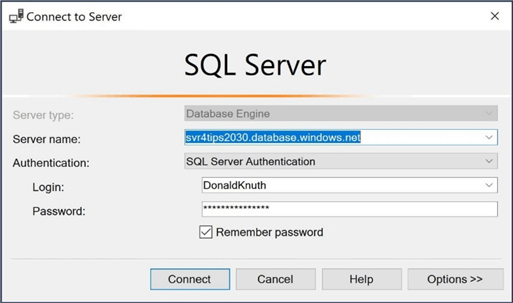
Now that we have executed the DCL code, we can log in and inspect the final database. The image shows a log into the database server. Since this is a contained user, choose the database under options as mssqltips as the default.
One question might be, “How many user-defined objects (schema) were deployed to the Azure SQL database?”
--
-- DML01 - Select from view
--

select
  type_desc as object_type,
  COUNT(*) as object_count
from
  sys.objects
where
  is_ms_shipped = 0
group by
  type_desc;
The answer is 42 objects. If you have read the hitch hikers guide to the galaxy, you will know this is the answer to all things!

There is a report view that was defined. It combines a bunch of tables into a final view. The query below tells us what bikes were sold in 2010. Since the company was one month old at that time, the number of rows was limited.
--
-- DML01 - Select from view
--

SELECT
  CalendarYear as RptYear,
  Month as RptMonth,
  Region as RptRegion,
  Model as ModelNo,
  SUM(Quantity) as TotalQty,
  SUM(Amount) as TotalAmt
FROM
  [saleslt].RptPreparedData
WHERE
  CalendarYear = 2010
GROUP BY
  CalendarYear,
  Month,
  Region,
  Model
ORDER BY
  CalendarYear,
  Month,
  Region;
Another lucky number comes up when we look at the query's output. The number 7 is very lucky when playing slot machines at a casino.

Many ETL processes drop indexes before loading data and re-create them at the end of the process. These pipelines have used the same practice to avoid precedence issues that might arise when constraints are involved.
Pipeline #4 – DML Statements
This article has been using the script activity with the non-query option. What happens when we use the query option? We will be reviewing the four statements that are lovingly called CRUD.
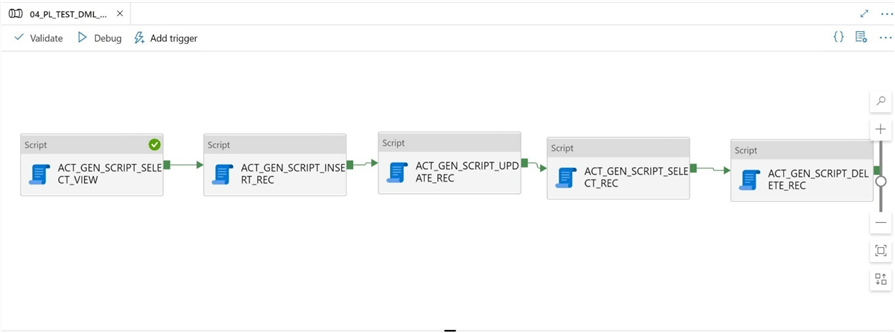
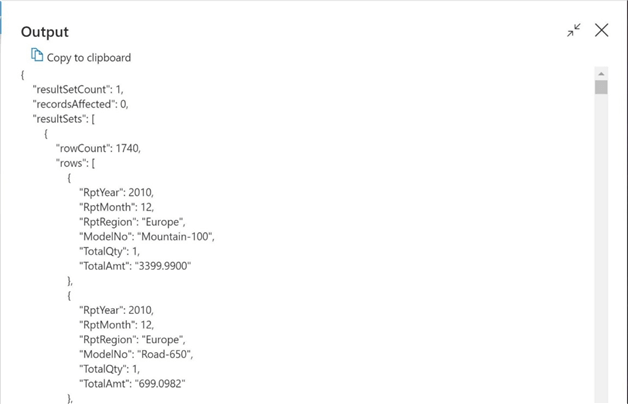
The SELECT statement can return actual rows of data from the table within the JSON output object. However, one has to be careful using this fact. There is a size limit of 5,000 rows or 2 MB of data. The first statement pulls data from the view with no WHERE criteria. That means there should be 60,398 rows. However, only 1,740 rows of data are returned. Note: Multiple record sets (MARS) can be returned in the output.
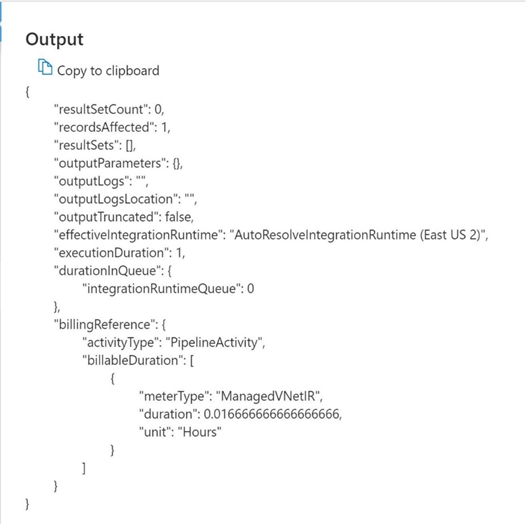
What does the acronym CRUD stand for? It stands for Create (insert), Read (select), Update, and Delete. Every statement except for the SELECT statement only returns the number of rows affected. I did not try the OUTPUT clause, which returns rows from the other three statements. Additionally, the MERGE statement can execute a physical INSERT, UPDATE or DELETE operation during execution. I suggest you try these niche cases yourself.
--
-- DML01 - Insert data
--

INSERT INTO [dbo].[BuildVersion]
VALUES
(
  '01.01',
  'Script Activity - test database example',
  getdate()
);

--
-- DML03 - Update data
--

UPDATE B SET B.VERSION = '01.02' FROM [dbo].[BuildVersion] B;


--
-- DML04 - Delete data
--

DELETE  FROM [dbo].[BuildVersion] WHERE [VERSION] = '01.02' ;
Use the output from the triggered run of the final pipeline to inspect the return JSON. We can see that one row is affected by any of these statements.
--
-- DML02 - Select data
--

SELECT * FROM [dbo].[BuildVersion];
The above T-SQL script selects from the Build Version table, which contains one row of data. Since this data is very small, no truncation occurs.
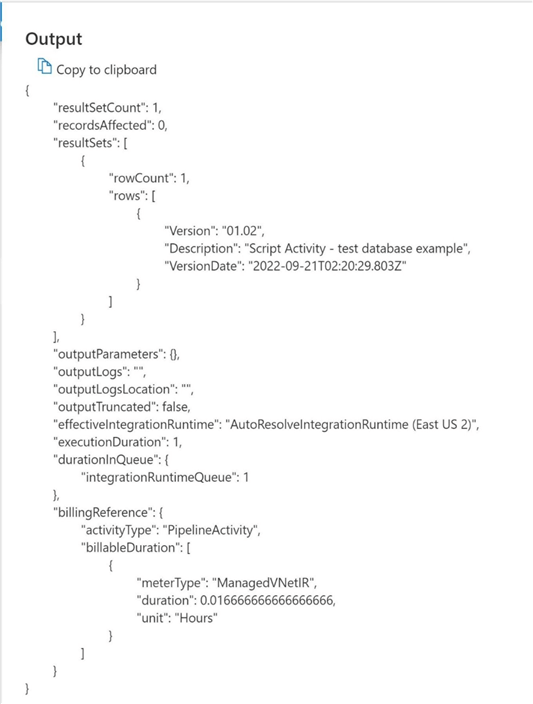
In a nutshell, use the query option of the script activity if you want to have a small result returned to the pipelines. Use this feature cautiously since large result sets will be truncated without warning.
Summary
The introduction of the script task last March has opened many doors that have been previously closed. We can now execute DDL, DCL, and DML statements against the database engine.
The great thing about this task is that it supports many RDBMS vendors, including Snowflake. I can see the use of this statement to create dynamic external stages for Snowflake. Then importing data into tables using these defined external stages. Or we can create external data sources, external file formats, and external tables within an Azure Synapse Database. I have not tried this yet, but I am pretty sure this will work with even Azure Synapse Serverless pools.
Before the introduction of the script task, we were limited to the lookup task that performed small lookups or the stored procedure task that worked with only SQL Server databases. Now, we have a script task that will execute various SQL statements against multiple databases. This new task has opened up possibilities for the data pipeline designer.
As promised, here is the T-SQL used with the Azure SQL database and the JSON from the Azure Synapse Pipelines that were saved in an Azure DevOps repository.
Next Steps
- More Azure Data Factory articles
- More Azure Synapse Analytics articles
About the author
 John Miner is a Data Architect at Insight Digital Innovation helping corporations solve their business needs with various data platform solutions.
This author pledges the content of this article is based on professional experience and not AI generated.
View all my tips
Article Last Updated: 2022-10-14


