By: Aubrey Love | Updated: 2022-11-07 | Comments (9) | Related: 1 | 2 | 3 | 4 | 5 | 6 | > Triggers
Problem
As a new DBA, I am tasked with logging all changes to a table, who changed a particular row of data on a table, and when they made those changes in the Microsoft SQL Server DBMS. How can I do this in a simple but effective way? I think I can use a trigger, but I'm unsure how to create one.
Solution
In this article, we will show, by example, how to track changes made to a table by a user. We will create a simple test table to hold some sample data. Next, we will create a second (log) table to store the actions taken on that test table using a simple DML trigger. Afterward, we will create three basic triggers in T-SQL code: INSERT, UPDATE, and DELETE. Then we will roll those three triggers into one trigger. Later, we will look at an INSTEAD OF trigger and explain how it works and why you should or should not use them. We will wrap it up by looking at the differences between the BEFORE and AFTER clauses provided by SQL Server. First, let's cover some of the basics of a trigger and the types (classes) of triggers available in SQL Server.
What is a SQL Trigger?
A SQL Server Trigger is a block of procedural code executed when a specified event occurs with which the trigger is associated.
The most common triggers are DML triggers that log events, such as when a user INSERTS, UPDATES, or DELETES a row in a table which is issued in a SQL query or stored procedure. SQL triggers can also be used to log (insert into a log table) when a user connects to a database. SQL triggers can also record when a user or event modifies a table and more.
Triggers can be nested—that is to say, you can create a trigger on Table A that updates Table B, and Table B could have a trigger that updates Table C. The maximum number of nested trigger executions is 32.
SQL Server Trigger Points of Interest:
- Triggers cannot be manually executed.
- Triggers cannot contain or receive parameters.
- You cannot use commit or rollback inside a trigger.
- The triggers schema must be the same as the schema of the table or view associated with the trigger.
It is important to note that all triggers on a table will be deleted when the table itself is deleted. If you are trying to delete and rebuild a table, you will also need to rebuild any triggers on that table.
Classes of Triggers in SQL Server
There are three types or classes of triggers in SQL Server, DML, DDL, and Logon triggers:
- DML (Data Manipulation Language) Triggers – Fire when an INSERT, UPDATE, or DELETE event occurs on a table, view, etc.
- DDL (Data Definition Language) Triggers – Fire when a CREATE, ALTER, or DROP event occurs on a database object.
- Logon Triggers – Fire when a user logs into a database i.e. logon event.
This article will focus on the most common of the three types of triggers: DML triggers.
SQL Server supports three types of DML triggers:
- BEFORE Triggers – This type of trigger fires before the data has been committed into the database.
- AFTER Triggers – This type of trigger fires after the event it is associated with completes and can only be defined on permanent tables.
- INSTEAD OF Triggers – This type of trigger fires instead of the event it is associated with and can be applied to tables or views.
INSERTED and DELETED Table Reference
DML triggers use two temporary tables created automatically by SQL Server named "INSERTED" and "DELETED". It's a good idea NOT to use one of these names when creating tables for your use. These tables contain the data (rows) that were affected by the modification that caused the trigger to fire.
The temporary table INSERTED holds the new data of the affected rows when an INSERT or UPDATE statement has been executed.
The temporary table DELETED holds the old data of the affected rows when an UPDATE or DELETED statement has been executed. See the chart below for a visual comparison.
| INSERTED Table | DELETED Table |
|---|---|
| Holds the new values to be inserted during INSERT or UPDATE event. | Holds a copy of DELETED (old) data during a DELETE or UPDATE event. |
| No records from DELETE statements. | No records from INSERT statements. |
Basic Syntax for a DML Trigger
CREATE TRIGGER [schema_name.]trigger_name -- Create Trigger Statement
ON { table_name | view_name }
{ FOR | AFTER | INSTEAD OF } {[INSERT],[UPDATE],[DELETE]}
[NOT FOR REPLICATION]
AS
    {sql_statements}
Here is a breakdown of the syntax in the code block above.
- CREATE TRIGGER – The SQL command to start creating a SQL Trigger.
- Schema_name – (Optional) Name of the SQL schema the trigger will be created in. If left blank, SQL will, by default, assign it to the "dbo" schema.
- Trigger_name – The name we provide for the new trigger. Make this descriptive of what the trigger does.
- ON table_name or view_name – Specifies which table or view the trigger will be created.
- FOR AFTER
or INSTEAD OF
INSERT UPDATE or DELETE
- The AFTER and INSTEAD OF are optional, but the INSERT, UPDATE, or DELETE are mandatory.
- The AFTER clause means that the trigger will only fire after the SQL query that fires the trigger completes successfully.
- The INSTEAD OF skips the INSERT, UPDATE, or DELETE statements to a table and executes other statements defined in the trigger. Note: The INSTEAD OF clause cannot be used on DDL triggers, only DML triggers.
- NOT FOR REPLICATION –Instructs SQL Server not to run the trigger when a replication agent modifies the table. However, the NOT FOR REPLICATION clause is not needed on single standalone database servers or servers that are part of an Availability Group.
Creating Your First Trigger
This article will cover a simple DML trigger in four steps. We will create two simple tables followed by an INSERT trigger, an UPDATE trigger, and a DELETE trigger. Afterward, we roll them all into one cohesive trigger.
Our first step is to build a sample "data" table to work with, along with a sample "log" table. We will use those tables to create our triggers against and test them. Note: Try this on your test environment, NOT your production environment in SQL Server Management Studio.
Create the Employee Table
CREATE TABLE Employee
(
    EmployeeID int NOT NULL,
    FirstName nvarchar(50) NOT NULL,
    LastName nvarchar(50) NOT NULL,
    HireDate date,
);
Create the Log Table
The Log table should contain one or more columns from the primary table. In this case, there is the Employee table and some additional columns. In our sample Log table, we will also capture the current date and time (UpdatedOn column) along with the user that made the changes to the Employee table (UpdatedBy column).
CREATE TABLE EmpLog (
   logID INT IDENTITY(1,1) NOT NULL
   , EmployeeID INT NOT NULL
   , FirstName NVARCHAR(50) NOT NULL
   , LastName NVARCHAR(50) NOT NULL
   , HireDate date NOT NULL
   , Operation NVARCHAR(50)
   , UpdatedOn DATETIME
   , UpdatedBy NVARCHAR(50)
   );
GO
The INSERT Trigger
Now that we have our two sample tables to work with, let's create a simple INSERT trigger to capture any INSERT actions that a user might apply to the Employee table. Notice, in our "FROM" statement, we are getting the data for our EmpLog table from the SQL Server temporary table "INSERTED," as we discussed earlier.
We are also adding a string value ‘INSERT' along with the current date and time via the "GETDATE()" function and the current user with the "SUSER_NAME()" function in the "SELECT" command.
CREATE TRIGGER trgEmployeeInsert
ON Employee
FOR INSERT
AS
   INSERT INTO EmpLog(EmployeeID, FirstName, LastName, HireDate, Operation, UpdatedOn, UpdatedBy)
   SELECT EmployeeID, Firstname, LastName, HireDate, 'INSERT', GETDATE(), SUSER_NAME()
   FROM INSERTED;
GO
Now that we have our two tables and trigger created on our "Employee" table, let's insert data into our "Employee" table and see the results when we query the "EmpLog" table.
INSERT INTO Employee
VALUES(101, 'Neena','Kochhar','05-12-2018'),
(112, 'John','King','01-01-2015');
GO
A simple query on the "EmpLog" table will show who updated the "Employee" table, what time they did so, and what action was taken.
SELECT *
FROM EmpLog
ORDER BY EmployeeID;
GO
Results:

The DELETE Trigger
Now that we understand how to create a basic INSERT trigger, let's apply the same logic to create a DELETE trigger. The similarities of these two triggers are so close that it allows us to simply copy/paste the INSERT trigger and give the delete trigger a distinctive name. We will replace the instances of INSERT or INSERTED with DELETE and DELETED, respectively. Those are the only changes that need to be applied.
Note: With the DELETE trigger, we will pull values from the SQL temporary table "DELETED" instead of the SQL temporary table "INSERTED". You can reference "Table 1" to refresh your memory on what is stored in which SQL temporary table.
Before we create the DELETE trigger, let's populate our Employee table with a few more entries.
INSERT INTO Employee
VALUES (203, 'Catherine','Abel','07-21-2010'),
(411, 'Sam','Abolrous','03-12-2016');
GO
The Employee table should look like this:
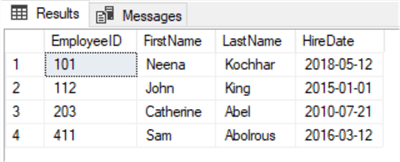
And the Employee log table should look like this:

As mentioned earlier, creating the DELETE trigger involves copying/pasting and changing the values from insert to delete.
CREATE TRIGGER trgEmployeeDelete
ON Employee
FOR DELETE
AS
   INSERT INTO EmpLog(EmployeeID, FirstName, LastName, HireDate, Operation, UpdatedOn, UpdatedBy)
   SELECT EmployeeID, Firstname, LastName, HireDate, 'DELETED', GETDATE(), SUSER_NAME()
   FROM DELETED;
GO
Now that we have created our INSERTED and DELETED triggers, let's test the delete operation with this SQL query.
DELETE
FROM Employee
WHERE EmployeeID = 203;
GO
Let's run a query for the Employee table and the EmpLog table to see our results.
SELECT *
FROM Employee;
GO
SELECT *
FROM EmpLog;
GO
Results:
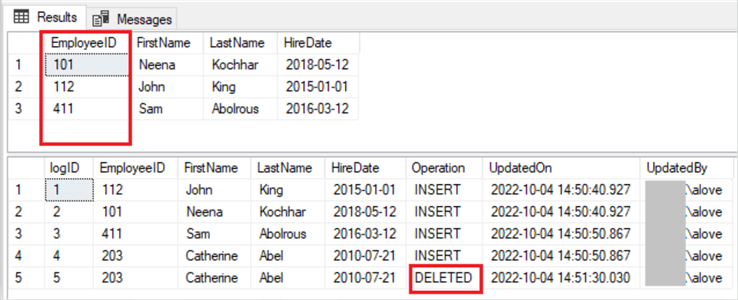
Notice that we are now missing Employee number 203 (Catherine Abel) from the Employee table, and we have a new row marked as DELETED in the EmpLog table.
The UPDATE Trigger
This section will create an UPDATE trigger as we did with the INSERT and DELETE triggers from above. Again, the only difference between the three triggers, besides the trigger's name, is that we are replacing INSERT with UPDATE. Aside from those changes, the triggers will be identical.
Remember: The updated values can be pulled from the INSERTED or DELETED temporary tables created by SQL Server. You can call either one in the example below.
Still working with our current tables, let's do another copy/paste to create our update trigger.
CREATE TRIGGER trgEmployeeUpdate
ON Employee
FOR UPDATE
AS
   INSERT INTO EmpLog(EmployeeID, FirstName, LastName, HireDate, Operation, UpdatedOn, UpdatedBy)
   SELECT EmployeeID, Firstname, LastName, HireDate, 'UPDATE', GETDATE(), SUSER_NAME()
   FROM INSERTED;
GO
Next, we just need to call an update on our table to see the changes. Let's assume that Neena Kochhar just got married and needs to change her last name to Adams.
UPDATE Employee
SET LastName = 'Adams'
WHERE EmployeeID = 101;
GO
Now, let's query both tables again to see the new results.
SELECT * FROM Employee;
GO
SELECT * FROM EmpLog;
GO
Results:
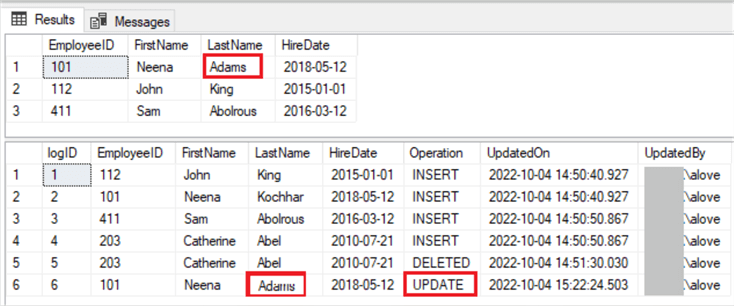
This time, the "Operation" column has UPDATE, and her new name appears in the Employee table and the EmpLog table in the most recent entry. However, there was no change to the first "INSERT" entry in the Emplog table, as seen on line 2 in the EmpLog table. The UPDATE statement only changes items (values) in the Employee table, not the log.
INSERT, UPDATE, DELETE Trigger
This section will put all three trigger options (INSERT, UPDATE, and DELETE) into one trigger. Some may argue this is a good idea, while others contend it's not a good option. I'll explain that in the following two paragraphs, and you can decide which option is best for you.
Putting all three clauses (INSERT, UPDATE, and DELETE) into one trigger means fewer triggers in your database.
Separating them into three different triggers means that if one fails, the other two should complete successfully. With this, you still have some record of what action was taken.
In the sample script below, we will combine all three triggers, INSERT, UPDATE, and DELETE, into one. For this example, we will need to use the BEGIN and END statements to create a break between one clause and the other. Notice that we are still getting data from the INSERTED and DELETED temporary tables we discussed earlier.
Sample trigger to combine INSERT, UPDATE, and DELETE into one trigger.
CREATE TRIGGER trgEmployeeAudit ON dbo.Employee
FOR INSERT, UPDATE, DELETE
AS
IF EXISTS ( SELECT 0 FROM Deleted )
BEGIN
   IF EXISTS ( SELECT 0 FROM Inserted )
   BEGIN
      INSERT  INTO dbo.EmpLog
      ( EmployeeID,
      FirstName,
      LastName,
      HireDate,
      Operation,
      UpdatedOn,
      UpdatedBy
      )
      SELECT  u.EmployeeID ,
      u.FirstName,
      u.LastName ,
      u.HireDate ,
      'Updated',
      GETDATE() ,
      SUSER_NAME()
      FROM deleted as u
   END
ELSE
   BEGIN
      INSERT  INTO dbo.EmpLog
      ( EmployeeID ,
      FirstName,
      LastName,
      HireDate,
      Operation,
      UpdatedOn,
      UpdatedBy
      )
      SELECT  d.EmployeeID ,
      d.FirstName ,
      d.LastName ,
      d.HireDate ,
      'Deleted',
      GETDATE() ,
      SUSER_NAME()
      FROM deleted as d
   END
   END
ELSE
   BEGIN
      INSERT  INTO dbo.EmpLog
      ( EmployeeID ,
      FirstName,
      LastName,
      HireDate,
      Operation,
      UpdatedOn,
      UpdatedBy
      )
      SELECT  i.EmployeeID ,
      i.FirstName ,
      i.LastName ,
      i.HireDate ,
      'Inserted',
      GETDATE() ,
      SUSER_NAME()
      FROM inserted as i
   END
GO
The INSTEAD OF Clause
Okay, we have learned how to use the INSERT, DELETE, and UPDATE trigger functions, but each required creating a separate table to hold the modified data. What if I don't have or can't create a separate table?
The INSTEAD OF trigger allows us to modify the table in a way that appears to INSERT, DELETE, or UPDATE values in a table when in fact, those actions are diverted, and another action takes place instead.
In this section, we are going to do the following steps:
- Create a new table, HREmployee. So we will have a clean slate to work with.
- Populate the table with generic data.
- Create an INSTEAD OF trigger on the table.
- Create a view for users to access.
- Attempt to delete one row.
- Query the HREmployee table as an administrator.
- Query the view as an end user.
Create a new table:
CREATE TABLE HREmployees(
   EmployeeID INT
   , FirstName VARCHAR(20)
   , LastName VARCHAR(20)
   , isActive BIT
   );
GO
Add some data to the table.
INSERT INTO HREmployees(EmployeeID, FirstName, LastName, isActive)
VALUES (111, 'John', 'King', 1)
, (112, 'Sam', 'Smith', 1);
GO
Query the table to verify the entries.
SELECT *
FROM HREmployees;
GO
Results:

Now, let's create a view for the users to access instead of the table itself. In this view, we will not allow them to see the "isActive" column and only allow them to see rows whose "isActive" value is 1.
CREATE VIEW vHREmployees
AS
SELECT
   EmployeeID
   , FirstName
   , LastName
FROM HREmployees
WHERE isActive = 1;
GO
When we run a query against the view, we get the following results:
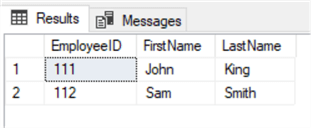
Now, let's create the INSTEAD OF trigger on our HREmployees table. We do not allow a user to delete any rows in this trigger. Instead, we will change the "isActive" value from 1 to 0 (zero). Remember, our view (what the user sees) does not have the "isActive" column, and it will only return rows that have a 1 in the "isActive" column.
CREATE TRIGGER trgHREmployeeDoNotDelete
ON HREmployees
INSTEAD OF DELETE
AS
   UPDATE HREmployees
   SET isActive = 0
   WHERE EmployeeID IN (SELECT EmployeeID FROM DELETED)
GO
As a user, we will try deleting from the table.
DELETE
FROM HREmployees
WHERE EmployeeID = 111;
GO
If we query the table as an administrator, we can see the new values of the "isActive" column.
SELECT *
FROM HREmployees;
GO
Results:

As you can see, the DELETE statement did not delete any rows but simply changed the "isActive" value from 1 to 0 (zero) as defined within our INSTEAD OF trigger.
Finally, let's query the view we created and see what is returned to the end user.
SELECT *
FROM vHREmployees;
GO
Results
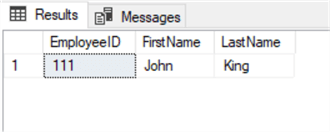
The end user thinks the row has been deleted, but we know it has not. It's merely been set to inactive, and the data remains in the table.
Of course, there's a lot more you can do with the INSTEAD OF trigger, but this will give you the basics.
AFTER Clause versus FOR Clause
You can use the FOR or AFTER clause interchangeably (to some degree) in a SQL trigger. There isn't a difference between the two. They both fire after an event, but the AFTER clause is more commonly used. In our samples above, we could have used the "AFTER" clause instead of the "FOR" clause when creating our triggers. For what we wanted to accomplish, either would have worked just fine.
BEFORE Triggers
However, there is another option available, the BEFORE clause.
In SQL, the BEFORE trigger actually executes prior to the data being committed to the database. Consequently, if someone runs a query on the table for example, they will most likely get the old values, if any, returned instead of the values associated with the BEFORE trigger.
Since BEFORE triggers are acting prior to actually modifying any data they will not have access to any ID columns, formulas, summaries, etc.
One of the key benefits of the BEFORE trigger is the ability to modify values prior to being committed to a database object.
Likewise, AFTER triggers execute after the data has been modified. We most commonly use AFTER triggers when we need access to ID columns, formulas, etc. when implementing an insert into a database object.
Next Steps
- Continue experimenting with the code samples above and see how you can make them work.
- Click on the following links to learn more about SQL Server Triggers.
About the author
 Aubrey Love is a self-taught DBA with more than six years of experience designing, creating, and monitoring SQL Server databases as a DBA/Business Intelligence Specialist. Certificates include MCSA, A+, Linux+, and Google Map Tools with 40+ years in the computer industry. Aubrey first started working on PC’s when they were introduced to the public in the late 70's.
This author pledges the content of this article is based on professional experience and not AI generated.
View all my tips
Article Last Updated: 2022-11-07


