By: Muhammad Kamran | Updated: 2022-11-21 | Comments (3) | Related: > Availability Groups
Problem
I have a 2-node SQL 2012 Always On Availability Group running on Windows Server 2016 Standard edition. Can you demonstrate the steps necessary to upgrade the SQL 2012 AG to SQL 2019 AG with little to no downtime?
Solution
SQL Server upgrades are often required in organizations. There are many ways to do a standalone SQL Server upgrade, but upgrading a multi-node AG environment is tricky and a bit complex.
I recently received a requirement from a client to upgrade a 2 Node SQL 2012 Always On Availability Group to SQL 2019 Always ON (AG) with minimal or no downtime. The SQL 2012 environment was running on Windows Server 2016 Standard edition, and the new nodes for SQL 2019 were to use Windows Server 2016 Standard.
To accomplish this task, we can follow one of two methods:
- Upgrade the replicas one-by-one starting from the Asynchronous Secondary replica followed by the Synchronous Secondary replica and upgrading the Primary replica as the last upgrade having the same SQL Server version on all the replicas.
- Add one or more new SQL replicas (higher SQL version, for example, SQL 2019) to the current AG (which is on SQL 2012) and then failover the lower version Primary replica (SQL 2012) to a higher version (SQL 2019) Synchronous secondary replica. Both methods can be done by following the rolling upgrade process.
This tip will focus on the second method, discussing all the steps required to achieve this task.
Note: Mixing the different versions of SQL Server in the same AG is only supported when performing the AG upgrade through the rolling upgrade method. This activity should be done quickly as it is not recommended to mix different SQL version in the same AG and keep it in the same state for a long time.
Prerequisites
Before beginning the AG upgrade process, check the supported versions and edition upgrades document from Microsoft to ensure that the SQL version you want to upgrade to is supported. In my case, I intended to upgrade from SQL 2012 AG to SQL 2019 AG, and the supported version for this upgrade requires SQL Server 2012 SP4, which is my current SQL environment.
Current Environment
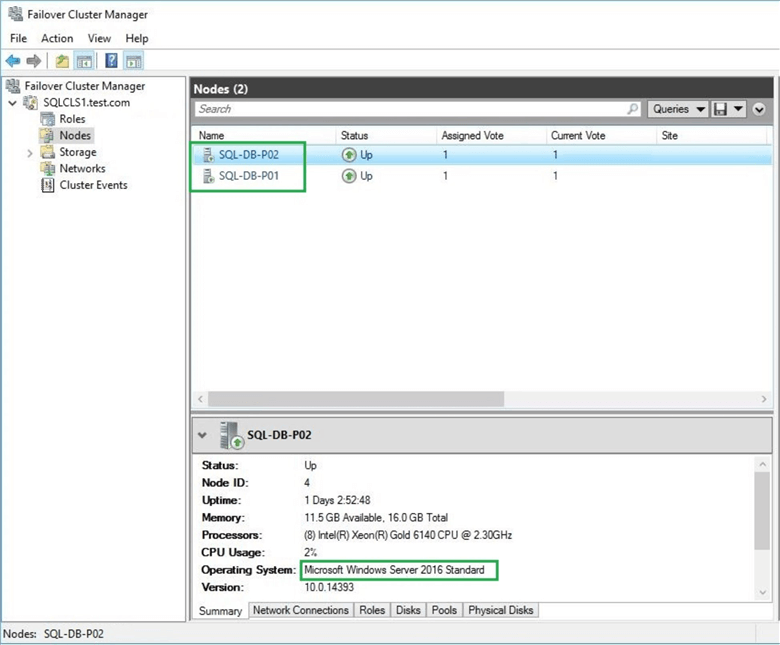
In my current environment, I have a Windows Server Failover Cluster (WSFC) with 2 nodes using Windows Server 2016 Standard Edition OS with the following details:
- WSFC Name: SQLCLS1
- Node 1: SQL-DB-P01
- Node 2: SQL-DB-P02
- Operating System: Windows Server 2016 Standard
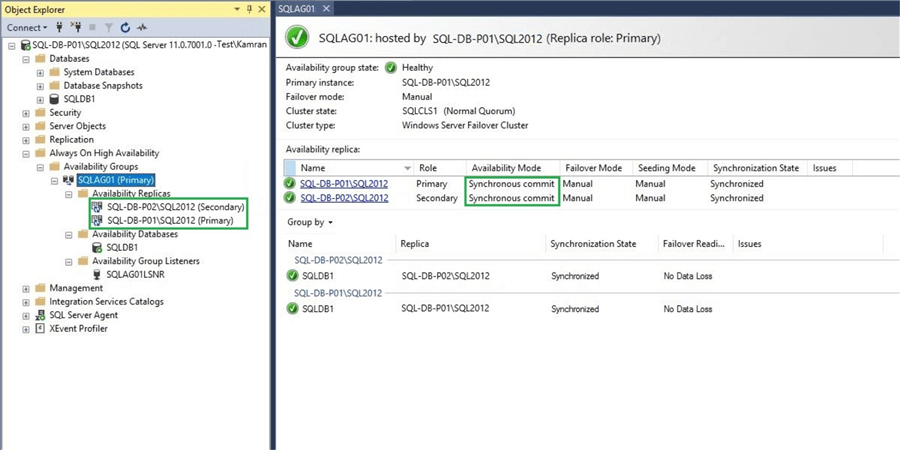
And we have two SQL 2012 instances participating in the Always On Availability Group with the following configuration:
- SQL Replica 1: SQL-DB-P01\SQL2012
- SQL Replica 2: SQL-DB-P02\SQL2012
- AG Name: SQLAG01
- Listener Name: SQLAG01LSNR
- Listener Port: 1422
- SQL version: SQL Server 2012 SP4
- Availability Mode: Synchronous Commit
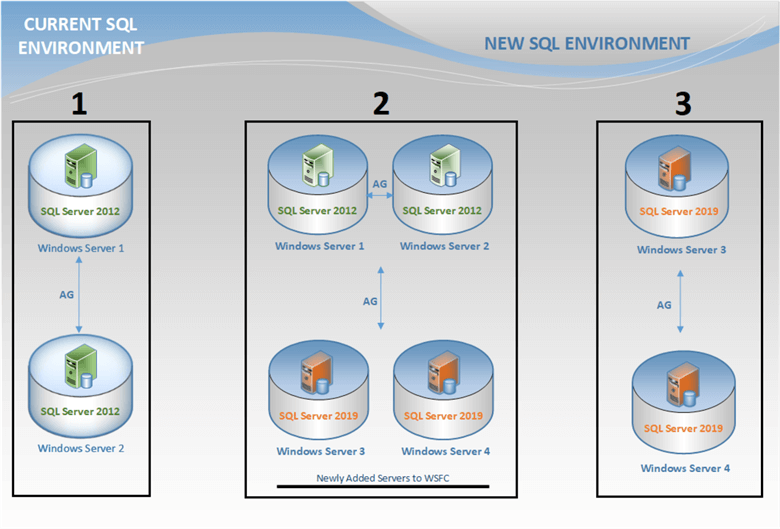
And we aim to upgrade/migrate from SQL 2012 AG to SQL 2019 AG, as depicted in the following diagram.
Major Steps
We will perform the following significant steps during this tip:
- Add 2 new nodes to the WSFC
- Install SQL 2019 on both new nodes
- Take a full backup before initiating the AG upgrade process
- Add a new SQL 2019 replica to the existing Always On Availability group (SQL 2012 version)
- Change the availability mode to Synchronous Commit for the first SQL 2019 replica
- Failover the AG to the first SQL 2019 replica to become the Primary role
- Remove both SQL 2012 replicas from the AG
- Change the availability mode to Synchronous Commit for the second SQL 2019 replica
- Evict both the old nodes from WSFC
Let’s jump into the above steps one by one in more detail.
Step 1: Add New Nodes to Windows Failover Cluster (WSFC)
We first need to add two new nodes, SQL-DB-P03 and SQL-DB-P04, to the existing WSFC to install SQL Server 2019.
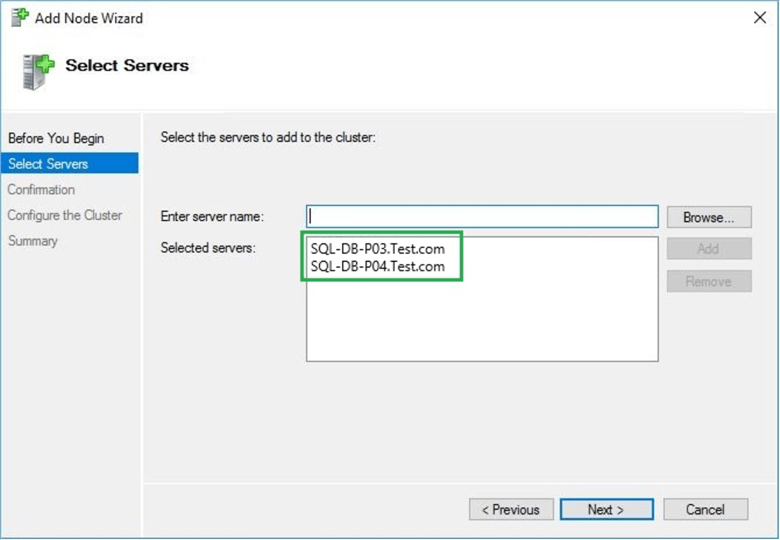
Perform the following steps for adding new nodes to WSFC SQLCLS1:
- Connect to WSFC SQLCLS1 from the failover cluster manager on SQL-DB-P01 (Node 1).
- Right-click on the nodes and select Add Node to open the wizard.
- Click Next. Enter the new nodes as shown in the above screenshot.
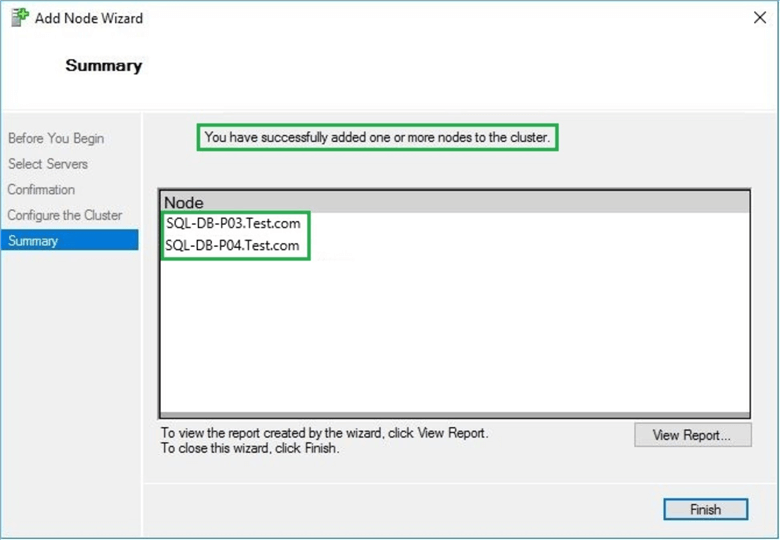
- Click Next. A success message will appear if no issues are found, as shown below.
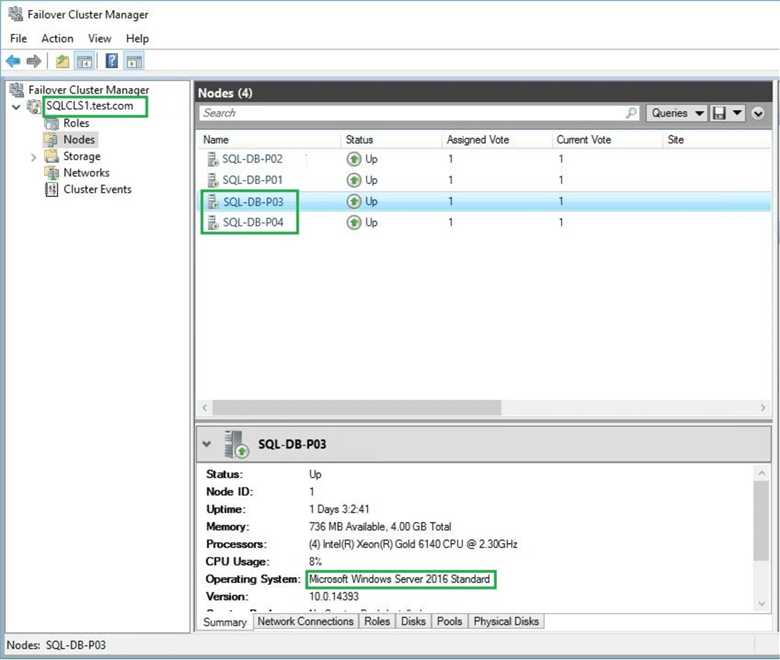
Click on the nodes in the failover cluster manager, and you will see the newly added nodes to the cluster. The newly added nodes also run on Microsoft Windows Server 2016 Standard edition.
Step 2: Install SQL 2019
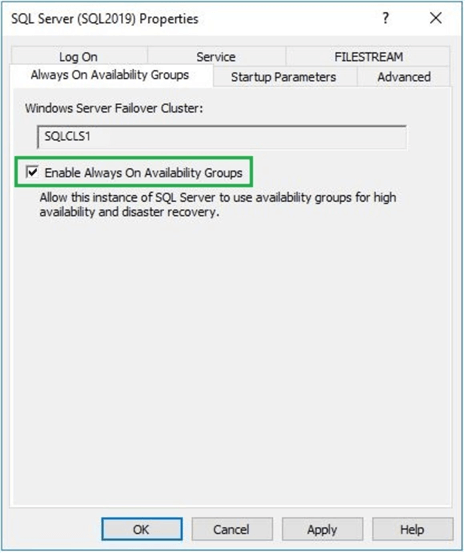
The next step is to install SQL Server 2019 on the new nodes (SQL-DB-P03 and SQL-DB-P04). Enable the Always On Availability Group feature by right-clicking on the SQL engine services for a new instance. Click properties and select the check box as shown in the screenshot below:
Step 3: Take Full Backup
We have one database, SQLDB1, for this activity.
Note: Taking a full backup is highly recommended at this point, as in the mixed SQL version AG upgrade method. Once the failover is done from the lower version (SQL 2012) Primary to the higher version (SQL 2019) Secondary replica, the synchronization will be stopped to the lower version replica. Failback to the lower version will not be possible, and any mishap can cause the databases to be inaccessible. So it is better to have a fresh copy of the backup for all the databases participating in the AG upgrade process.
Step 4: Add New Replicas to AG
After the SQL 2019 installation on nodes SQL-DB-P03 and SQL-DB-P04, we need to add these two replicas to the existing AG, which is running on SQL 2012. Once the SQL 2019 instances are added to AG, we get the following picture:
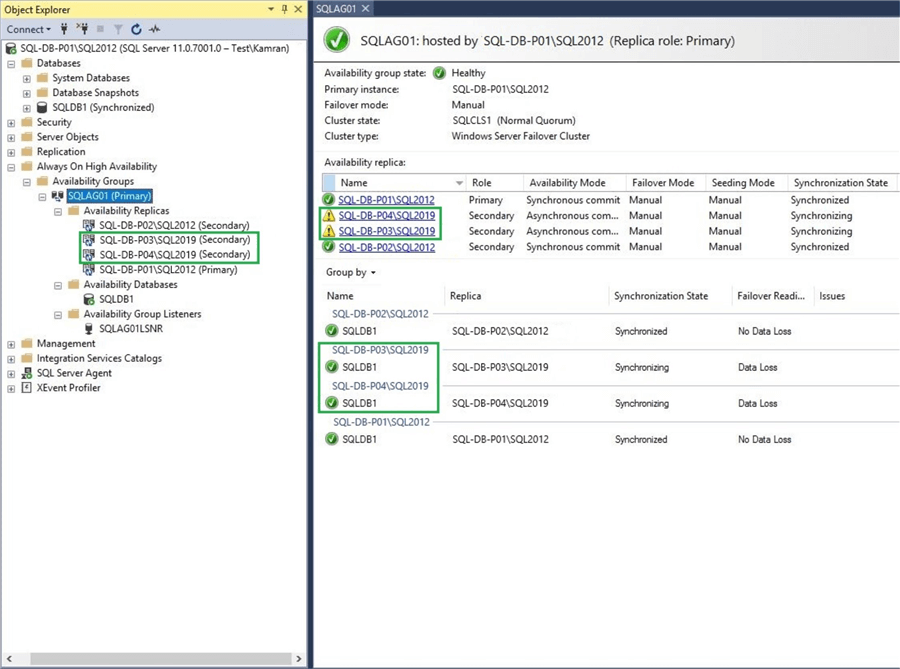
You may see the warning sign for the new replicas in the dashboard. This is probably because the different higher version replicas (2019) are added to SQL 2012 AG. The warning message will show that the replica needs to join the availability group but that replicas are already part of the AG.
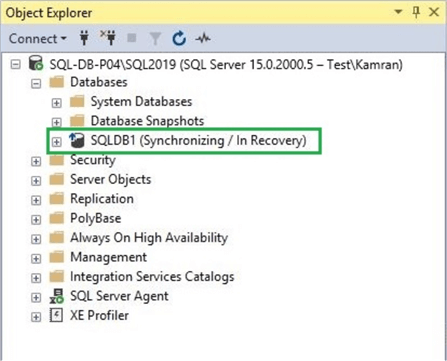
Note: At this point, the newly added replicas of SQL 2019 cannot be read, and the databases will be in the state of (Synchronizing / In Recovery) as shown below:
Step 5: Change Availability Mode
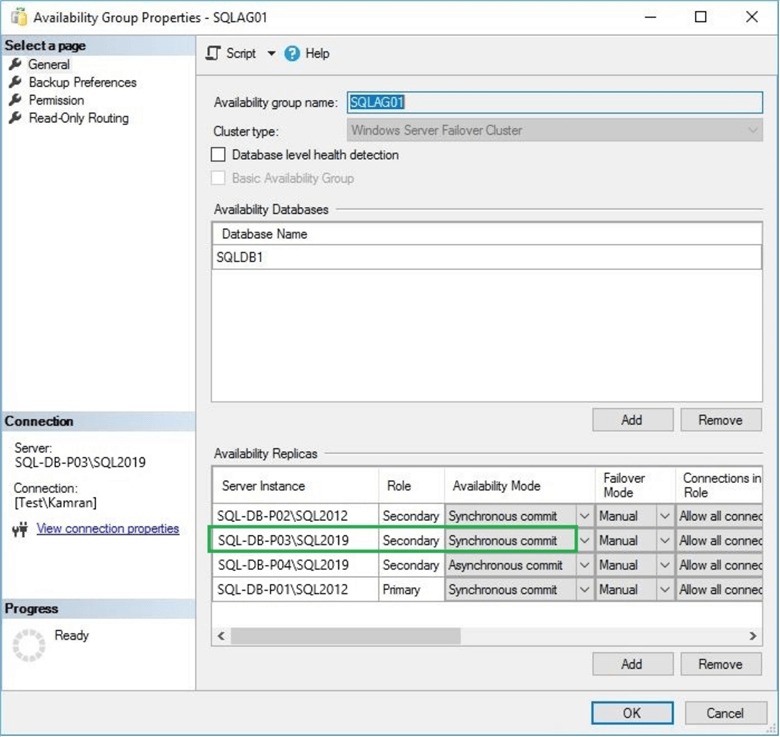
This processes most important step is performing the manual failover to one of the SQL 2019 replicas. Among the two SQL 2019 replicas, I chose SQL-DB-03\SQL2019 to do the failover and become the next primary replica. Before the failover, we need to change the availability mode for SQL-DB-P03\SQL2019 to Synchronous, as shown below.
Step 6: Perform Failover
Currently, SQL-DB-P01\SQL2012 is the primary replica. I ran the failover wizard to failover the AG SQLAG01 from SQL-DB-P01\SQL2012 to SQL-DB-P03\SQL2019.
During the failover process, all the databases participating in the AG will be upgraded to SQL Server 2019. This process will take some time, depending on the number of databases. This will be the only downtime required for this activity unless you plan to perform a second failover to the second replica of the SQL 2019 version. In this case, the failover will be quick as there will be no upgrade because both the new replicas will have the same SQL version and be in sync.
After the failover from SQL-DB-P01\SQL2012 to SQL-DB-P03\SQL2019 is done successfully, the AG dashboard looks like this:
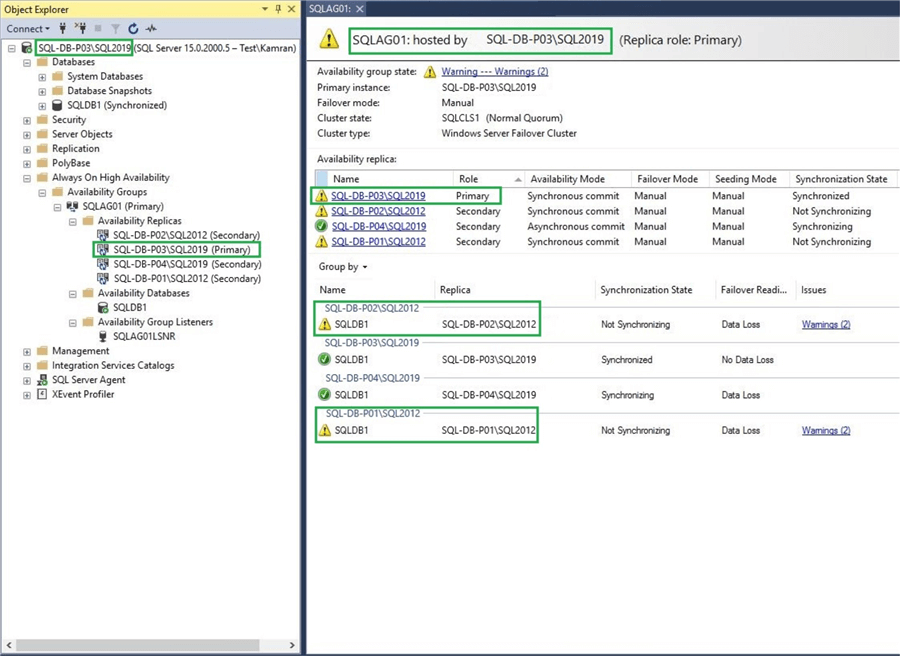
As you can see from the above screenshot, SQL-DB-P03\SQL2019 is now running in the primary role. At this point, the second replica of SQL 2019 version SQL-DB-P04\SQL2019 will be in sync with the new Primary replica SQL-DB-P03\SQL2019, and as mentioned earlier, synching to the lower version will be stopped after failover to the higher version, so now the syncing is stopped to SQL 2012 replicas, and its status is showing unhealthy in the dashboard.
Step 7: Remove Old Replicas
Now we will remove the SQL 2012 replicas SQL-DB-P01\SQL2012 and SQL-DB-P02\SQL2012 from the AG as it is no use now. We will get the following image of the AG dashboard after removing SQL 2012 replicas.
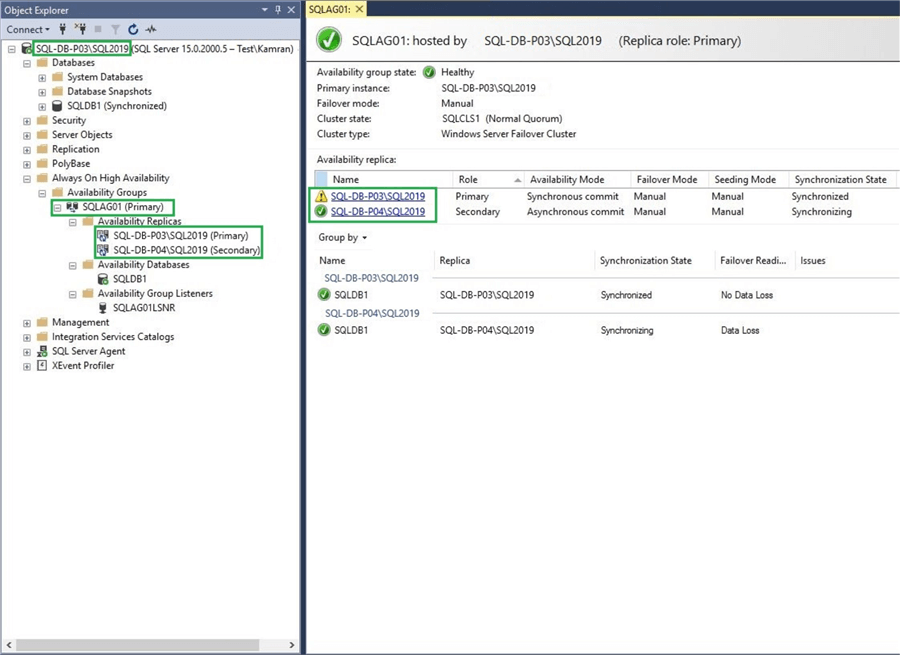
The Primary replica still shows a warning sign, which was showing earlier after adding it to the SQL 2012 AG. We need to complete a failover to the secondary replica SQL-DB-P04\SQL2019 (the same version), which will make the warning sign disappear.
Step 8: Change Availability Mode
We changed the Availability mode to Synchronous for SQL-DB-P04\SQL2019, performed the failover to it, and got the following image for the AG dashboard:
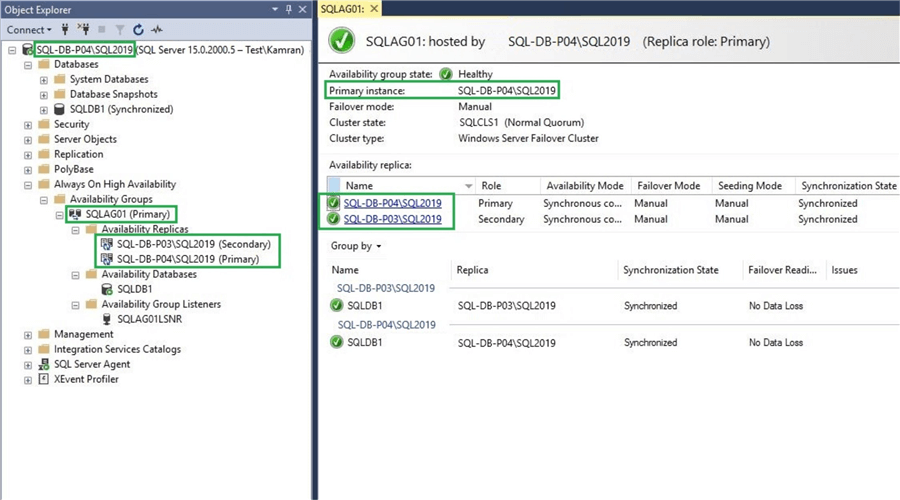
Great! Now all the replicas are green.
We can perform the failover to the SQL-DB-P03\SQL2019 replica if we want to keep it as Primary. For now, we will leave SQL-DB-P04\SQL2019 as our primary replica.
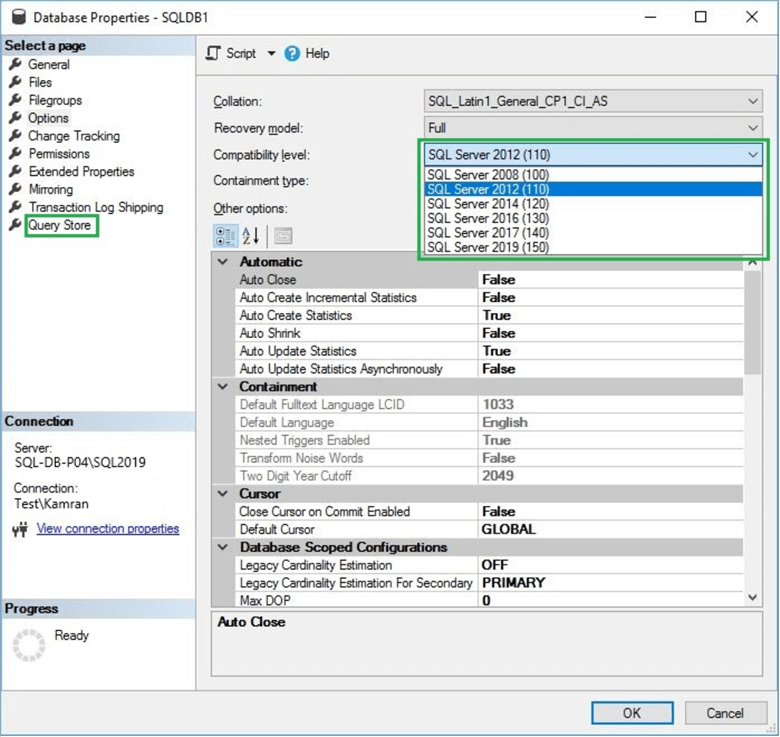
The compatibility level is not selected for the upgraded databases at this stage. We can change the database compatibility level according to the requirements and compatibility of the application. Go to database properties. We can see all the compatibility levels applicable up to SQL Server 2019, as shown below.
Check if the database is accessible and working fine after the AG upgrade. We created one simple table, dbo.EmpInfo, in the SQLDB1 database before the upgrade, which was populated with dummy records.
We executed a simple SELECT query against that table to check if the data was intact and accessible. Below is the screenshot of the query result.
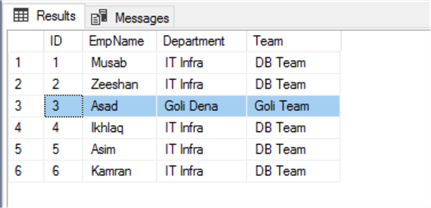
Great! Everything is good at this stage.
Step 9: Evict Old Nodes
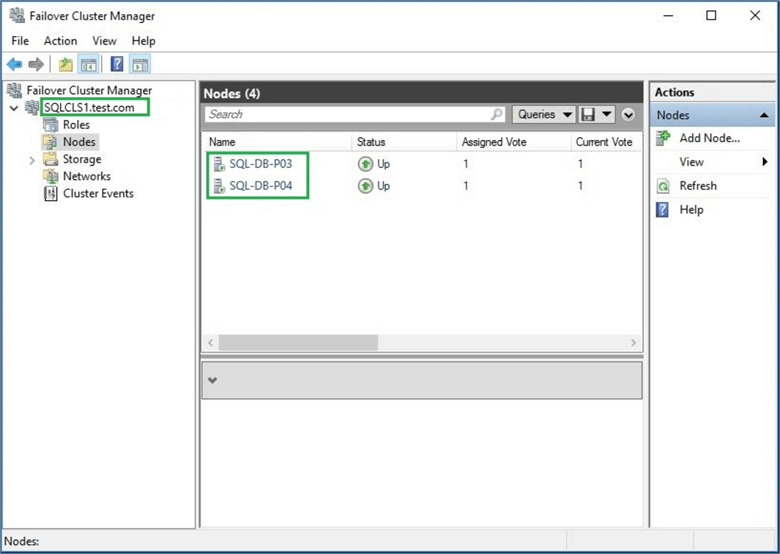
Now, as the last step, we can evict both SQL 2012 nodes, SQL-DB-P01 and SQL-DB-P02, from the WSFC. After the removal of the above-mentioned nodes, we get the following screenshot:
Conclusion
This tip includes all the necessary steps to upgrade an AG environment from SQL 2012 to SQL 2019 as a rolling upgrade process. These steps can be more complex depending on the number of AGs, the number of databases in the AG, and the size of those databases. These steps can also be applied to other SQL versions depending on the supported versions for upgrades. I hope this article is helpful for many SQL DBAs and developers.
Next Steps
- As mentioned, this is one method of upgrading an AG from a lower to a higher version. I suggest using this method for smaller databases to take less time during the upgrade (failover).
- This method of upgrading SQL Server AG can also be applied to other SQL versions.
About the author
 Muhammad Kamran is a Senior SQL DBA with many years of experience in providing SQL Server high-availability solutions.
 This author pledges the content of this article is based on professional experience and not AI generated.
View all my tips
Article Last Updated: 2022-11-21


