By: Temidayo Omoniyi | Updated: 2023-01-23 | Comments | Related: > Azure Data Factory
Problem
Azure Data Factory is a scale-out, serverless data integration and transformation solution offered by Microsoft Azure. It provides a code-free user interface for simple authoring and single-pane management. This platform also solves the data ingestion problem from tools like Google Drive and importing data to a Data Lake or Data Warehouse. In this article, we will look at how to ingest data from Google Drive using Azure Data Factory.
Solution
In this article, we will create an Azure Data Factory and a step-by-step breakdown of how to ingest data from Google Drive and migrate ingested data to Azure Data Lake Gen2. A schedule trigger copy activity will also be created to help automate the entire copy process.
What is Azure Data Factory?
Most industries today consume big data and employ relational, non-relational, and other storage technologies to store raw, disorganized data formats. To properly ingest, migrate, and transform these massive stores of raw data into usable business insights, big data requires a service that can orchestrate and operationalize processes, which is where the application of Azure Data Factory comes to use.
Azure Data Factory (ADF) is a cloud-based service that primarily performs the complete extract-transform-load (ETL) process for ingesting, preparing, and transforming all data at scale. The ADF service provides a code-free user interface for simple authoring and single-pane glass management. This allows users to build complex ETL processes for transforming data using dataflow or other computation services like Azure HDInsight, Azure Databricks, Azure Synapse Analytics, and Azure SQL Database.
Azure Data Factory Use Cases
- ADF supports data ingestion and migration.
- ADF allows users to get and copy data from different data sources and store it in an online data storage like PostgreSQL, Azure SQL, or Azure Data Lake Gen2.
- ADF offers data integration from enterprise resource planning (ERP) software and stores it in Azure Synapse Analytics for data and business intelligence use.
Components of Azure Data Factory
ADF's primary function is to extract data from one or more sources and format it to enable data scientists and analysts to gain insight by utilizing it.
ADF consists of the four major components of technology that work together. These components define the input and output of data, activity pipeline, and schedule to trigger all processes.

Data Set
This represents data structures within which data are stored, which point to or usually reference two points. A data set can be divided into two:
- Input: Represents the input for an activity in the pipeline. This is usually where data has been ingested and can either be from an Azure Blob Storage, HTTP site, or on-premises data source.
- Output: Represents the output activity. This is usually where the data is finally stored. This can be an Azure Blob container, Azure Data Lake, Azure SQL, or other storage packages available in ADF.
Pipeline
A Pipeline is a group of activities that perform a task. The work performed by ADF is usually defined as a pipeline operation. Pipeline runs are created by supplying arguments to the pipeline-defined parameters, and the argument can be passed manually or by a trigger.
Activity
This is what happens in the data pipeline. The ADF performs various activities, such as data movement, control, and transformation.
- Data movement is copying data from one data source to another.
- Data Transformation involves other transformation tools like HDInsight (Hive, Hadoop, Apache Spark), Data Lake Analytics, and Azure Batch.
- Control activities invoke another pipeline, ForEach, set, until, wait and run SSIS packages.
Linked Services
These specify the information ADF needs to connect to an external data source or resources. They are like connection strings, which specify the connection details required for Data Factory to connect to external resources.
Setting Up/Create Azure Data Factory
You must log into Azure Portal. To create an ADF, you first need to create a Resource Group.
Create Azure Resource Group
Azure resources are created in the Azure Portal. You can check the previous article released, Connect Power BI to Azure Data Lake Gen2 Storage for Reporting for more information.
Data Factories
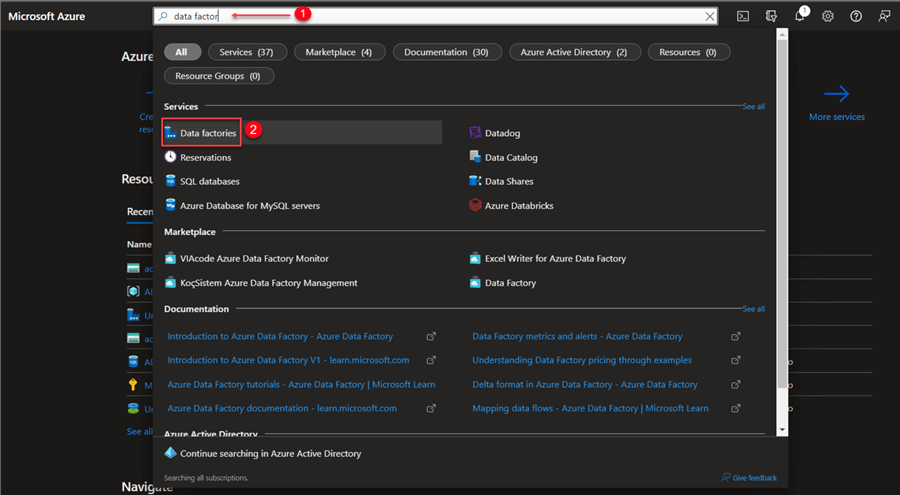
In the Azure Portal, go to the search resources at the top and type 'data factories". This will bring up a list of resources. Select the Azure Data Factory and click Create.
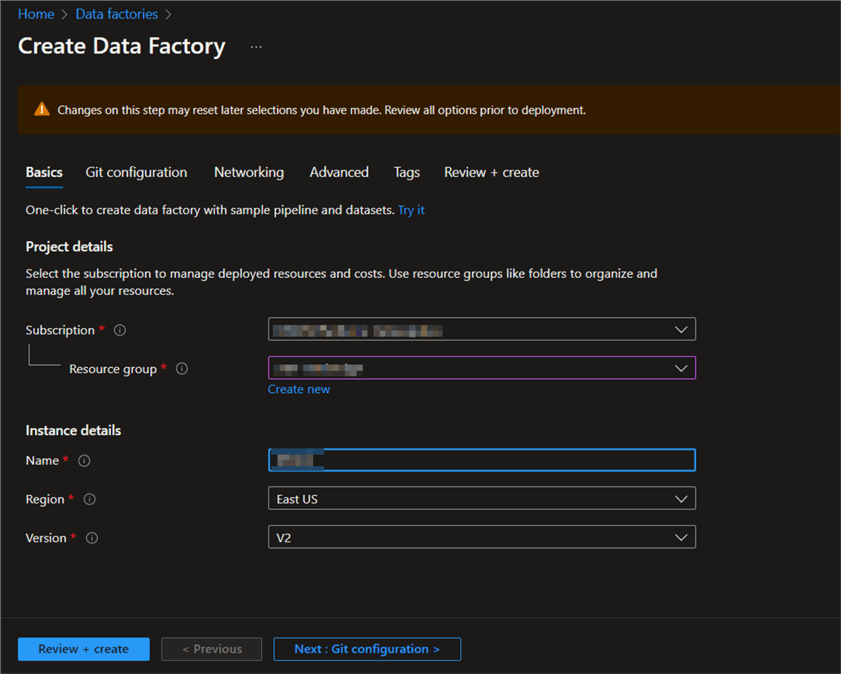
Basics Configuration
In Basics, select the subscription type, and the resource group created.
For "Instance details," select a unique name for the ADF, the region for the data center, and the version to use.
Click "Next: Git configuration >".
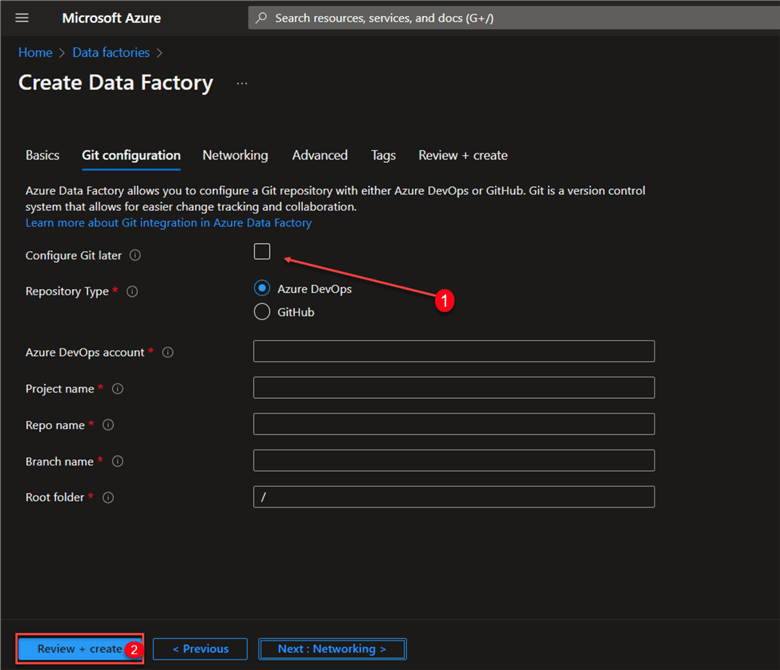
Git Configuration
In Git configuration, unselect the check box "Configure Git later". Select "Review + create".
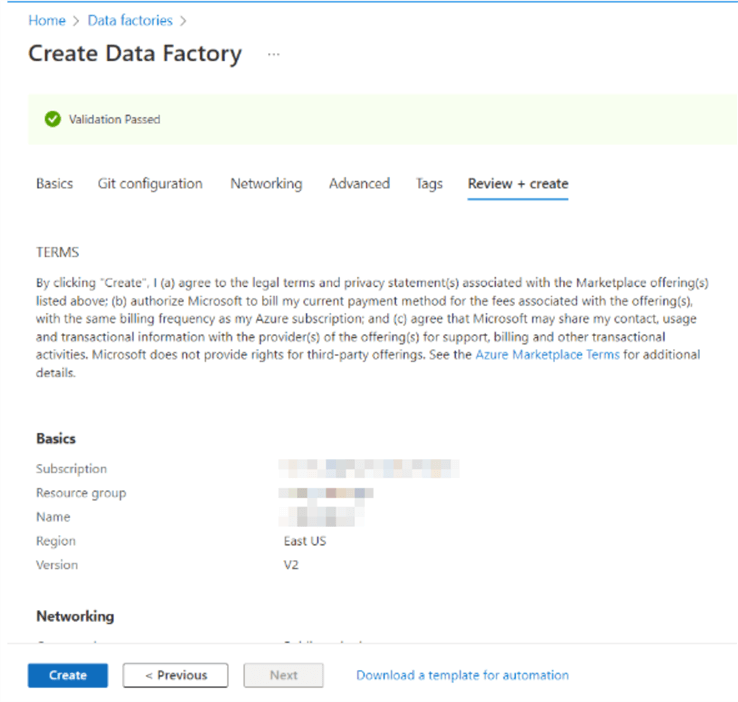
When the validation is successful, click Create.
Select "Go to resource" to go to the Data Factory page after creation is finished.
Open Azure Data Factory
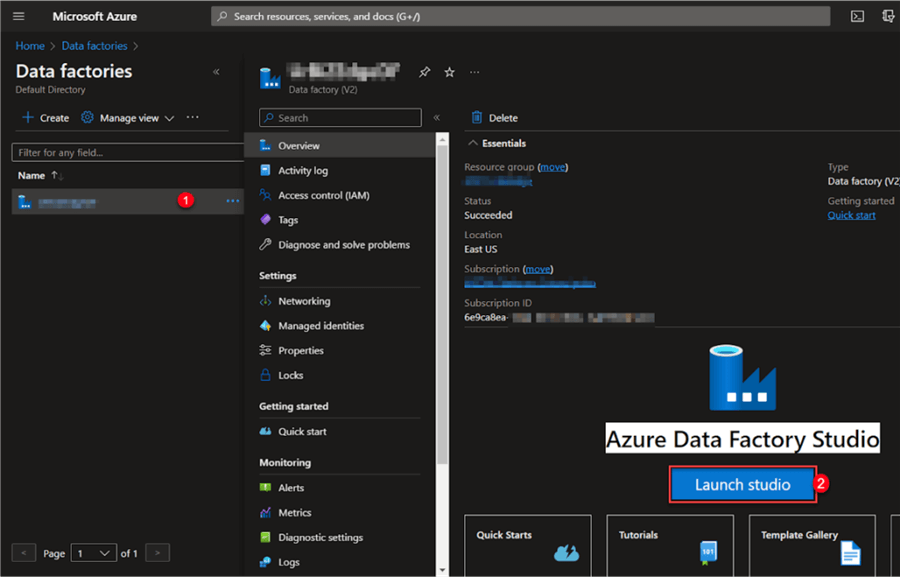
After successfully creating the ADF, go to the resource and navigate to the Azure Data Factory page. In the Azure Data Factory environment, select the Data Factory. This will open the Azure Data Factory Studio. Click "Launch Studio".
Data Ingestion from HTTP Site
Data ingestion is the process of obtaining and importing data into storage in a database for further processing and analysis purposes.
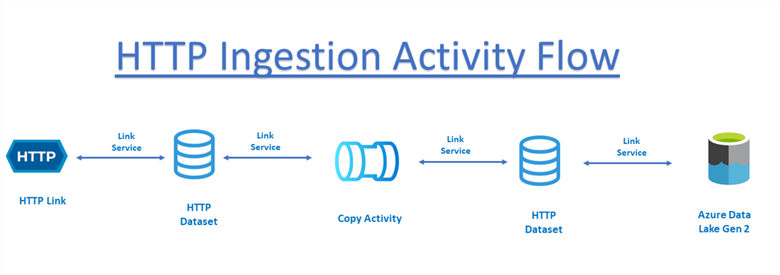
Ingestion of data from an HTTP site in ADF requires four significant components:
- Copy Activity: Moves data from data stores on-premises and in the cloud to a database or other storage facility.
- Linked Service: Connectors needed to connect to external resources.
- Datasets: Points or references to the data to be used in activities as inputs and outputs.
- Pipeline: A logical collection of activities collectively performing a task.
Convert Google Drive Link to a Website
Google Drive is a cloud-native collaboration tool that lets a team work more productively together in real time. For this project, let’s convert the document in Google Drive to a web link accessible by anyone.
Get a Shareable Link
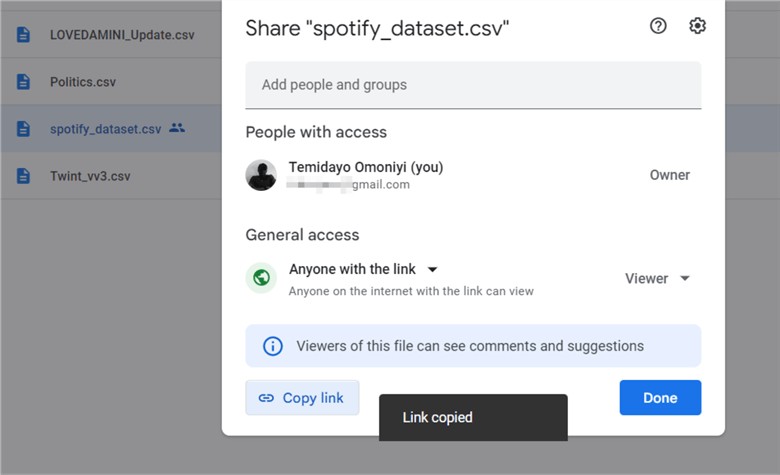
In Google Drive, right-click the file to be shared and select "Share". Change the General Access to "Anyone with the link" and copy the link to Notepad.
Convert Shared Linked to Website
Paste the copied URL link from Google Drive to Notepad, then follow the step in the image below.

https://drive.google.com/uc?id=1me4SqHCvcEh0RUqrBfoSkKM0yXe6JbM3
Ingestion of HTTP Data
Now that we have successfully converted the shared link to a website, let's create all necessary components in ADF.
HTTP Linked Service
In ADF, an HTTP service link must be created to connect to external resources. The first link service to be created is the source link, which is the link to Google Drive.
Create Source Link.
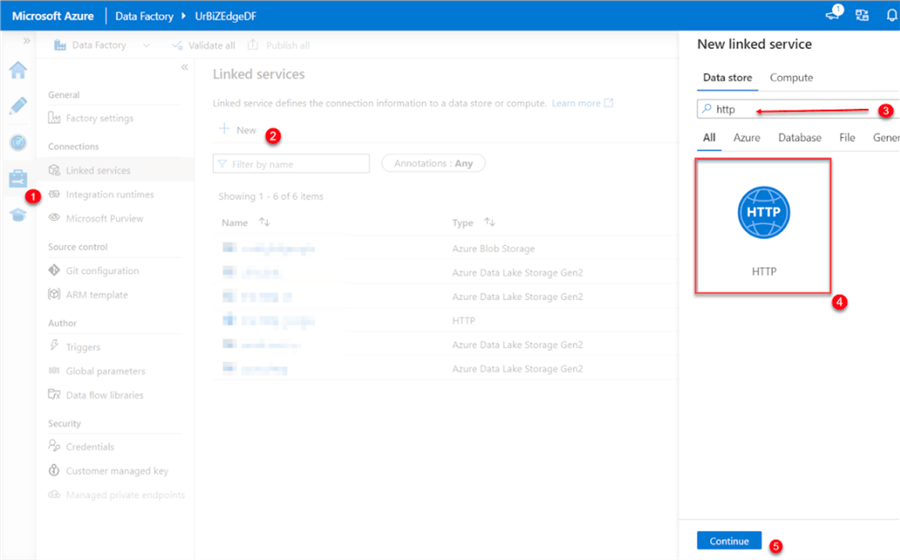
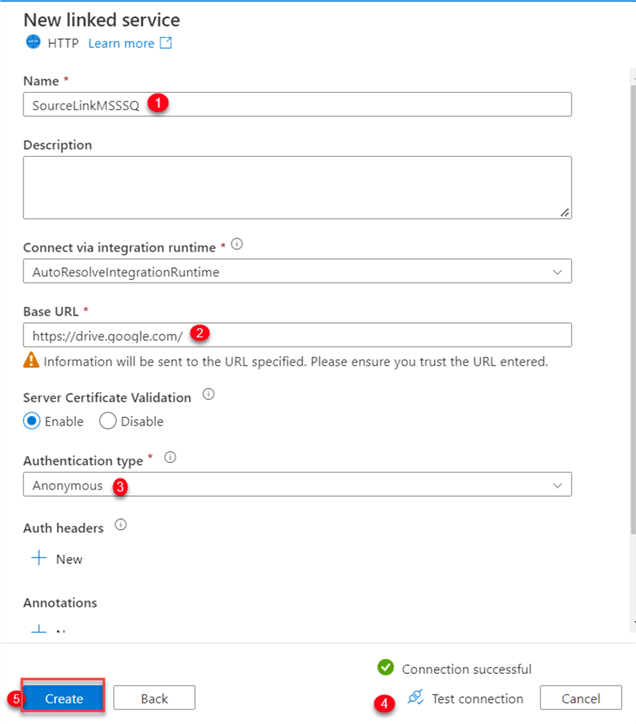
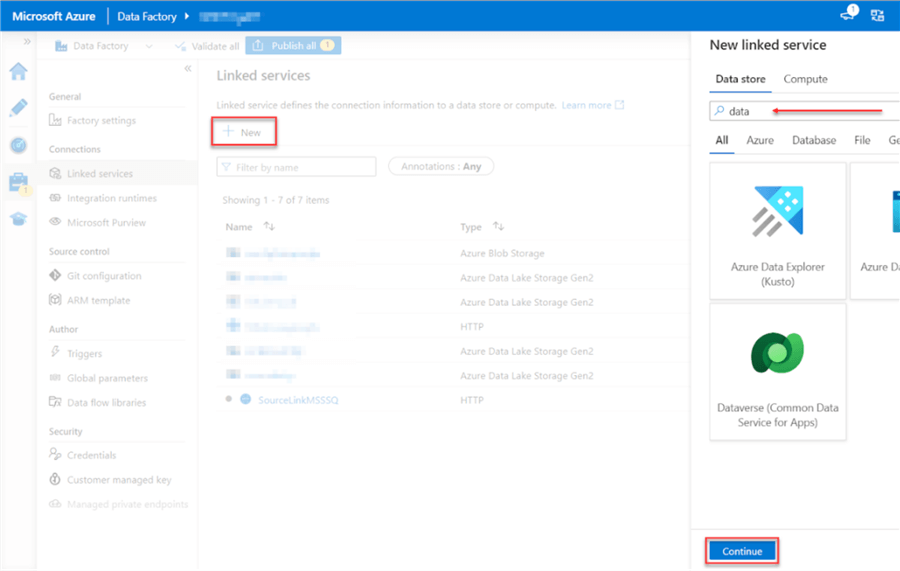
- In the ADF, navigate to the left pane and click "Manage". The Manage icon will open a window. Click on "+ New" and search for the "HTTP" data store. Click Continue.
Setting New Service Linked.
- Name: Change to a preferred name.
- Based URL: Copy the based URL from the Google shared link created above.
- Authentication type: Change from Basic to Anonymous; this will help to connect without a password or other authentication.
Click "Test connection" to check if the connection is working correctly. If working properly, "Connection successful" with a green checkmark will appear. Click Create to create the service link.
Create Sink Link.
- Let’s create a sink link to connect to the Data Lake Gen2. Repeat the source link process but change the search data store to Data Lake Gen2. Click Continue.
Set the Sink Service Link.
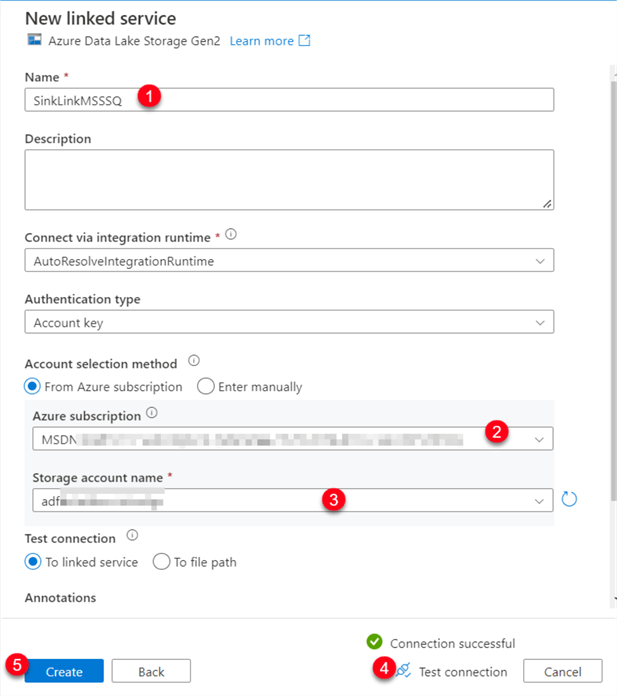
In the Service Link setting, fill in the following information:
- Name: Change to a preferred name.
- Azure Subscription: Select the Azure subscription to be used.
- Storage Account: Select the storage into which you want to copy your data. For this blog, we will copy the data to Azure Data Lake Gen2.
Click "Test connection" to check if the connection is working correctly. If working properly, "Connection successful" with a green checkmark will appear. Click Create to create the service link.
Create Source Dataset.
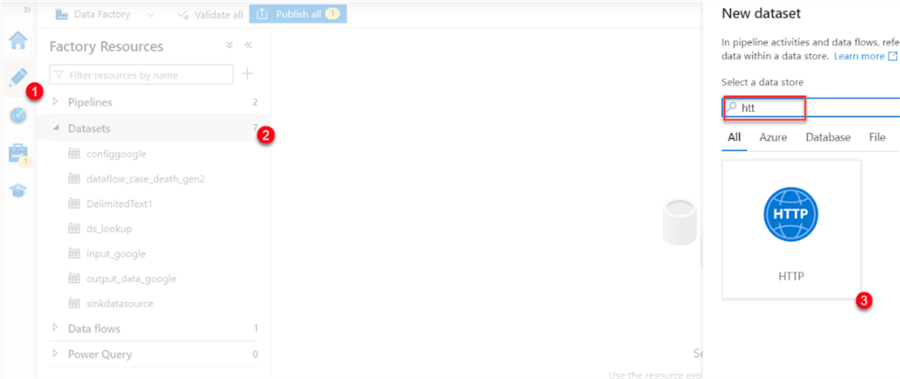
- In ADF, select "Author" at the top left pane, then navigate to Datasets. Right-click and select the new dataset. In the data source, search for "HTTP" and then Continue.
You will be prompted to select the data types. Use "Delimited Text (CSV)" for this project.
The next window expects properties to be set.
- Name: Select the dataset name.
- Linked Service: Select the Source link created above, "SourceLinkMSSSQ"
- Relative URL: The relative URL is the link after the source link.

Once complete, check the first row as a header. This will indicate that the first row of the data has a title.
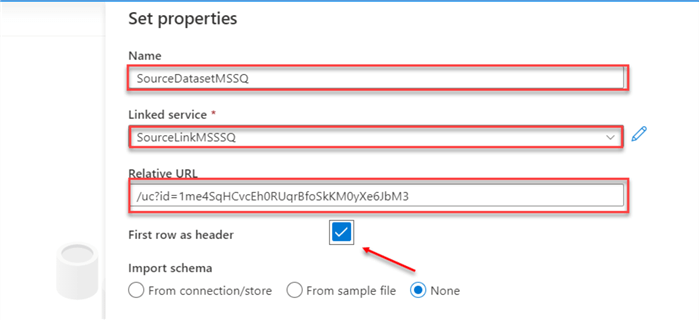
Create Sink Dataset.
- Repeat creating the source, but this time for the source, search "Data Lake Gen2" and then Continue. For the data type, select "Delimited Text (CSV)".
In the set properties for Data Lake Gen2, fill in the following information:
- Name: Select a unique name.
- Linked Service: Use the sink link service created above.
- Directory: Click on the folder sign and navigate to the directory where the data should be stored.
Check to make the first row a header and click OK.
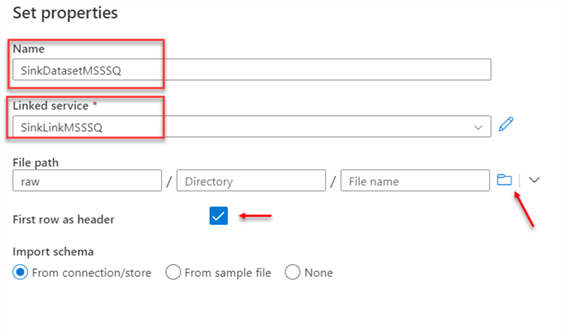
Set the Copy Activity
The copy activity in the ADF pipeline allows the data to be copied between on-site and cloud-based data repositories. The data can be further transformed and analyzed using other activities after it’s copied.
Copy Data Activity.
- In ADF, click the Author tab, right-click on the pipeline, and create a new pipeline. Expand "Move & transform" in the activity pane, and drag "Copy data" to the activity center.
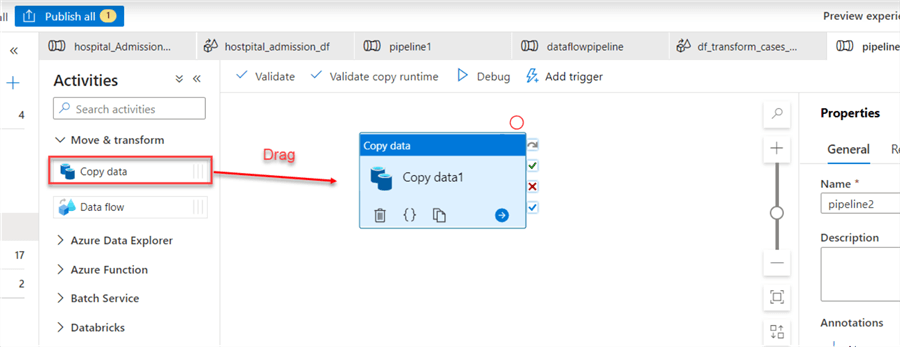
Source & Sink Settings.
- Select the Source and Sink tab, then change the dataset.
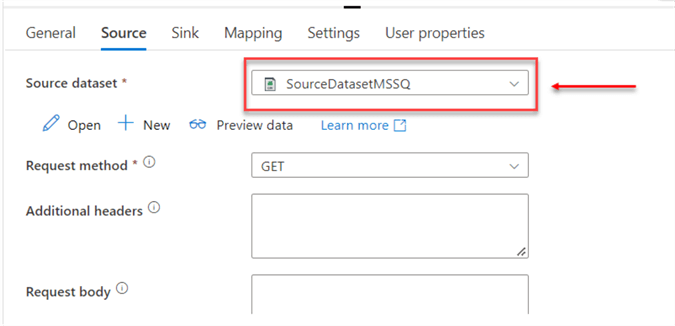
Save and Debug.
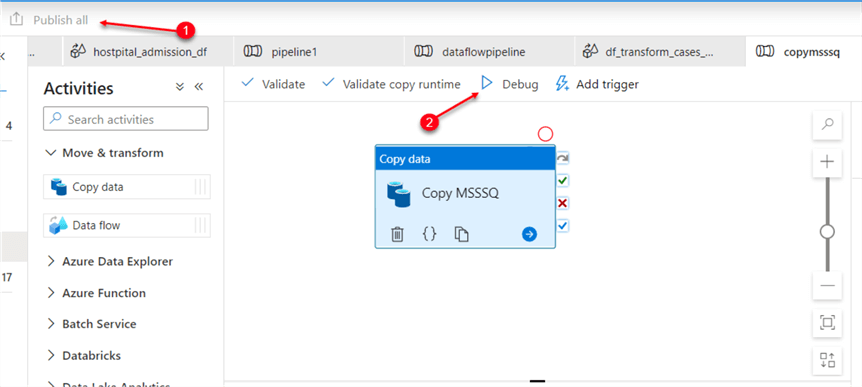
- To save all the activities completed in the ADF, click "Publish all" in the top left corner. After publishing, click on Debug to run the "copy activity".
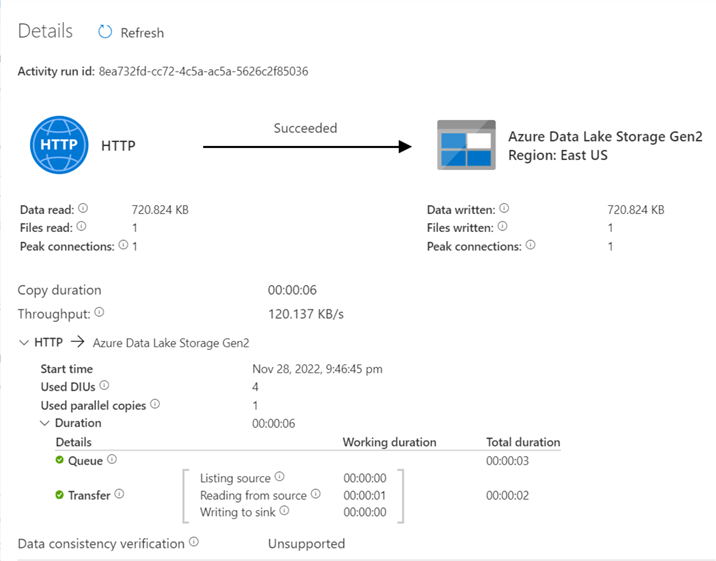
After copying, you should see success. Now, head to Azure Portal and check the storage container the data was copied to.
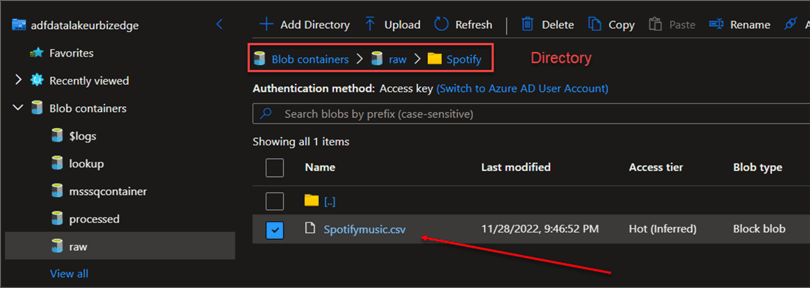
In Azure Portal, navigate to Azure Data Lake Gen2 to confirm the data was successfully copied.
Set Up Parameters
Parameters are external values passed into pipelines, datasets, or connected services. You cannot change the value inside a pipeline.
We need to set the parameter for both the Source and Sink datasets.
Relative URL.
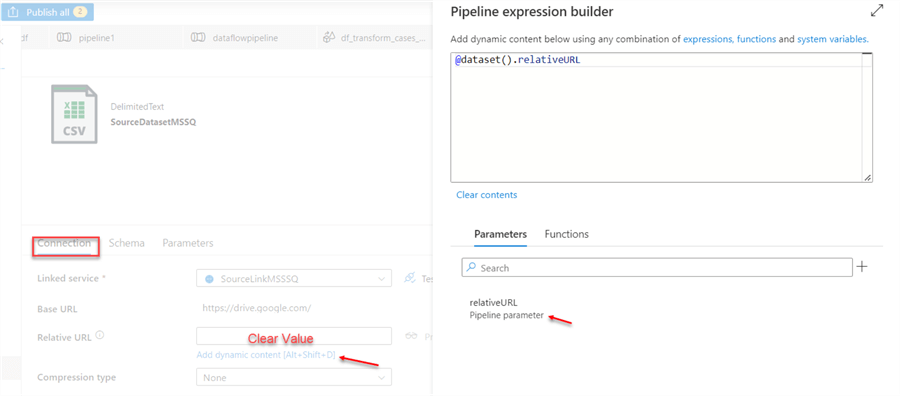
- Click on the "Parameter tab" from the source dataset. Then click "+New" and name it relativeURL.

Set Connection.
- Go to the "Connection" tab, clear the value in the Relative URL, and click on the dynamic content.
Repeat the same process for the Sink dataset.
Set Parameter.
- Click on the "Parameters" tab and create a new parameter called "fileName".

Set Sink Connection.
- From the "Connection" tab, clear the file name, and click on the dynamic content.
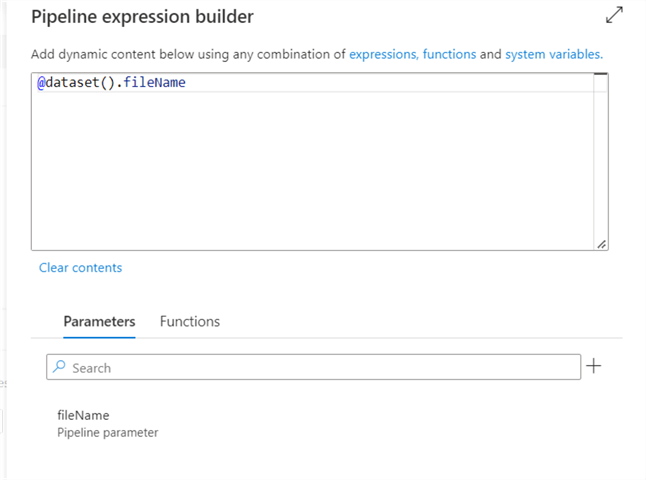

Set Parameter Pipeline
In the Pipeline activity, select the "Parameter" tab, click on the new icon, and add the new parameters "sourceRelativeURL and sinkFileName".
Also, leave the default value blank. This will provide flexibility to change to different data sources.

Set the Activity Data source (Relative URL)
Click on "Copy Data" activity and set the data source relative URL.
Source Parameter Activity.
- Click on the "Source" tab in the relativeURL. Click on the dynamic content and select the source.
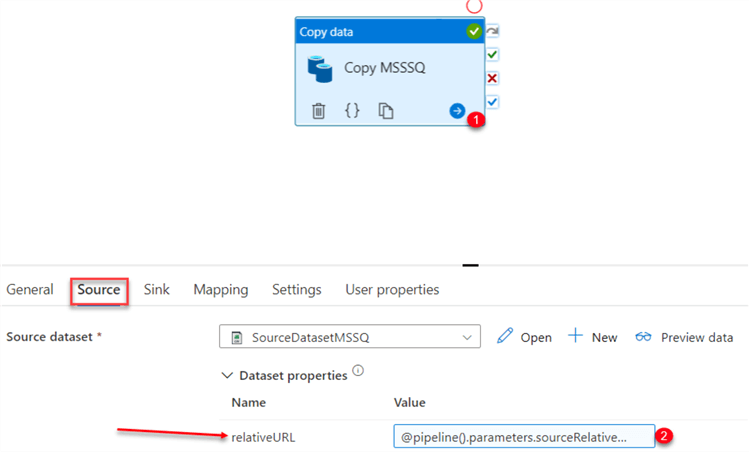
Repeat the same process for the Sink data, then publish to save all changes.

Note: You can repeat copy activity by changing the Pipeline parameter relative.
Publish and Debug.
- To save all the activity completed so far, click "Publish all", then click "Debug". Manually input the source relative URL link and the file name to save.

Verify Copied Data.
- Now, we need to verify if the data was copied successfully. Head to the Azure Portal.
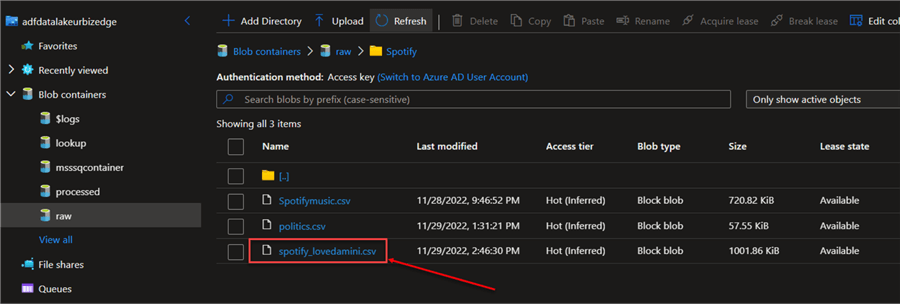
Schedule Trigger
Trigger in ADF helps to activate a process automatically when an event happens.
When creating a schedule trigger, specify the schedule setting (start date, recurrence, end date, etc.) for the trigger, and associate it with a pipeline.
Setting Up a Trigger.
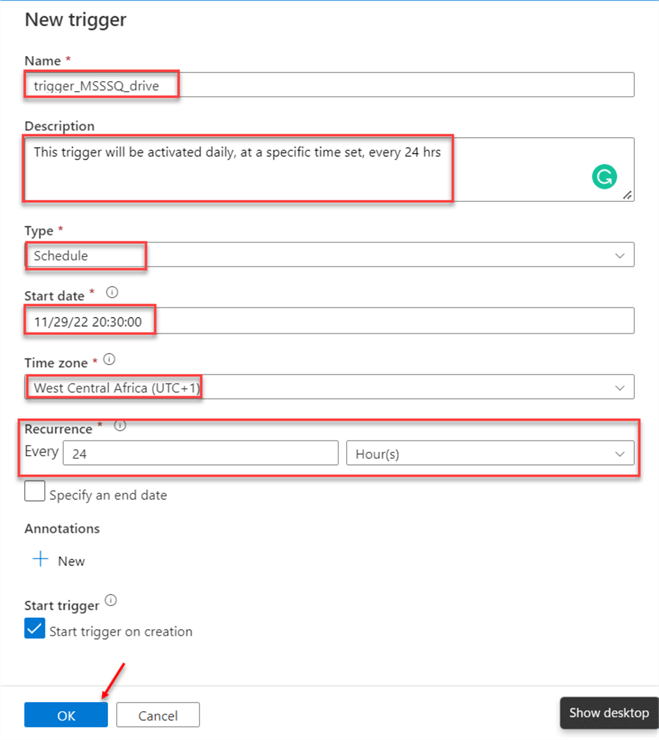
On the "Trigger" icon, click on the new trigger and set the trigger parameter using the information below:
- Name: Set the Trigger name to represent the type of activity flow.
- Description: This is optional. This provides an in-depth understanding of the type of trigger.
- Type: The type of trigger will be a Schedule Trigger.
- Start Time: The time to activate the trigger.
- Time Zone: Set the time zone.
- Recurrence: How often do you want the trigger to repeat?
Parameter Values.
- Add the relative URL and file name to save as a CSV file.

Note: You must publish your Trigger before it can work.

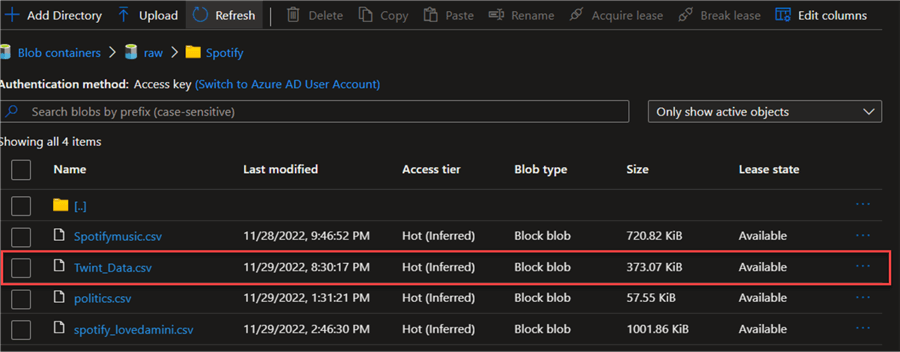
After the set time, go to the Azure Portal to confirm if the data was copied successfully.
Conclusion
In this article, you learned how to ingest data from Google Drive and populate it directly into Azure Data Lake, creating a schedule trigger to help automate the entire process. This method has saved us countless times from needing a third-party application.
You can improve the process by using a "Metadata Driven Pipeline." This allows ingesting data from multiple sources using a Lookup Activity and JSON file.
Next Steps
- Lookup Activity in Azure Data Factory and Azure Synapse Analytics
- SQL Server Azure Data Factory Tips
- Create on-demand Apache Hadoop clusters in HDInsight using Azure Data Factory
- Parameterize linked services in Azure
- Create a data factory by using the Azure portal
- Copy data from an HTTP endpoint by using Azure Data Factory
About the author
 Temidayo Omoniyi is a Microsoft Certified Data Analyst, Microsoft Certified Trainer, Azure Data Engineer, Content Creator, and Technical writer with over 3 years of experience.
 This author pledges the content of this article is based on professional experience and not AI generated.
View all my tips
Article Last Updated: 2023-01-23


