By: Nirali Shastri | Updated: 2023-01-11 | Comments | Related: > SQL Server 2019
Problem
How do you install, configure and access Microsoft SQL Server 2019 Express Edition as well as LocalDB?
Solution
In this tutorial, you will learn the step-by-step process to install and configure SQL Server 2019 Express Edition and LocalDB. Moreover, you will learn how to configure the LocalDB and access the functionality using SQL Server Management Studio.
Download Microsoft SQL Server Express Edition
You can download the SQL Server 2019 from the Microsoft.com official website.
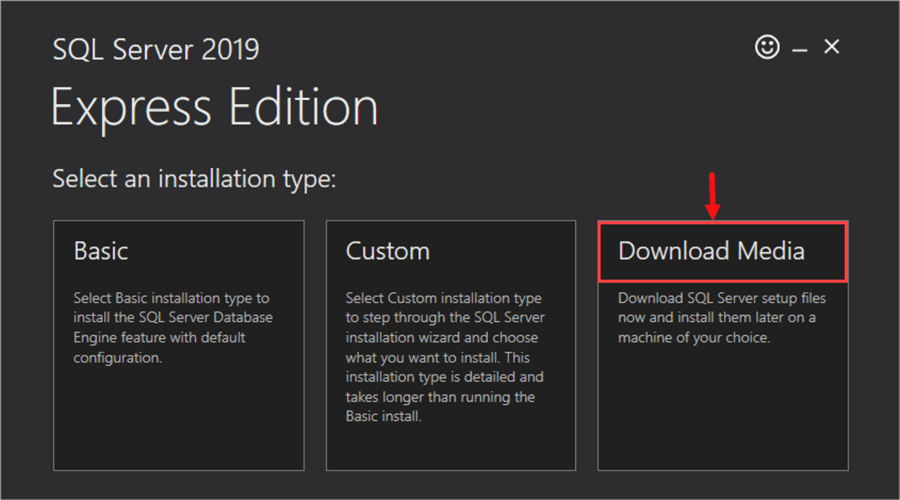
Once the installation file is downloaded, execute it. Select the Download media option from the "Select an installation type" dialog box.
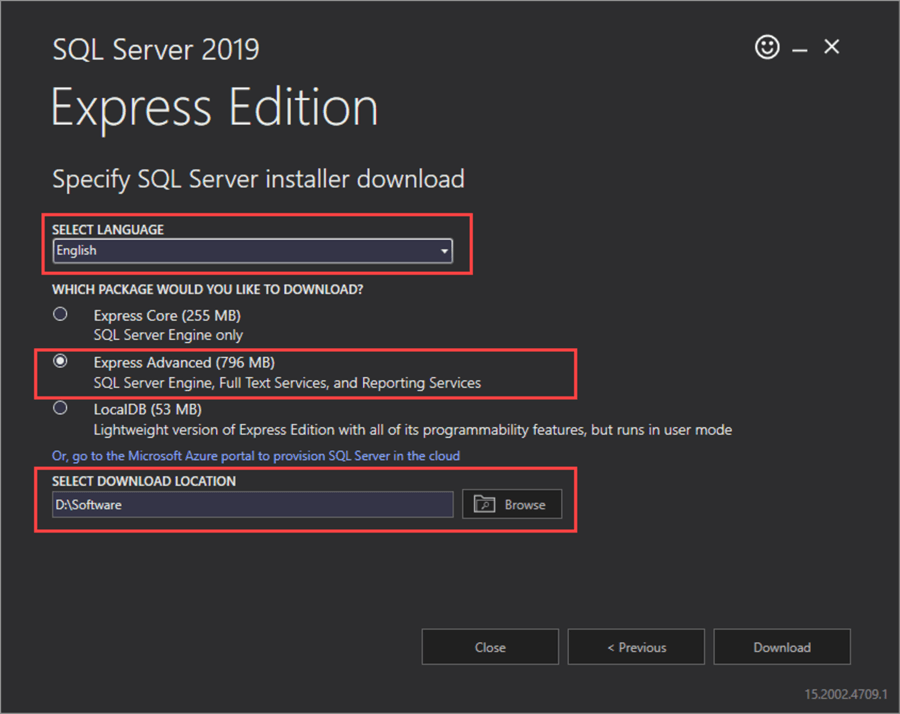
On the "Specify SQL Server installer download" screen, you need to specify the following options:
- Language: choose the language of the SQL Server
- Package type: you can select
- Express core: the installer will download the SQL Server database engine.
- Express Advanced: the installer will download the SQL Server database engine, Reporting Services, and Full-Text Services.
- LocalDB: the installer will download the lightweight version of the express edition will all programming features.
- Location: specify the directory location where you want to store the SQL Server installation package.
We will download the Express Advanced package.
The installer file named SQLEXPPRADV_x64_ENU.exe has been downloaded.

Double-click the file to begin the installation process.
Installation of SQL Server Express Edition
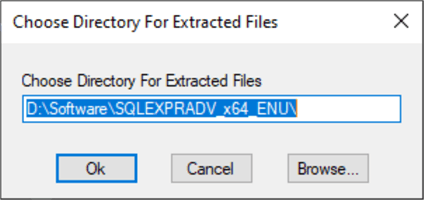
The first step of the Express installation is to specify the directory where you want to extract the files in the Windows operating system. Specify the desired directory location to extract the files and be sure to have sufficient disk space.
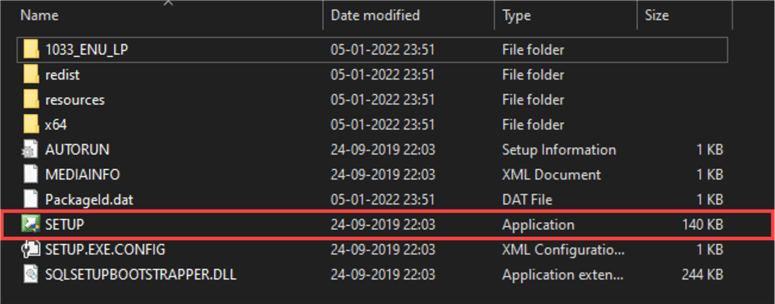
Once files are extracted, start the installation process by running the setup.exe file.
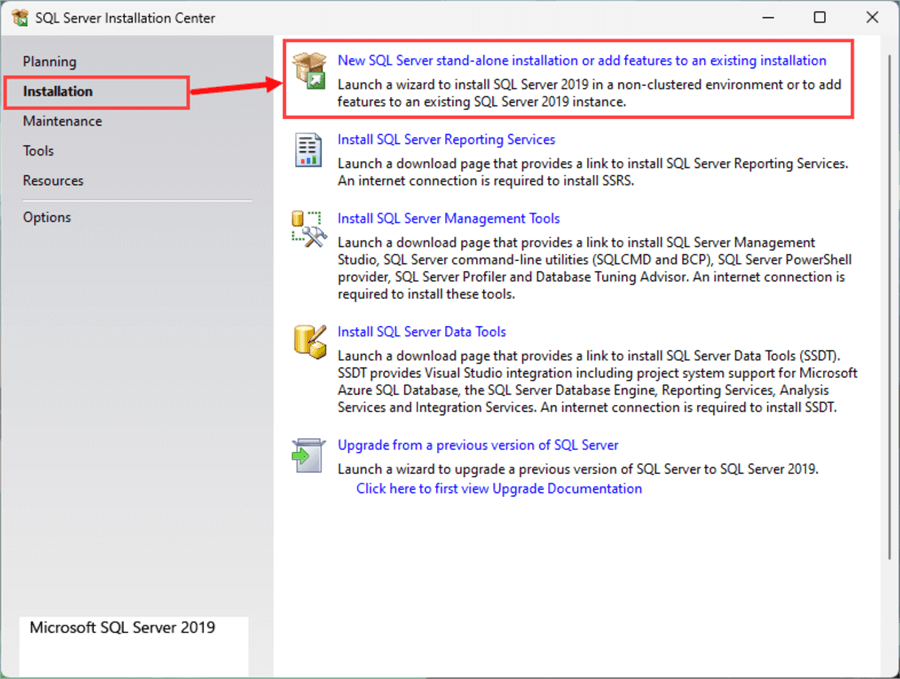
The SQL Server Installation Center opens. Select Installation from the left pane and select the New SQL Server stand-alone installation option.
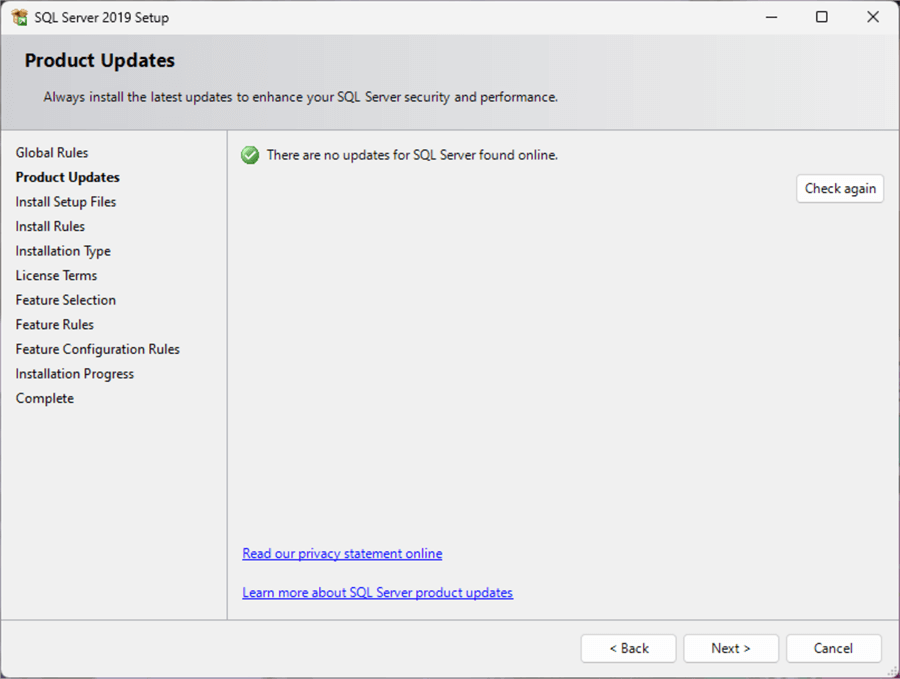
First, the installation wizard checks for Product Updates.
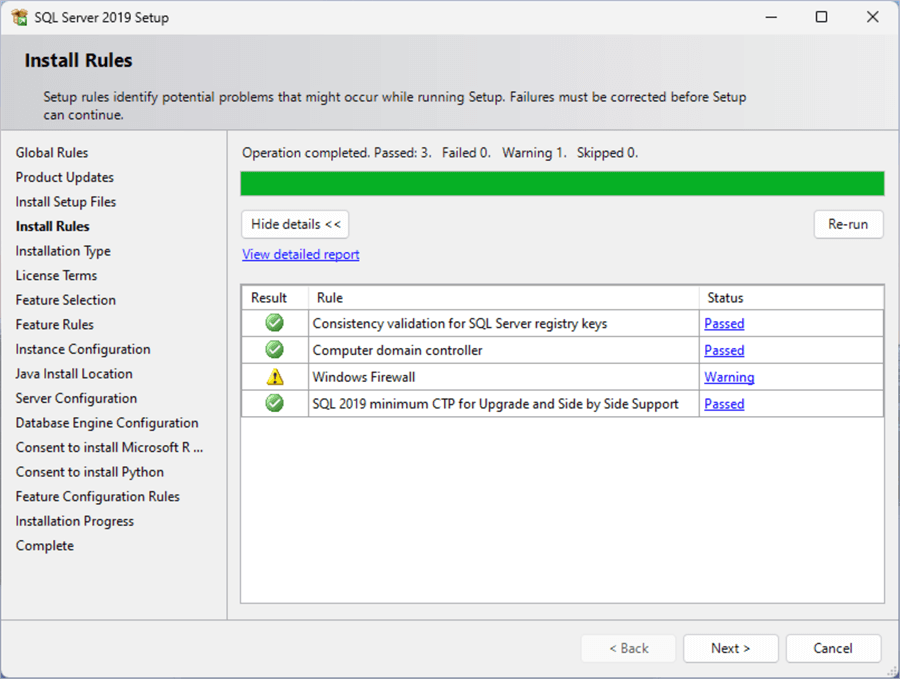
On the Install Rules screen, the install will check all setup rules. If any of the rules fail, we must fix them before the installation will continue.
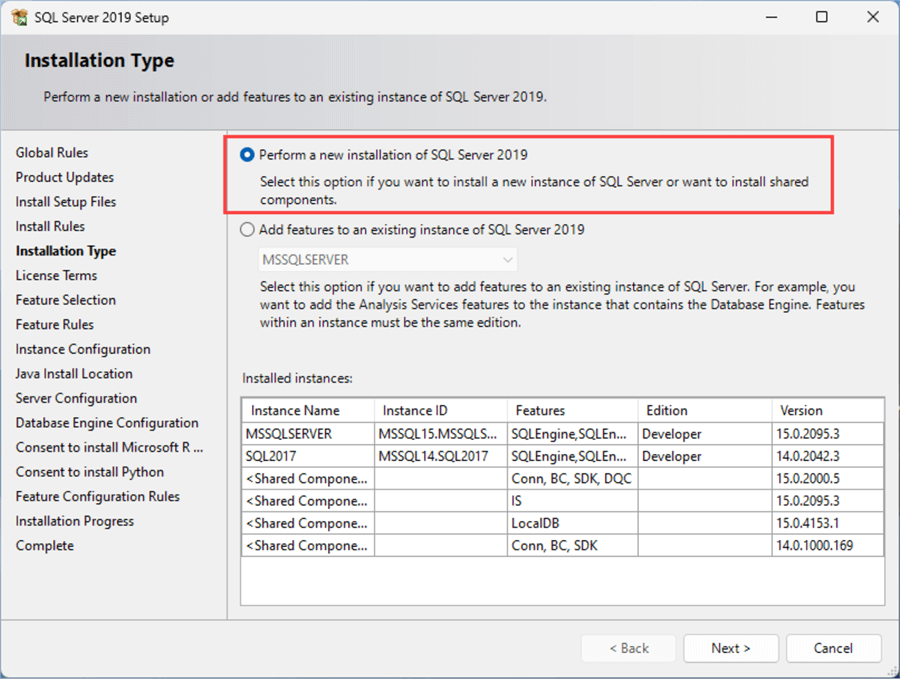
On the Installation Type screen, you can select any of the following options
- Perform a new installation of SQL Server 2019 Express edition.
- Add a feature to the existing instance of the SQL Server.
We are installing a new instance of SQL Server 2019.
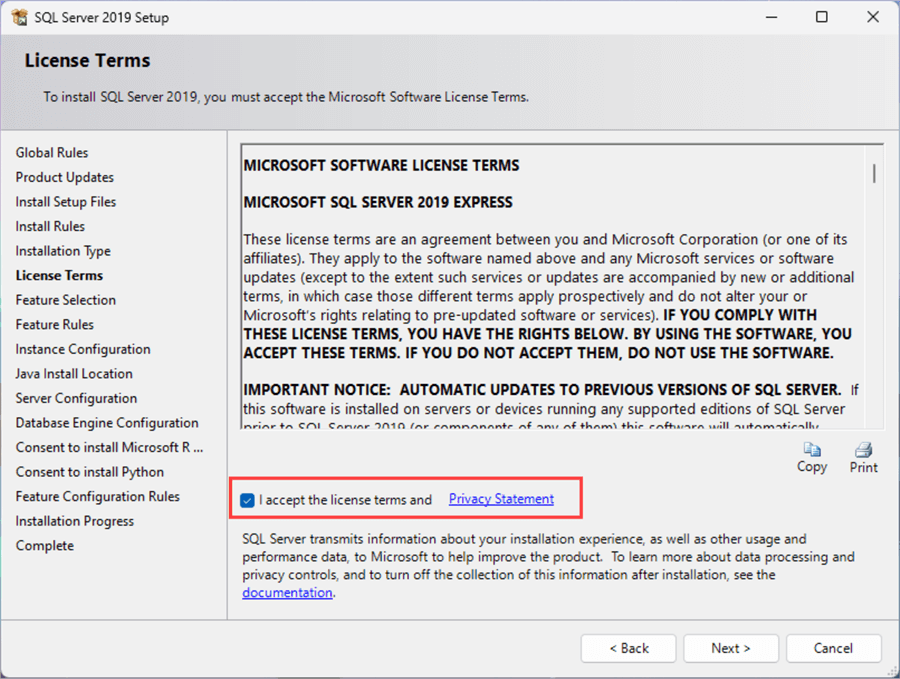
On the License Terms screen, review the Microsoft Software license terms for SQL Server 2019 express edition. Click on I Accept.
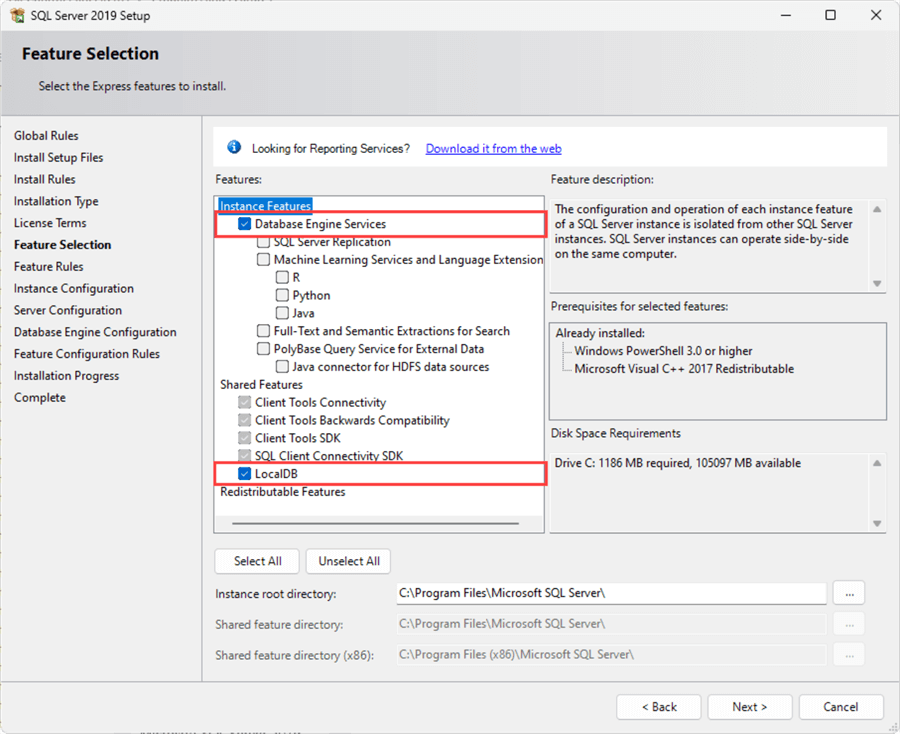
On the Feature Selection screen, you can select the features you want to install. We are installing a database engine and localdb, therefore I selected those features in the list.
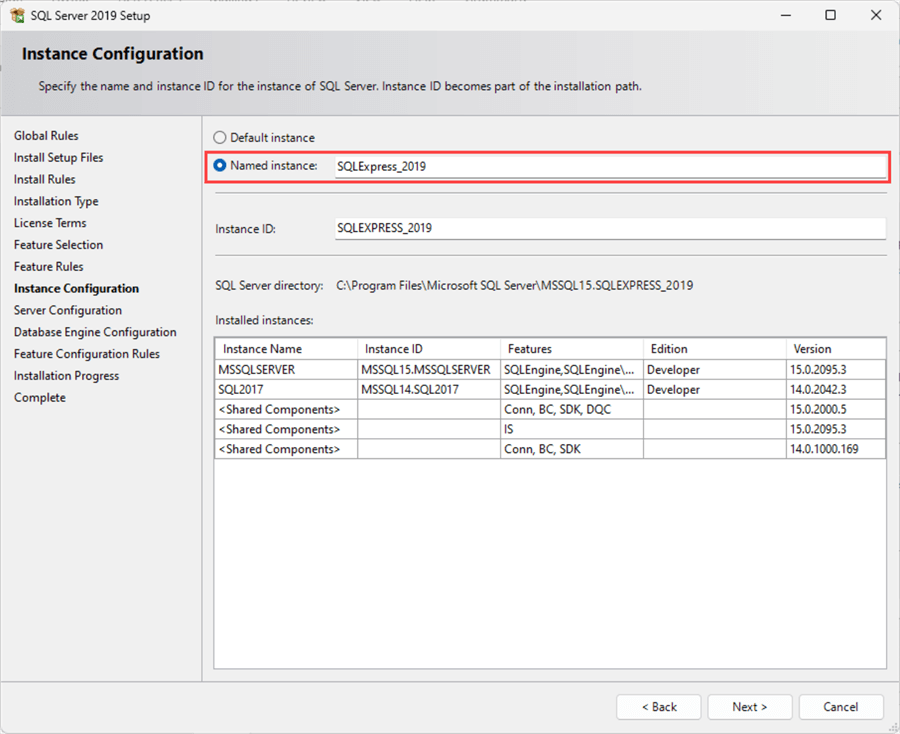
On Instance Configuration, specify the name of the SQL Server instance. We are using a named instance, therefore I have selected it and named it SQLExpress_2019.
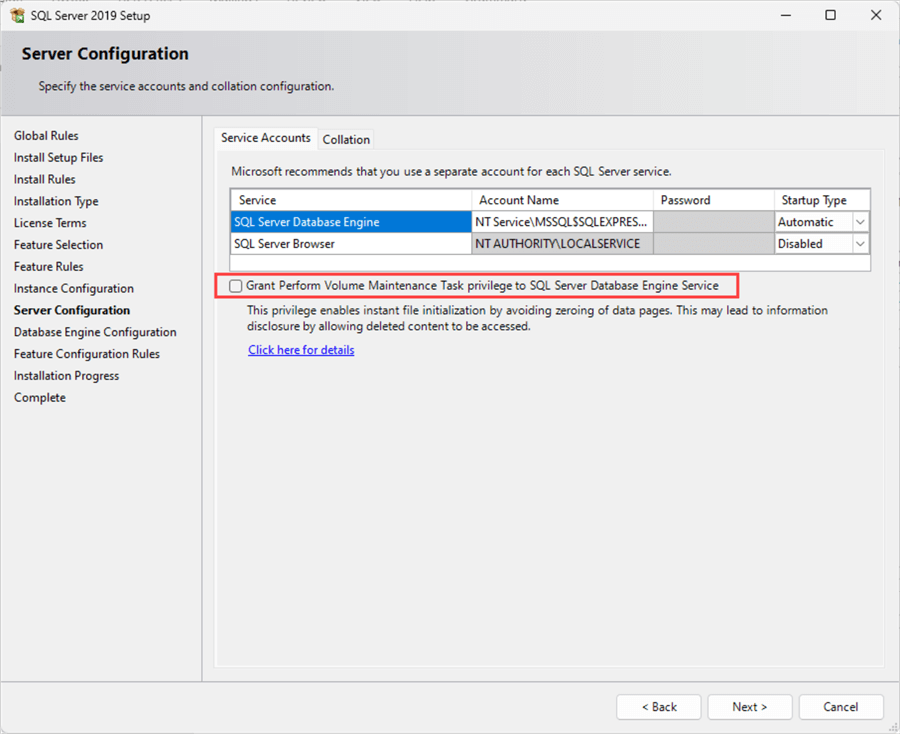
On the Server Configuration screen, specify the service accounts for the SQL Server database engine and SQL Server browser services. If you want to enable the instant file initialization, select "Grant Perform Volume Maintenance Task privilege...".
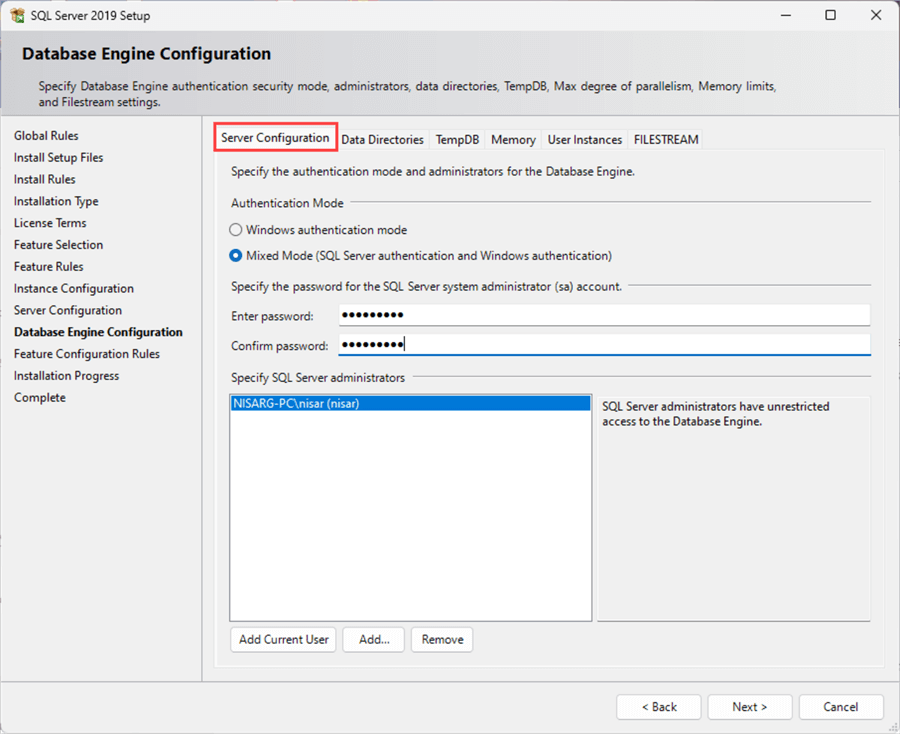
The next screen, Database Engine Configuration, is used to set the database engine configuration parameters. The parameters are in six different tabs: Server Configuration, Data Directories, TempDB, Memory, User Instances, and FILESTREAM.
Server Configuration: specify the following parameters
- Authentication Mode: it can be Windows Authentication or Mixed mode (Windows authentication + SQL Server authentication)
- Password of SA user: specify the password for SA user.
- Specify SQL Server administrator: specify the list of SQL Server administrators.
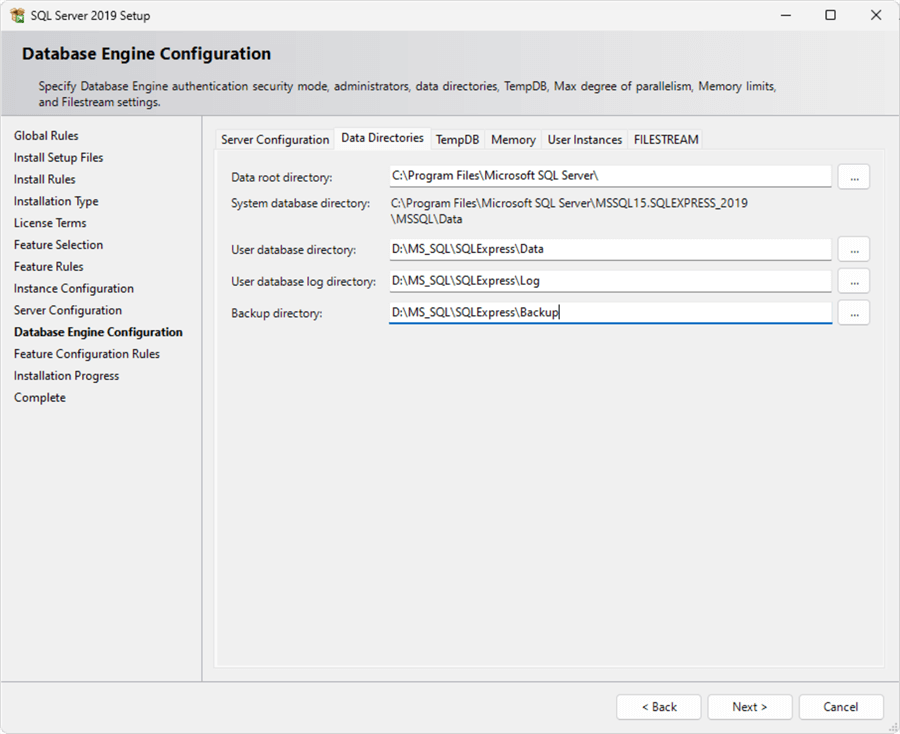
Data Directories: You can specify the location of SQL Server database files.
- Database root directory: specify the location of the SQL Express database root directory.
- User database datafile directory: specify the data file (database primary and secondary data file) directory for the user database.
- User database log file directory: specify the log file (transaction log) directory for the user database.
- Backup directory: specify the backup directory (directory where the backups are stored).
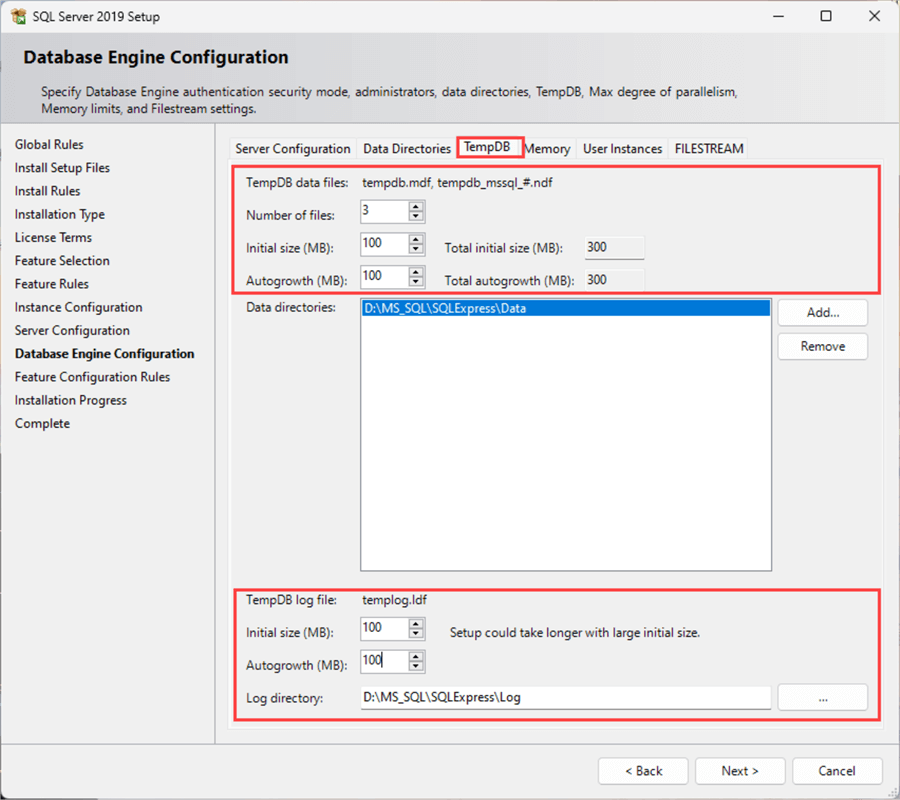
TempDB: Specify the following parameters of the TempDB database
- Data Files
- Number of files for the TempDB database.
- Initial Size: initial size of each TempDB database file.
- Autogrowth: specify the value of an auto-growth parameter of the TempDB data files.
- Data directory: specify the location of the data files for the TempDB database.
- Log File
- Initial size of the TempDB log file.
- Autogrowth: specify the value of an auto-growth parameter of the TempDB log file.
- Log directory: specify the location of the log file of the TempDB database.
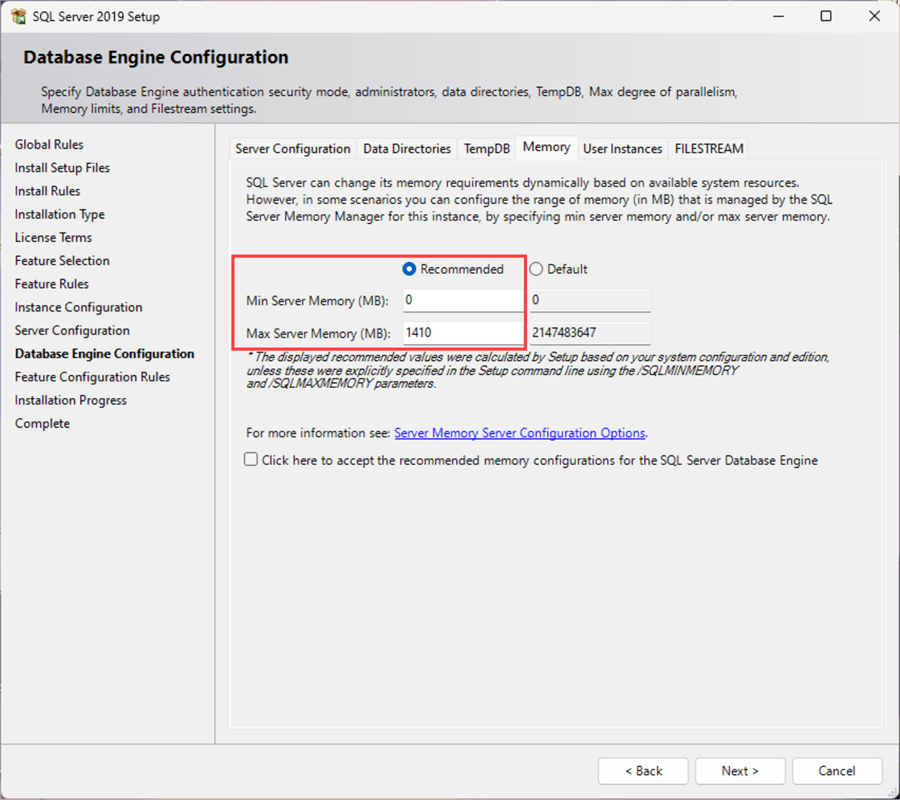
Memory: Specify the memory values in MBs that you want to allocate to the SQL Server database engine. We can manually set the Minimum and Maximum memory parameter values, or we can use the default values of Min Server memory and Max Server Memory.
Click Next to save the configuration and begin the installation of SQL Server express. Once installation completes, you can view the summary and log of the installation process.
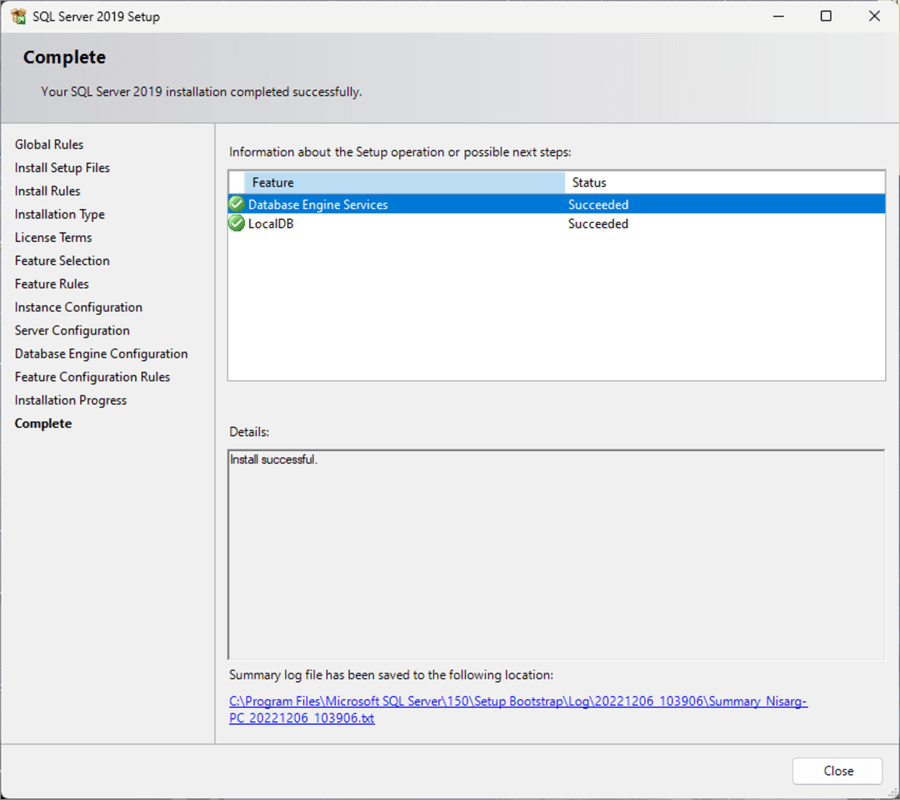
As you can see, the SQL Server database engine services and LocalDB have been installed. Now, let's connect and use the LocalDB in SQL Server express edition.
Connect to SQL Server LocalDB using SQL Server Management Studio
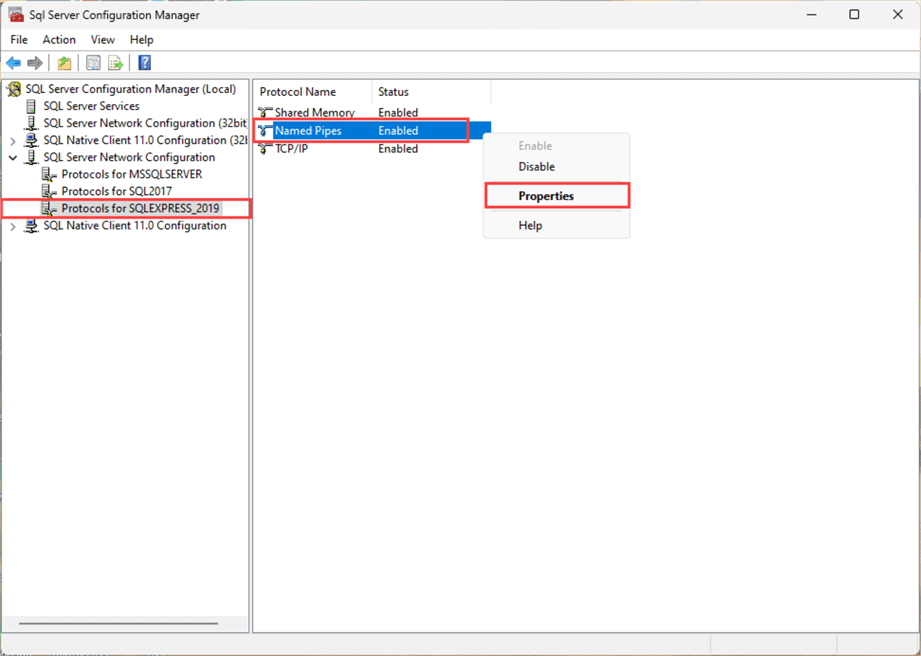
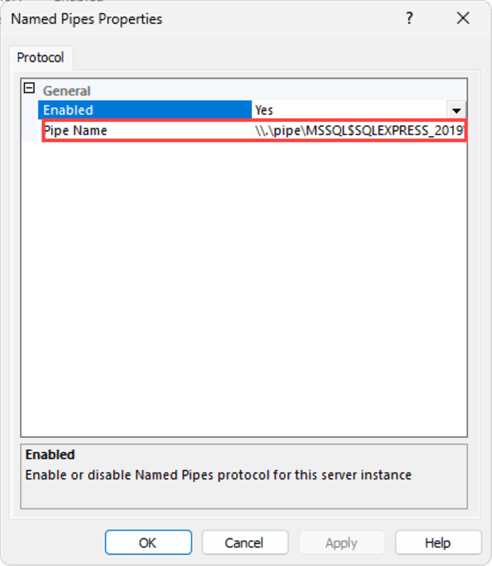
We can use the named pipe protocol to connect to SQL Server Express edition LocalDB. To do that, first, we must obtain the pipe name, which can be obtained from SQL Server Configuration Manager.
Open a command prompt with administrative access and Run SQLServerManager15.msc.
- Expand SQL Server Network Configuration
- Click on Protocols for SQLEXPRESS_2019
- Right-click on Named Pipes
- Select Properties.
A dialog box opens and you can see the Pipe Name which can be used to connect to the SQL Server Express LocalDB.
We will use the Pipe Name as the hostname in SQL Server Management Studio. Open SSMS and on the Connect to Server window, specify the pipe name in the Server name text box, and click connect.
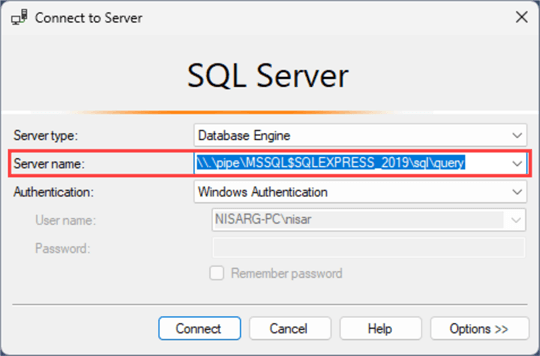
The connection will be established.
Let us run a query to view the version of SQL Server.
SELECT @@version
go
Results

As you can see in the above screenshot, the query has returned the SQL Server version, which shows that the LocalDB database instance is up and running.
Next Steps
In this article, we learned how to install SQL Server 2019 Express Edition and how to connect and configure the LocalDB.
Check out these related articles:
- MS SQL Server Installation Best Practices
- Install SQL Server 2019 Standard Edition
- How to install SQL Server 2022 step by step
- Versions of Microsoft SQL Server
About the author
 Nirali Shastri is an experienced Core Database Administrator having more than 4 years of experience managing large SQL Databases.
This author pledges the content of this article is based on professional experience and not AI generated.
View all my tips
Article Last Updated: 2023-01-11


