By: Hadi Fadlallah | Updated: 2023-01-17 | Comments (2) | Related: More > Integration Services Development
Problem
Since no official MongoDB destination component is available in SSIS, developers are still confused about migrating data from a SQL Server relational database to a MongoDB NoSQL document database. This article will give an overview of the approaches to migrating SQL Server data to a MongoDB database.
Solution
Before getting started!
It is worth mentioning that NoSQL document databases are not developed to act as a data dump! Schema-less data requires more effort in data modeling to make data retrieval more efficient.
If you are new to MongoDB, it is highly recommended to read more about the data modeling techniques and design patterns of MongoDB databases.
Another thing worth mentioning is that developers should not be confused about BSON and JSON data types; MongoDB stores the data as BSON (Binary JSON) to support more data types and guarantees a higher performance, while the data is visualized as JSON.
Inserting data into a MongoDB database using a Script Component
The most popular method to insert data into MongoDB using SSIS is to write C# code that inserts the data rows from the SSIS pipeline. MongoDB provides several official programming language drivers that allow developers to manage MongoDB databases using their preferred languages. Based on the official documentation, 12 official drivers, including the MongoDB C# driver, are provided.
Let's assume we want to migrate the Employees table from the AdventureWorks2017 database into a MongoDB collection.
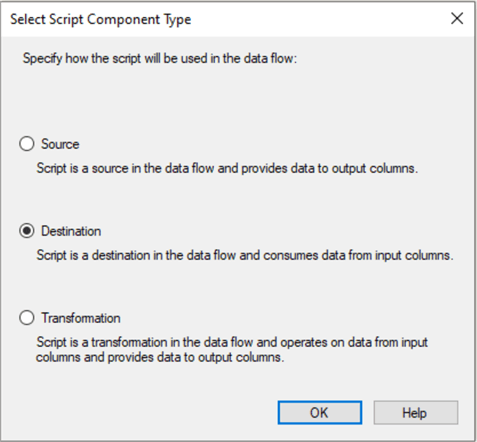
First, we should create an Integration Services project using Visual Studio. Then, we should add an OLE DB connection manager to establish an SQL Server connection. After adding the OLE DB connection manager, we should add an OLE DB source component that reads the Employee tables from the database. Then, we should add a Script Component and configure it as a destination.
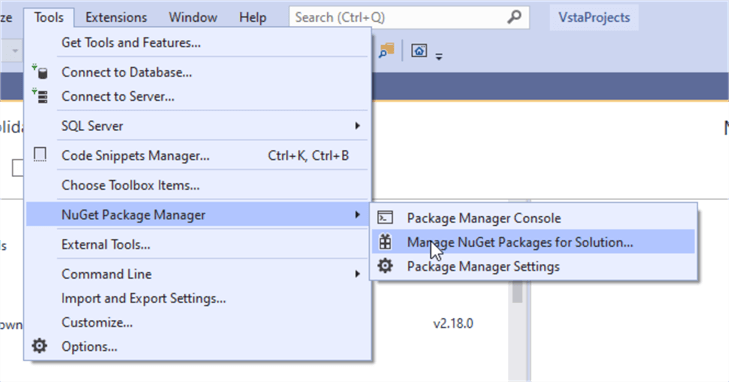
Now we should open the Script editor. Then in the menu strip, navigate to "Tools > Nuget Package Manage > Manage NuGet Packages for Solution…".
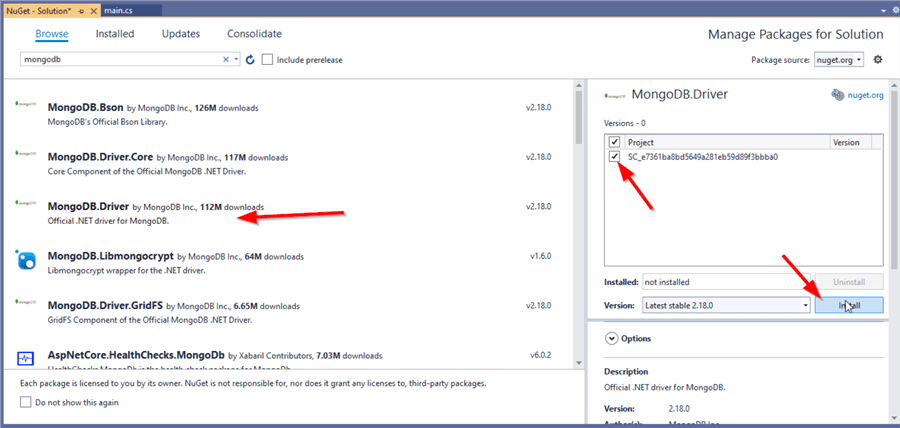
Once the Nuget Package manager window appears, search for MongoDB.Driver Nuget package, select the current script component project, and click on Install.
As shown in the license acceptance dialog, this NuGet package contains five main MongoDB libraries:
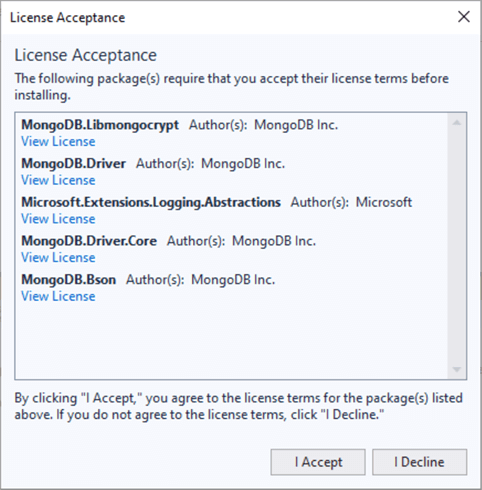
- MongoDB.Libmongocrypt
- MongoDB.Driver
- Microsoft.Extensions.Logging.Abstractions
- MongoDB.Driver.Core
- MongoDB.Bson
When the NuGet package is installed successfully, get back to the C# editor and open the main.cs class.
In the Namespaces region, we should include both MongoDB.Bson and MongoDB.Driver namespaces using the following lines of code:
using MongoDB.Bson;
using MongoDB.Driver;
Now, within the ScriptMain class, we should define the connection, database, and collection objects as follows:
MongoClient client;
IMongoDatabase database;
IMongoCollection<BsonDocument> collection;
Now, we should establish the connection and specify the destination MongoDB database and collection within the PreExecute() function since this step is required once at the beginning of the Script execution. In this tutorial, I have already created a MongoDB database named "AdventureWorks" and added a collection named "Employees" on my local machine.
client = new MongoClient("mongodb://localhost:27017/?readPreference=primary&ssl=false"); //Make sure to change the connection string based on your MongoDB installation.
database = client.GetDatabase("AdventureWorks");
collection = database.GetCollection<BsonDocument>("Employees");
Next, we should write the data insertion logic within the <Input Buffer name>_ProcessInputRow function. To insert data into MongoDB, each data row should be serialized as a BsonDocument object, as illustrated below:
var document = new BsonDocument {
    { "BusinessEntityID", Row.BusinessEntityID },
    { "NationalIDNumber", Row.NationalIDNumber },
    { "LoginID", Row.LoginID },
    { "JobTitle", Row.JobTitle },
    { "BirthDate", Row.BirthDate },
    { "MaritalStatus", Row.MaritalStatus },
    { "Gender", Row.Gender },
    { "HireDate", Row.HireDate },
    { "SalariedFlag", Row.SalariedFlag },
    { "VacationHours", Row.VacationHours },
    { "SickLeaveHours", Row.SickLeaveHours },
    { "CurrentFlag", Row.CurrentFlag },
    { "rowguid", Row.rowguid.ToString() },
    { "ModifiedDate", Row.ModifiedDate }
    };
Once the data row is serialized, we can insert it into the MongoDB collection synchronously using the collection.InsertOne() method as follows:
collection.InsertOne(document);
If we need to insert the whole data at once and not row-by-row, we should create a list of BsonDocument in the ScriptMain class:
List<BsonDocument> documents;
Instantiate it in the PreExecute() function:
documents = new List<BsonDocument>();
Then instead of using the collection.InsertOne()within the ProcessInputRow() function, we should add the serialized data row into the documents list:
documents.Add(document);
Finally, in the PostExecute method, we should use the collection.InsertMany() function to insert all documents into the MongoDB collection:
collection.InsertMany(documents);
Using an Execute Process Task
The second approach to import data from SQL Server to MongoDB using SSIS is by exporting the data to comma-separated values, then using an Execute Process Task to run the mongoimport service to import the generated CSV files into MongoDB database.
In this tutorial, we will not explain how to export data from SQL Server to external files since different methods are already explained in previously published tips on MSSQLTips:
- How to export data to a csv file using an SSIS package
- Simple way to export SQL Server data to Text Files
- Export SQL Server Records into Individual Text Files
- Export SQL Server Data with Integration Services to a Mainframe
- Simple way to export data from SQL Server
Getting back to the mongoimport service. It is a tool that imports content from an Extended JSON, CSV, or TSV files. This service is located by default in "C:\Program Files\MongoDB\Tools\100\bin\" directory.
To import data using an Execute Process Task, we should first define 4 variables (or parameters, based on the package logic) to store the MongoDB connection string, database name, collection name, and the CSV file path, as shown below:

Now, let us open the Execute Process Task editor, go to the "Expressions" tab, and add the expression below to the "Arguments" property:
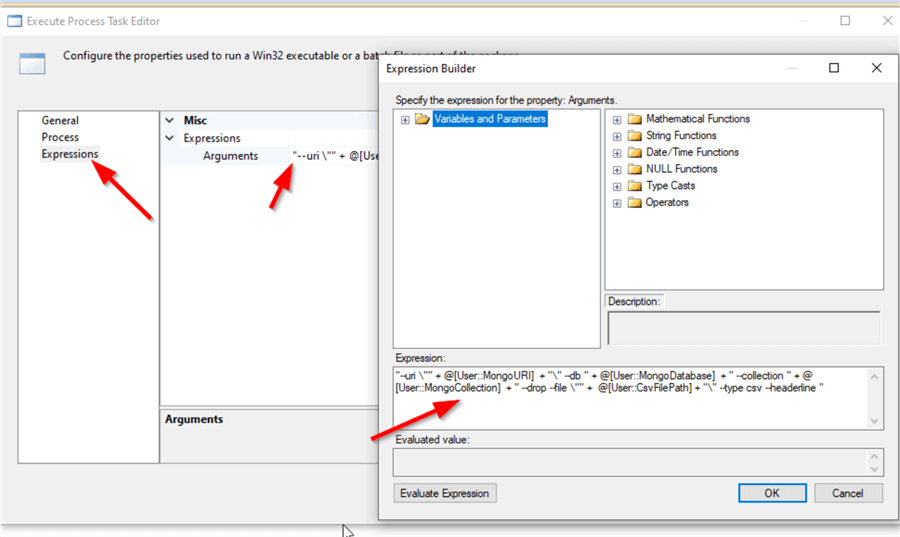
This expression contains the following arguments:
- --uri: specify the MongoDB connection string
- --db: the destination MongoDB database
- --collection: the destination MongoDB collection
- --drop: this argument forces dropping and recreating the collection (if it exists) before inserting the data
- --file: the CSV file path
- --type: specify the file type (JSON, CSV, or TSV)
- --headerline: read the columns header from the first line of the imported file.
Next, in the Process tab, we should specify "C:\Program Files\MongoDB\Tools\100\bin\mongoimport.exe" as the Executable path.
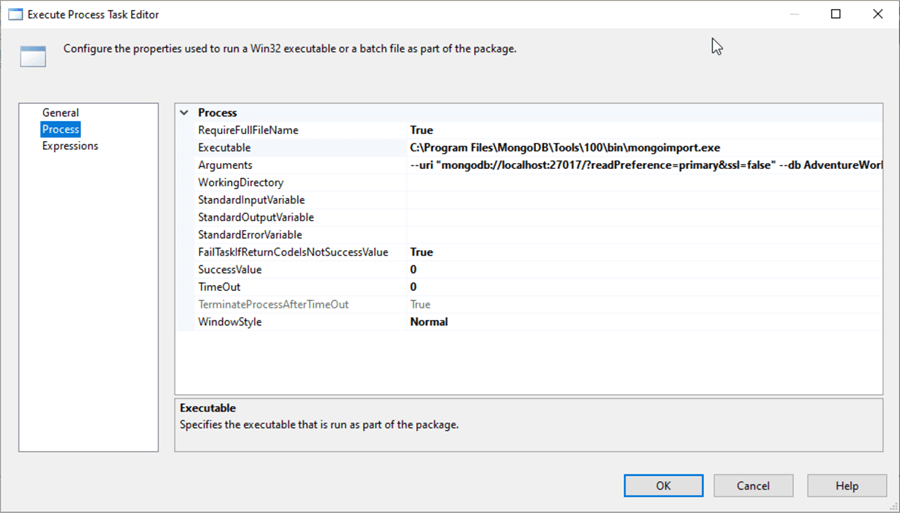
After executing the package, we can check that the "Employees" data is imported from the CSV file into the MongoDB database.

Is MongoDB BI Connector useful for inserting data into a MongoDB database?
Unfortunately, MongoDB BI Connector is read-only by definition and cannot be used to insert data. BI connector can be only useful to access MongoDB using an ODBC source component.
Next Steps
Before putting your SSIS package into production, it is highly recommended to read more about SSIS performance optimization techniques and the bad habits that you should avoid:
- SSIS Bad Habits: Decreasing SSIS Package Performance
- SSIS Bad Habits: Inefficient Data Staging Strategies
- SSIS Bad Habits: Wrong OLE DB components configuration
- SSIS Bad Habits: Inefficient data staging strategies - Part 2
- SSIS Bad Habits: Slow lookup transformations
- SSIS Bad Habits: Using Sort and Merge Join Components
About the author
 Hadi Fadlallah is an SQL Server professional with more than 10 years of experience. His main expertise is in data integration. He's one of the top ETL and SQL Server Integration Services contributors at Stackoverflow.com. He holds a Ph.D. in data science focusing on context-aware big data quality and two master's degrees in computer science and business computing.
 This author pledges the content of this article is based on professional experience and not AI generated.
View all my tips
Article Last Updated: 2023-01-17


