By: Kenneth A. Omorodion | Updated: 2023-03-24 | Comments (3) | Related: > SharePoint
Problem
Sometimes you might have your data within a SharePoint list, and you would prefer this dataset to be within a SharePoint folder instead for reasons like reporting in Power BI or Excel. You need to be able to move the data automatically from the SharePoint list to the SharePoint folder.
You might ask, what is the purpose of doing this in the first place? Recently, I helped a team create a Power App solution that allows for data entry and updating. The data was entered into a SharePoint list from the App. The requirement was that a new row of data will be created each time an existing record is updated. But this is not how the gallery and form updating in Power Apps works. Only updates can be done; it would not usually create a new row of data unless a new record entry is made each time. This is just a sample scenario. Your business requirement might be different, i.e., you need to extract the data and create a CSV file in the SharePoint folder.
Solution
In the example above, the end solution was to ensure that each updated record carries a new datetime, then use Power Automate to extract the data and create a CSV file in a SharePoint folder to load the files periodically. The CSV files would then be combined (appended) in Power BI and deduped to ensure accurate reporting. However, in this article, I will concentrate on how to automate the extraction of the SharePoint list dataset and create a CSV file in the SharePoint folder using Power Automate.
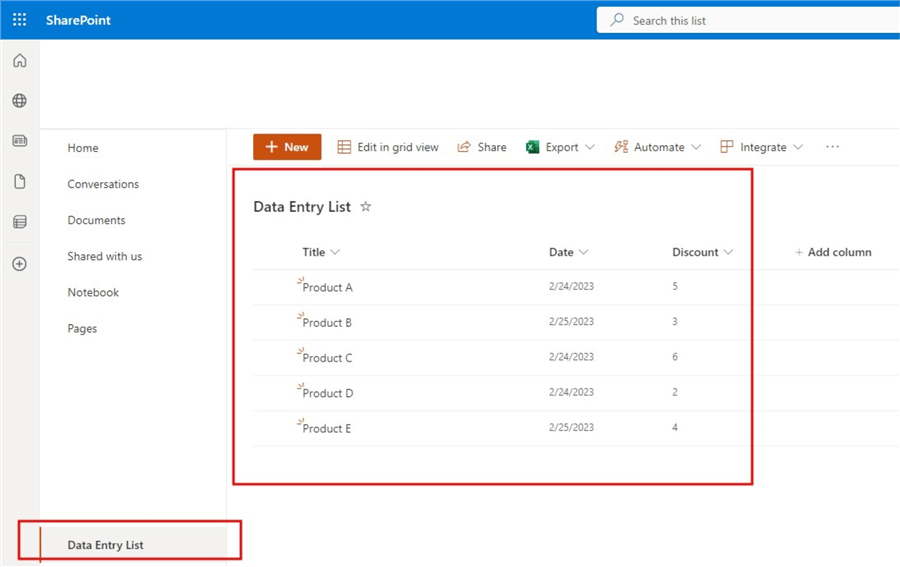
In this demo, I will use the SharePoint list, as shown in the image below. It has only three columns; yours might have more (the real business case above had over 40 columns).

To demonstrate, I have separated the steps followed as follows.
- Create a new folder within your SharePoint site
- Go to Power Automate and create a Scheduled cloud flow
- Create and configure the "Get Items" action flow step
- Create and configure the CSV table in the SharePoint folder flow step
- Create and configure the create a file action flow step
- Save and test the solution
Step 1: Create a New Folder Within Your SharePoint Site
Creating a new folder can be done by anyone. However, check if you have permission to create a folder in your organization's SharePoint environment. It is possible to use an existing folder too.
If you need to create a new folder, follow the image below to guide you.

Step 2: Go to Power Automate and Create a Scheduled Cloud Flow
On your browser, you can type https://make.powerautomate.com/ to access Power Automate. Then follow the steps in the image below to create a "Scheduled cloud flow."

On the window that opens after selecting "Scheduled cloud flow," you must enter a name for the Flow. For this demo, I have named it "Extract SharePoint List Data." You will also need to enter a schedule for the flow to run. As seen in the image below, I have set this demo to start on 25 February 2023 and automatically repeat every 7 days. After entering the details, click "Create."

Once the scheduled cloud flow step is created, you can see it (image below), and it is editable in case you need to make changes.

Step 3: Create and Configure the "Get Items" Action Flow Step
This step begins with clicking "+ New step," as seen in the image above. Type "Get items" in the action step window that opens, as seen in the image below.

You can get more information on the "Get items" action in Power Automate here. In a nutshell, the "Get items" action step is going into the SharePoint list and extracting data periodically.
Next, you need to configure the "Get items" action flow, as seen in the image below. Note: the only mandatory sections in this step are "Site Address" and "List Name."

For the "Site Address," I have clicked on the dropdown at the end of the section and selected the name of my SharePoint address accordingly. The same was done for the "List Name" section, where in this case, I chose the name of the SharePoint list I am extracting data from.
Step 4: Create and Configure the CSV Table in the SharePoint Folder Flow Step
This step creates a flow step that takes the extracted data and creates a CSV table in the SharePoint folder.
Again, to start this step, click "+ New step" and enter "Create CSV table" in the Choose an operation search bar, as seen in the image below.

Once selected, configure the "Create CSV table" flow. Note: You can expand the point that states "Show advanced options," which allows you to determine to auto-populate the columns (bring in other default columns within your SharePoint list, some of which you did not create) or change it to "Custom" allowing you to choose which columns you want in the CSV table.
Using the Auto-Populated Option
To use the auto-populated option, configure it, as seen in the image below. Click inside the "From" mandatory section, and the dynamic content window will open, as seen below. Then select "value" from the contents, as seen in the image below.

Next, ensure the "Columns" section remains on "Automatic," as seen in the image below.

Using the Custom Option
To use the "Custom" option, manually select each column you want, as seen in the image below.
To begin, change the "Columns" section value to "Custom," then on the "Header" sections, enter any column names you want. On the "Value" sections, use the dynamic content to enter the values in that column as created in the SharePoint list. See the image below.

Whichever option you choose depends on your business need; both will work fine. Note: The automatic option is must faster to configure, but it packs additional columns you might not need. For this demo, I will continue with the custom option.
Step 5: Create and Configure the Create a File Action Flow Step
This is the step where we create the CSV file within the CSV table created in the previous step.
To set up this step, we need to click "+ New step" as we did before, then type "Create file" on the "Choose an operation" search bar. Select the "Create file SharePoint," as seen in the image below. You can read more about this action operation here.

The image below shows the window that opens once "Create file" is selected above.

There are four mandatory sections to complete for this configuration. Firstly, enter the "Site Address" by clicking the dropdown at the end of the section and selecting the SharePoint address, as seen in the image below.

Similarly, for the "Folder Path," click on the folder symbol at the end of the section and navigate to the folder created earlier where the CSV files will be saved. See the image below.

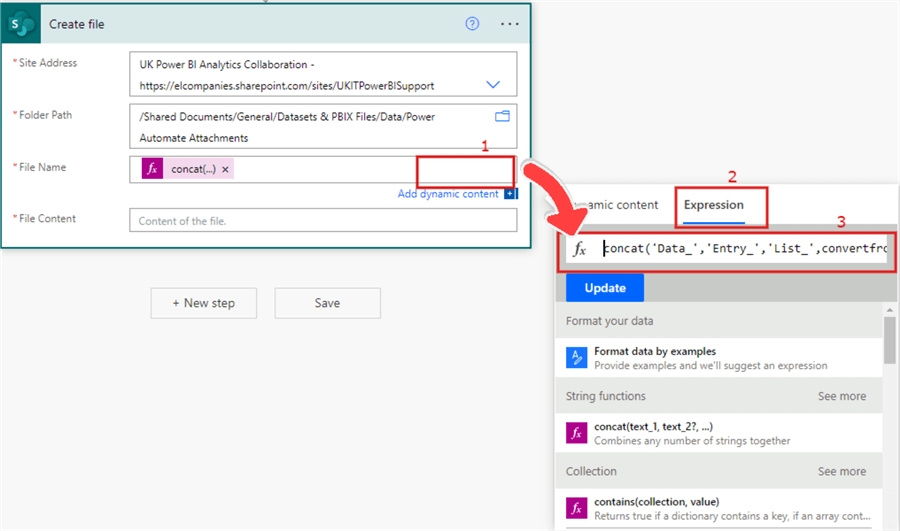
In the "File Name" section, create a dynamic name for each CSV file created in the folder. Since we expect the number of files to increase over time, it is a best practice to ensure each file created has a unique name different from the previous one; otherwise, overwriting or errors might occur.
To ensure unique CSV file names, we need to merge a datetime stamp to each file. We need to leverage the dynamic content expression using the expression below. In a nutshell, the expression below uses the "CONCAT" function to combine the file name "Data Entry List" and a datetime stamp using "convertfromutc(utcNow(), 'GMT Standard Time', 'ddMMyyyy hh:mm:ss tt'". Please see my other blog, where I did something similar here.
= concat('Data_','Entry_','List_',convertfromutc(utcNow(), 'GMT Standard Time', 'ddMMyyyy hh:mm:ss tt'),'.csv')
Follow the steps shown in the image below to achieve this.

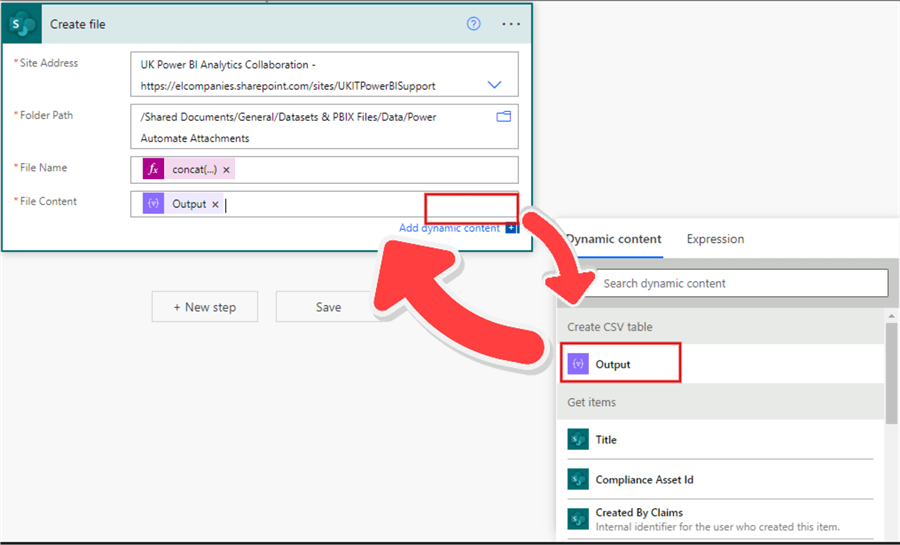
Finally, we must leverage the dynamic content to get the "File Content." See the image below for how to achieve this.

Step 6: Save and Test the Solution
After the last flow step above, click "Save." A confirmation will appear in the top left corner, assuring your work was successfully saved. If your flow is ready to go, you might see a warning message on the right side of the screen, as seen in the image below. Ignore and cancel this message.

Next, click "Test" in the top right corner to test the flow. This demonstration was tested using the "Manual" testing (see image below).

The image below shows that the demo flow ran successfully.

Usually, I will verify in the SharePoint folder if a CSV file has been created with the name "Data Entry List" + datetime stamp. This is shown in the image below.

In summary, this article successfully demonstrated how to create a SharePoint list data export and create a CSV file in a SharePoint folder using Power Automate. This was further automated to merge the file name with a datetime stamp to ensure the uniqueness of the files.
Next Steps
- See my other blog on concatenating a datetime to a file name here.
- Check out this blog on enjoy SharePoint here.
- Get more information on getting started with Power Automate in this Microsoft documentation.
- Read more on Time Zone Ids from this Microsoft documentation here.
About the author
 Kenneth A. Omorodion is a Business Intelligence Developer with over eight years of experience. He holds both a bachelorís and masterís degree (Middlesex University in London). Kenneth has the MCSA, Microsoft Data Analyst - Power BI and Azure Fundamentals certifications. Kenneth is a Microsoft Certified Trainer and has delivered corporate training on Power BI, SQL Server, Excel and SSRS.
This author pledges the content of this article is based on professional experience and not AI generated.
View all my tips
Article Last Updated: 2023-03-24


