By: Edwin Sarmiento | Updated: 2024-02-06 | Comments | Related: 1 | 2 | 3 | > Clustering
Problem
I used the guide in a previous tip on Install SQL Server 2008 on a Windows Server 2008 Cluster Part 1 to install a SQL Server 2008 on a Windows Server 2008 failover cluster (WSFC). Now, I would like to upgrade and migrate my SQL Server 2008 failover clusters to SQL Server 2022 running on Windows Server 2022. What is the process for installation and configuration?
Solution
To continue this series on Step-by-Step Installation of SQL Server 2022 on a Windows Server 2022 Failover Cluster, we will look at adding a node to an existing SQL Server 2022 failover clustered instance (FCI). In Part 2, you completed the installation of a single-node SQL Server 2022 FCI. This tip will cover installing a secondary node to an existing SQL Server 2022 FCI.
SQL Server 2022 Failover Cluster Instance Installation - Install Secondary (Failover) Cluster Node
The SQL Server 2022 FCI installed in Part 2 is not highly available even though it is a fully functioning instance. To make it highly available, you need to add nodes to it. To add a node to an existing SQL Server 2022 FCI, use the following steps:
Step 1
Run setup.exe from the SQL Server 2022 installation media to launch the SQL Server Installation Center. Click Installation on the left-hand side.
Step 2
Click the Add node to a SQL Server failover cluster link. This will run the SQL Server 2022 Setup wizard.

Step 3
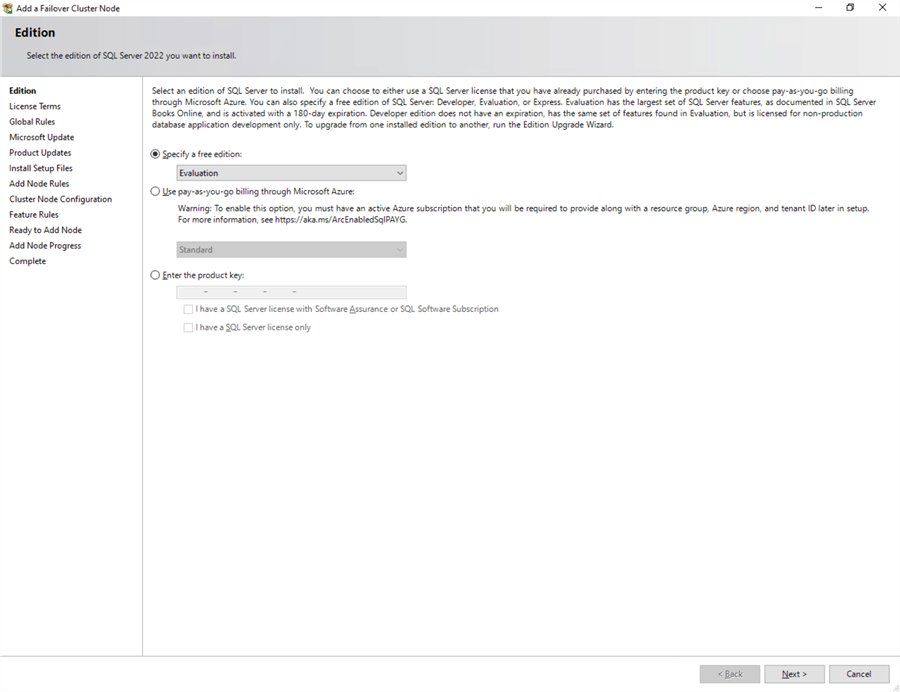
In the Product Key dialog box, enter the product key that came with your installation media and click Next.

Step 4
In the License Terms dialog box, click the I accept the license terms check box and click Next.

Step 5
In the Global Rules dialog box, validate that the checks return successful results and click Next.

Step 6
In the Microsoft Update dialog box, click Next.
Adding a node to an existing SQL Server FCI while slipstreaming the latest cumulative update will be covered in the section called Adding a Node to an Existing SQL Server 2022 Failover Clustered Instance (FCI) with Slipstreamed Updates.

Step 7
In the Add Node Rules dialog box, validate that the checks return successful results. If the checks returned a few warnings, fix them before installing. Click Next. Just like when you were installing the SQL Server 2022 FCI in Part 2, be aware that you will get a warning result for Microsoft Cluster Service (MSCS) cluster verification warnings as a side effect of the storage spaces direct (S2D) checks described in this tip.

Step 8
In the Cluster Node Configuration dialog box, verify that the information for the existing SQL Server 2022 FCI you installed and configured in Part 2 is correct. Then, click Next.

Step 9
In the Cluster Network Configuration dialog box, validate that the IP address information is the same as you provided in the previous tip. Click Next.

Step 10
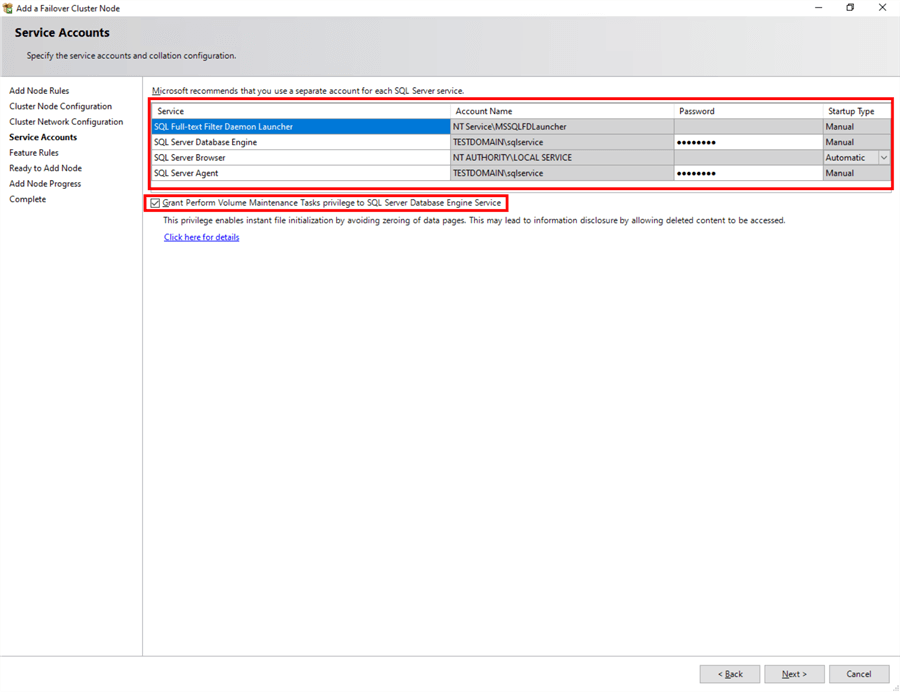
In the Service Accounts dialog box, verify that the information is the same as what was used to configure the first node. Provide the appropriate credentials for the corresponding SQL Server service accounts.
Pay close attention to the order of the SQL Server services, especially when you use different service accounts. In the previous tip, you see the SQL Server Agent service listed first before the SQL Server Database Engine service. Here, it's the reverse - the SQL Server Database Engine service is listed first before the SQL Server Agent service. Be sure not to mix those two up.
Select the Grant Perform Volume Maintenance Task privilege to SQL Server Database Engine Service checkbox to enable Instant File Initialization for SQL Server as highlighted in this tip. Because this is a local permission assigned to an account, you need to explicitly do this on all the nodes in the SQL Server FCI.
Click Next.

Step 11
In the Feature Rules dialog box, verify that all checks are successful. Click Next.

Step 12
In the Ready to Add Node dialog box, verify that all configuration settings are correct. Click Install to proceed with the installation.

Step 13
In the Complete dialog box, click Close. This concludes adding a node to an existing SQL Server 2022 FCI.

Repeat steps #1 to #13 to add more nodes to the SQL Server 2022 FCI.
After a successful installation and configuration of the node, you need to validate whether the SQL Server 2022 FCI will failover - automatically or manually - to all the available nodes. This will be covered in the section Testing SQL Server 2022 FCI Manual Failover with Application Connectivity.
Adding a Node to an Existing SQL Server 2022 Failover Clustered Instance (FCI) with Slipstreamed Updates
Slipstreaming updates when adding a node to an existing SQL Server 2022 FCI installation is similar to the steps outlined in the previous tip. It also requires installing SQL Server from the command line, but the /Action=AddNode parameter will be used. The example command below references the \\HAFileShare\SQLServerCUs shared folder to look for SQL Server 2022 updates.
setup.exe /Action=AddNode /UpdateEnabled=True /UpdateSource="\\HAFileShare\SQLServerCUs"

The Product Updates section of the Add a Failover Cluster Node process will confirm whether the updates have been detected.

Proceed with adding a node to an existing SQL Server FCI as outlined in the previous section, SQL Server 2022 Failover Cluster Instance Installation - Install Secondary (Failover) Cluster Node. The Ready to Add Node dialog box of the installation process will also confirm the SQL Server version number after the installation. In this example, the installation media is using the RTM version of SQL Server 2022 (16.0.1000.0), while the update contains SQL Server 2022 CU 5 (16.0.4045.0), as shown in the Update Version: field.

Testing SQL Server 2022 FCI Manual Failover with Application Connectivity
A simple way to test whether the SQL Server 2022 FCI works is to perform a manual failover, which involves moving the SQL Server cluster resource group/role from one node to another. A simple query using SQL Server Management Studio as the client application can be used for this test. It is recommended to perform this test with application connectivity to observe how the application behaves during the failover process. Refer to the query below and connect to the SQL Server 2022 FCI.
SELECT @@VERSION
SELECT @@SERVERNAME AS InstanceName, SERVERPROPERTY ('ComputerNamePhysicalNetBIOS') AS NodeName
SELECT * FROM sys.dm_os_cluster_nodes

To test the failover process using the Failover Cluster Manager console:
Step 1
Expand Roles and select SQL Server (<NAME>).
Step 2
Right-click the SQL Server (<NAME>) role, select Move and click Select Node...

Step 3
In the Move Clustered Role dialog box, select the node where you want the SQL Server FCI to move into. Click OK.

Step 4
After completing the failover process, re-run the query above to verify that the SQL Server FCI is now running on the other node.

Another way to perform a manual failover test is by using the Move-ClusterGroup PowerShell cmdlet, as described in this previous tip.
Move-ClusterGroup "SQL Server (TDPRDSQLCLS88)" -Node "TDPRD082"
Next Steps
Review the previous tips on Install SQL Server 2008 on a Windows Server 2008 Cluster Part 1, Part 2, Part 3, and Part 4 to see the difference in the setup experience between a SQL Server 2008 FCI on Windows Server 2008 and a SQL Server 2022 FCI on Windows Server 2022.
- Read more on the following topics:
About the author
 Edwin M Sarmiento is a Microsoft SQL Server MVP and Microsoft Certified Master from Ottawa, Canada specializing in high availability, disaster recovery and system infrastructures.
This author pledges the content of this article is based on professional experience and not AI generated.
View all my tips
Article Last Updated: 2024-02-06


