By: Temidayo Omoniyi | Updated: 2024-02-20 | Comments (3) | Related: > Azure Data Factory
Problem
Migrating large amounts of data from multiple sources to a particular destination has always been critical for data professionals worldwide. The ability to dynamically move data while maintaining its integrity is of the utmost importance. As data professionals, we continue to seek out the best platform for achieving this need.
Solution
Microsoft Azure Data Factory (ADF) allows data professionals to dynamically move bulk data from multiple sources to a required destination using the ForEach and Lookup activities.
This article will discuss multiple concepts for achieving this process. We will divide it into separate sections, each containing different scenarios.
Section 1: Migrate Bulk Data from One Azure Data Lake to Another
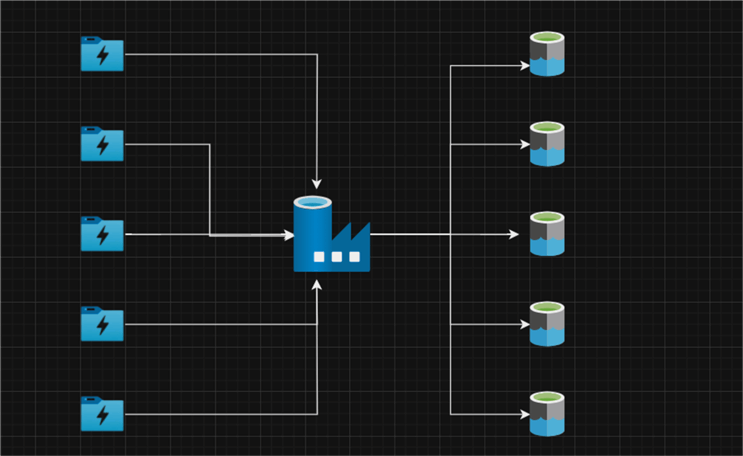
The first section focuses on migrating multiple data from Azure Data Lake Staging storage to Azure Data Lake Gen 2 using the Lookup and ForEach activities in ADF.
Some of our previous articles describe how to create the necessary resources for ADF and Azure Data Lake Gen 2.
Linked Services
The ADF Linked Service provides a connection to the external data source, giving ADF the information needed to connect and interact with an external system. We will create two Linked Services for the source (Azure Data Lake Staging Storage) and sink (Data Lake Gen 2).
Dataset
The dataset in ADF describes the structure and location of the data. Since the datatype will be in a CSV format, we will migrate the data from Azure Data Lake Staging to Data Lake. The input and output data for ADF actions are defined by datasets.
Create a Simple Copy Activity in ADF
Let's start by creating a simple copy activity, moving data from Azure Data Lake Staging Storage to Azure Data Lake Gen 2. This is done as a testing process to confirm everything is working as expected.
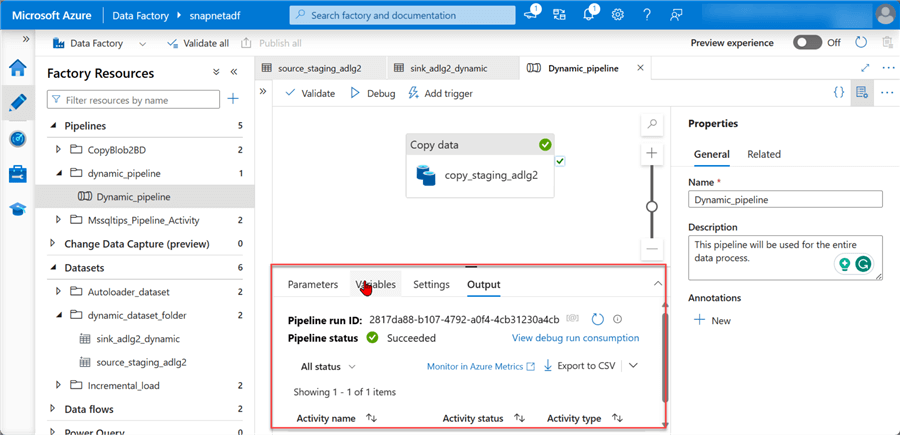
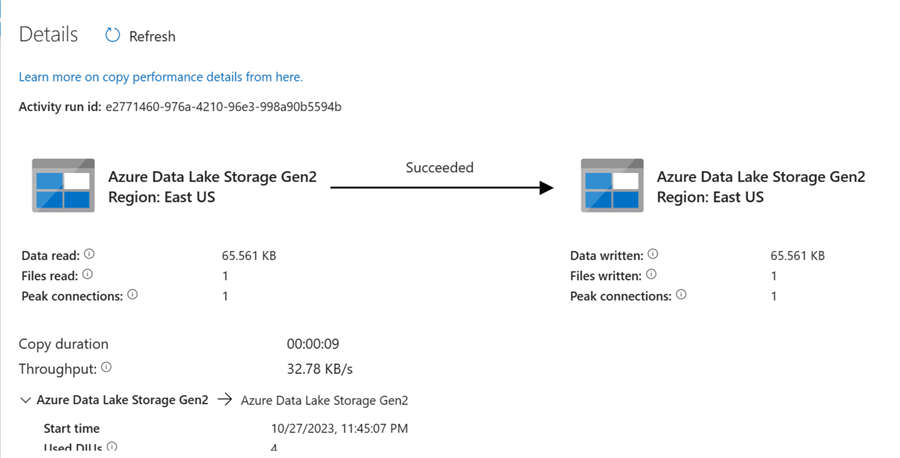
The image below shows the pipeline successfully copied from Azure Data Lake Staging Storage to Azure Data Lake Gen 2. After you are satisfied with this process, delete the copied file in the Azure Data Lake Gen 2.
ADF Parameter and Variable
These two features are used in storing and passing values to pipeline activities and datasets. They are important for dynamically moving data from one destination to another.
- ADF Parameter. In the ADF pipeline, parameters define values that may be passed to activities and datasets. When a pipeline is run, parameters are usually utilized to allow users to provide alternative values. One common use case is to specify the name of a file to copy or the target table to load data into.
- ADF Variables. Variables in ADF are also defined in the pipeline but are not usually passed in an activity or dataset. Intermediate values needed by several pipeline activities are typically stored in variables. One usage for a variable would be to keep track of how many rows were transferred during a copy activity.
Set Parameter Pipeline
Let's start by adding Parameters to all the necessary parts needed for the pipeline.
Step 1: Source Parameter.
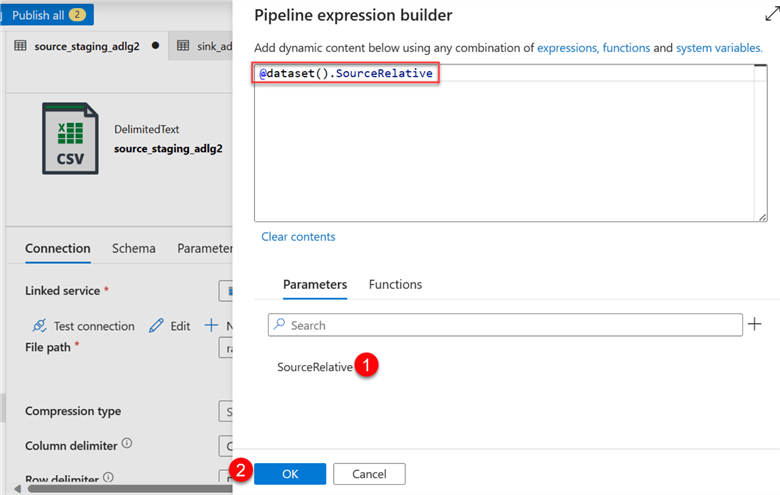
In your ADF, click on the source dataset and select the Parameters. In the Parameter table, add a new Parameter, "SourceRelative."
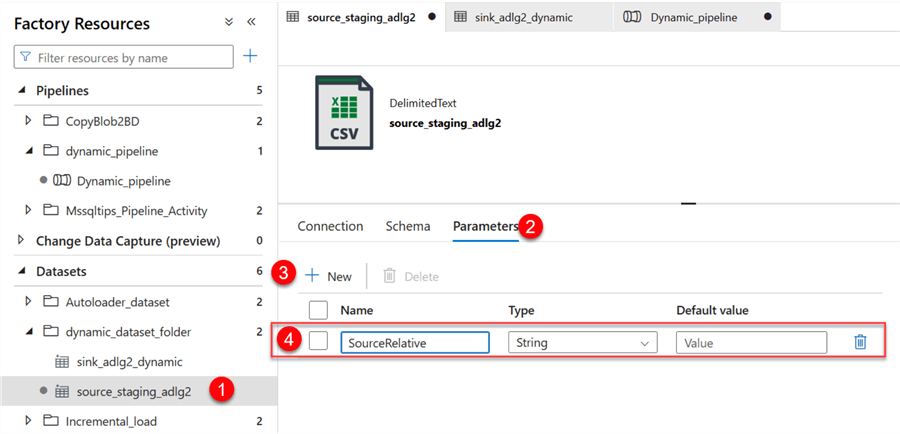
Click the Connection tab, then select Dynamic Content in the File Path. This should open another window.

In the new window, add the new parameter just created to the data source File Path. Select the SourceRelative in the Parameters section at the bottom, then click OK. This will automatically add the parameter to the data source file path.

Step 2: Sink Parameter.
You will repeat the same process for the sink dataset. Click on the sink dataset and select the parameter. Put the Filename as the parameter to use.

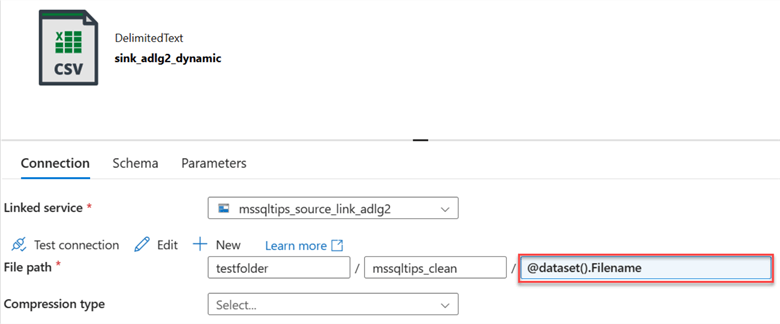
Next, we need to add the new parameter Filename to the Connection. Click on the Connection tab, select the Dynamic Content, and fill in the following information:
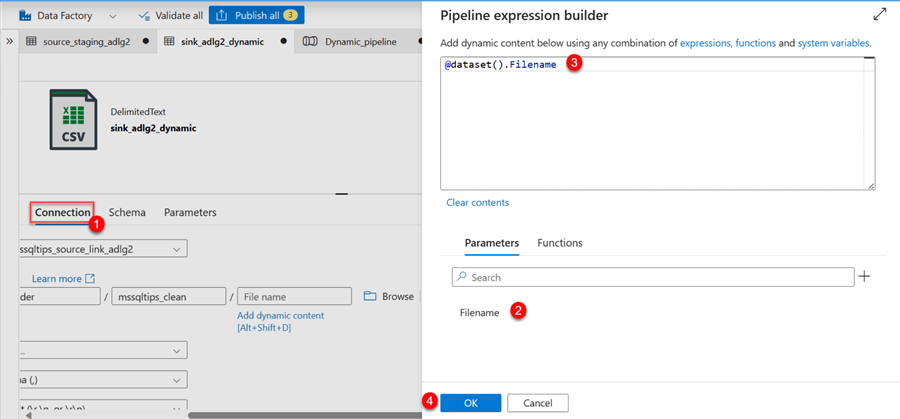
You will notice the parameter sink name in the connection.
Step 3: Set Pipeline Parameter.
Click on the Copy pipeline we created earlier. In the pipeline, select Parameters, then fill in the following information:
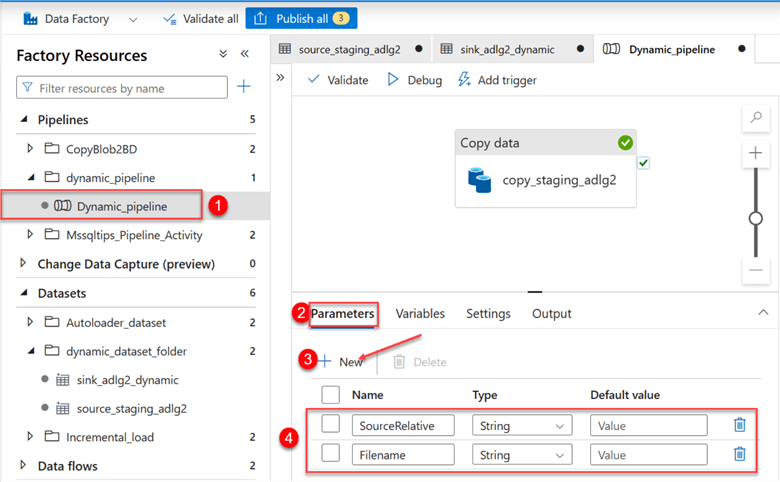
Step 4: Set Activity Parameter.
Now, we need to change the source and sink of the activity. Start by clicking on the copy data activity.
Click the Source tab and click Dynamic Content. This should take you to another window, in which you will select the Source Parameter.
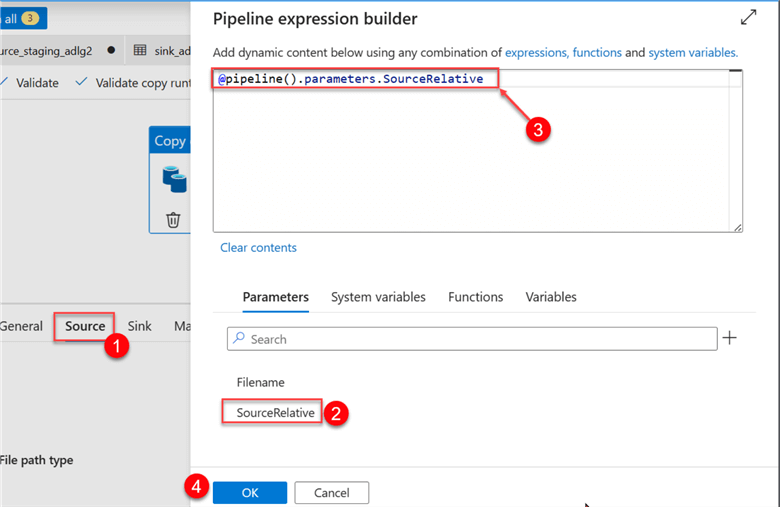
You will notice the new Dynamic Content in the value section.

Repeat the same process for the Sink by selecting the Sink tab and changing the value to Parameter of the Filename.

Step 5: Publish All, Validate, and Debug.
For the last step, we need to Publish all, which will save all changes made in the dataset and pipeline. The Validate tab checks for errors, while the Debug runs the pipeline manually.
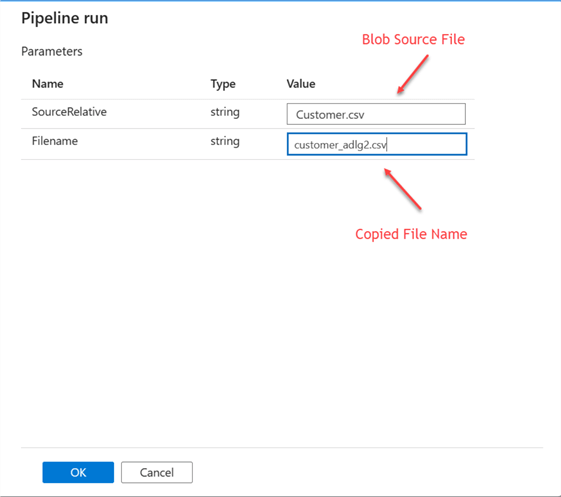
After clicking on the Debug table, a new window appears from the right-hand side. Fill in the following information:
- SourceRelative should be the file name from your Azure Data Lake Staging storage.
- Filename is the new name you want to give it in your Azure Data Lake Gen 2.
The new file has been copied to the Azure Data Lake Gen 2 container.
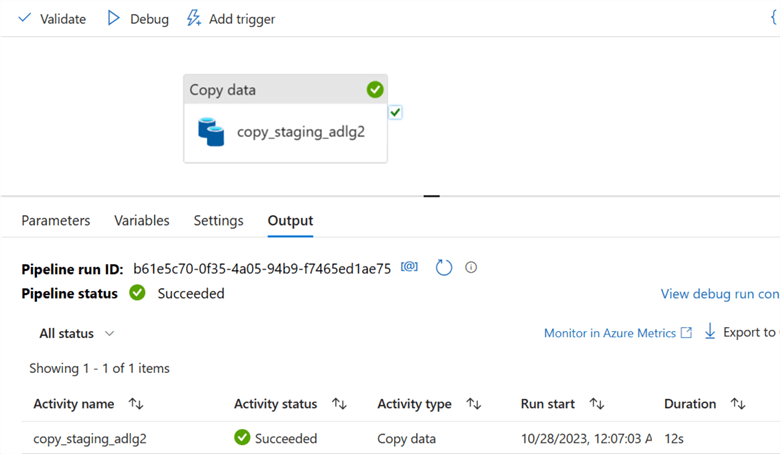
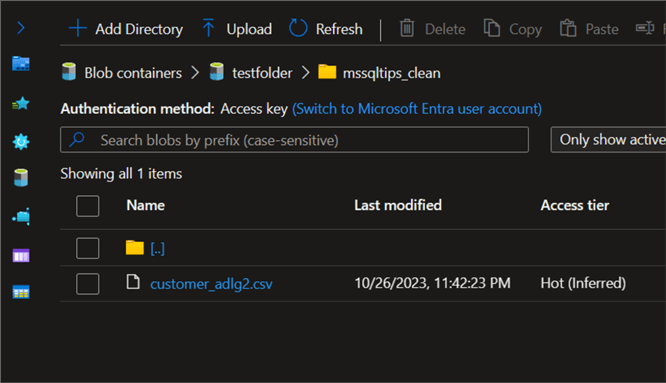
Dynamically Copy Multiple Data from Azure Data Lake Staging to Data Lake Gen 2
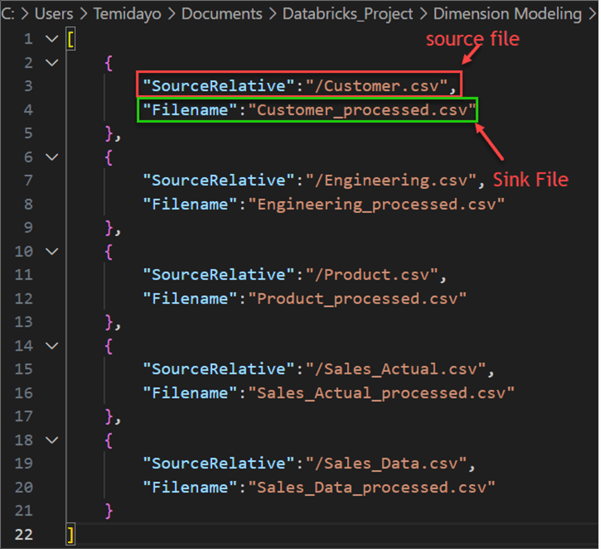
Now, let's move multiple data from the Azure Data Lake Staging storage to the Data Lake using the Lookup and ForEach activities. To achieve this, I have prepared a config file in JSON format containing the different Source and Sink names we want to use.
Configuration File
To get started with the dynamic copy, we first need to create a configuration file in JSON format. The configuration file adds two main variables to the Source: SourceRelative and Filename. The SourceRelative variable indicates the data you want to copy from the Azure Data Lake Staging storage, and the Filename variable indicates the data you want to save in the copied file in Data Lake Gen 2.
Lookup Activity
The Lookup activity in ADF retrieves data from a dataset and feeds it to subsequent activities in a pipeline. It can retrieve data from multiple sources, such as cloud data stores from other vendors, on-premises data stores, and Azure data stores.
ForEach Activity
The ForEach activity in ADF iterates over a collection of items and performs a specific action on each item.
They are useful in performing tasks such as:
- Processing files in a folder one by one.
- Importing information from a list of tables into a database.
- Calling a REST API for each item in a list.
The following steps are needed to conduct the Dynamic Data Migration.
Step 1: Add Config File Dataset.
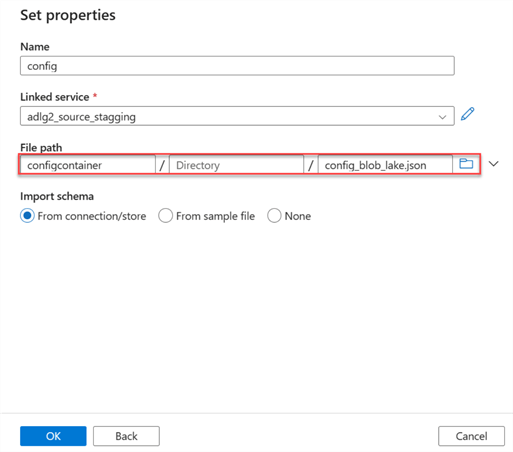
Let's start by adding the config JSON file to the ADF dataset. From the image below, we have already uploaded the config file to our Data Lake Gen 2.

Add the dataset to ADF and select the file path directory. It should be noted that this is a JSON file.
Step 2: Add Lookup Activity.
In your Azure activity, search for Lookup and drag it to your pipeline canvas.
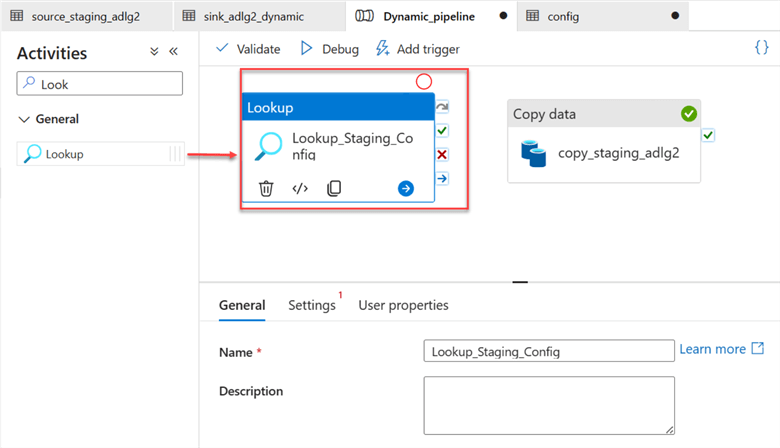
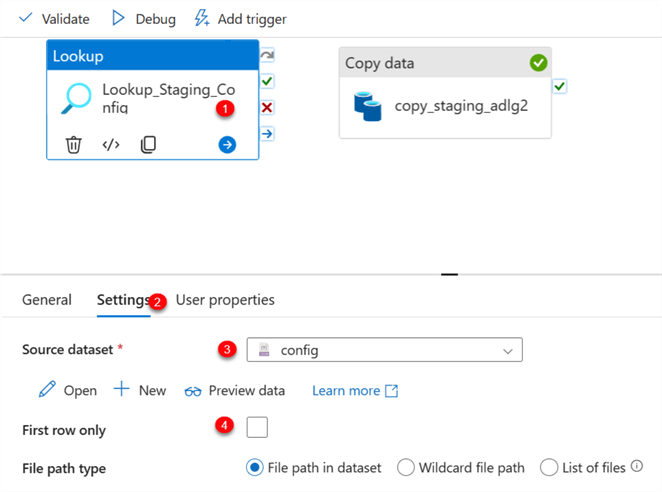
Select the Lookup activity and perform the following configuration on your Settings tab.
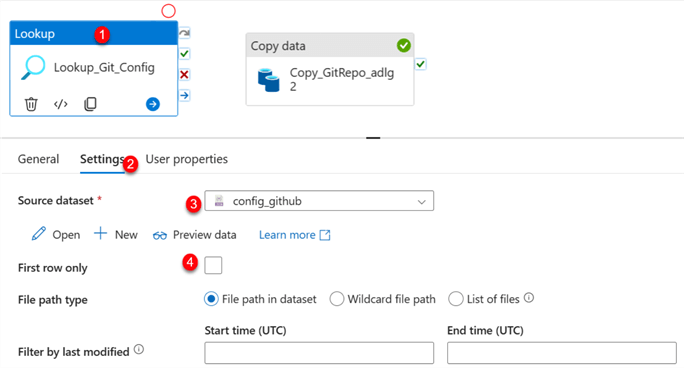
- Source dataset: This is the config dataset in JSON we just added from the Data Lake. It contains information about the directory from both source and sink.
- First row only: Uncheck the box to allow the data to read the entire file in the Data Lake JSON file.
Step 3: Add ForEach Activity.
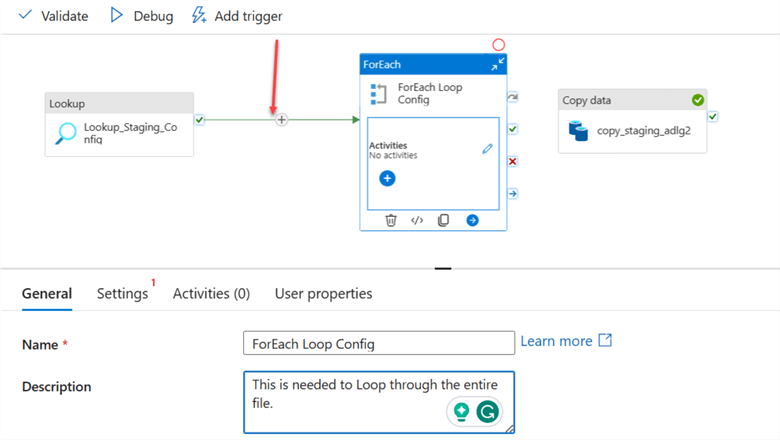
Add the ForEach activity to the pipeline and connect the Lookup activity to the ForEach.
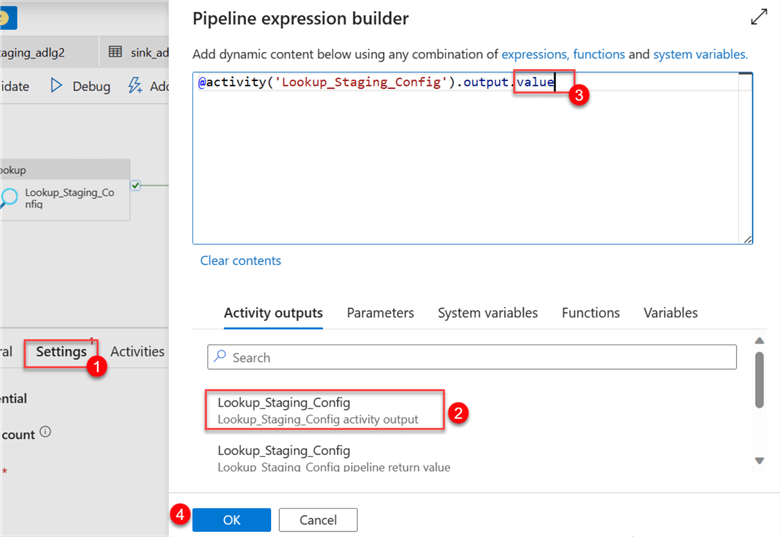
After connecting the Lookup activity to the ForEach activity, click on the settings tab in ForEach. Click on the dynamic content in the items area. This should open another window on the right-hand side. Select the activity output of the Lookup and add .value to the end of the code. Click OK.
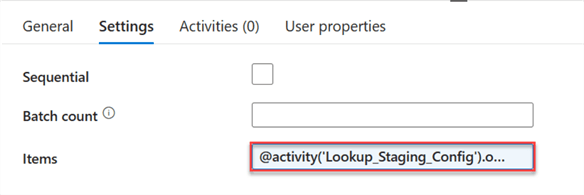
The Lookup activity has been added to the item's dynamic content area.
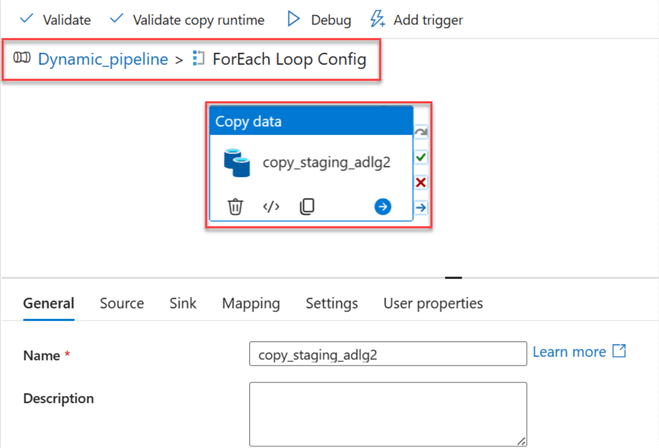
Step 4: Cut Copy the Activity and Paste Inside ForEach Activity.
Cut the Copy activity and paste it inside the ForEach activity. The image below shows the Copy Data inside the ForEach Loop Config, which is part of the pipeline dynamic_pipeline.
Now, go back to the pipeline. We need to perform some operations. Click on the Pipeline canvas, select the Parameter tab, and then delete the entire parameter list.
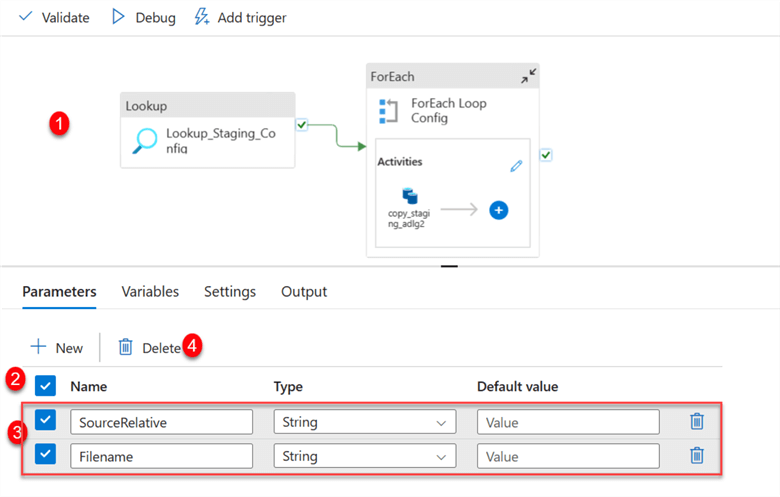
Add Source Copy Activity - Deleting the Source Parameter from the Pipeline Canvas affected the source and sink in the copy activity. Go back to ForEach and select the Copy activity inside.
You will notice the warning indication from both the source and sink tab. Let's start by fixing the SourceRelative path. Start by deleting the value and selecting the dynamic content.
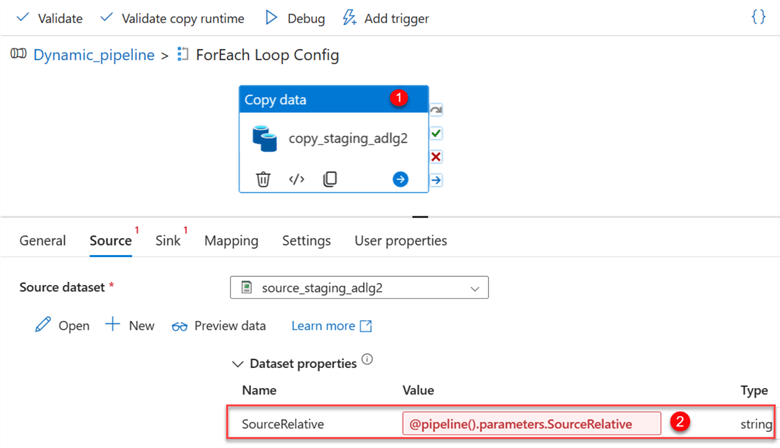
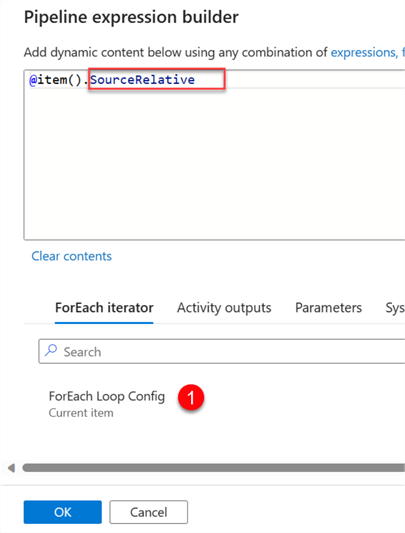
In Dynamic Content, select the ForEach Loop Config and add the SourceRelative to the item line of code.
Add Sink Copy Activity - Repeat the same process as the Source for the sink.
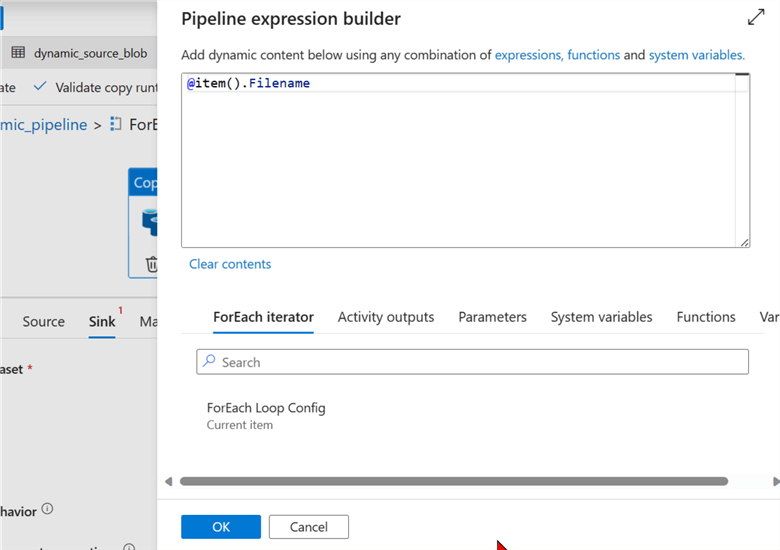
After you have done the dynamic content, you will notice the file path name has changed.

Step 5: Publish All, Validate, and Debug.
This is the last step. We need to Publish all to save our changes, Validate to check for errors, and Debug to manually run the pipeline created.
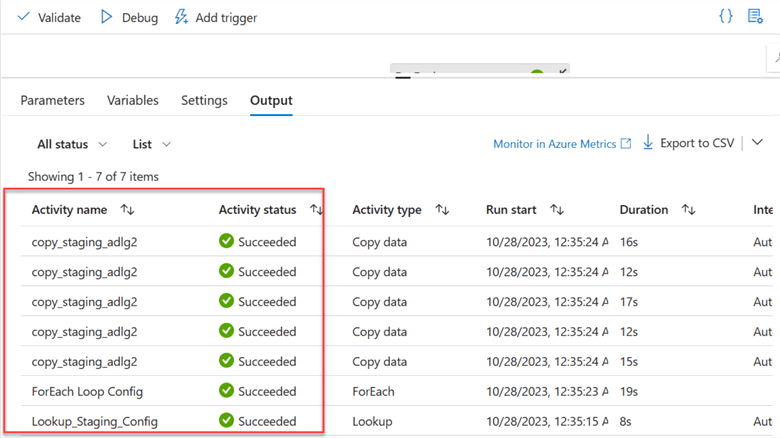
You will notice the data copy pipeline successfully moved the data from the staging Data Lake to Azure Data Lake Gen 2.
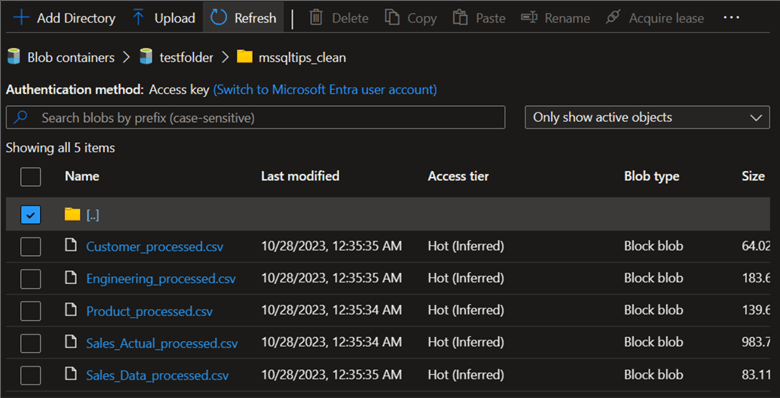
Let's go to our container to confirm if the data was successfully copied to the data lake.
Section 2: Migrate Bulk Data from Web to Azure Data Lake Gen 2
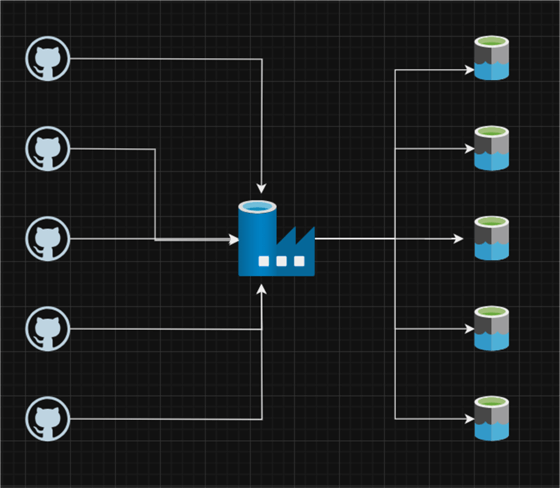
In this section, we will move data from a web source (GitHub Repo) to Azure Data Lake Gen 2.
Create a Simple Copy of Web Data to Azure Data Lake
GitHub is a web-based hosting service used by most software professionals all over the world for version control by using Git. You can check our previous article on how to copy data from Azure Data Factory Google Drive to Azure Data Lake Gen 2.
The following steps should be followed to achieve a simple copy activity:
Step 1: Create a Web Source Dataset and Linked Service.
Since the data will be gotten from the web, we need to create both a web and linked service.
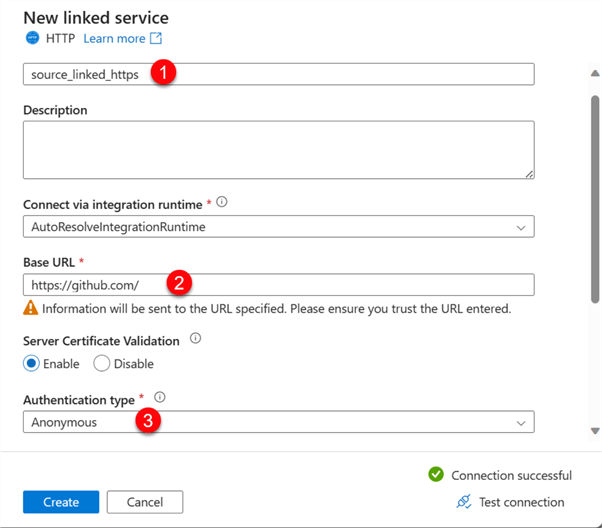
In the Source data, search for HTTP, then select the file type Parquet. For the Linked service, you are expected to fill in the following information:
- Name: This is the linked service name for easy identification.
- Base URL: Since the data will be gotten from GitHub, we will need to provide it with a Git-based URL.
- Authentication Type: Leave this to Anonymous since the repo is not a private but a public repository.
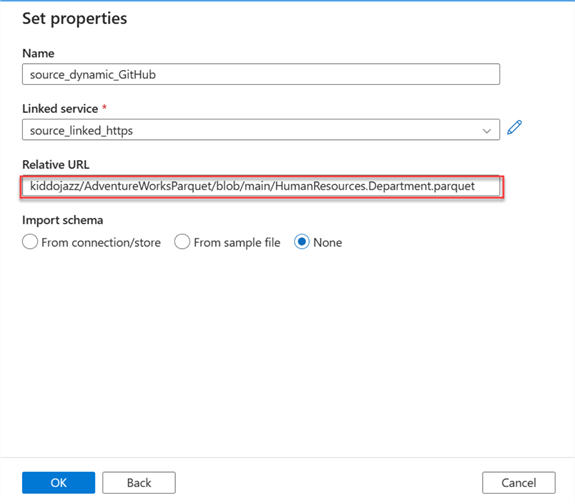
In the new window, fill in the Relative URL of the file you want to copy.
Step 2: Create the Sink Dataset and Linked Service.
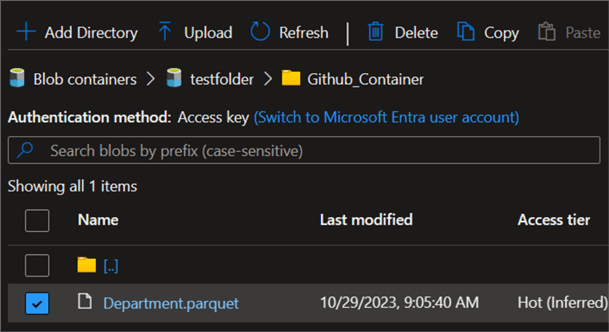
Follow the previous step to do this using Azure Data Lake Gen 2. The folder where the file will be copied is called "GitHub Container".
Step 3: Create a Simple Copy Activity.
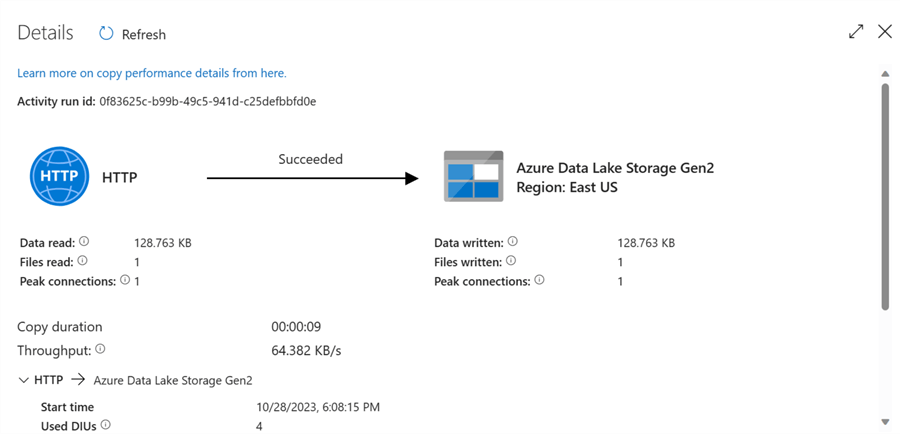
In your ADF pipeline, drag the copy data activity to the pipeline canvas and fill in the necessary information for both the source and sink settings.
Set Parameter Pipeline
Now, let's set the parameter for both the source and sink datasets.
Step 1: Set the Source Parameter.
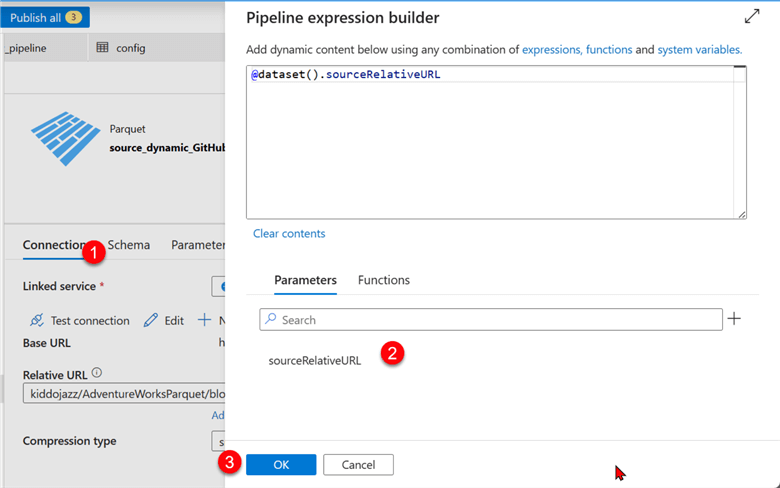
In your source dataset, you need to add a new parameter and name it sourceRelativeURL.

After that, click the Connection tab, then select Dynamic Content in the Relative URL. This should open another window.
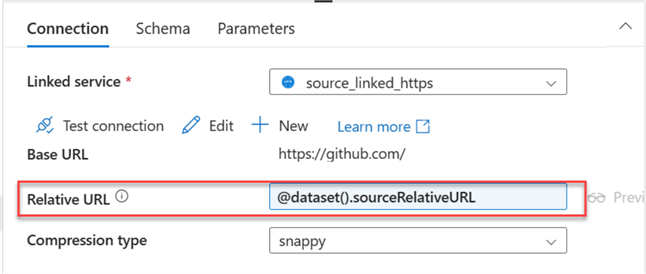
The new Relative URL has been changed to the source parameter.
Step 2: Set the Sink Parameter.
Select the sink dataset and add the new parameter.

After that, click the Connection tab, then select Dynamic Content for the file path name. This should open another window.
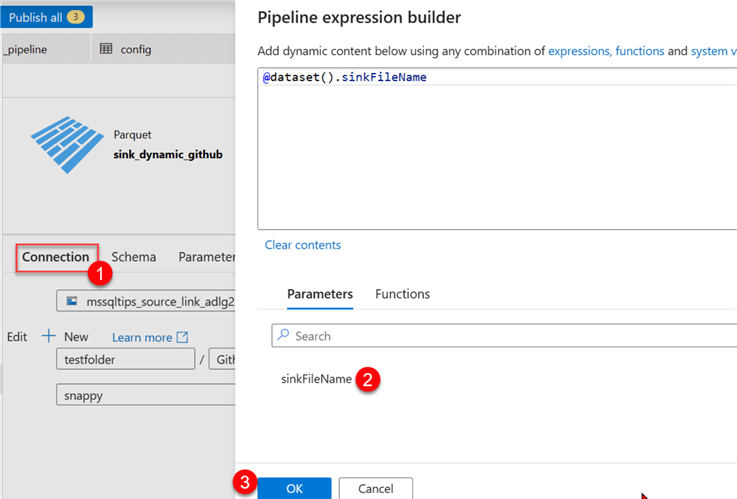
You will notice the new parameter has been added to the sink dataset.
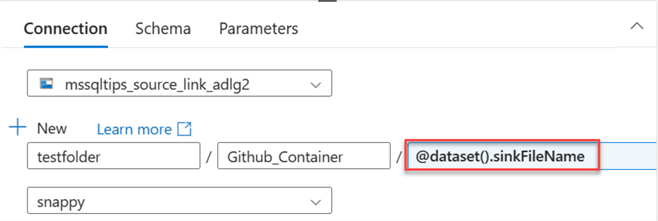
Step 3: Set Pipeline Parameter.
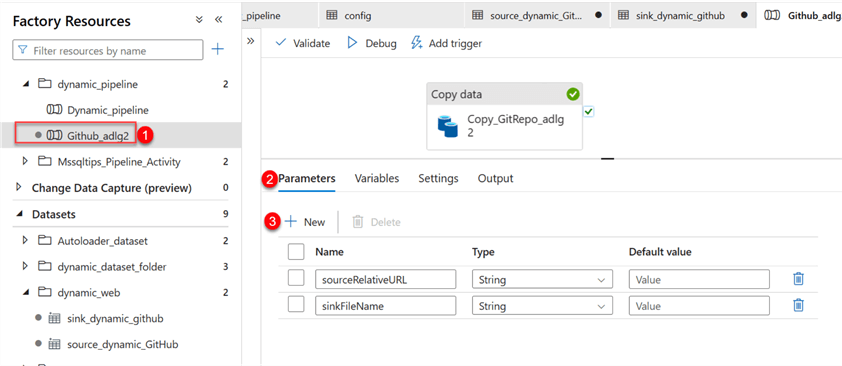
Now click the Copy pipeline we created earlier. In the pipeline, select Parameters, then fill in the information seen in the image below.
Step 4: Set Activity Parameter.
Now, we need to change the source and sink of the activity. Start by clicking copy data activity.
Click on the Source tab and click Dynamic Content. This should take you to another window where you will select the Source Parameter.
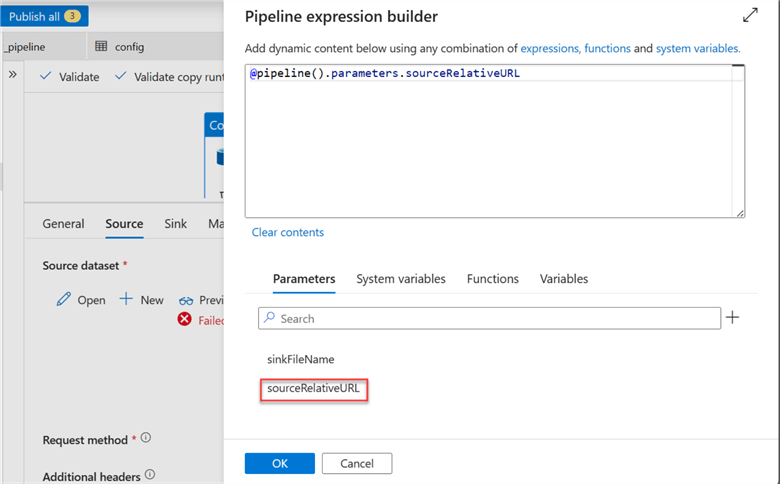

Repeat the same process for the Sink by selecting the Sink tab and changing the value to Parameter of the Filename.

Step 5: Publish All, Validate, and Debug.
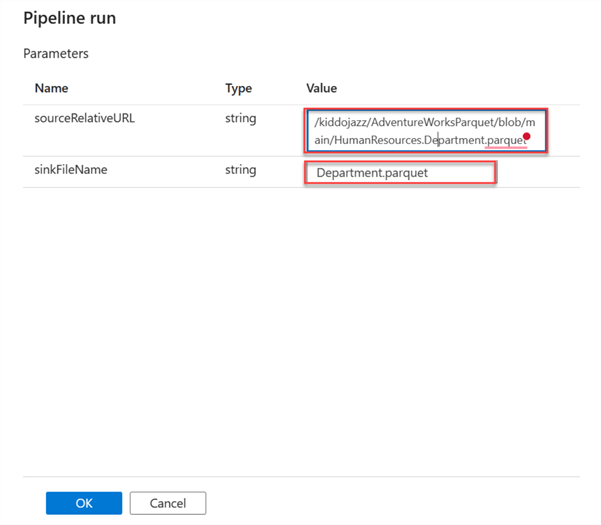
Let's evaluate the parameter we just created by pushing and running the pipeline with the debug button. In the new window, copy the RelativeURL and the file name.
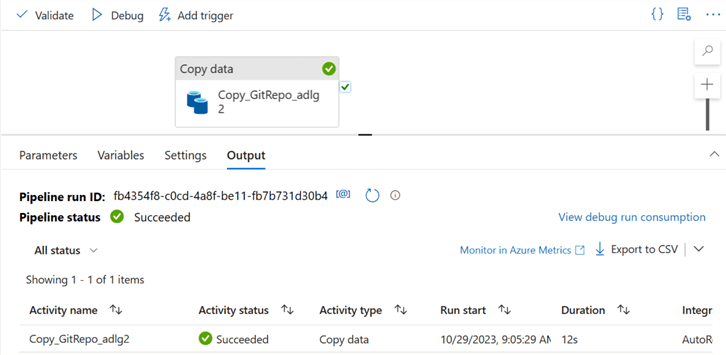
A success message should appear if it is correctly done.
Dynamically Copy Multiple Data from the GitHub Repository to the Data Lake Gen 2
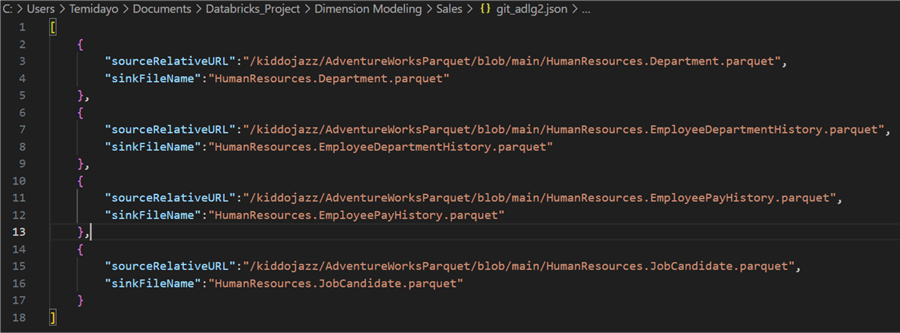
Configuration File. We need to set the configuration file to dynamically copy the different file repos from GitHub to Azure Data Lake Gen 2. The configuration format should be in JSON form. After that, you must upload the JSON file to your Azure Data Lake Gen 2.
Step 1: Add Config File Dataset.
Upload the config file to your Azure storage folder called config_folder.
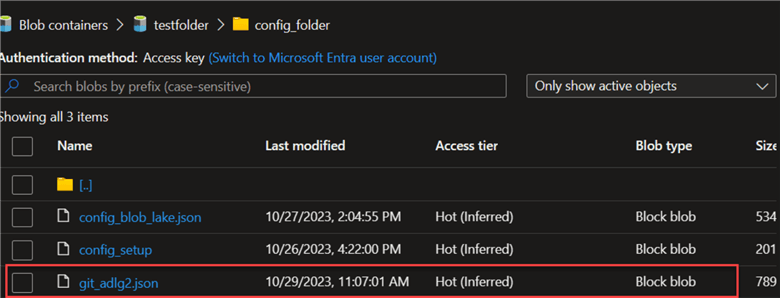
Now go to your Azure Data Factory and add the new dataset we just uploaded to the Azure storage.
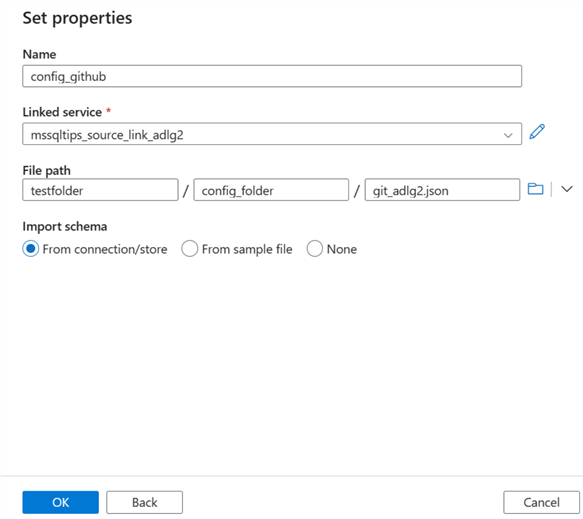
Step 2: Add Lookup Activity.
In your Azure activity, search for Lookup and drag it to your pipeline canvas. Click on the Settings tab and fill in the following information.
Step 3: Add ForEach Activity.
Add the ForEach activity to the pipeline and connect the Lookup activity to the ForEach. You are expected to set some configuration for the ForEach activity.

Item Configuration - In the ForEach settings tab, click on the dynamic content in the items area. This should open another window on the right-hand side. Select the activity output of the Lookup and add .value to the end of the code.

Step 4: Cut Copy the Activity and Paste Inside ForEach Activity.
Cut the Copy activity and paste it inside the ForEach activity. From the image below, you will notice the Copy Data inside the ForEach Loop Config, which is part of the pipeline GitHub_adlg2.
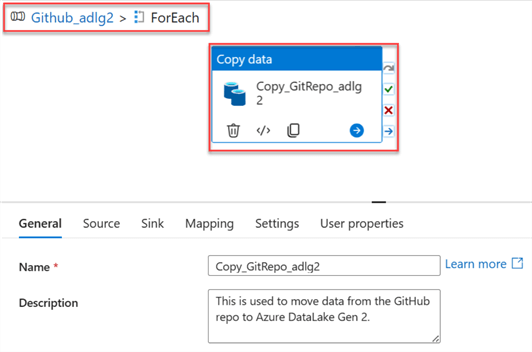
Now, go back to the pipeline to perform some operations. Click on the Pipeline canvas, select the Parameter tab, and delete the entire Parameters.
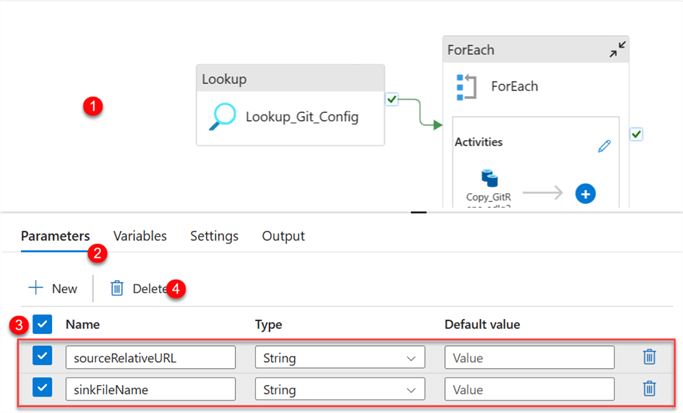
Add Source Copy Activity - Deleting the Source Parameter from the Pipeline Canvas affected the source and sink in the copy activity. Now, head back to ForEach and select the Copy activity inside.
Notice the warning indication from both the source and sink tab. Let's start by fixing the URL path. Start by deleting the value and selecting the dynamic content.
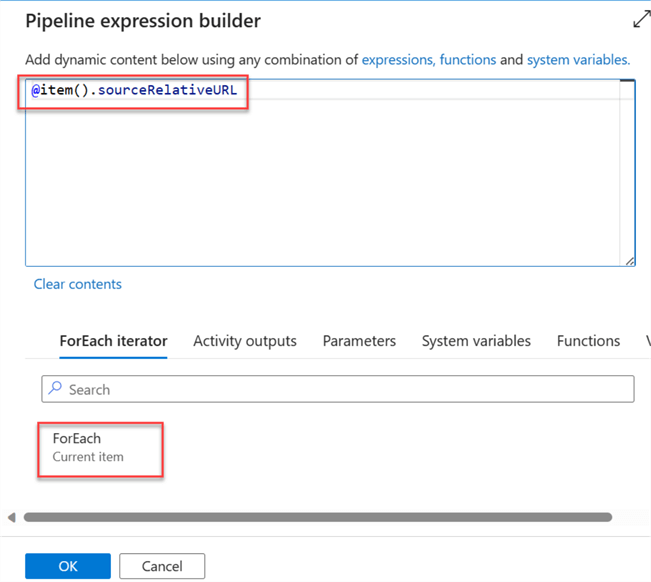
Repeat the same process for the sink tab configuration. Notice the SinkFileName has changed.

Step 5: Publish All, Validate and Debug.
This is the last step. We need to Publish all to save our changes, validate to check for errors, and debug to manually run the pipeline created.
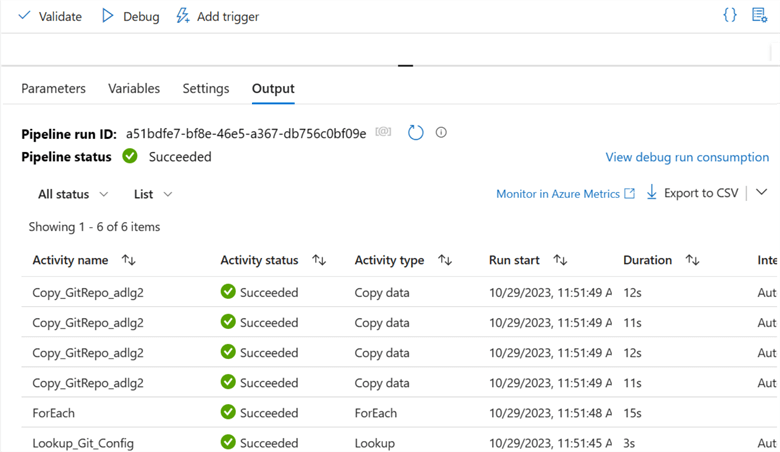
The pipeline ran successfully and pulled all the data from the GitHub Repository to Azure Data Lake Gen 2.

Section 3: Migrate Bulk Data from On-Premises SSMS to Azure SQL Database
For this section, I recommend you try it yourself. You must pull data from SQL Server Management Studio to Azure SQL Database, the same process used in Sections 1 and 2.
Stay tuned for the next tip, where I will explain how we can go about it.
Conclusion
This tip taught you how to dynamically move multiple data from various sources using the Lookup and ForEach activities in Azure Data Factory. We moved data from one data lake to another and from the web (GitHub Repo) to Azure Data Lake. You will notice in the third section I stated you should try it out yourself. It is the same process as the first and second sections, but if you are still unable to, we will make the following article showing you how to go about it.
Next Steps
- Change data capture in Azure Data Factory and Azure Synapse Analytics
- Move Data Between On-premises Sources and Cloud with Data Management Gateway
About the author
 Temidayo Omoniyi is a Microsoft Certified Data Analyst, Microsoft Certified Trainer, Azure Data Engineer, Content Creator, and Technical writer with over 3 years of experience.
 This author pledges the content of this article is based on professional experience and not AI generated.
View all my tips
Article Last Updated: 2024-02-20


