By: Hristo Hristov | Updated: 2024-05-15 | Comments | Related: More > Artificial Intelligence
Problem
You have a vast amount of data on an Azure SQL Server and would like to take advantage of the newest architectural pattern for AI-infused apps—the retrieval augment generation (RAG). RAG enables large language models (LLMs) such as GPT to be grounded in your company-specific data and provide answers to complex questions and queries that would otherwise require time-consuming data mining.
Solution
With the newest features in Azure AI Search, we can connect an Azure SQL data source, define an index, and create an automated indexer to vectorize and store the source data. Then, we can configure an Azure OpenAI model to use the vectorized data to provide grounded answers and references based on them.
Each task can be accomplished from a VS Code Jupyter notebook. From that to a fully serverless automation agent, the gap is minimal but outside this article's scope.
Resource Requirements
For this solution, you will need the following resources:
- Azure SQL Server with a target table containing a column with long text subject to indexing.
- A Jupyter notebook and a local Python environment.
- Azure AI Search for data indexing and vector store.
- Azure OpenAI for an embedding model that will vectorize our data.
Let's start with examining each component's setup.
Azure SQL Server
I have configured a managed instance database with a single table called
IntVect. The table has three
columns: id,
title, and
content. I have imported
some of Paul Graham's
essays – they are good examples of long, non-synthetic string data with
lots of complex ideas. This is what the data looks like:
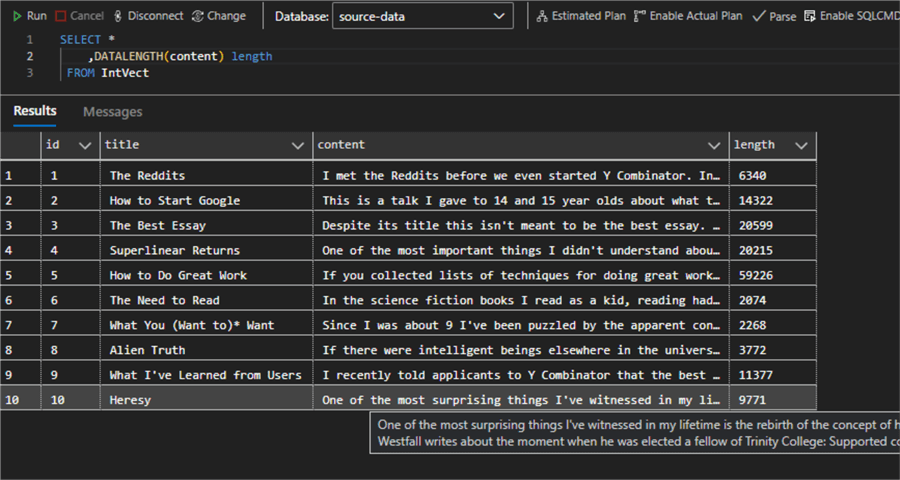
You can use this (or any other data) if the table schema stays the same. In an actual setup, the database will be populated by an upstream analytical process.
Python Environment
From VS Code, open your project folder. Create a requirements.txt file with the following lines and save it:
python-dotenv
azure-search-documents==11.6.0b1
azure-identity
ipykernel
Hit Ctrl+Shift+P, select Python:
Create environment, select
venv, then your global Python
interpreter. Check the requirements file for installing the required packages:

Wait until your environment is created and selected.
Azure AI Search
Create an instance of Azure AI Search, Microsoft's indexing service and vector store. You should use the Basic pricing tier to ensure the service can later be coupled with an OpenAI GPT model. However, ideally, you want to use the Standard tier at a minimum, which also enables semantic reranking. The image below is what my Azure AI Search instance looks like:

Azure OpenAI
Create an instance of Azure OpenAI. Depending on your subscription settings, this resource may not be directly available to you. If this is the case, refer to the following article: Limited access to Azure OpenAI Service. Then, fill in the form to request access to the platform. Below is what my Azure OpenAI resource looks like:

Next, open the Azure Studio and go to Deployments. Click Create new deployment and fill in the form:
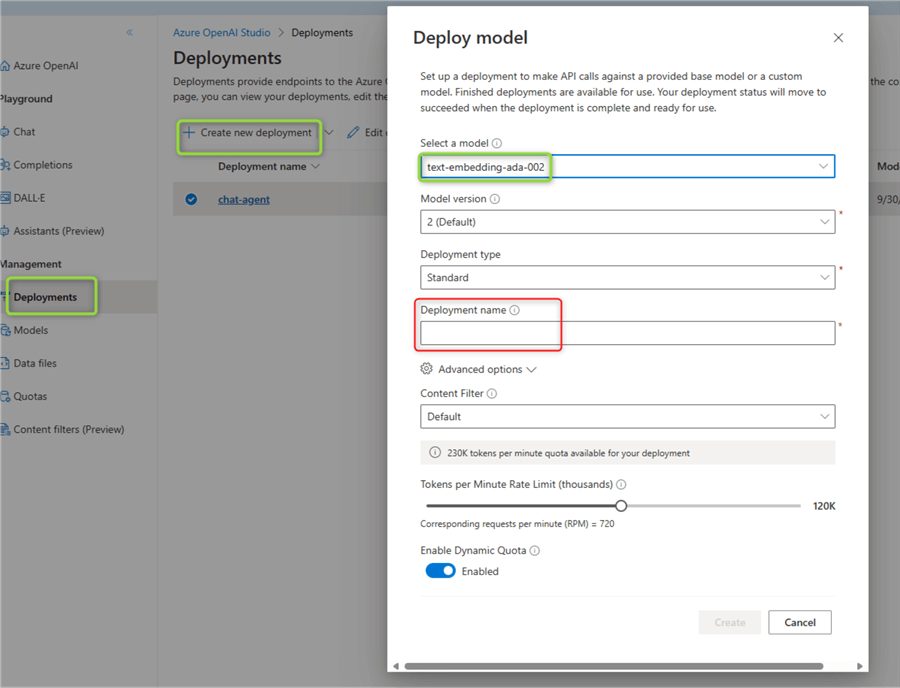
Once done, note down the name of your embeddings model, the URI of the Azure OpenAI resource, and your API key. Alternatively, you can follow this detailed tutorial for creating the resource and deploying an embeddings model.
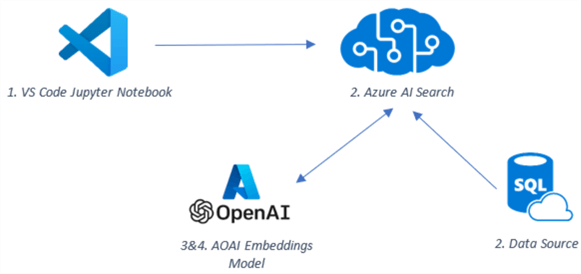
At this point, all the resources are in place. Below is a high-level overview of how these resources will interact with each other:
- The notebook will interact programmatically with the Azure AI Search API via the Python SDK.
- The search service will ingest data from the database by splitting it into chunks.
- The search service will call the Azure OpenAI API to produce an embedding representation of the data.
- Azure OpenAI will respond with an embedding representation, which will be stored in Azure AI Search.
Data Vectorization
With all the pieces of the puzzle, let's get back to the meat of this article – setting up an automated data vectorization pipeline for Azure SQL data.
Environment Variables
This is our first code block. Create a
.env file and add lines
for the required variables.

Then refer to these variables using the
dotenv and
os packages:
from dotenv import load_dotenv
from azure.identity import DefaultAzureCredential
from azure.core.credentials import AzureKeyCredential
import os

load_dotenv(override=True)

endpoint = os.environ['AZURE_SEARCH_SERVICE_ENDPOINT']
credential = AzureKeyCredential(os.environ['AZURE_SEARCH_ADMIN_KEY']) if len(os.environ['AZURE_SEARCH_ADMIN_KEY']) > 0 else DefaultAzureCredential()
index_name = os.environ['AZURE_SEARCH_INDEX']
azure_openai_endpoint = os.environ['AZURE_OPENAI_ENDPOINT']
azure_openai_key = os.environ['AZURE_OPENAI_KEY'] if len(os.environ['AZURE_OPENAI_KEY']) > 0 else None
azure_openai_embedding_deployment = os.environ['AZURE_OPENAI_EMBEDDING_DEPLOYMENT']

Create a Data Source Connector
Using the following code snippet, create a data source connector in your Azure AI Search:
from azure.search.documents.indexes import SearchIndexerClient
from azure.search.documents.indexes.models import SearchIndexerDataSourceConnection, SearchIndexerDataContainer

sql_connection_string = 'Server=;Database=;Uid=adm;;Encrypt=yes;TrustServerCertificate=no;Connection Timeout=30;'
sql_table_name = 'IntVect'

indexer_client = SearchIndexerClient(endpoint, credential)
container = SearchIndexerDataContainer(name=sql_table_name)
data_source_connection = SearchIndexerDataSourceConnection(
    name=f'{index_name}',
    type='azuresql',
    connection_string=sql_connection_string,
    container=container
)
data_source = indexer_client.create_or_update_data_source_connection(data_source_connection)
This is what my code looks like with the sensitive connection string information blurred out:
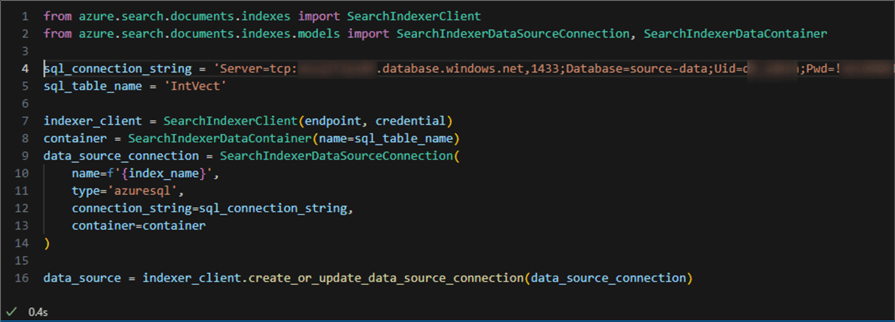
In a production setup, the connection string should not be as exposed. It may come from another environment variable, or another type of authentication may be used.
Checking the data sources in the Azure portal will reveal the newly created one:

Create a Search Index
The next step is to create a search index. The Azure AI Search Python SDK gives us all the necessary data types and functions to do so:
001: from azure.search.documents.indexes import SearchIndexClient
002: from azure.search.documents.indexes.models import (
003:     SearchField,
004:     SearchFieldDataType,
005:     VectorSearch,
006:     HnswAlgorithmConfiguration,
007:     HnswParameters,
008:     VectorSearchAlgorithmMetric,
009:     ExhaustiveKnnAlgorithmConfiguration,
010:     ExhaustiveKnnParameters,
011:     VectorSearchProfile,
012:     AzureOpenAIVectorizer,
013:     AzureOpenAIParameters,
014:     SemanticConfiguration,
015:     SemanticSearch,
016:     SemanticPrioritizedFields,
017:     SemanticField,
018:     SearchIndex
019: )
020:
021: index_client = SearchIndexClient(endpoint=endpoint, credential=credential)
022: fields = [
023:     SearchField(name='parent_id', # key column for azure ai search
024:                 type=SearchFieldDataType.String,
025:                 sortable=True,
026:                 filterable=True,
027:                 facetable=True),
028:     SearchField(name='title',
029:                 type=SearchFieldDataType.String),
030:     SearchField(name='chunk_id',
031:                 type=SearchFieldDataType.String,
032:                 key=True,
033:                 sortable=True,
034:                 filterable=True,
035:                 facetable=True,
036:                 analyzer_name='keyword'),
037:     SearchField(name='chunk',
038:                 type=SearchFieldDataType.String,
039:                 sortable=False,
040:                 filterable=False,
041:                 facetable=False),
042:     SearchField(name='vector',
043:                 type=SearchFieldDataType.Collection(SearchFieldDataType.Single),
044:                 vector_search_dimensions=1536,
045:                 vector_search_profile_name='myHnswProfile'),
046: ]
047:
048: vector_search = VectorSearch(
049:     algorithms=[
050:         HnswAlgorithmConfiguration(
051:             name='myHnsw',
052:             parameters=HnswParameters(
053:                 m=4,
054:                 ef_construction=400,
055:                 ef_search=500,
056:                 metric=VectorSearchAlgorithmMetric.COSINE,
057:             ),
058:         ),
059:         ExhaustiveKnnAlgorithmConfiguration(
060:             name='myExhaustiveKnn',
061:             parameters=ExhaustiveKnnParameters(
062:                 metric=VectorSearchAlgorithmMetric.COSINE,
063:             ),
064:         ),
065:     ],
066:     profiles=[
067:         VectorSearchProfile(
068:             name='myHnswProfile',
069:             algorithm_configuration_name='myHnsw',
070:             vectorizer='myOpenAI',
071:         ),
072:         VectorSearchProfile(
073:             name='myExhaustiveKnnProfile',
074:             algorithm_configuration_name='myExhaustiveKnn',
075:             vectorizer='myOpenAI',
076:         ),
077:     ],
078:     vectorizers=[
079:         AzureOpenAIVectorizer(
080:             name='myOpenAI',
081:             kind='azureOpenAI',
082:             azure_open_ai_parameters=AzureOpenAIParameters(
083:                 resource_uri=azure_openai_endpoint,
084:                 deployment_id=azure_openai_embedding_deployment,
085:                 api_key=azure_openai_key,
086:             ),
087:         ),
088:     ],
089: )
090:
091: semantic_config = SemanticConfiguration(
092:     name='my-semantic-config',
093:     prioritized_fields=SemanticPrioritizedFields(
094:         content_fields=[SemanticField(field_name='chunk')]
095:     ),
096: )
097:
098: semantic_search = SemanticSearch(configurations=[semantic_config])
099:
100: index = SearchIndex(name=index_name,
101:                     fields=fields,
102:                     vector_search=vector_search,
103:                     semantic_search=semantic_search)
104:
105: result = index_client.create_or_update_index(index)
Let's break it down (skipping the obvious imports):
- 21: Create an index client using the instance we have.
- 22 – 46: Define the fields of the index. This critical step tells
the index what and how we want to store. We have:
parent_id: which is like a key column for Azure AI Search.title: which will hold the text stored in the SQL title column.chunk_id: identifier of the chunk in the text needs to be chunked.chunk: will hold text stored in the SQL content column.vector: will contain the numerical representation of the text.
- 48 – 89: Next comes the vector search configuration.
- 49: In the list of algorithms, we provide the two powerful algorithms that will enable the correct information retrieval.
- 66: Give the vector search profile a name and reference to the algorithms
- 78: Finally, configure the vectorizers. Here, we are using the Azure OpenAI embedding model. Therefore, we reference the environment variables provided earlier.
- 91 – 98: Configure the semantic search profile, enabling hybrid querying.
- 100: Instantiate the index.
- 105: Create the index.
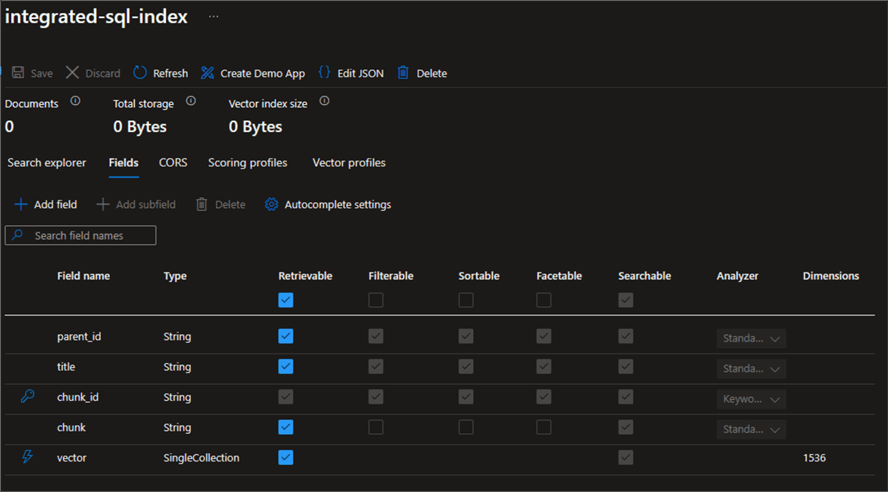
Running this code will result in the index being created (or updated):

We have not populated this index with data yet. Nevertheless, we can examine the fields it has. They correspond to the configuration we provided:
Create a Skillset
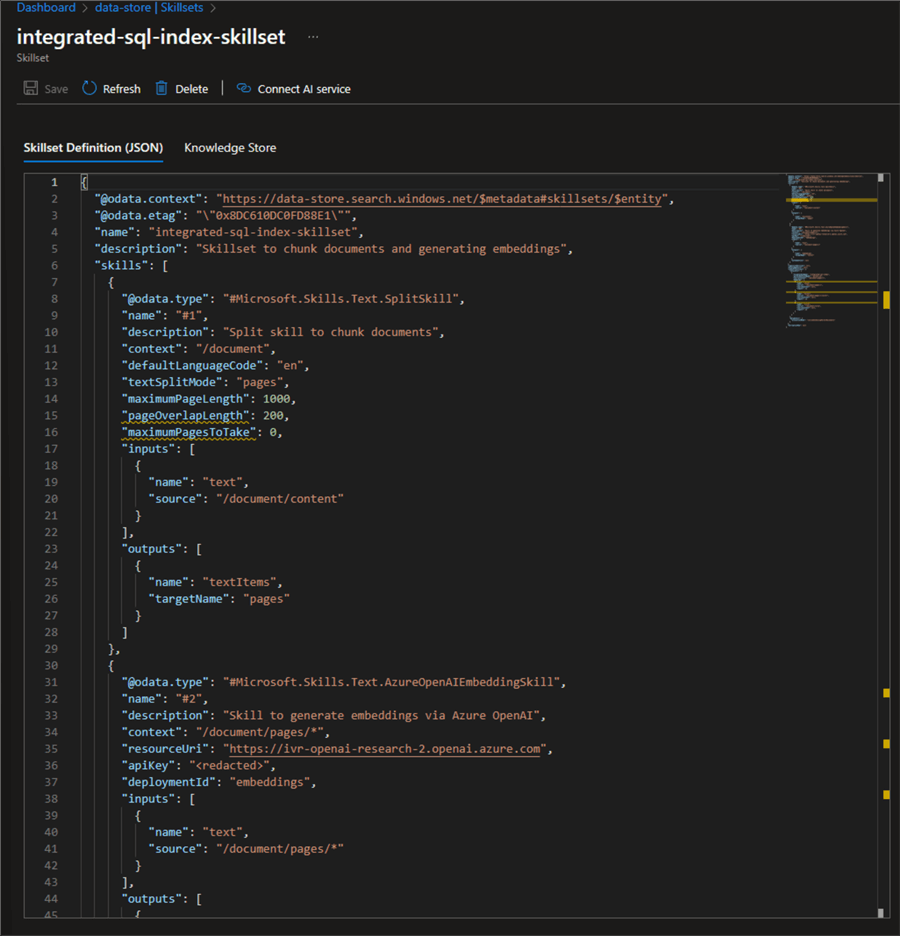
Next comes the creation of two skillsets: chunking and embedding. Skillsets are reusable resources attached to the index and use built-in AI capabilities. These two skillsets are also why we call the vectorization "integrated." We do not need to chunk and embed the data separately prior to storing them in the index. The index will take care of all of this for us.
01: from azure.search.documents.indexes.models import (
02:     SplitSkill,
03:     InputFieldMappingEntry,
04:     OutputFieldMappingEntry,
05:     AzureOpenAIEmbeddingSkill,
06:     SearchIndexerIndexProjections,
07:     SearchIndexerIndexProjectionSelector,
08:     SearchIndexerIndexProjectionsParameters,
09:     IndexProjectionMode,
10:     SearchIndexerSkillset
11: )
12:
13: skillset_name = f'{index_name}-skillset'
14:
15: split_skill = SplitSkill(
16:     description='Split skill to chunk documents',
17:     text_split_mode='pages',
18:     context='/document',
19:     maximum_page_length=1000,
20:     page_overlap_length=200,
21:     inputs=[
22:         InputFieldMappingEntry(name='text',
23:                                source='/document/content'),
24:     ],
25:     outputs=[
26:         OutputFieldMappingEntry(name='textItems',
27:                                 target_name='pages')
28:     ],
29:     default_language_code='en'
30: )
31:
32: # TEXT MUST BE LESS THAN 8000 TOKENS
33: embedding_skill = AzureOpenAIEmbeddingSkill(
34:     description='Skill to generate embeddings via Azure OpenAI',
35:     context='/document/pages/*',
36:     resource_uri=azure_openai_endpoint,
37:     deployment_id=azure_openai_embedding_deployment,
38:     api_key=azure_openai_key,
39:     inputs=[
40:         InputFieldMappingEntry(name='text',
41:                                source='/document/pages/*'),
42:     ],
43:     outputs=[
44:         OutputFieldMappingEntry(name='embedding',
45:                                 target_name='vector')
46:     ],
47: )
48:
49: index_projections = SearchIndexerIndexProjections(
50:     selectors=[
51:         SearchIndexerIndexProjectionSelector(
52:             target_index_name=index_name,
53:             parent_key_field_name='parent_id',
54:             source_context='/document/pages/*',
55:             mappings=[
56:                 InputFieldMappingEntry(name='chunk', source='/document/pages/*'),
57:                 InputFieldMappingEntry(name='vector', source='/document/pages/*/vector'),
58:                 InputFieldMappingEntry(name='title', source='/document/title'),
59:             ],
60:         ),
61:     ],
62:     parameters=SearchIndexerIndexProjectionsParameters(
63:         projection_mode=IndexProjectionMode.INCLUDE_INDEXING_PARENT_DOCUMENTS
64:     ),
65: )
66:
67: skillset = SearchIndexerSkillset(
68:     name=skillset_name,
69:     description='Skillset to chunk documents and generating embeddings',
70:     skills=[split_skill, embedding_skill],
71:     index_projections=index_projections,
72: )
73:
74: client = SearchIndexerClient(endpoint, credential)
75: client.create_or_update_skillset(skillset)
Let's break it down:
- 13: Give the skillset a name.
- 15 – 30: Define the split skill. The important configuration parameters
are:
- 17: Text split mode: either
pagesorsentences. - 18: Context: the
'root'of our data called'document'. - 19: Maximum page length in characters.
- 20: Page overlap length. It should be adjusted according to the use case and expected input text length. If you go back and examine the length of essay five, you will see that it is close to 60,000 characters. Therefore, some chunks are expected to appear.
- 21 – 24: Inputs: the source is the
contentcolumn. - 25 – 28: Outputs: an array of substrings called
pages. This output will be used as a source for the embedding skill.
- 17: Text split mode: either
- 33 – 47: Define the embedding skill
- 35: Context: note
the context here are all the pages coming from the upstream skill denoted
by
/pages/*. - 36 – 38: Azure OpenAI service configuration.
- 39 – 42: The input is the text from the split pages from the upstream skill.
- 43 – 46: The output is the embedding vector, which will end up
in the embedding field
vector.
- 35: Context: note
the context here are all the pages coming from the upstream skill denoted
by
- 49 – 65: Define the index projections. In short, this means mapping the skillset to an index. The index projections define a secondary index that outlines the AI capabilities coupled with the front-facing index.
- 67 – 72: Define the skillset with a name, description, list of skills just defined, and an index projection.
- 74: Instantiate a client.
- 75: Add or update the skillset to the client.
Running this code block will result in the skillset being created. We can check the result in the Azure portal:
Create an Indexer
Finally, we must create an indexer. This is the agent that will run the index and ingest the target data to it. The creation is straightforward:
01: from azure.search.documents.indexes.models import (
02:     SearchIndexer,
03:     FieldMapping
04: )
05:
06: indexer_name = f'{index_name}-indexer'
07:
08: indexer = SearchIndexer(
09:     name=indexer_name,
10:     description='Indexer to index documents and generate embeddings',
11:     skillset_name=skillset_name,
12:     target_index_name=index_name,
13:     data_source_name=data_source.name,
14:     field_mappings=[FieldMapping(source_field_name='id', target_field_name='chunk_id'),
15:                     FieldMapping(source_field_name='title', target_field_name='title'),
16:                     FieldMapping(source_field_name='content', target_field_name='chunk')]
17: )
18:
19: indexer_client = SearchIndexerClient(endpoint, credential)
20: indexer_result = indexer_client.create_or_update_indexer(indexer)
21:
22: indexer_client.run_indexer(indexer_name)
Let's break it down:
- 06: Give the indexer a name. The good practice is to name it based on the index name.
- 08 – 17: Define the indexer. We must give it a name, a description,
a skillset (in this case, but not necessarily), the data source, and the field
mappings between the data source and the index destination fields. The
source_field_namevalues correspond to the SQL columns, and thetarget_field_namevalues correspond to the index destination fields. - 19: Instantiate the indexer client.
- 20: Create the indexer.
- 22: Run the indexer.
Using this code block, an indexer automation can also be easily implemented later. Going back to the Azure portal, we can examine the indexer. We see that 10 out of 10 documents have successfully been indexed. The count corresponds to the number of rows in the source SQL table:

When we go back to the index, we now see that the indexer has populated the index:
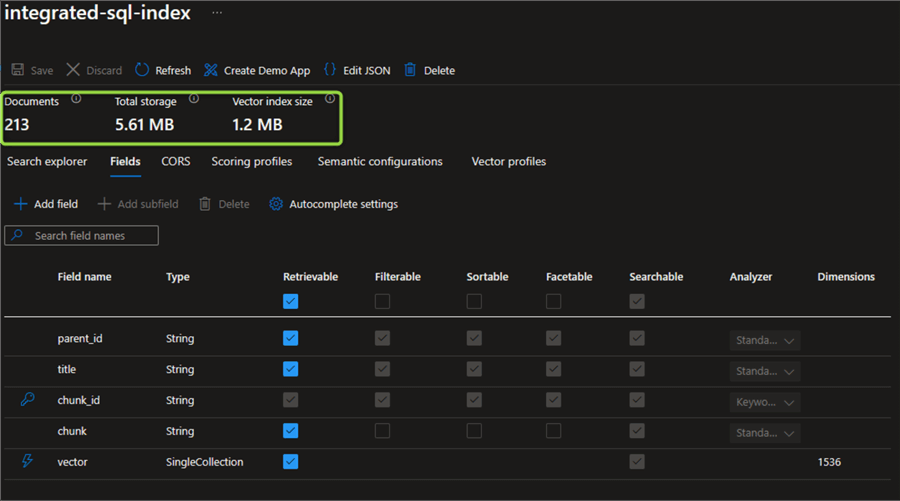
The 213 documents (much more than the count of rows in the source data) are, in fact, the chunks that the splitter determined to divide the source data into.
Validation
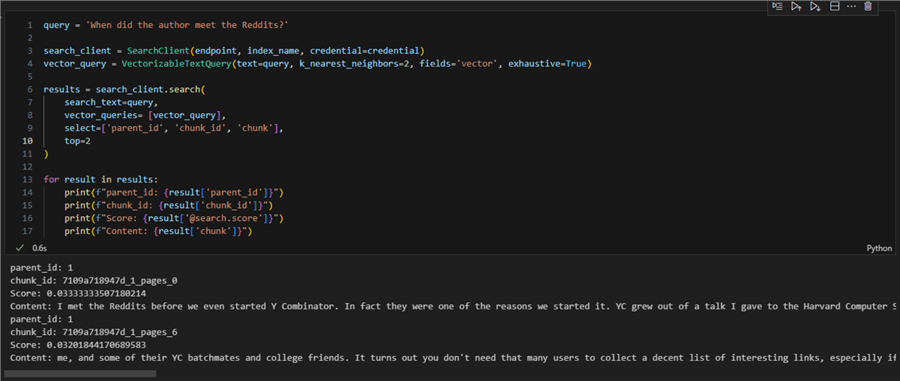
Having our data indexed, we are ready to vector-query it. Let's see that in action:
01: query = 'When did the author meet the Reddits?'
02:
03: search_client = SearchClient(endpoint, index_name, credential=credential)
04: vector_query = VectorizableTextQuery(text=query, k_nearest_neighbors=2, fields='vector', exhaustive=True)
05:
06: results = search_client.search(
07:     search_text=query,
08:     vector_queries= [vector_query],
09:     select=['parent_id', 'chunk_id', 'chunk'],
10:     top=2
11: )
12:
13: for result in results:
14:     print(f"parent_id: {result['parent_id']}")
15:     print(f"chunk_id: {result['chunk_id']}")
16:     print(f"Score: {result['@search.score']}")
17:     print(f"Content: {result['chunk']}")
Let's break it down:
- 01: Define the query.
- 03: Instantiate a search client.
- 04: Get a vectorized query out of the string one. We use the
VectorizableTextQueryclass with settings for how many k-nearest neighbors to return, the field to search against (vector), and theexhaustiveset to True to search across all vectors within the vector index. - 06 – 11: Using both the string and vector representation of
the query, we search the index. We select only three fields for display:
parent_id, chunk_id, andchunk. Note: Thetopvalue is set to two, which corresponds to the value for k-nearest neighbors. In other words, from the two possible results, we select both. - 13 – 17: the result is an iterable paged search item so we can loop over it.
Running this code block will give us the top two results (chunks) that contain text like our query. Later, when we connect this index to an LLM, it will use the chunks to generate relevant answers.
Conclusion
Using the Python SDK for Azure AI Search, we have programmatically created a data source, defined an integrated vectorized index, and run an indexer. As a result, we can vector-query the data. Even more, the index is now ready for integration within an AI chatbot using RAG.
Next Steps
- Request Access to Azure OpenAI Service
- RAG in Azure AI Search
- Vector search configuration overview
- Azure AI Search Integrated Vectorization
- Azure AI Search split skill
- Azure AI Search embedding skill
- Azure AI Search Index Projections
- Indexers in AI Search
About the author
 Hristo Hristov is a Data Scientist and Power Platform engineer with more than 12 years of experience. Between 2009 and 2016 he was a web engineering consultant working on projects for local and international clients. Since 2017, he has been working for Atlas Copco Airpower in Flanders, Belgium where he has tackled successfully multiple end-to-end digital transformation challenges. His focus is delivering advanced solutions in the analytics domain with predominantly Azure cloud technologies and Python. Hristo's real passion is predictive analytics and statistical analysis. He holds a masters degree in Data Science and multiple Microsoft certifications covering SQL Server, Power BI, Azure Data Factory and related technologies.
This author pledges the content of this article is based on professional experience and not AI generated.
View all my tips
Article Last Updated: 2024-05-15


