By: Levi Masonde | Updated: 2024-07-30 | Comments | Related: > Azure
Problem
You want to create an application using the microservice architecture in Microsoft's ecosystem, but you do not know where to start building your functions for the application. In this guide, we walk through the steps to help you build an Azure Function.
Solution
You can create event-driven serverless microservices using Microsoft's Azure functions. In this tutorial, you will learn how to create an Azure function on a local workspace, interact with the local Azurite storage account, and edit the function's APIs to integrate with web frameworks. Before you start with building functions, I suggest you design the application using this article as a template.
Prerequisites
- Python (v3.11.7)
- Azure free account (Signup)
- Visual Studio Code (latest)
- Python extension for Visual Studio Code
- Azurite V3 extension
What are Azure Functions?
Azure functions are event-driven serverless functions offered by Microsoft's Azure platform. They essentially enable you to run code on the cloud without needing to manage the infrastructure for your code, and this code can be triggered by HTTP requests, task scheduling, database changes, and other events in your development channels. Azure will only charge you when the function is being used.
To break it down further, imagine if you could store your functions on a global database, call this function from a variety of applications, and do not need to worry about networking, storage, scaling, or uptime. Azure functions allow object clients to interact with other Azure services, like storage, in a simple manner.
Why Use Azure Functions for Microservices?
- Serverless Architecture: You do not need to manage your code's infrastructure, helping with your application's uptime and automatic scaling.
- Programming Languages: Azure functions support multiple programming languages, including Python, JavaScript, C#, Java, and even PowerShell.
- Azure Integration: You can easily integrate your functions with other Azure services, like Azure Cosmos DB or Azure Data Lakes.
- Local Development: You can test your application in a local workplace or environment before deploying your functions.
- Event Driven: This gives life to your functions by enabling them to react to events from different sources. This also makes Azure functions ideal for Microservices.
Create Your Local Project
Before deploying your function, it is ideal to test your project locally, especially at the early stages of development, to avoid costly mistakes.
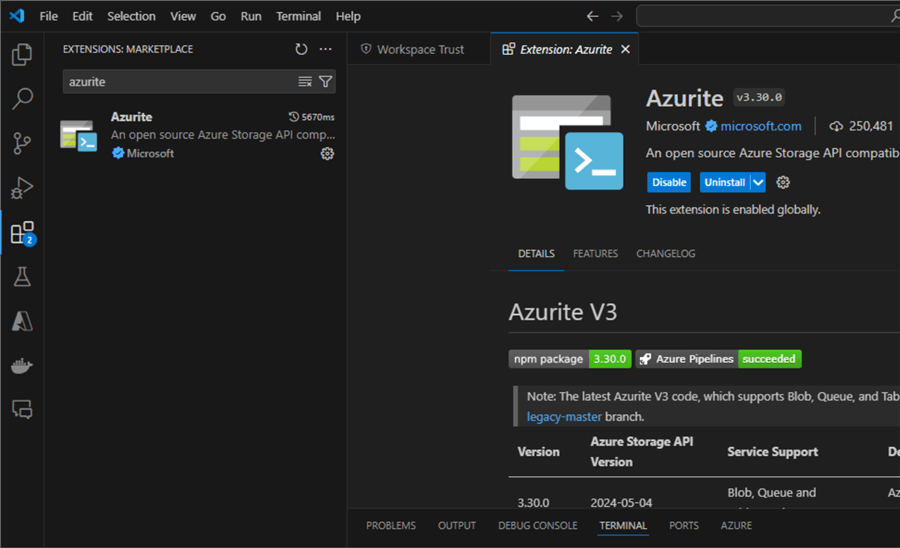
Installing Azurite
Visual Studio (VS) VS code has an extension called Azurite, an open-source extension used to emulate Azure's storage account on your local machine. Search for this extension and install it:
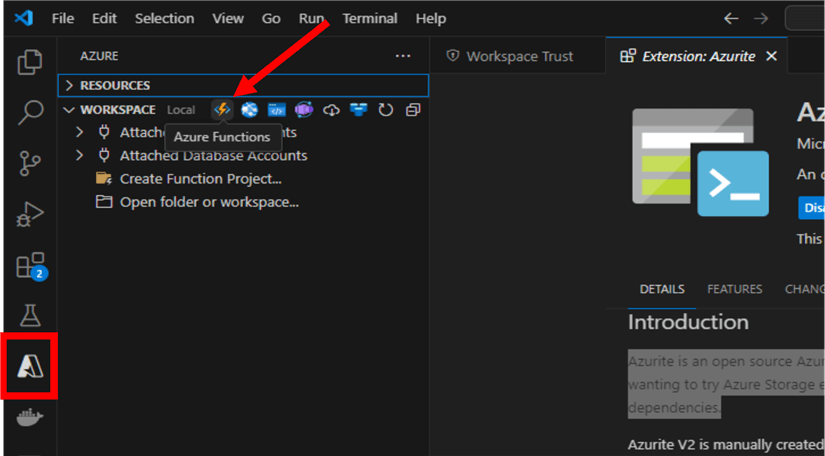
Creating a Local Azure Function
After installing Azurite, you can create your local Azure function by clicking on the Azure Functions icon next to your local workspace:
First, select an empty folder where you will save your function. Then, for the prompts below, make the following selections:
| Prompt | Selection |
|---|---|
| Select a language | Python (Programming Model V2). |
| Select a Python interpreter to create a virtual environment | Choose your preferred Python interpreter between version 3.3.X and version 3.11.X |
| Select a template for your project's first function | HTTP trigger. |
| Name of the function you want to create | Enter <your function name>. |
| Authorization level | Choose ANONYMOUS, which lets anyone call your function endpoint. For more information about the authorization level, see Authorization keys. |
| Select how you would like to open your project | Open in a current window. |
Once the setup is complete, a new project directory will be added to your chosen folder, and your main Python file will look like this:
import azure.functions as func
import logging

app = func.FunctionApp(http_auth_level=func.AuthLevel.ANONYMOUS)

@app.route(route="productService_http_trigger")
def productService_http_trigger(req: func.HttpRequest) -> func.HttpResponse:
    logging.info('Python HTTP trigger function processed a request.')

    name = req.params.get('name')
    if not name:
        try:
            req_body = req.get_json()
        except ValueError:
            pass
        else:
            name = req_body.get('name')

    if name:
        return func.HttpResponse(f"Hello, {name}. This HTTP triggered function executed successfully.")
    else:
        return func.HttpResponse(
             "This HTTP triggered function executed successfully. Pass a name in the query string or in the request body for a personalized response.",
             status_code=200
        )
Run the Function Locally
To run the function locally, first, make sure to run the following command to install Azure functions core tools:
npm install -g azure-functions-core-tools
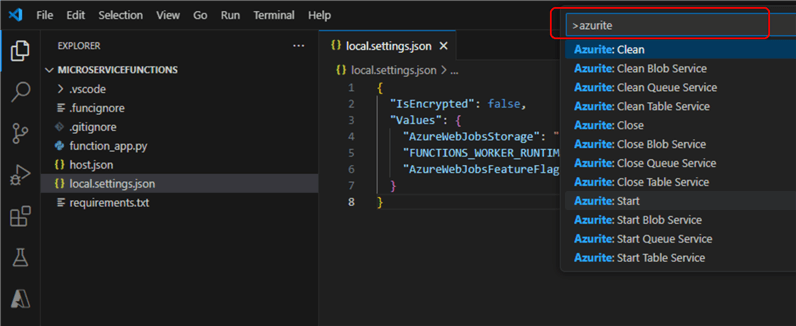
Next, start the Azurite emulator by pressing "F1" search, and select "azurite: start":
Azure tools will run the "func" command on your PowerShell. If this is the first time doing this, you might run into an error:
func : File C:\Users\Levi\AppData\Roaming\npm\func.ps1 cannot be loaded because running scripts is disabled on this system.
To overcome this, open your PowerShell as an administrator and run the following command:
Set-ExecutionPolicy -ExecutionPolicy RemoteSigned
Then, type "y" and press Enter to accept the changes.
To finally run the function locally, press "F5".
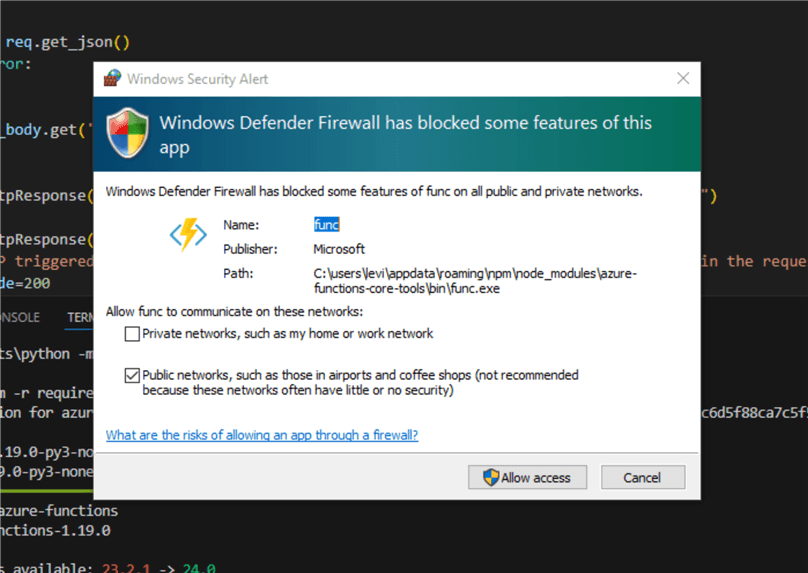
You will be prompted to give permission by your firewall. Click Allow access for your function to run on your system:
Wait for a minute for your function to start running. You will see the endpoint once the function starts running:
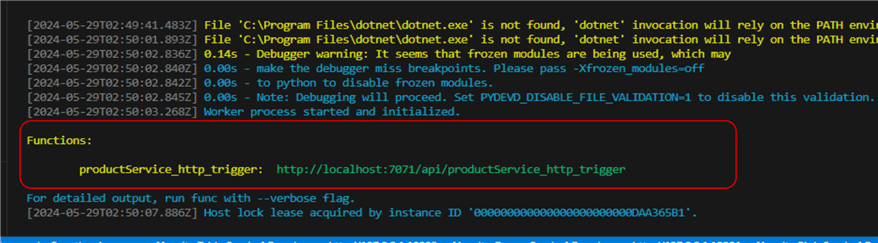
To run the function in your browser, hold "Ctrl" and click on the link shown above. Since the default request runs without the name parameter, you will see the following message in your browser:

Now, let's add a query string for our name and run the function.

Great! Your API is working on your local network. Azurite is a local storage emulator, so you can test your Azure functions before uploading them to the cloud. This is a great way to learn how to interact with your Azure application without wasting Azure resources for early development purposes.
Azure Tables Client Library for Python
To use Azure Tables, you must first have an Azure or Cosmos DB storage account. But since we will be developing on our local workspace, we will use an Azurite storage account, which has predefined default endpoint and credentials:
AZURE_STORAGE_ACCOUNT_NAME = 'devstoreaccount1'
AZURE_STORAGE_ACCOUNT_KEY = 'Eby8vdM02xNOcqFlqUwJPLlmEtlCDXJ1OUzFT50uSRZ6IFsuFq2UVErCz4I6tq/K1SZFPTOtr/KBHBeksoGMGw=='
endpoint='http://127.0.0.1:10002/ devstoreaccount1'
In this tutorial, you will be using shared credentials, but other credentials include Connection String, Shared Access Signature Token, and TokenCredential(AAD)(Supported on Storage).
Azure Tables client library for Python allows you to interact with your Azure tables and entities in the tables programmatically. You can install it on your environment using this pip command:
pip install azure-data-tables
Web Frameworks
Everything makes more sense when you see it visually. So, to be confident with our simulated application, we must create a web interface to visually see how our application would work in real production because we intend to use it for such use cases. You can use Asynchronous Server Gateway Interface (ASGI)-compatible and Web Server Gateway Interface (WSGI)-compatible frameworks like Flask with your HTTP-triggered Python functions.
You must first update the host.json file to include an HTTP routePrefix:
{
  "version": "2.0",
  "logging": {
    "applicationInsights": {
      "samplingSettings": {
        "isEnabled": true,
        "excludedTypes": "Request"
      }
    }
  },
  "extensionBundle": {
    "id": "Microsoft.Azure.Functions.ExtensionBundle",
    "version": "[4.*, 5.0.0)"
  },
  "extensions":
  {
    "http":
    {
        "routePrefix": ""
    }
  }
}
Then, you need to make a few changes to how you code. Let me give you an example using a sample of the code used in the previous article, which was Azure Function (Func) specific:
import azure.functions as func
import logging

app = func.FunctionApp(http_auth_level=func.AuthLevel.ANONYMOUS)

@app.route(route="productService_http_trigger")
def productService_http_trigger(req: func.HttpRequest) -> func.HttpResponse:

return func.HttpResponse("<h1>Hello World™</h1>", status_code=200)
The code above can be written as follows to ensure you are integrating your web frameworks with Azure functions:
import azure.functions as func
from flask import Flask, Response

flask_app = Flask(__name__)

@flask_app.get("/productService_http_trigger")
def productService_http_trigger():
return Response("<h1>Hello World™</h1>", mimetype="text/html")

app = func.WsgiFunctionApp(app=flask_app.wsgi_app, http_auth_level=func.AuthLevel.ANONYMOUS)
Note: The WSGI uses the get() method instead of route()
and returns values using the Response method from Flask instead of Func.HttpResponse.
Then, you finally must declare your app as a Func App with WSGI capabilities using
the func.WsgiFunctionApp() method. That is all you need to change,
so do not add the "status_code" response parameter to your Flask code.
Customizing Azure Function Code
Now, open your function_app.py file and add the following code:
#MSSQLTIPS CODE
import logging
import json
import os
import azure.functions as func
from azure.data.tables import TableServiceClient, TableEntity
from azure.core.credentials import AzureNamedKeyCredential
from flask import Flask, render_template, jsonify,Response, request, redirect, url_for
import requests

flask_app = Flask(__name__)

@flask_app.route('/add_product', methods=['POST'])
def add_product():
    product_name = request.form['name']
    product_price = request.form['price']

    if product_name and product_price:
        account_name = os.getenv('AZURE_STORAGE_ACCOUNT_NAME', 'devstoreaccount1')
        account_key = os.getenv('AZURE_STORAGE_ACCOUNT_KEY', 'Eby8vdM02xNOcqFlqUwJPLlmEtlCDXJ1OUzFT50uSRZ6IFsuFq2UVErCz4I6tq/K1SZFPTOtr/KBHBeksoGMGw==')

        if not account_name or not account_key:

            return redirect(url_for('index'))

        credential = AzureNamedKeyCredential(name=account_name, key=account_key)
        table_service_client = TableServiceClient(
            endpoint=f"http://127.0.0.1:10002/{account_name}",
            credential=credential
        )

        table_client = table_service_client.get_table_client(table_name="Products")

        try:
            table_client.create_table()
        except:
            pass

        product = {
            'PartitionKey': 'Products',
            'RowKey': product_name,
            'Name': product_name,
            'Price': product_price
        }

        table_client.create_entity(entity=product)

    else:
        print("error")

    return redirect(url_for('index'))
@flask_app.get('/')
def index():
    try:
        response = requests.get('http://127.0.0.1:7071/api/getProducts')
        response.raise_for_status()
        products = response.json().get('data', [])
    except requests.RequestException as e:
        print(f"Error fetching products: {e}")
        products = []

    return render_template('index.html', products=products)

@flask_app.get("/api/getProducts")
def getProducts():
    logging.info('Python HTTP trigger function processed a request to get products.')

    account_name = os.getenv('AZURE_STORAGE_ACCOUNT_NAME', 'devstoreaccount1')
    account_key = os.getenv('AZURE_STORAGE_ACCOUNT_KEY', 'Eby8vdM02xNOcqFlqUwJPLlmEtlCDXJ1OUzFT50uSRZ6IFsuFq2UVErCz4I6tq/K1SZFPTOtr/KBHBeksoGMGw==')

    if not account_name or not account_key:
        return Response(
            "Azure Storage credentials not provided",

        )

    # Initialize the TableServiceClient with AzureNamedKeyCredential
    credential = AzureNamedKeyCredential(name=account_name, key=account_key)
    table_service_client = TableServiceClient(
        endpoint="http://127.0.0.1:10002/devstoreaccount1",
        credential=credential
    )

    # Create a table client
    table_client = table_service_client.get_table_client(table_name="Products")

    try:
        products = table_client.list_entities()
        products_list = []
        for product in products:
            products_list.append({
                'PartitionKey': product['PartitionKey'],
                'RowKey': product['RowKey'],
                'properties': {
                    'PartitionKey': product['PartitionKey'],
                    'RowKey': product['RowKey'],
                    'Name': product['Name'],
                    'Price': product['Price'],

                },

            })

        response_data = {
            "name": f"{account_name}$Products",
            "data": products_list
        }

        return Response(
            json.dumps(response_data),
            mimetype='application/json',

            headers={
                "Access-Control-Allow-Origin": "*",
                "Access-Control-Allow-Methods": "GET, OPTIONS",
                "Access-Control-Allow-Headers": "Content-Type"
            }
        )
    except Exception as e:
        return Response(
            f"An error occurred: {str(e)}",

        )


app = func.WsgiFunctionApp(app=flask_app.wsgi_app,
                           http_auth_level=func.AuthLevel.ANONYMOUS)
Then, create a folder in your directory called "templates," create a new HTML file named "index.html," and add the following code to it:
<!DOCTYPE html>
<html lang="en">
<head>
    <meta charset="UTF-8">
    <meta name="viewport" content="width=device-width, initial-scale=1.0">
    <title>MSSQLTIPS Azurite Browser Example</title>
    <link rel="stylesheet" href="{{ url_for('static', filename='styles.css') }}">
</head>
<body>
    <h1>MSSQLTIPS Azurite Browser Example</h1>
    <h2>Add a New Product</h2>
    <form id="add-product-form" action="/add_product" method="POST">
        <label for="name">Product Name:</label>
        <input type="text" id="name" name="name" required>
        <br>
        <label for="price">Product Price:</label>
        <input type="text" id="price" name="price" required>
        <br>
        <button type="submit">Add Product</button>
    </form>
    <h2>Product List</h2>
    <div id="product-list">
        {% for product in products %}
            <div class="product">
                <h2>{{ product['properties']['Name'] }}</h2>
                <p>Price: ${{ product['properties']['Price'] }}</p>
            </div>
        {% endfor %}
    </div>
</body>
</html>
Finally, create another folder named "static," create a new CSS file named "styles.css," and add the following code to it:
body {
    font-family: Arial, sans-serif;
    margin: 20px;
}

#product-list {
    display: flex;
    flex-wrap: wrap;
}

.product {
    border: 1px solid #ccc;
    padding: 10px;
    margin: 10px;
    width: 200px;
    box-shadow: 2px 2px 8px rgba(0,0,0,0.1);
}

form {
    margin-bottom: 20px;
    padding: 20px;
    border: 1px solid #ccc;
    background-color: #fff;
    border-radius: 5px;
    box-shadow: 2px 2px 8px rgba(0, 0, 0, 0.1);
    max-width: 400px;
}

form label {
    display: block;
    margin-top: 10px;
    font-weight: bold;
}

form input {
    width: 100%;
    padding: 8px;
    margin-top: 5px;
    margin-bottom: 10px;
    border: 1px solid #ccc;
    border-radius: 4px;
}

form button {
    margin-top: 10px;
    padding: 10px 15px;
    background-color: #4CAF50;
    color: white;
    border: none;
    cursor: pointer;
    border-radius: 4px;
}

form button:hover {
    background-color: #45a049;
}
User Interface Testing
After completing the code, you can test your APIs, authentication, and storage for the function using the user interface (UI). Keep in mind that we could have also used other applications like Postman to check the APIs. However, since the APIs will be used on UIs, we are attempting to create a UI with both authenticated requests and responses while testing the function code.
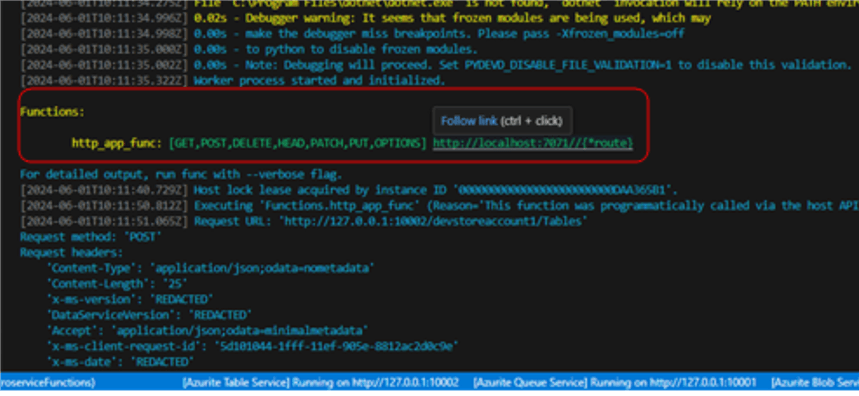
To initialize your Azure Func after changes, click "F5." Give it time to load, then click "Ctrl" + the link:
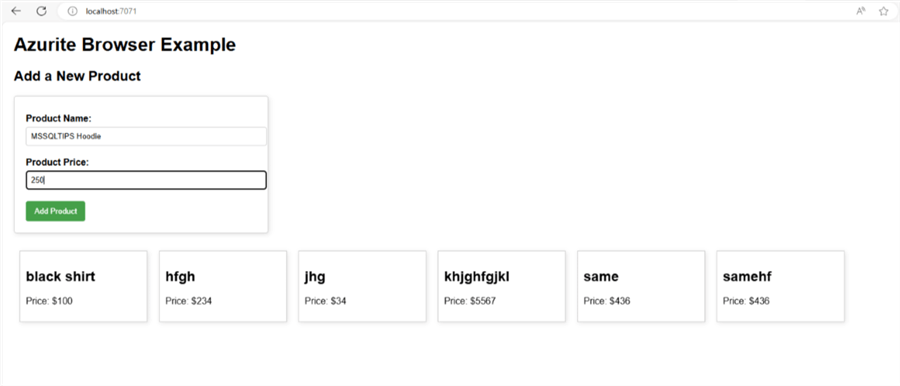
This will take you to the browser. Run a test by adding a new product using the form:
After clicking on the Add Product button, you should see the new product reflected on the products list:
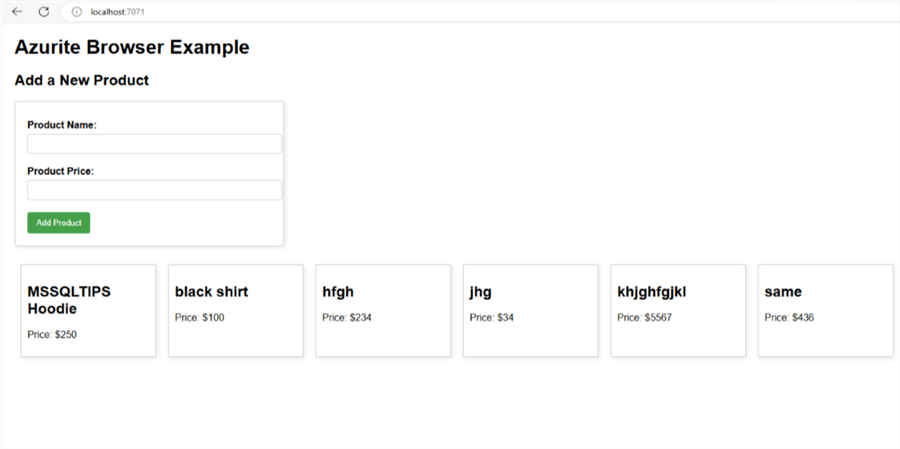
Great! To recap, we customized the default Azure Function Python code on our local workspace and created Azure functions that use Azurite as a storage simulator to generate and store new products. We integrated the Azure function with the Flask web framework to create a user interface for our code, allowing us to interact more visually while reflecting our expected use cases.
Now that we have the Azure function to handle some functions for the product service, we need to upload the function to Azure. Before doing so, you need to know which plan you intend to use for your code. One option is to use Azure Cosmos DB or MongoDB vCore cluster, which has databases, collections, and documents. This option also offers a free-tier plan to get your application off the ground before committing.
Conclusion
Cloud computing is the future of software. So, as a developer, you must keep up with the new technologies. Azure is one of the leading cloud platforms and learning how to use their services is an excellent investment for your career. This tutorial aimed to show you how flexible Azure functions are by allowing you to create instances on your local workspace and how modules like Azurite can help you simulate the storage account for Azure functions. This means you can develop your applications locally, edit them, and run tests before you deploy them to the cloud.
Next Steps
- Learn How to Schedule T-SQL Statements to Run with Azure Functions.
- Learn how to Generate PDF file using Azure Functions, Python Runtime and xhtml2pdf Package.
- Learn how to Integrate Azure Function into Azure Data Factory Pipeline.
- Learn how to Read an Excel File from Azure Blob Storage with an Azure Function.
- Learn more about Serverless Microservice Computing Concepts and Architecture


About the author
 Levi Masonde is a developer passionate about analyzing large datasets and creating useful information from these data. He is proficient in Python, ReactJS, and Power Platform applications. He is responsible for creating applications and managing databases as well as a lifetime student of programming and enjoys learning new technologies and how to utilize and share what he learns.
This author pledges the content of this article is based on professional experience and not AI generated.
View all my tips
Article Last Updated: 2024-07-30