By: Nai Biao Zhou | Updated: 2024-08-21 | Comments | Related: > Application Development
Problem
Web applications have many business advantages (Khamooshi, 2019). Organizations are opting for web application services. While learning some programming languages (such as HTML, JavaScript, and CSS) for web development is essential, grasping the fundamental concepts, terminology, and commonly used techniques is also necessary. Building a web application and deploying it on the Internet helps developers learn web development processes and architectures. AWS is an excellent choice for building and hosting web applications in the cloud. The AWS Free Tier provides us with products and services to practice web development at a limited cost. How can developers quickly create a web application and make it publicly accessible by using the free tiers of AWS?
Solution
We can build and host a WordPress web application on a single Amazon EC2 T2.micro instance within the free tiers of AWS. WordPress is an open-source content management system (CMS) that allows us to quickly create web applications without spending much time coding. Amazon EC2 (i.e., Amazon Elastic Compute Cloud) provides many configuration and management options. We adopt a two-tier architecture (i.e., client-server architecture), which comprises two components: one that provides services and the other that consumes those services (Nishtha, 2024).
This tip concentrates on setting up a WordPress web application on an EC2 instance. However, we should know that the web application development process involves several phases (Das, 2024). We should resist the attempt to write code immediately. After collecting and analyzing business requirements, we determine the technology stack, frameworks, and tools. We then can quickly create a prototype to ensure all these techniques can work together. In this article, we use the following steps to build and host a simple web application:
- Establishing an EC2 T2.micro instance.
- Installing PHP and its Dependencies on Amazon Linux 2023.
- Installing MySQL and phpMyAdmin.
- Building a WordPress Web Application.
As of this writing, over 100 AWS products are available on the AWS Free Tier. This exercise uses an EC2 t2.micro instance as a web server; therefore, we should have an AWS account to complete these steps. We use the AWS console, a web application, to manage and utilize AWS services. The web browser used in this article is Google Chrome (Version 127.0.6533.73). We use a LAMP stack to create and host a WordPress web application. The LAMP stack includes Linux, Apache, MySQL, and PHP. All LAMP technologies are open source.
1 – Establishing an EC2 T2.micro Instance
The MSSQLTips.com tip, "Create a Multi-Node Apache Hadoop Cluster in AWS for Big Data Projects," covered steps to create four EC2 t2.micro instances (Zhou, 2023). In this section, we follow those steps to create one instance:
1.1 Launch an AWS EC2 Instance
Log into the AWS console (https://console.aws.amazon.com/). Next, search for "EC2" in the search bar at the top of the screen, as shown in Figure 1.
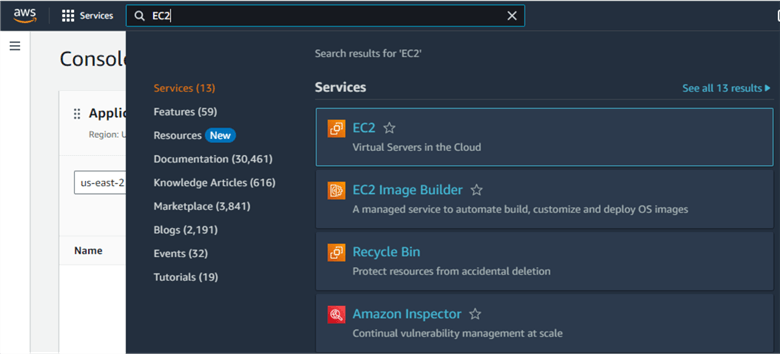
Figure 1 Search for "EC2" in the search bar
Click on the "EC2" item in the search results and go to the EC2 dashboard, as shown in Figure 2. Next, click "Launch instance" to bring up the "Launch an instance" page.
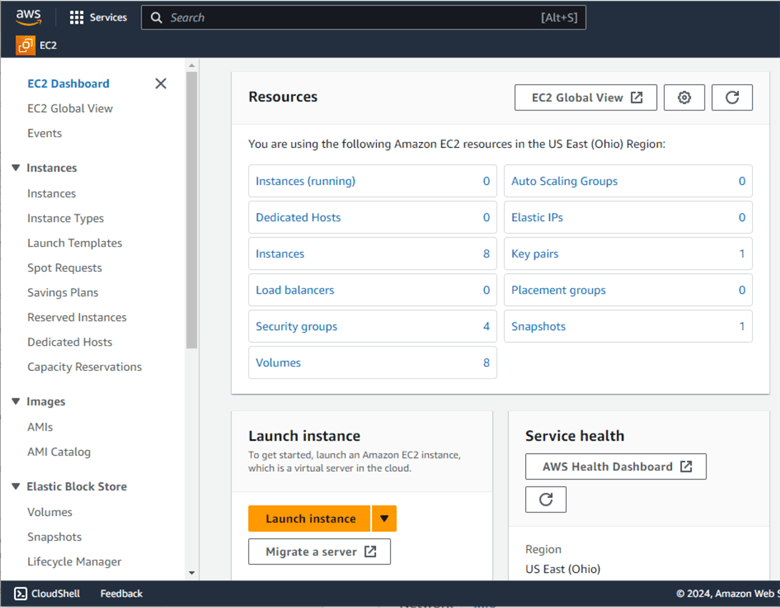
Figure 2 The EC2 dashboard
1.2 Set Up the EC2 Instance
We then follow Steps 1.1, 1.2, 1.3, and 1.4 in the tip Create a Multi-Node Apache Hadoop Cluster in AWS for Big Data Projects to complete the settings in the Name and tags, Application and OS Images, Instance type, and Key pair sections. Each step has a screenshot that illustrates the configurations.
In the Network Settings section, we check the "Allow HTTPS traffic from internet" and "Allow HTTP traffic from internet" options, as shown in Figure 3. These changes make the instance reachable on the internet. The current settings allow SSH traffic from anywhere. The warning message at the bottom indicates we should only allow known IP addresses. We will use a known IP address later.
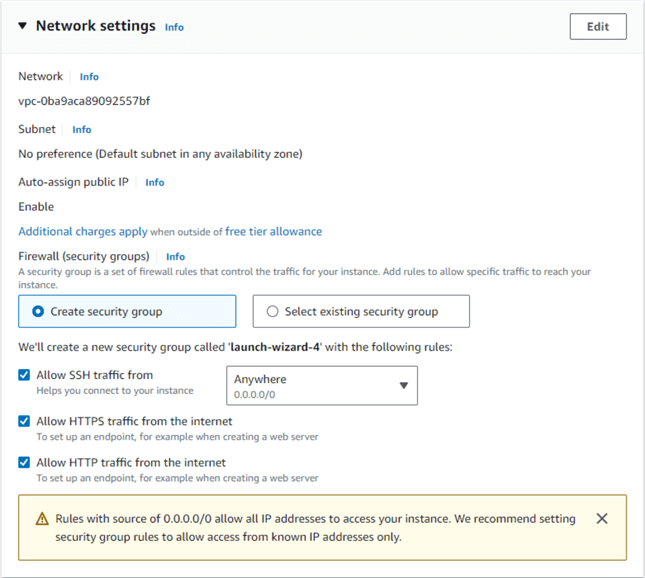
Figure 3 The Network settings on the Launch instance page
1.3 Create and Access the EC2 Instance
The Summary pane on the left of the Launch instance page should look like Figure 4. We then click the "Launch instance" button to create the instance (Giles, 2022).
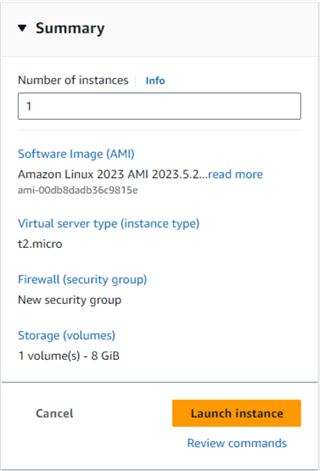
Figure 4 The Summary pane on the Launch instance page
Next, we follow Steps 1.5, 1.6, and 3.1 in the tip Create a Multi-Node Apache Hadoop Cluster in AWS for Big Data Projects to connect to the instance via the web browser. The instance has an auto-assigned public IP address. We may receive a security warning message that looks like Figure 5. We follow the instructions in the warning message and reference Section 2 in that tip to edit inbound rules.

Figure 5 The security warning message
After the changes, the inbound rules should look like Figure 6.
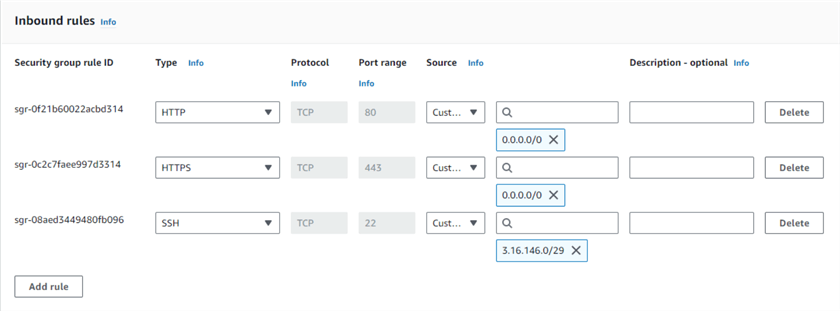
Figure 6 The inbound rules
Now, we can control the virtual machine through the terminal window. AWS has several options (such as Amazon Lightsail) for provisioning virtual machines to host WordPress websites. We use EC2 because of its flexibility and cost-effectiveness. In this way, developers have complete control over a web server and install many software packages on the server without much limitation.
The web application built in this article adopts a simple client-server architecture in which the EC2 instance acts as a server, and the user's web browsers work as clients. A PHP program lives on the server, where it handles web requests, executes business logic, and interacts with the data storage. We can use EC2 instances to construct web applications with more advanced architectures (Prakash, 2021).
2 – Installing PHP and its Dependencies
WordPress, written using the scripting language PHP, dominates the CMS market with a 62.7% share (Q-Success, 2024). Therefore, it is worth exploring WordPress and PHP (Golofit, 2024). This section covers commands to install PHP8.2 and its dependencies.
2.1 Install PHP8.2 on Amazon Linux 2023 (AL2023)
This step installs the version 8.2 on the EC2 instance. First, we run a command to update all installed packages and their dependencies on the Linux system:
$ sudo yum update
Then, we install PHP8.2 and its dependencies:
$ sudo yum install php8.2 php-mysqlnd -y
Figure 7 illustrates all the installed packages. The command installed "https" packages, the Apache Hypertext Transfer Protocol (HTTP) server program. Therefore, we do not need to install Apache separately.

Figure 7 Installed packages
We then run the following commands to start the Apache service and make the service always started when launching the instance (Landmesser, 2020):
$ sudo systemctl start httpd
$ sudo systemctl enable httpd
2.2 Run a Test Page
Next, we create a test page to verify the installation. We use the command line text editor, i.e., nano, to create a PHP page. The following command opens the text editor:
$ sudo nano /var/www/html/test.php
Copy the following code to the editor:
<?php
phpinfo( );
?>
Hit Ctrl + O, then the Entry key to save the changes. Next, we hit Ctrl + X to exit the editor. Find the instance's public IP address (3.139.104.17) and then access the page: http://3.139.104.17/test.php. The page should return some useful information. Figure 8 shows one section on the test page.
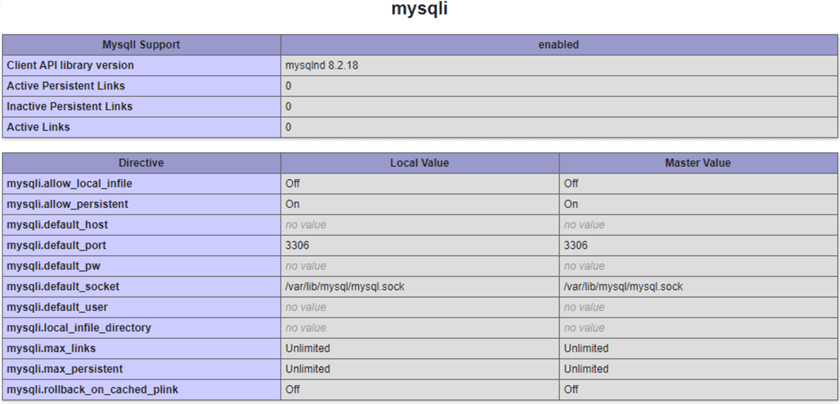
Figure 8 A table on the test page
Next, we run a command to delete the test page:
$ sudo rm /var/www/html/test.php
It is worth noting that the public IP address automatically changes every time we stop and start the instance. If we host a web application on an EC2 instance, we should use a static IP address for the web server. AWS EC2 provides an Elastic IP address feature designed for dynamic cloud computing (AWS, 2024). An Elastic IP address is a static IPv4 address.
3 – Installing MySQL and phpMyAdmin
MySQL is an open-source relational database management system (RDBMS), and phpMyAdmin is a free tool that provides a web interface to manage MySQL.
3.1 Install MySQL and Create a Database
We first use the following command to download the RPM file, a Red Hat package manager file (Mulei, 2023):
$ sudo wget https://dev.mysql.com/get/mysql84-community-release-el9-1.noarch.rpm
We then install the package, plus the mysql-community-server:
$ sudo dnf install mysql84-community-release-el9-1.noarch.rpm -y
$ sudo dnf install mysql-community-server -y
Next, run the following command to start the MySQL server:
$ sudo systemctl start mysqld
The installation process creates a superuser account, i.e., root, with all privileges. We can use the following command to find the account's temporary password:
$ sudo grep 'temporary password' /var/log/mysqld.log
Figure 9 illustrates the generated password. We should change the password before using the superuser's power.

Figure 9 The generated root password
Let us use the temporary password to connect to the MySQL server, as illustrated in Figure 10. Here is the command:
$ mysql -u root -p
The command asks us to enter the password. After entering the temporary password, we see a welcome message.
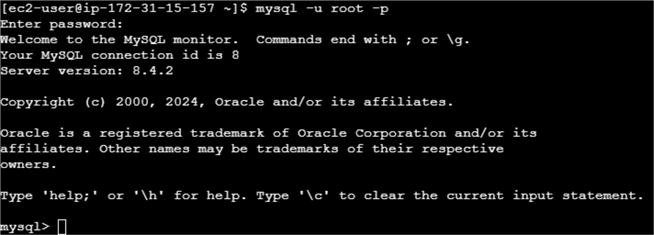
Figure 10 Connect to the MySQL server
Next, run the following commands sequentially to change the password and quit the connection:
mysql> ALTER USER 'root'@'localhost' IDENTIFIED BY 'MSSQLTip.com@2024';
mysql> quit
Then, we use the following command to create a new database for the web application. Note that we should use the new password.
$ mysqladmin -u root -p create wp_db;
We can perform almost every database operation through commands (Sruthy, 2024). However, some may prefer UI tools. We introduce phpMyAdmin, which can handle MySQL administration over the web.
3.2 Install phpMyAdmin
After installing MySQL, we download the phpMyAdmin installation package:
$ sudo wget https://files.phpmyadmin.net/phpMyAdmin/5.1.1/phpMyAdmin-5.1.1-all-languages.tar.gz
We want to install the tool in the folder "/var/www/html/phpMyAdmin," therefore, we create this folder first:
$ sudo mkdir /var/www/html/phpMyAdmin
Next, we run the following command to install this tool:
$ sudo tar -xvf phpMyAdmin-5.1.1-all-languages.tar.gz -C /var/www/html/phpMyAdmin --strip-components=1
We can use this tool through the URL http://3.139.104.17/phpMyAdmin. Figure 11 illustrates the login page of this tool. We log in to the tool using the root account.
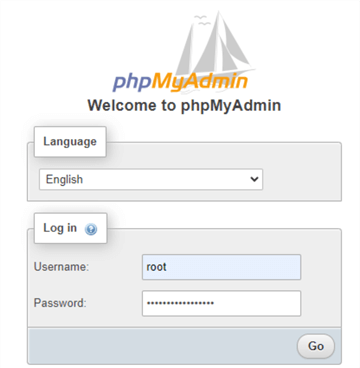
Figure 11 The login page of the phpMyAdmin tool
Figure 12 shows the landing page after we successfully log in to the tool. We see the database we created. The UI allows us to perform a wide range of database operations on MySQL. It is better to create another account to access this database. For the sake of simplicity, we continue to use the root account to access all databases.
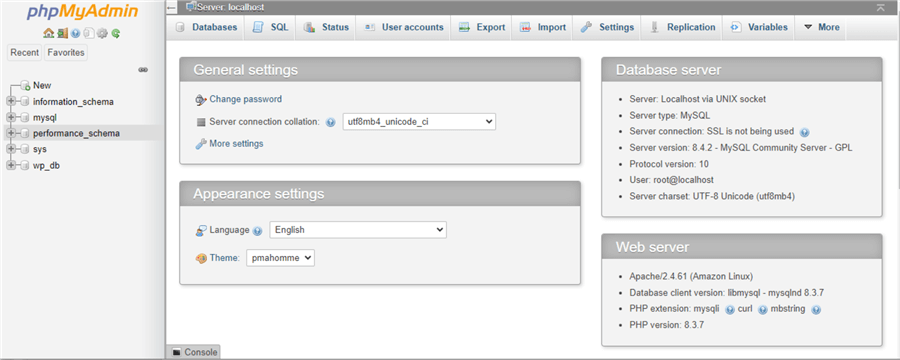
Figure 12 The phpMyAdmin tool interface
4 – Building a WordPress Web Application
Tahir explores 11 reasons we should use WordPress in 2024 (Tahir, 2024). WordPress can quickly build a full-fledged web application. We then play with the application and dive into details from all perspectives. As Tahir mentioned, the WordPress community has built many helpful resources. We can benefit from others' experiences.
4.1 Install the WordPress Package
The WordPress official website (https://wordpress.org/download/) gives us a hyperlink to download the installation package. We run the following command to obtain the package:
$ sudo wget https://wordpress.org/latest.zip
We then unzip the package to extract all contents into the "wordpress" folder:
$ sudo unzip latest.zip
Move all contents from the "wordpress" folder to the "/var/www/html" folder:
$ sudo mv wordpress/* /var/www/html
Next, we remove the "wordpress" folder and the installation package:
$ sudo rm -rf wordpress latest.zip
4.2 Configure WordPress File/Directory Permissions
When configuring WordPress, building a web application, or operating a web application, we may need the application to create or modify files or directories on the web server. For example, webmasters install new themes, or users upload files to the "wp-content/uploads" folder. In this case, we enable the web server users to create folders and write files in the "wp-content" folder. Sundaram recommends setting WordPress directory permissions to 755 and most files to 644 (Sundaram, 2022). Sundaram also explains how to decode permission numbers and symbols, as shown in Table 1. The column headings "User," "Group," and "World" represent the three categories of roles.
|
|
Symbols |
User |
Group |
World |
||||||
|
755 |
rwxr-xr-x |
Read |
Write |
Execute |
Read |
- |
Execute |
Read |
- |
Execute |
|
644 |
rw-r–r– |
Read |
Write |
- |
Read |
- |
- |
Read |
- |
- |
Table 1 Decoding permission numbers and symbols (Sundaram, 2022)
We use the following command to find out who runs the Apache service (Gite, 2017):
$ egrep -iw --color=auto '^user|^group' /etc/httpd/conf/httpd.conf
The returns shown in Figure 13 indicate that the Apache service is running as the user apache. So, we want the user to have all the permissions the application needs.

Figure 13 The Apache web server user and group names
We use the following command to list the contents of the "/var/www/" folder:
$ ls -l /var/www/
The output indicates that the "/var/www/html" owner is root. We want the user apache to own the folder; therefore, we change the folder owner with this command:
$ sudo chown -R apache:apache /var/www/html
Next, we check the folder's existing permissions with the "ls -l" command:
$ ls -l /var/www/html
The output shown in Figure 14 indicates that the user apache can modify all folders and files.
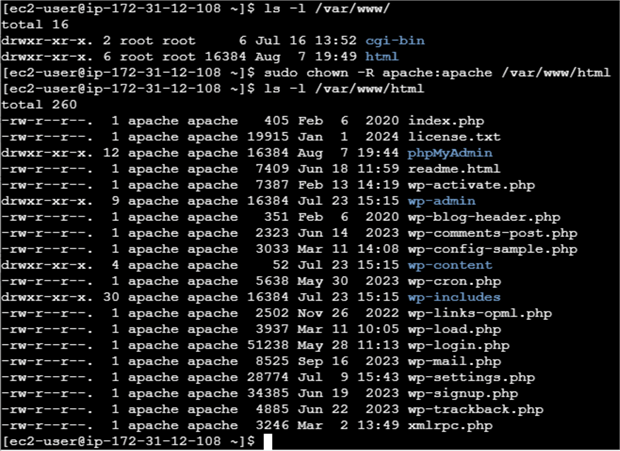
Figure 14 WordPress file and folder permissions
If the existing permission of a folder is not 755, we can change the folder permission to 755 (i.e., drwxr-xr-x):
$ sudo chmod -R 755 /var/www/html/wp-content
4.3 Create a WordPress Web Application
We can access and set up the web application through the public IP address, for example, http://3.139.104.17/. After selecting a language on the landing page, we arrive at a welcome page, as shown in Figure 15.
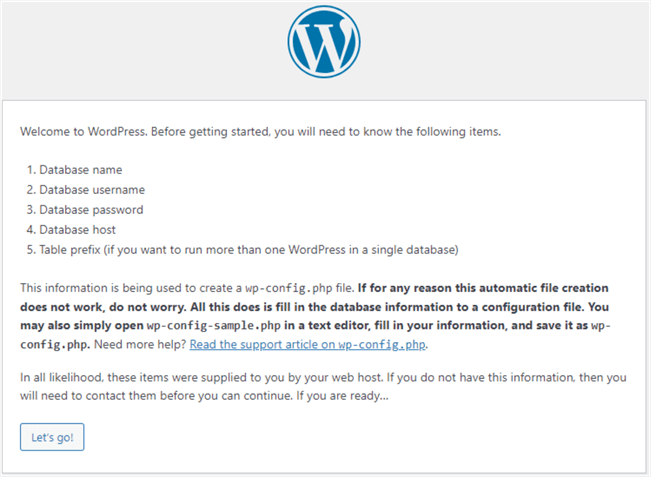
Figure 15 The welcome page of the WordPress web application configuration
Click on the "Let's go!" button to configure the database connection, as shown in Figure 16.
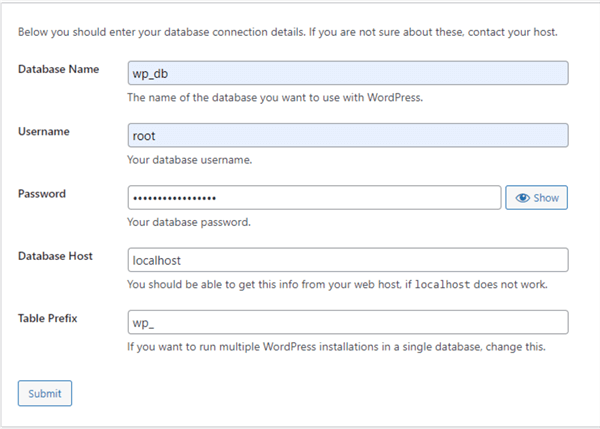
Figure 16 The database connection details
Click the "Submit" button to bring up the confirmation page, as shown in Figure 17.

Figure 17 The database connection confirmation
We click the "Run the installation" button to continue the installation process. The subsequent dialog box welcomes us to the five-minute WordPress process. The dialog box is the same as in Figure 16 on the "Setup a WordPress Environment - Apache Web Server, MySQL Database and phpMyAdmin" tip (Zhou, 2024). We then follow the steps in Section 1.3.2 on the tip to land on the WordPress dashboard. Next, we follow the instructions in Section 1.3.3 to create a website.
End users may consider this application a website because they get static information from it. However, it is a web application to us since we use the admin interface to build websites. We can conduct all kinds of testing, such as changing themes, installing plugins, embedding JavaScript code in pages, etc.
Summary
Building a WordPress application on an EC2 instance allows developers to learn about a basic web application architecture (e.g., a two-tier architecture) and go through the web development process quickly. In this way, developers can have a fully functional web application without investing significant time in coding.
The tip began by explaining how to set up an EC2 T2.micro instance. It then installed PHP and its dependencies. We then explored MySQL installation and database creation. We also installed a handy tool, phpMyAdmin, for MySQL administration.
Next, we installed WordPress on the EC2 instance. We demonstrated the process of creating a web application. The process also showed how to change the WordPress file and directory permissions.
Reference
AWS. (2024). How To Setup Amazon EC2 (AWS) To Host Your Websites. https://runcloud.io/blog/aws
Das, S. (2024). Web Application Development: Process, Tools, & Examples. https://www.browserstack.com/guide/web-application-development-guide.
Ghodasara, K. (2020). Step by Step Guide to Setup WordPress on Amazon EC2 (AWS) Linux Instance. https://crunchify.com/setup-wordpress-amazon-aws-ec2/.
Giles, A. (2022). Deploying an EC2 instance in AWS and installing Apache. https://blog.devgenius.io/deploying-an-ec2-instance-in-aws-and-installing-apache-81d3c3670b9.
Gite, V. (2017). Linux: Find Out Apache User Name, https://www.cyberciti.biz/faq/unix-osx-linux-find-apache-user/
Golofit, P. (2024). Is PHP still relevant in 2024? https://accesto.com/blog/is-php-still-relevant-in-2024/
Khamooshi, P. (2019). The benefits of using web-based applications. https://www.geeks.ltd.uk/insights/articles/the-benefits-of-using-web-based-applications.
Landmesser, B. (2020). Install WordPress in AWS EC2 instance. https://medium.com/@babettelandmesser/install-wordpress-in-aws-ec2-instance-ada5b2db06d2.
Mulei, F. (2023). How to Install MySQL on Amazon Linux 2023. https://muleif.medium.com/how-to-install-mysql-on-amazon-linux-2023-5d39afa5bf11.
Nishtha (2024). What is Client-Server Architecture? https://intellipaat.com/blog/what-is-client-server-architecture/.
Prakash, Y. (2021). Web Application Architecture. https://medium.com/geekculture/web-application-architecture-800d3ecd8019.
Q-Success. (2024). Usage statistics and market share of WordPress. https://w3techs.com/technologies/details/cm-wordpress.
Wittig, M. & Wittig, A. (2023). Amazon Web Services in Action, Third Edition. Shelter Island, NY: Manning Publications.
Sruthy. (2024). How To Use MySQL From The Command Line [With Examples], https://www.softwaretestinghelp.com/use-mysql-from-command-line/
Sundaram, K. (2022). WordPress File Permissions: Complete Beginner's Guide. https://www.malcare.com/blog/wordpress-file-permissions.
Tahir, O. (2024). 11 Reasons Why You Should Use WordPress in 2024. https://wpforms.com/why-use-wordpress/.
Zhou, N. (2023). Create a Multi-Node Apache Hadoop Cluster in AWS for Big Data Projects. https://www.mssqltips.com/sqlservertip/7877/build-multi-node-apache-hadoop-cluster-aws-ec2/
Zhou, N. (2024). Setup a WordPress Environment - Apache Web Server, MySQL Database and phpMyAdmin. https://www.mssqltips.com/sqlservertip/7905/wordpress-environment-apache-web-server-mysql-database-phpmyadmin.
Next Steps
- This tip lets people quickly create a web application and play with it. Even though this is a two-tier architecture application, we still observed three core components: a web browser, a web server, and a database server. We should clearly understand each component's functionalities. The web browser executes HTML + JavaScript + CSS code that presents web content to end users. The web server runs the PHP programs to load the web content from the MySQL database or the server file system. The database server stores web contents. We can use the phpMyAdmin tool to view the HTML + JavaScript + CSS code stored in the database table "wp_posts." In addition, understanding the difference between HTML, CSS, and JavaScript is crucial. Only the web browser interprets these three front-end languages. The web server and the database server consider them as data. They operate and store the front-end code but do not execute the code. The instance configured in this tip is for development or training purposes. We cannot use it as a production server. AWS provides three main ways to host WordPress web applications.
- Check out these related tips:
- Create a Multi-Node Apache Hadoop Cluster in AWS for Big Data Projects
- Setup a WordPress Environment - Apache Web Server, MySQL Database and phpMyAdmin
- Setting up SQL Server on Red Hat Linux in AWS - Part 1
- Install SQL Server 2017 on Red Hat Linux on AWS - Part 2
- Launch SQL Server instances on AMAZON EC2
- How to build an Enterprise Environment in AWS for SQL Server
- Use SQL Server and CSS to Generate More Interesting Events Calendar in HTML
- Simple Web Based Content Management System using SQL Server, Python and Flask


About the author
 Nai Biao Zhou is a Senior Software Developer with 20+ years of experience in software development, specializing in Data Warehousing, Business Intelligence, Data Mining and solution architecture design.
This author pledges the content of this article is based on professional experience and not AI generated.
View all my tips
Article Last Updated: 2024-08-21