By: Temidayo Omoniyi | Updated: 2024-09-05 | Comments (1) | Related: > Cloud Strategy
Problem
In today's world, billions of data are generated daily from messaging applications like WhatsApp, financial data like the New York Stock Exchange, or video streaming platforms like YouTube. As a data engineer or solution architect, you are tasked to design a real-time streaming platform that captures the data as they are generated and stored in the necessary storage for decision-making.
Solution
Microsoft Azure has provided resources for data professionals to develop real-time streaming architecture to meet business needs. With the introduction of resources like Azure Event Hub, which is similar to Apache Kafka for messaging and Azure Stream Analytics for processing and aggregating streamed data, achieving a full-time streaming pipeline is more possible than ever before.
Project Overview
As a data engineer for a financial stock organization, you have been tasked to create a near-to-real-time streaming data pipeline from any finance platform. You are expected to connect to the financial service platform through an API to pull data in real time and perform the necessary aggregation. The stream data is expected to be stored in a data lake and viewed in real-time in Power BI to make informed decisions by business users.
Project Architecture
This project is broken down into multiple sections to get the best understanding and increase our ability to reproduce without issues.
- Section 1: Provisioning all necessary resources such as Azure Functions, Azure Event Hub, Azure Datalake Gen2, and Azure Stream Analytics in Azure Portal.
- Section 2: Writing the necessary streaming code for ingesting data from API and sending it to Azure Event Hub.
- Section 3: Integrate Code to Azure Functions and Deploy to Azure Portal.
- Section 4: Aggregate Streamed Data with Azure Stream Analytics and Push to Power BI for Visualization.
- Section 5: Create a Machine Learning Model for Prediction.
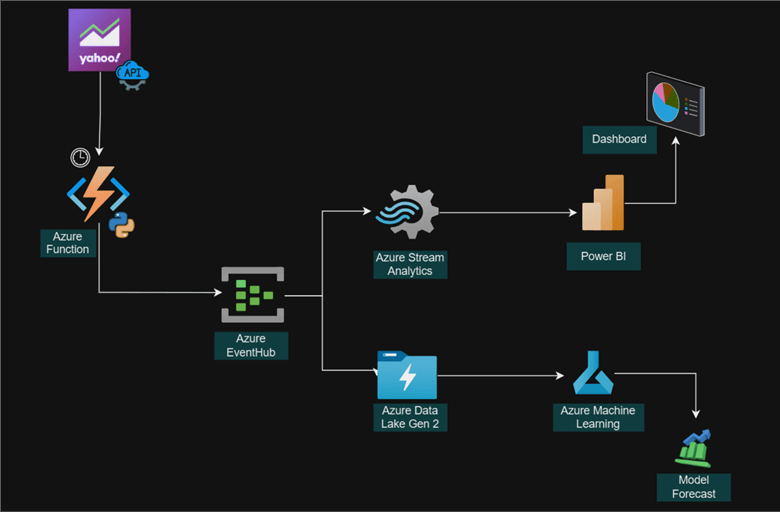
Project Architecture
Azure EventHub
Azure Event Hubs is a cloud-native data-streaming solution that can stream millions of events per second from any source to any destination with little or no latency. Apache Kafka is compatible with Event Hubs. It lets you run current Kafka workloads without requiring any modifications to the code.
Event Hubs are useful for businesses to consume and store streaming data. EventHub can integrate with other data and analytics services to build a comprehensive data streaming pipeline.
Key Capabilities of Azure Event Hub
- Apache Kafka on Azure Event Hubs. Azure Event Hubs has an Advanced Message Queuing Protocol (AMQP) like Apache Kafka. Because Event Hubs supports Apache Kafka, you may continue using your current Kafka workloads without changing the code.
- High-throughput Ingestion. Event Hubs are great for real-time data processing demands since they can process millions of events per second.
- Low Latency. Event Hubs ensure real-time event processing by delivering low latency for data ingestion.
- Scalability. Event Hubs may be readily scaled up or down to adapt to fluctuating data volumes.
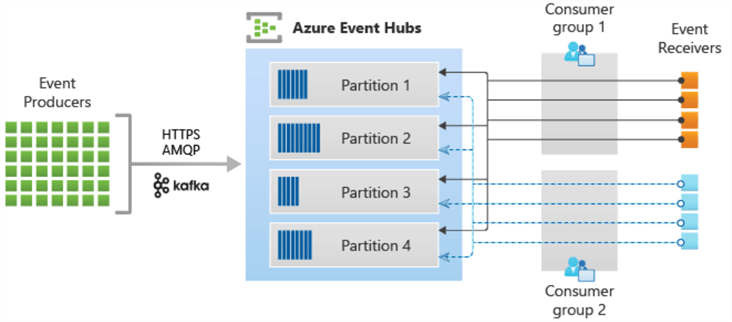
Key Component of Azure Event Hub
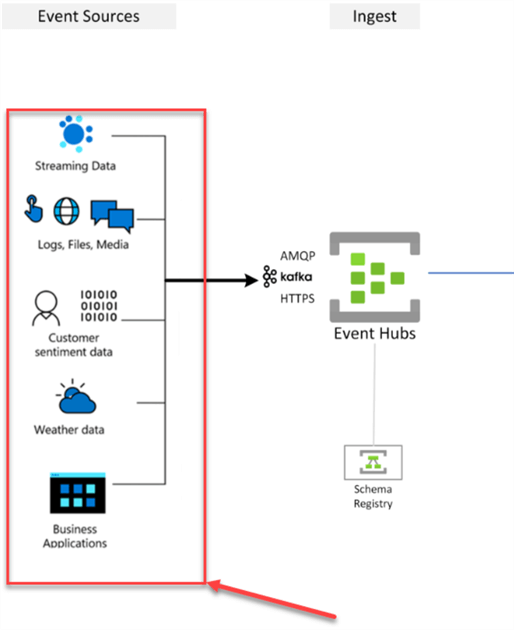
The Azure Event Hub consists of several high-throughput data ingestion and messaging delivery components.
Event Producers. This is usually the first step to streaming; any application or entity capable of sending data to Event Hub is considered an Event Producer. HTTPS, AMQP 1.0, and Apache Kafka (1.0 and higher) protocols can all be used to broadcast events. HTTP often handles low volumes of published events, but AMQP offers greater throughput and performance at higher volumes.
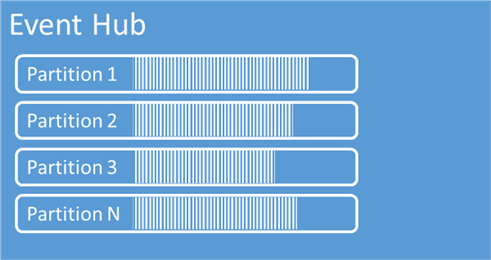
Partitions. Events gotten from the producer are partitioned, with each consumer reading a subset of the partitions. When a partition is created, its number must be between 1 and 32. Partitioning improves scalability and performance by enabling numerous consumers to analyze data in parallel.
Event Consumers. The event consumers are clients who view events from Event Hub. They can connect to the event hub and read events from partitions using the AMQP 1.0 protocol. Managing offsets, reading events, and connecting to partitions are typical consumer tasks.
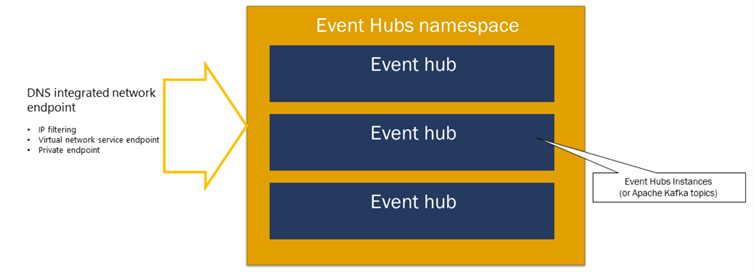
Namespaces. This serves as an Event Hubs administration container. It offers virtual network integration and IP filtering, as well as access control capabilities, including DNS-integrated network endpoints.
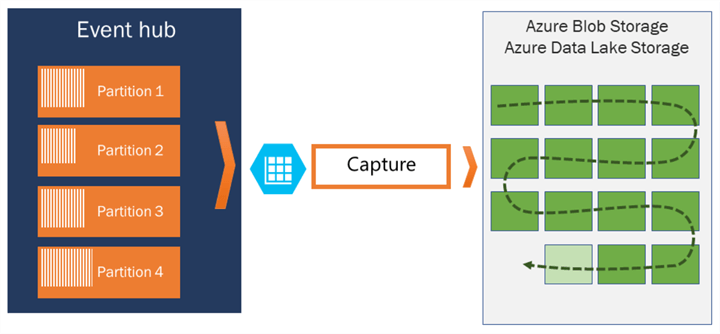
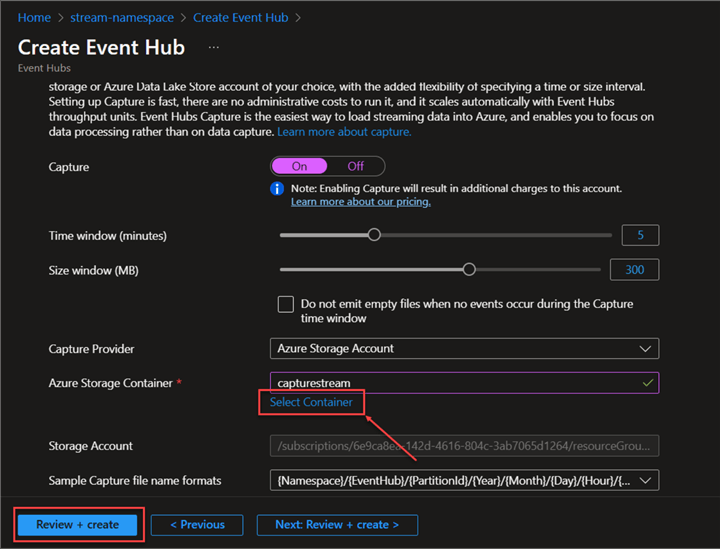
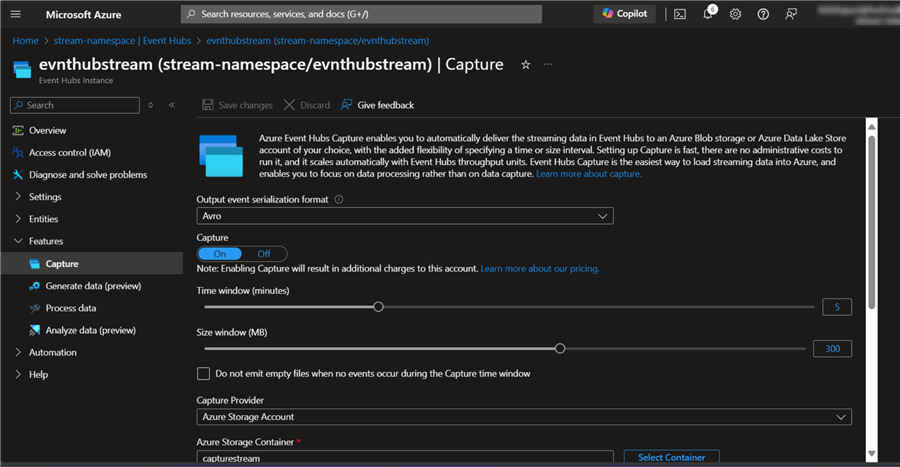
Capture. This feature is optional. In Event Hubs, capture enables automatically acquiring streaming data and saving it to a BLOB or Azure Data Lake Storage. The format in which captured data is written is Apache Avro (JSON format with timestamp).
Publisher Policy. Publisher regulations provide event publishers with more control by allowing each publisher to utilize a distinct identification when publishing events to an event hub.
Create Azure Event Namespace
To create an Azure Event Hub, you first must create an Event Namespace. Azure Event Hubs are usually found inside Azure Event Namespace.
The following steps should be followed to start the process:
Step 1: Provision Azure Event Namespace
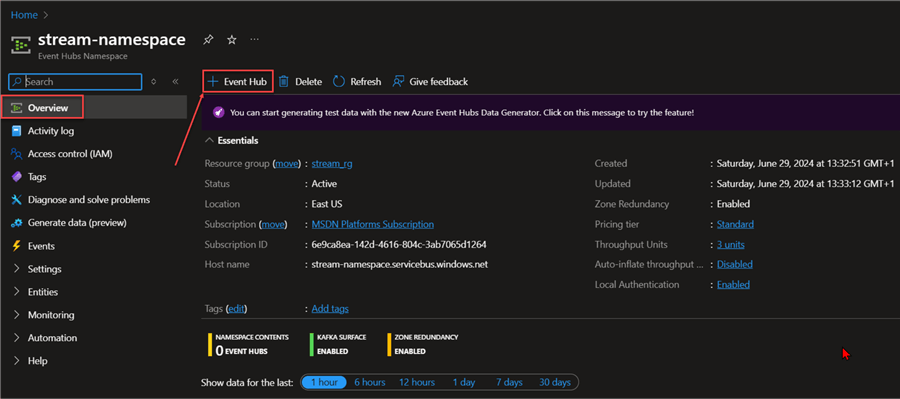
In your Azure portal, search for Event Hub or Event Namespace. This should take you to another window.
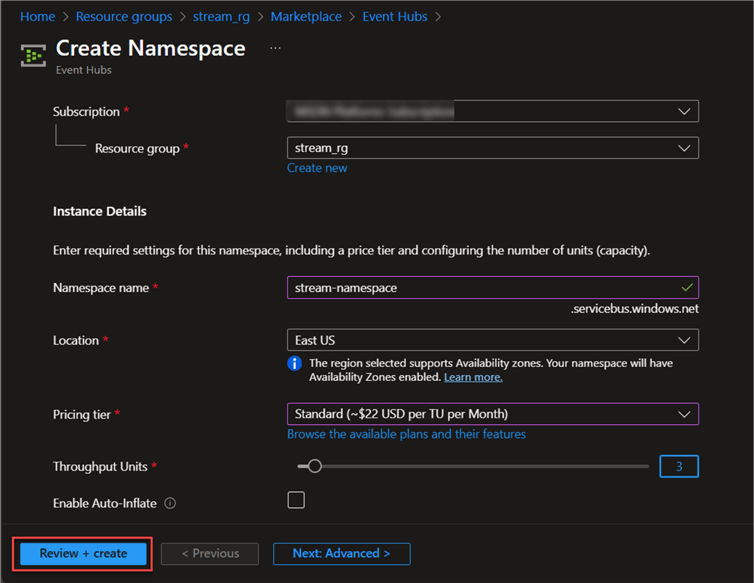
In the Basic settings, you are expected to fill in the following settings.
- Pricing Tier: We are using the Standard tier, which offers increased throughput, options for message preservation, and interoperability with Apache Kafka. This is the most common choice for general-purpose use.
- Throughput Unit (TU) (Standard Tier Only): This metric is used in the Standard Tier to specify the data ingestion and egress capacity of your workspace. More events can be processed per second at higher TU levels. For this project, we will set the TUs to 3.
Click Review + create, then wait a few minutes for the resource to be provided.
Step 2: Provision Azure Event Hub
After successfully provisioning the Event Namespace, go to the resource and click on + Event Hub at the top left corner. This should open a new window.
In the new window, complete the following:
- Partition Count: These are ordered sequences inside an Event Hub Stream. This enhances scalability and throughput by enabling parallel processing of data by multiple consumers. When choosing the number of partitions, consider the anticipated volume and your event stream. Faster processing is made possible by more partitions, but the overhead of management also rises. For this project, we will set the partition to 3 counts.
- Retention Period (Optional): This is the duration that Event Hubs will keep messages before automatically deleting them permanently. Depending on your data processing requirements, this setting can help you control storage expenses. Long-term storage might not be necessary in some situations.
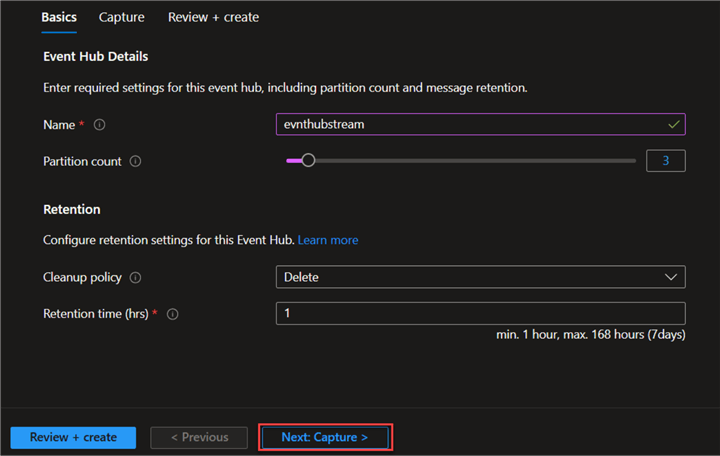
- Capture or Archiving (Optional): This feature allows Event Hub to automatically capture ingested data and store it in storage. In the Capture Settings, select the Container where you want to save your streaming data. By clicking on Container, a new window will open where you are expected to create a new container in a particular storage or select an already existing storage.
- Confirm Event Hub: After successfully creating Event Hub, click on the newly created Event Hub and check if all settings are done appropriately.
Click Review + create.
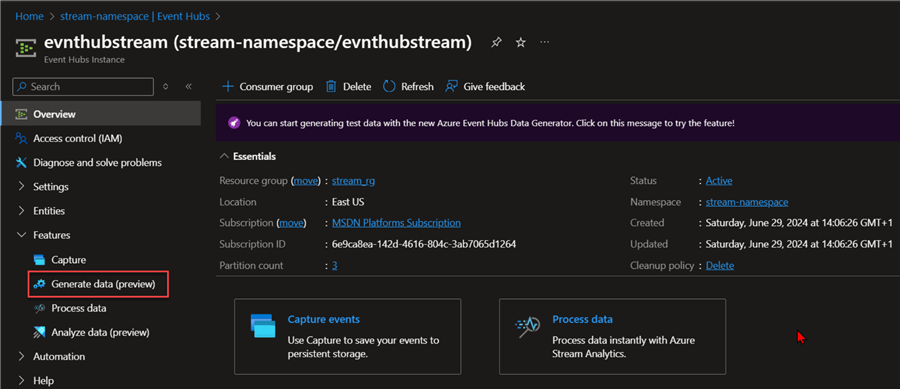
Step 3: Test Event Hub with Data Generator
Azure Event Hub introduced Data Generate (Preview), which enables users to easily generate and stream data samples into Azure Event Hub without writing any form of code. This process is seamless and fast.
In your Event Hub, click on Generate data. This will open another window where you can pick the data type you want to use.
In the Generate data tab, you are expected to fill in the following:
- Select Dataset: Here, you have the option to select any type of data you want to use for testing. I used the Stocks data sample.
- Repeat Send: This indicates how many times you want to send to Azure Event Hub.
Click Send.
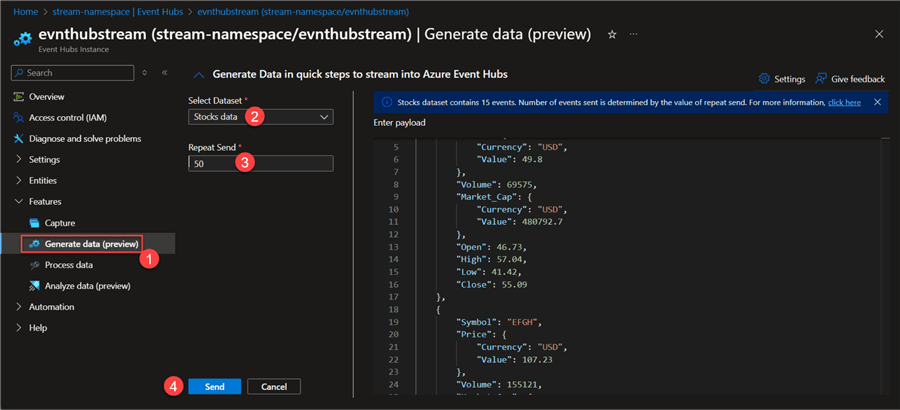
After clicking Send, you should be able to view the data in a JSON format.
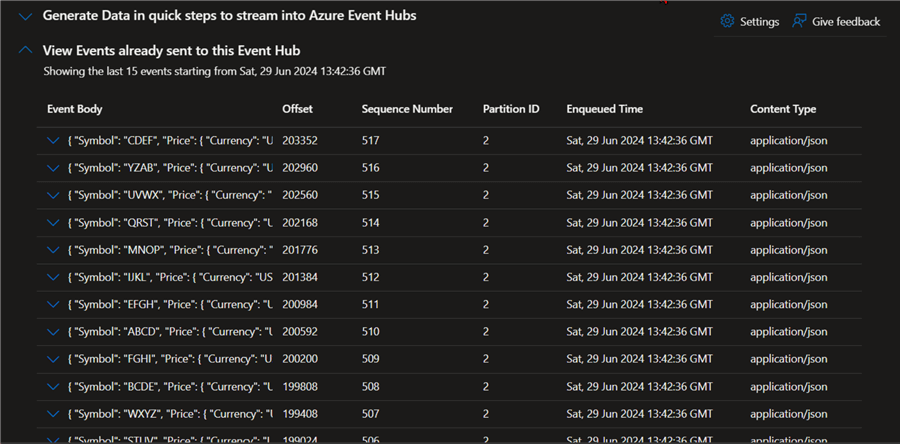
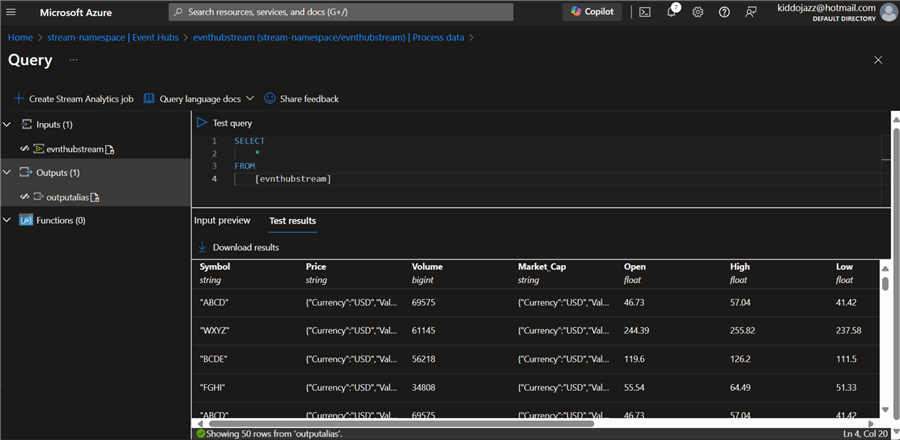
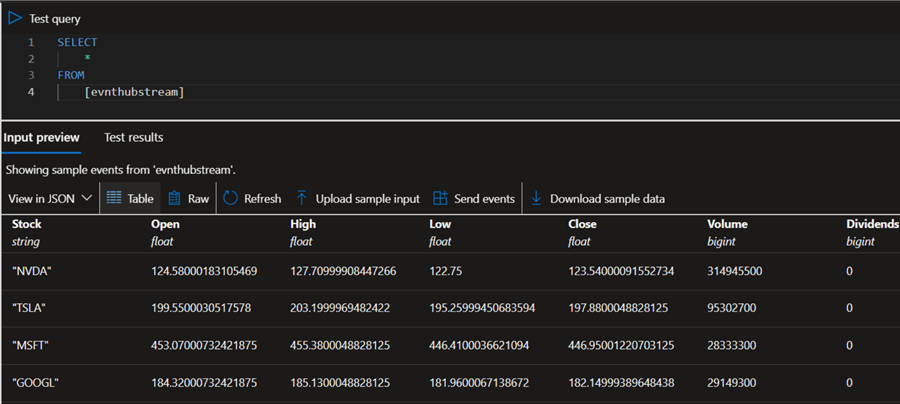
To get a table/relational view of the data sent, we can activate the Process Data in Event Hub.
From your Event Hub, select Process Data and click Start to Enable real-time insight from Event, as shown below.
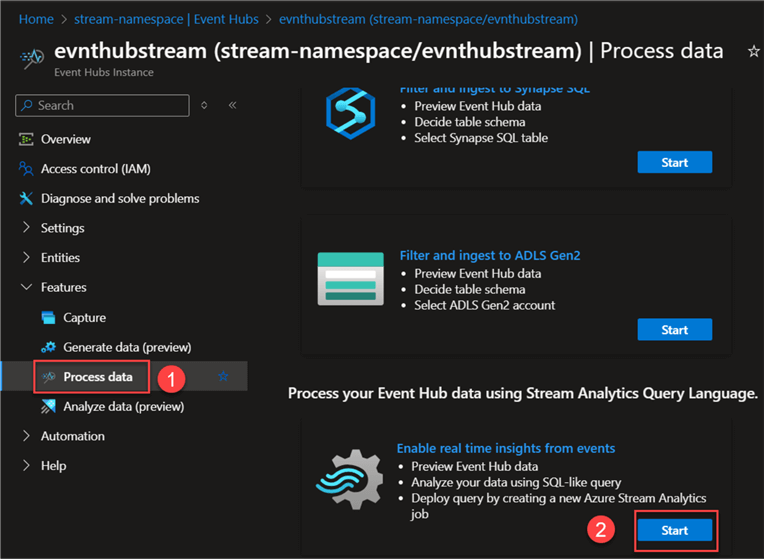
In the new window, write the SQL query shown below to test the output of the data.
Send Data to Azure Event Hub
For this project, we will pull data from Yahoo Finance Stock and send the data to Azure Event Hub.
Send Data
Microsoft has well-documented steps on how to send data to Azure Event Hub in its documentation: Send events to or receive events from event hubs by using Python. This article will use Python to connect to Yahoo Finance API and send the data to Azure Event Hub.
Prerequisites
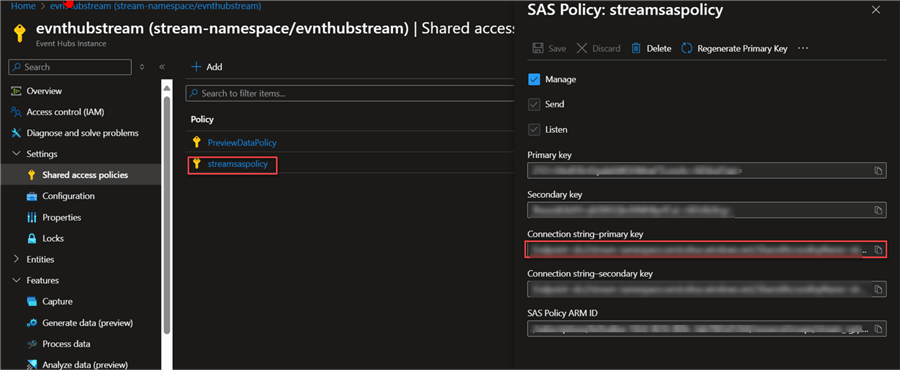
Shared Access Signature Policy. There are two approaches to connecting to Azure Event Hub: Service Principle or SAS policy. For production purposes, I would advise using the Azure Service Principal, as it provides a more secure approach to achieving this. SAS policy acts as a secure way to grant limited access to Azure Event Hub.
In your Azure Event Hub, click on Shared access policies, then Add. This should open a new window on the right-hand side. Provide a Policy name and click Create.

Click on the new policy. Copy the Connection String and keep it in a well-secured place.
Install Necessary Package. As we plan to use the connection string for this project, we need to download the Azure-EventHub library using the command below.
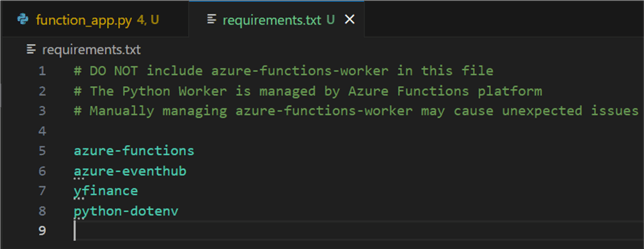
pip install azure-eventhub
pip install python-dotenv
Send Code
The code below connects to the Yahoo Finance API, pulls the stock data, and then sends the data to Azure Event Hub.
import asyncio
import yfinance as yf
from azure.eventhub import EventData
from azure.eventhub.aio import EventHubProducerClient
from dotenv import load_dotenv
import os
import json

# Load environment variables from .env file
load_dotenv()

# Azure Event Hub connection string and event hub name
EVENT_HUB_CONNECTION_STR = os.getenv("EVENT_HUB_CONNECTION_STR")
EVENT_HUB_NAME = os.getenv("EVENT_HUB_NAME")

# Function to fetch stock data using yfinance
def fetch_stock_data(tickers):
    stock_data = []
    for ticker in tickers:
        try:
            stock = yf.Ticker(ticker)
            data = stock.history(period='1d')
            if not data.empty:
                stock_data.append({
                    'Stock': ticker,
                    'Open': data.iloc[0]['Open'],
                    'High': data.iloc[0]['High'],
                    'Low': data.iloc[0]['Low'],
                    'Close': data.iloc[0]['Close'],
                    'Volume': data.iloc[0]['Volume'],
                    'Dividends': data.iloc[0]['Dividends'],
                    'Stock Splits': data.iloc[0]['Stock Splits']
                })
            else:
                print(f"No data available for {ticker}")
        except Exception as e:
            print(f"Error fetching data for {ticker}: {str(e)}")

    return stock_data

# Function to send stock data to Azure Event Hub
async def send_stock_data_to_eventhub(stock_data):
    try:
        producer = EventHubProducerClient.from_connection_string(
            conn_str=EVENT_HUB_CONNECTION_STR, eventhub_name=EVENT_HUB_NAME
        )
        async with producer:
            for data in stock_data:
                event_data_batch = await producer.create_batch()
                event_data_batch.add(EventData(json.dumps(data)))  # Serialize data to JSON
                await producer.send_batch(event_data_batch)
            print("Stock data sent successfully to Event Hub!")
    except Exception as e:
        print(f"An error occurred: {e}")

# Main function to run the tasks
async def main():
    tickers = ['NVDA', 'TSLA', 'MSFT', 'AAPL', 'GOOGL', 'AMZN', 'META', 'LLY', 'TSM',
               'AVGO', 'JNJ', 'V', 'XOM', 'PG', 'KO', 'MCD', 'INTC', 'CSCO', 'UNH', 'T']
    stock_data = fetch_stock_data(tickers)
    await send_stock_data_to_eventhub(stock_data)

# Run the main function
if __name__ == "__main__":
    asyncio.run(main())
The Python code above is used to send data from the various stocks to Azure Event Hub.
Verify Send Data
From your Azure Event Hub overview tab, you will notice movement in the Chart indicating that the Hub is currently ingesting data.
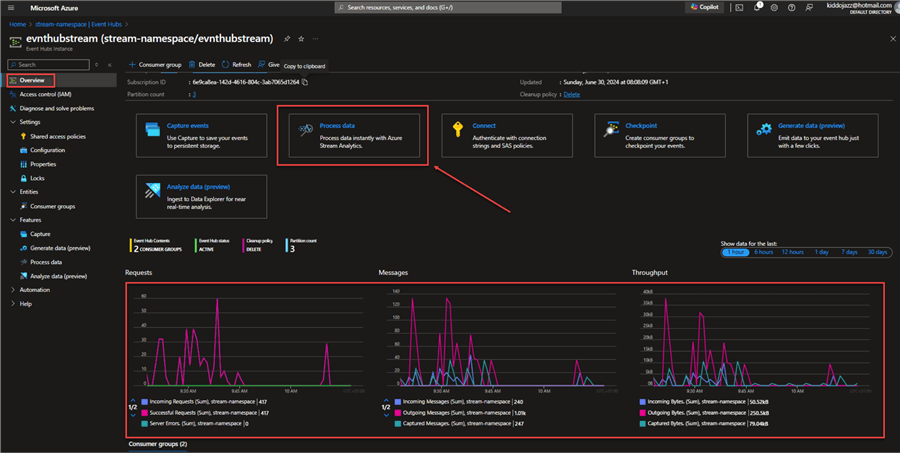
To get a better view of the data being ingested, click on Process data from the image above. This will open another window, where a SQL query is generated to view the data in a tabular format, as seen below.
From the captured session, you will also notice that the data is streamed into the Data Lake in different partitions.

Integrate Code to Azure Functions and Deploy to Azure Portal
We have been able to successfully get the data from Yahoo Finance and push it to Azure Event Hub for ingestion purposes. Note: The solution is still static since it requires users to manually run the script to push data to Azure Event Hub.
We need a timer between the Yahoo Finance API and Azure Event Hub to continually run the Python script and push the data to Azure Event Hub.
Azure Functions
Microsoft Azure Functions are serverless computing services that allow users to create event-driven apps without requiring infrastructure or server management.
Create Azure Function App
The following steps should be followed to create an Azure Function App:
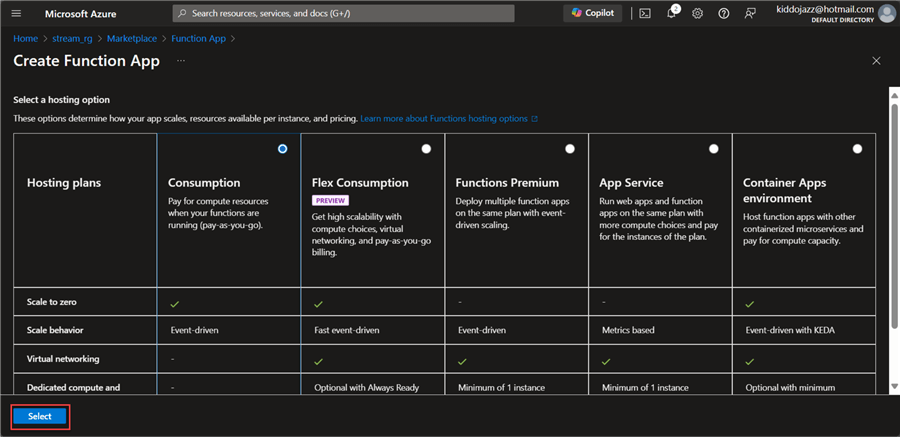
Step 1: Select Hosting Option. In your Azure Portal, search for Azure Function App and create. It will open a window to select the hosting options. For this project, we will be using the Consumption mode. Click Select.
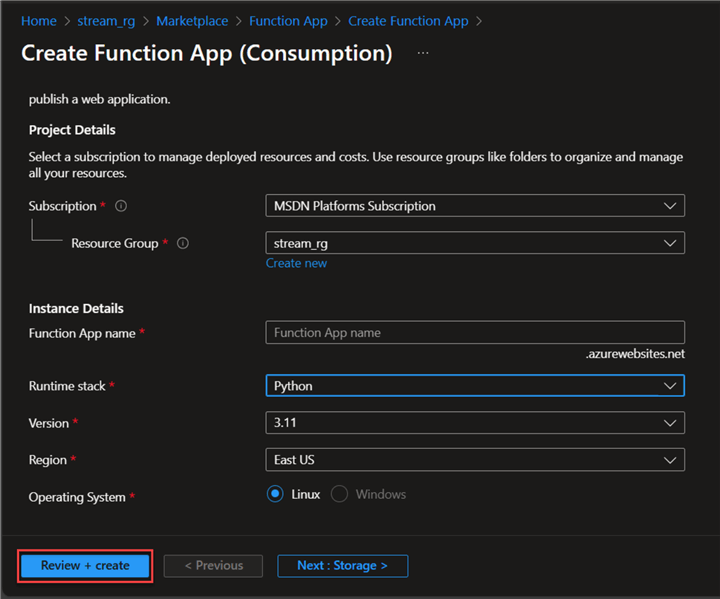
Step 2: Basic Setting. You are expected to fill in the following settings, then click Review + create. I will be using Python as my runtime stack because I plan to do all the development in Python. You can use any of your preferred languages.
Prerequisite
Azure Function Core Tools. The Azure Function Core Tools provide a local experience for designing, developing, testing, executing, and debugging.
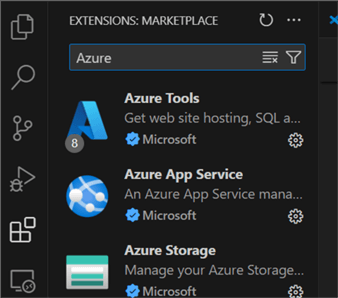
Azure Tools Extension. In your VSCode, click the Extension tab and search for Azure Tools.
Create Timer Trigger with Azure Function
Now, let's create a Timer Trigger Function with Azure Function. The following steps will help us achieve this.
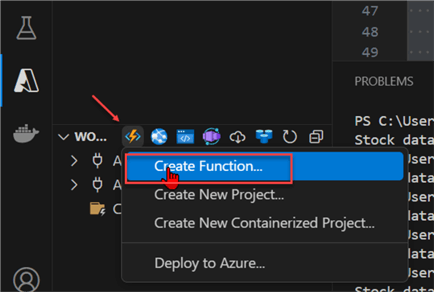
Step 1: Create a Function in VSCode. From VSCode, click on the Azure Tools icon and choose Create Function... This should open a window at the top.
In the new window, pick the directory where you want the project to be saved, select the Programming language, which is Python, and choose Model V2.
Step 2: Select Trigger Type. For the trigger type, we will be using the Timer Trigger to run the Python script in 5-minute intervals.
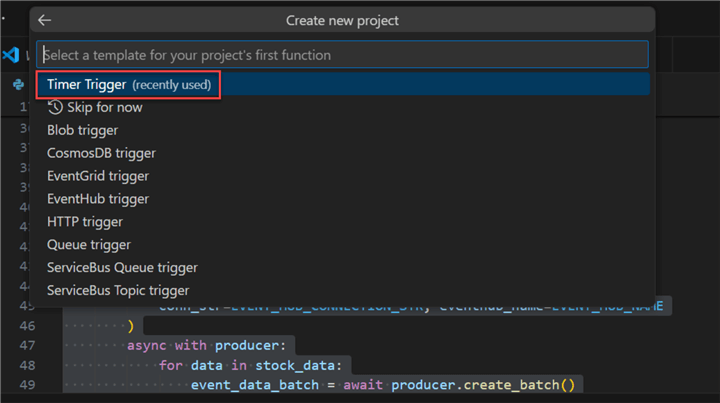
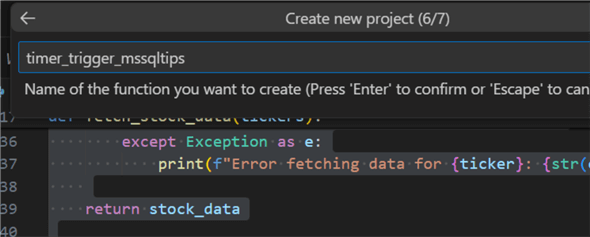
Then, provide the Function with a unique name.
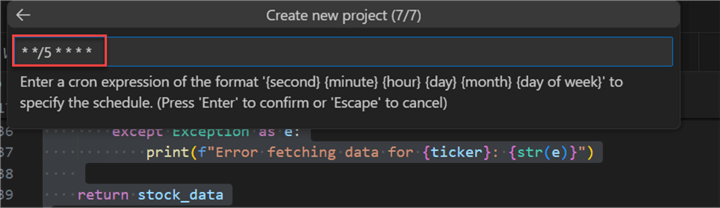
Step 3: Create CRON. Setting up CRON can be tricky. That is why I use a web site to better understand the syntax.
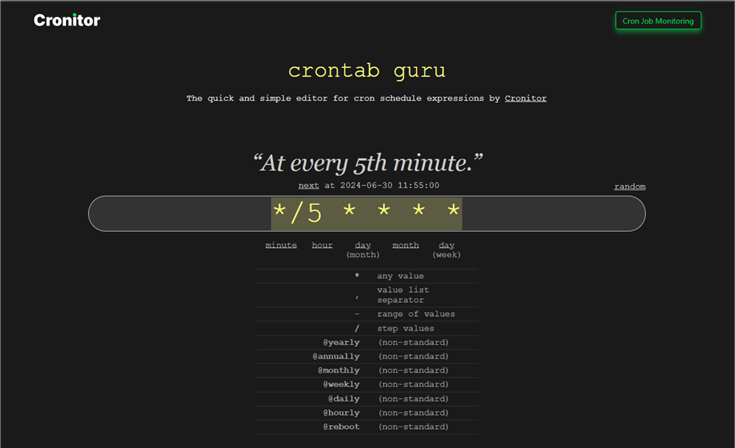
In our Azure Function, we will set the CRON timer for
*/5 * * * *
This should take a couple of minutes to provision and create a new virtual environment for the Azure Function.
After successfully provisioning, you should have an Azure Function app with the following extra files:
import logging
import azure.functions as func
app = func.FunctionApp()
@app.schedule(schedule="* */5 * * * *", arg_name="myTimer", run_on_startup=True,
use_monitor=False)
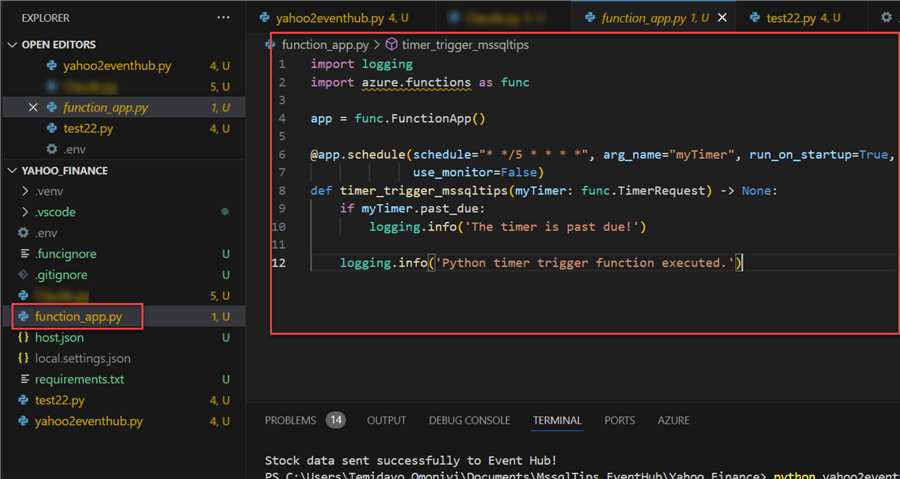
def timer_trigger_mssqltips(myTimer: func.TimerRequest) -> None:
if myTimer.past_due:
logging.info('The timer is past due!')
logging.info('Python timer trigger function executed.')
Step 4: Add Streaming Script to Azure Function App. Now that we have the function app script, we need to add the streaming script from earlier that pulls data from Yahoo Finance API.
Before debugging, ensure you update the Requirement.txt file in your environment. This will help to install all dependencies needed before deployment.
The code below is updated to get data from Yahoo Finance and push it to the Azure Event Hub using the timer trigger from Azure Functions every 5 minutes.
import logging
import asyncio
import yfinance as yf
from azure.eventhub import EventData
from azure.eventhub.aio import EventHubProducerClient
from dotenv import load_dotenv
import os
import json
import azure.functions as func
# Load environment variables from .env file
load_dotenv()
# Azure Event Hub connection string and event hub name
EVENT_HUB_CONNECTION_STR = os.getenv("EVENT_HUB_CONNECTION_STR")
EVENT_HUB_NAME = os.getenv("EVENT_HUB_NAME")
# Function to fetch stock data using yfinance
def fetch_stock_data(tickers):
stock_data = []
for ticker in tickers:
try:
stock = yf.Ticker(ticker)
data = stock.history(period='1d')
if not data.empty:
stock_data.append({
'Stock': ticker,
'Open': data.iloc[0]['Open'],
'High': data.iloc[0]['High'],
'Low': data.iloc[0]['Low'],
'Close': data.iloc[0]['Close'],
'Volume': data.iloc[0]['Volume'],
'Dividends': data.iloc[0]['Dividends'],
'Stock Splits': data.iloc[0]['Stock Splits']
})
else:
logging.info(f"No data available for {ticker}")
except Exception as e:
logging.error(f"Error fetching data for {ticker}: {str(e)}")
return stock_data
# Function to send stock data to Azure Event Hub
async def send_stock_data_to_eventhub(stock_data):
try:
producer = EventHubProducerClient.from_connection_string(
conn_str=EVENT_HUB_CONNECTION_STR, eventhub_name=EVENT_HUB_NAME
)
async with producer:
for data in stock_data:
try:
event_data_batch = await producer.create_batch()
event_data_batch.add(EventData(json.dumps(data))) # Serialize data to JSON
await producer.send_batch(event_data_batch)
logging.info(f"Stock data sent successfully for {data['Stock']} to Event Hub!")
except Exception as e:
logging.error(f"Error sending data for {data['Stock']}: {e}")
except Exception as e:
logging.error(f"An error occurred: {e}")
# Timer-triggered function
app = func.FunctionApp()
@app.function_name(name="timer_trigger_mssqltips")
@app.schedule(schedule="* */5 * * * *", arg_name="myTimer", run_on_startup=True, use_monitor=False)
async def timer_trigger_mssqltips(myTimer: func.TimerRequest) -> None:
if myTimer.past_due:
logging.info('The timer is past due!')
logging.info('Python timer trigger function executed.')
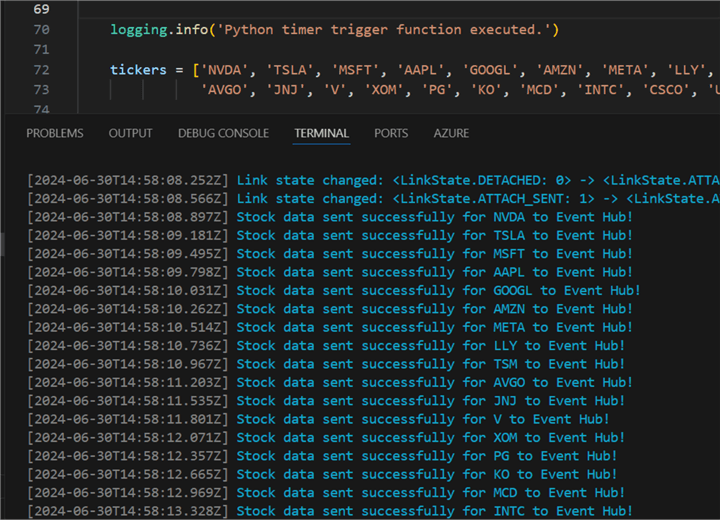
tickers = ['NVDA', 'TSLA', 'MSFT', 'AAPL', 'GOOGL', 'AMZN', 'META', 'LLY', 'TSM',
'AVGO', 'JNJ', 'V', 'XOM', 'PG', 'KO', 'MCD', 'INTC', 'CSCO', 'UNH', 'T']
stock_data = fetch_stock_data(tickers)
# Run the async function
await send_stock_data_to_eventhub(stock_data)
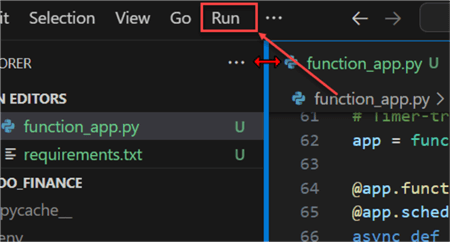
Step 5: Run and Test Function App. In VSCode, click Run at the top corner, then select Start Debugging. This should open your terminal, install all required libraries, and run the funtion_app.py script.
You should get an output like the one below if it works as expected. Let's head to the Azure Portal to confirm the file upload in Event Hub.
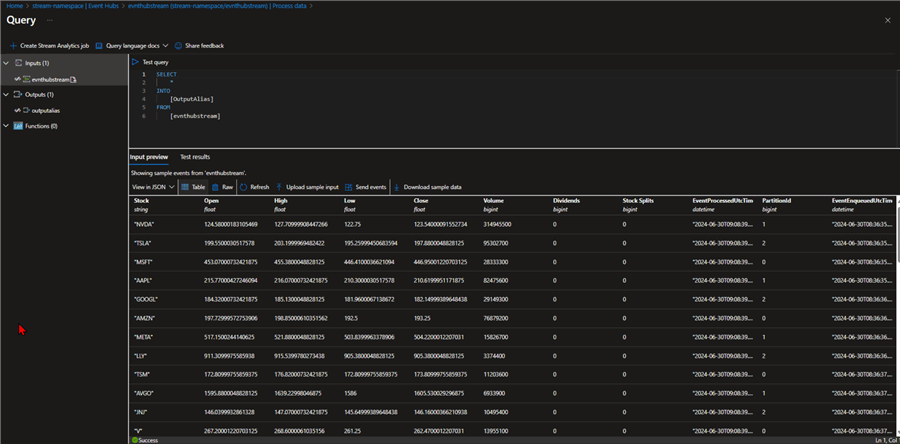
In your Azure Event Hub, we will visualize the ingested data using the Process Data feature.
Deploy Function
With our Function App working as expected, let's deploy our Function App to Azure Portal. In VSCode, click on the Azure Tools, right-click on the folder directory, and select Deploy to Azure.
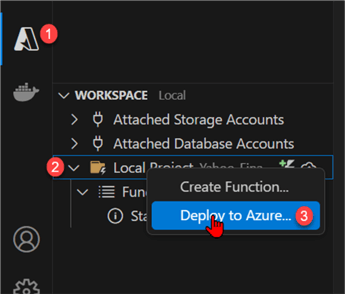
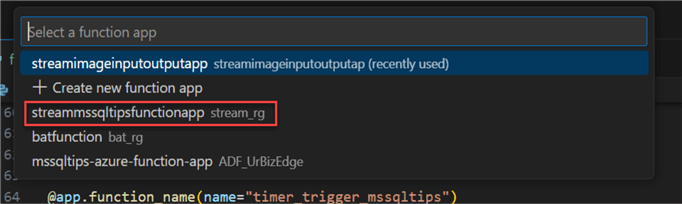
In the search area at the top of your VSCode, select the Azure Function App into which you want to deploy the function.
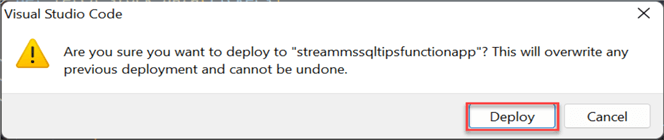
A new window will open, asking you to reconfirm your deployment. Click Deploy to confirm. It should take a couple of minutes to deploy, depending on your processing speed.
Confirm Deployment
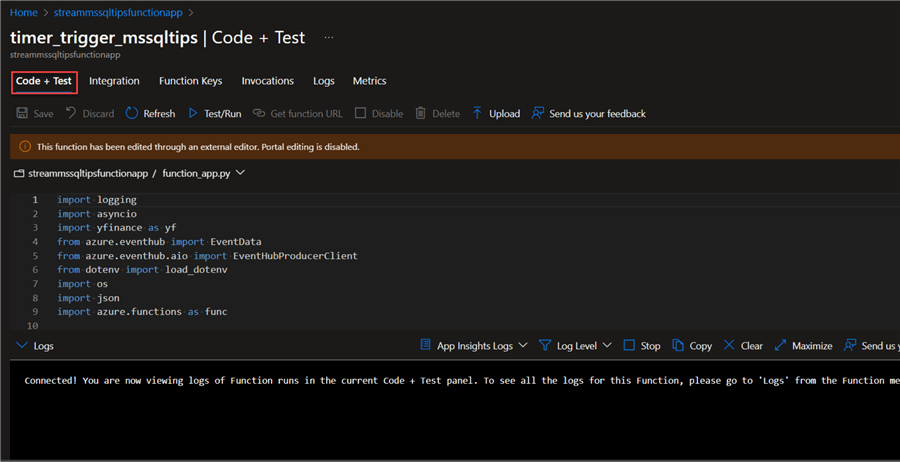
In your Azure Portal, go to the Azure Function App created earlier and click the function inside the app.
Code + Test. In the new window, you will notice that the same code as your VSCode is now in Azure Function.
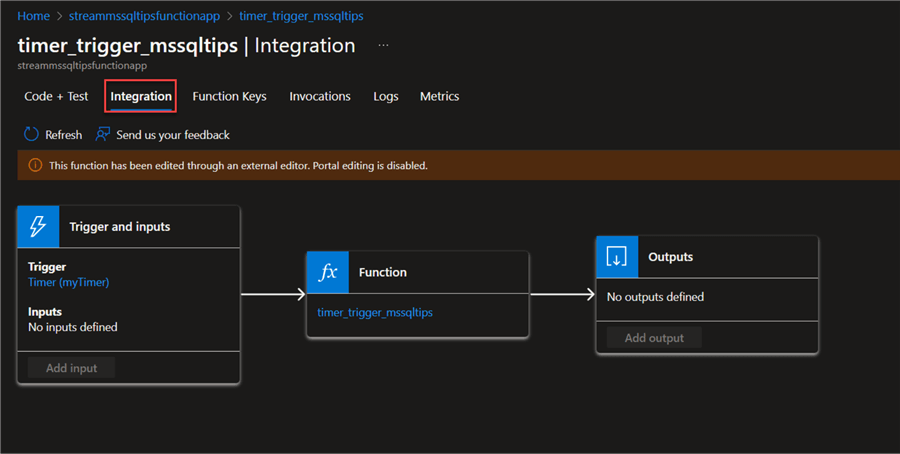
Integration. This gives more of a flow diagram, showing the various sources from which your Function is obtained.
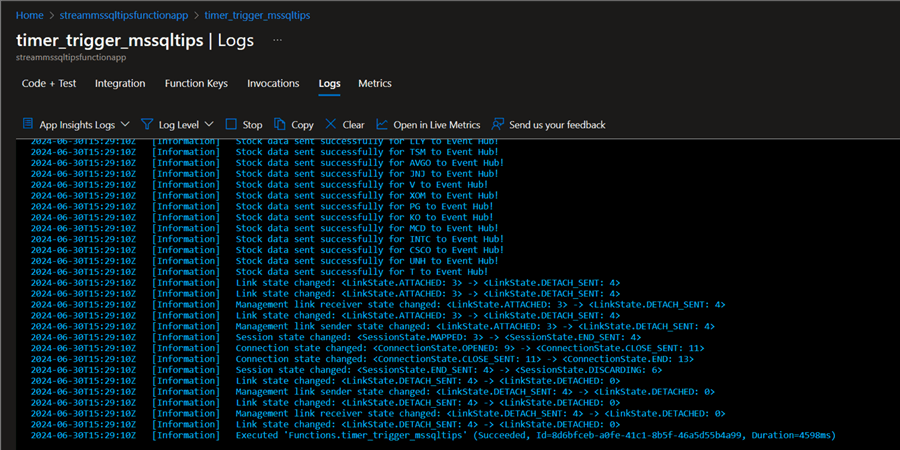
Logs. This gives a terminal view of the activities of your Function.
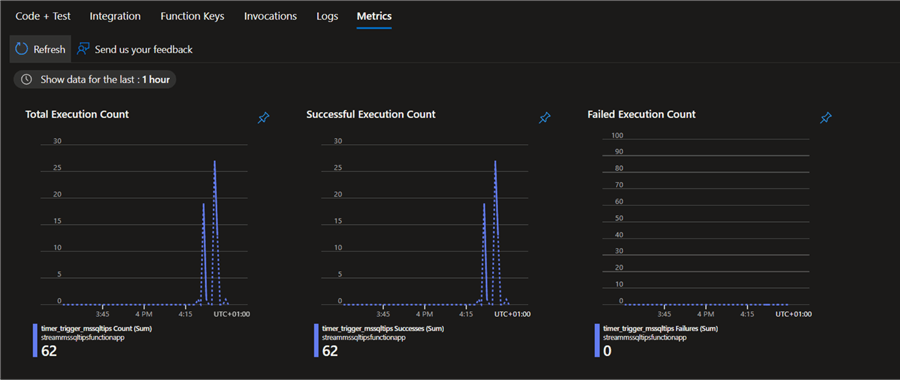
Metrics. This gives a general overview of your Azure Function running—total number of executions, successes, and failures.
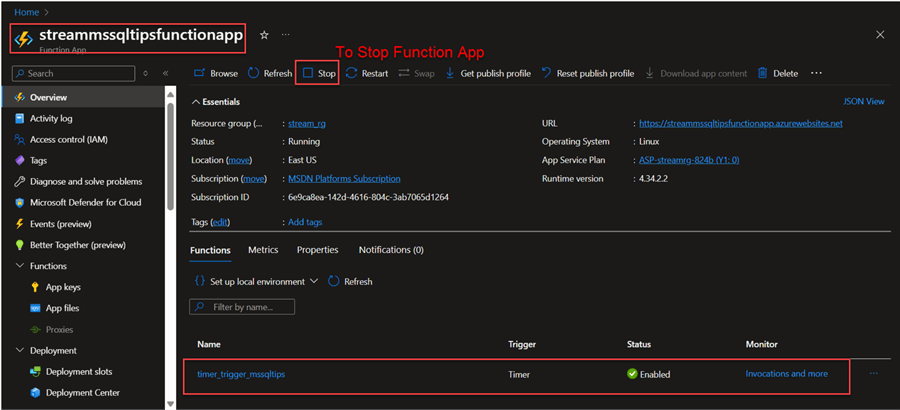
Stop Function App
In your Azure Function App, you can stop it if you know you will not be using the function for a particular period. This is aimed at saving costs for organizations.
Conclusion
In this article, we have covered creating a streaming pipeline using Azure technology. We wrote a Python script that connects to Yahoo Finance API and sends the data to Azure Event Hub, a messaging platform in Azure. The data was also stored in the Data Lake based on partitioning with the Capture feature in Event Hub.
The entire process was automated using a serverless tool known as Azure Function that triggers the Python script at a 5-minute interval based on the timer trigger setup. It should be noted that this is not the entire article, as we plan to release Part 2 that will contain both the predictive and descriptive sections of the project.
Next Steps
- Stream processing with Stream Analytics - Azure Architecture Center | Microsoft Learn
- Outputs from Azure Stream Analytics - Azure Stream Analytics | Microsoft Learn
- Use Azure Stream Analytics to stream data into the storage account | AgroHack (jimbobbennett.github.io)
- Send events to or receive events from event hubs by using Python
Download the scripts for this article:
Check out related articles:
- Serverless Scripting with Azure Functions to Move Data
- Reading Data from Event Hubs into Event Stream and a Lakehouse Table - Part 2


About the author
 Temidayo Omoniyi is a Microsoft Certified Data Analyst, Microsoft Certified Trainer, Azure Data Engineer, Content Creator, and Technical writer with over 3 years of experience.
 This author pledges the content of this article is based on professional experience and not AI generated.
View all my tips
Article Last Updated: 2024-09-05