By: Temidayo Omoniyi | Updated: 2024-10-29 | Comments | Related: > Cloud Strategy
Problem
We are in a world of fast and quick decision-making. Data gets generated and distributed in real-time, making decision-makers search for reliability and robust solutions to handle millions and billions of data generated daily. Retail industries and other business-to-customer enterprises have been at the forefront of implementing such technology for everyday use.
Solution
As billions of data get generated daily, it is important to have a solution that can seamlessly handle large volumes of data with multiple parallel processing power capabilities. This need led to the creation of Apache Kafka (The Backbone of Real-Time Data Processing) by LinkedIn, a popular social network for professionals to connect and share ideas.
Section 1: Kafka Fundamentals
This section aims to help understand Kafka fundamentals and its different components.
What is Apache Kafka?
Apache Kafka is a distributed open-source platform from the Apache Software Foundation for streaming that is also designed to handle real-time data feeds. It forms the basis for many current applications, particularly those that require some form of data processing and analysis in real-time.
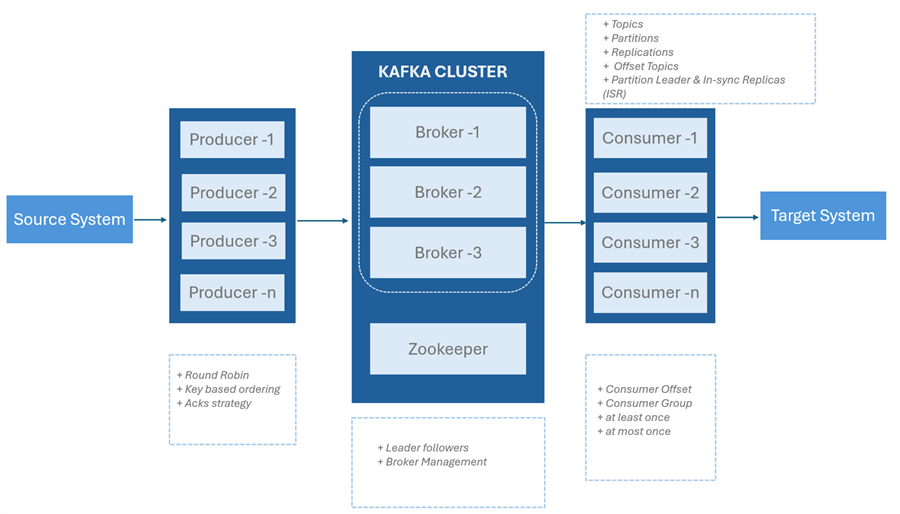
Kafka Architecture
Kafka Key Features
- Real-Time Data Processing: Kafka makes it possible to process massive amounts of data in real-time, giving businesses the ability to obtain insights and make decisions based on data swiftly.
- Decoupling of Microservices: Kafka facilitates the decoupling of microservices by offering an asynchronous messaging system for inter-service communication.
- Scalable Data Pipelines: Kafka is perfect for creating scalable data pipelines that can manage growing volumes of data over time because of its fault-tolerant, high performance and scalable architecture.
- Reliability and Durability: Its fault-tolerant design makes sure that data is preserved even in the case of network or device failures. It also stores data on disk, making it a dependable and long-lasting storage method.
- Data Integration with Big Data Ecosystems: End-to-end data processing pipelines are made possible by Kafka's good integration with other big data technologies, including Apache Spark and Apache Hadoop.
Industry Use Cases of Apache Kafka
Apache Kafka is versatile, making it a popular choice in numerous industries.
- Online Shopping/E-commerce
- Real-time recommendations: Making tailored suggestions based on an analysis of consumer behavior. Using algorithms like cosine similarities in machine learning.
- Order processing includes handling inventories, tracking shipments, and processing orders.
- Fraud detection: Quickly spotting questionable activity. This is based on the trading/purchase pattern of customers.
- Banking and Related Services
- Processing market data involves managing large amounts of data in real time.
- Risk management means keeping an eye on risk variables and setting off alarms.
- Trade execution is the act of handling and verifying deals.
- I.T.
- IoT device data collection and analysis are known as sensor data processing.
- Real-time monitoring: Tracking the functionality and health of the equipment.
- Predicting equipment failures using sensor data is known as predictive maintenance.
- Medical Care
- Integration of electronic health records (EHR):Combining information from several medical systems.
- Real-time patient monitoring: keeping an eye on the health of the patient and sending out alarms.
- Data processing and analysis for clinical trials is known as clinical research.
- Gaming
- Games are played in real-time with numerous players: synchronizing the game state.
- Analytics: Examining the preferences and actions of players.
- Messages and chat: Managing communication within games.
Apache Kafka Component
Apache Kafka, being a distributed streaming platform, is made of several components that enable it to function as expected.
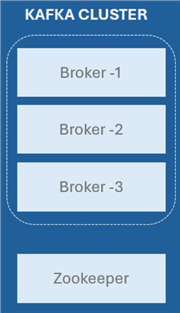
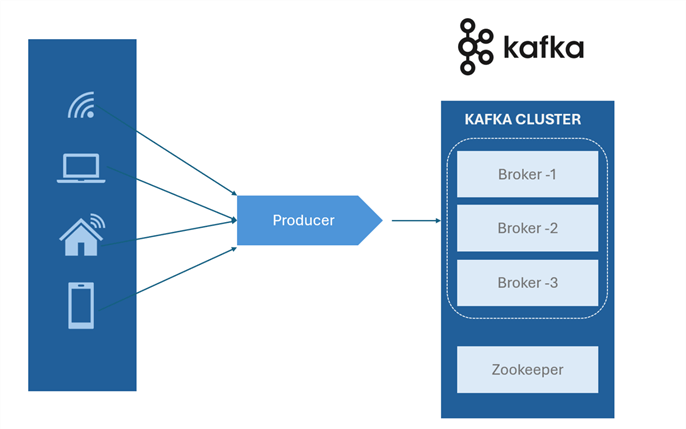
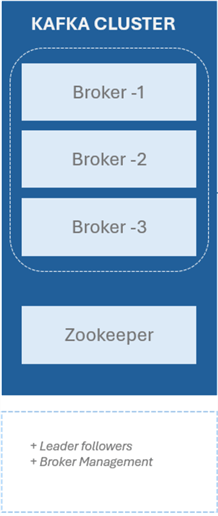
Kafka Broker. The Kafka Brokers are the fundamental building blocks of a Kafka cluster. They oversee keeping track of, duplicating, and providing customers with data. Since each broker is a separate server, adding or removing it from the cluster won't have an impact on the system.
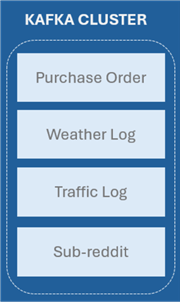
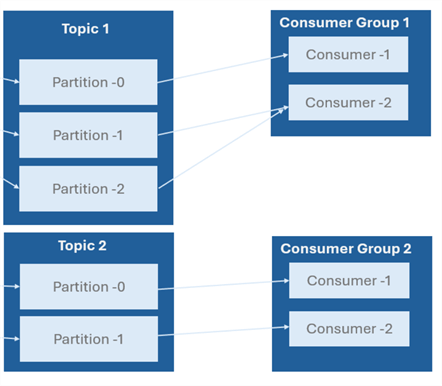
Kafka Topics. Topics are the core building block for the Apache Kafka distributed streaming platform's data for organizations. They act as sensible routes for message publication and subscription. Think of them as virtual message boards where producers can publish messages and consumers can subscribe to receive those messages.
Kafka Partitions. This is an essential data component that makes up a Kafka topic. They function as well-organized message sequences, which provide the Kafka platform with its scalability, parallelism, and fault tolerance. This gives each partition the ability to be processed independently by a consumer, enabling parallel processing and improving performance.
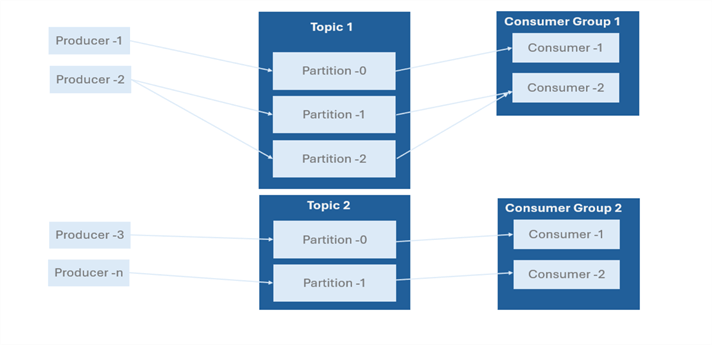
Kafka Producers. The Producers are client applications that publish (write) data to Kafka topics. They can select which partition to send messages to, frequently based on a key to preserve order, and they can send messages to specific themes. To maximize performance, producers might additionally serialize and compress messages before transmitting them.
Kafka Consumer. Consumers are applications that subscribe to Kafka topics and process the streams of records produced. They oversee managing their offsets to keep track of which messages have been handled, and they can read from one or more topics. Customers in Kafka might behave both individually and collectively.
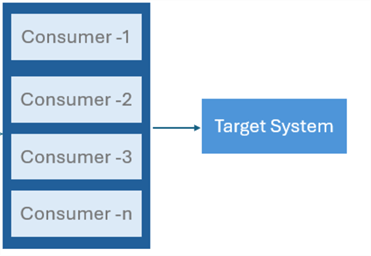
Kafka Consumer Group. Consumer groups facilitate group reading of a certain topic by several customers. Because each consumer in a group reads from a distinct set of partitions, messages are processed concurrently and duplicate-free. This approach improves load balance and scalability.
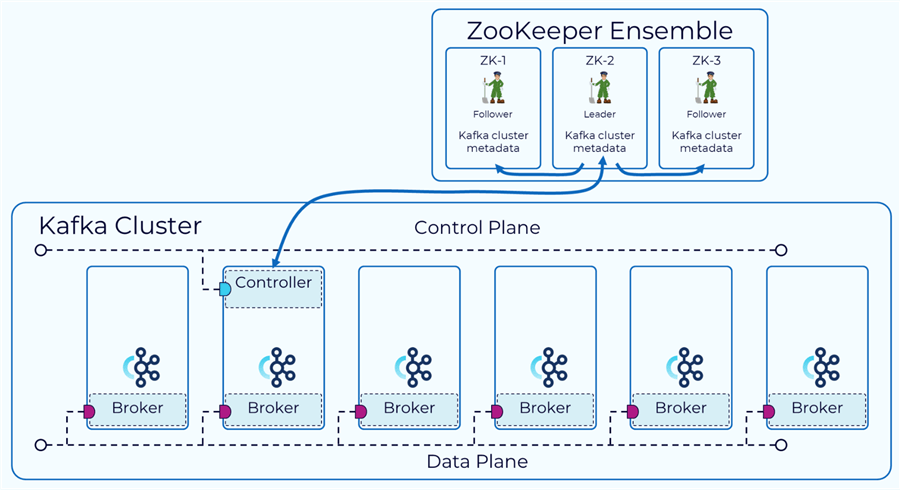
Kafka Zookeeper. ZooKeeper is a centralized service to oversee and manage the Kafka brokers. It takes care of things like managing configuration data, monitoring broker status, and electing leaders for partitions. Although Kafka has been working to become less reliant on ZooKeeper, it is still an essential part of many deployments.
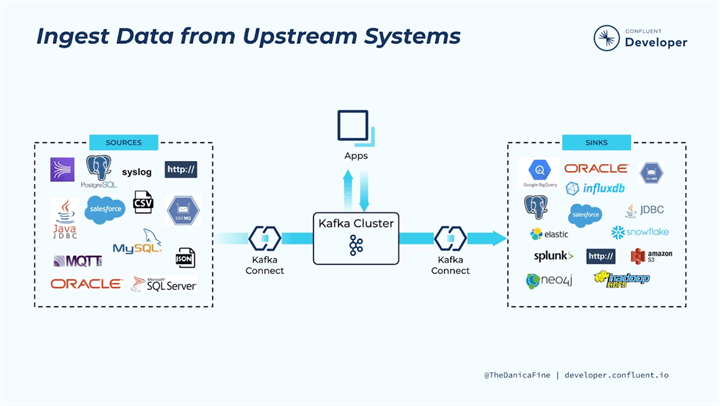
Kafka Connect. A tool used for integrating Kafka with other systems is called Kafka Connect. It makes data streaming into and out of Kafka easier.
Two categories of connections exist:
- Source connectors: These insert information into Kafka topics from other systems (such as message queues or databases).
- Sink connectors: These write data to other systems (such as databases or data lakes) using information from Kafka topics.
Kafka Stream. A Java package called Kafka Streams makes it possible to process data streams in real time. It enables programmers to create Kafka-capable apps that can generate, process, and consume data. Filtering, aggregating, and joining streams are just a few of the activities that Kafka Streams can offer, making it an effective tool for stream processing.
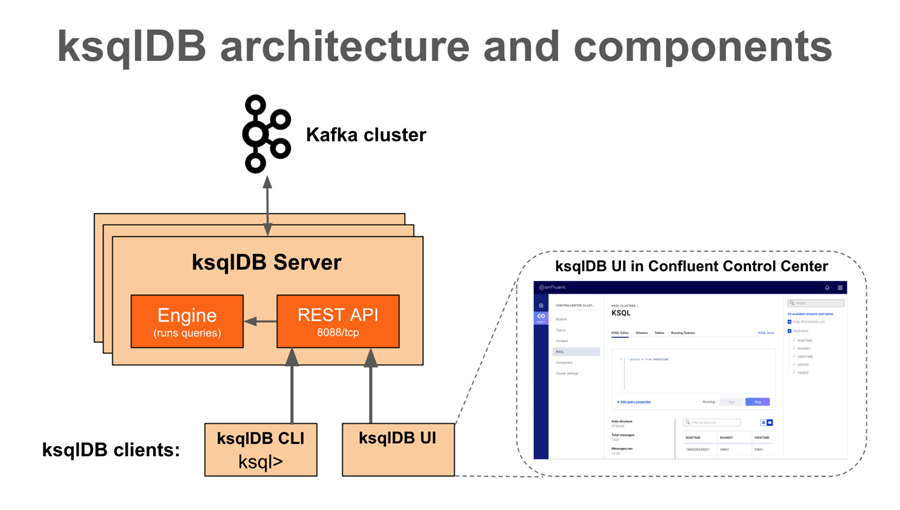
Kafka ksqlDB. ksqlDB, an event streaming database that builds on Kafka Streams, enables users to do stream processing with syntax to SQL. For users who are comfortable with SQL, it makes stream processing application development simpler and easier to implement real-time analytics and data transformations.
Kafka Offset. An offset in Apache Kafka is a distinct number that is linked to every message inside a particular topic partition. It allows users to monitor how far along they are in reading messages by indicating where a message is in the partition's log. Every message posted to a Kafka topic has a sequential offset, which is an integer value beginning at zero, added to the end of its partition.
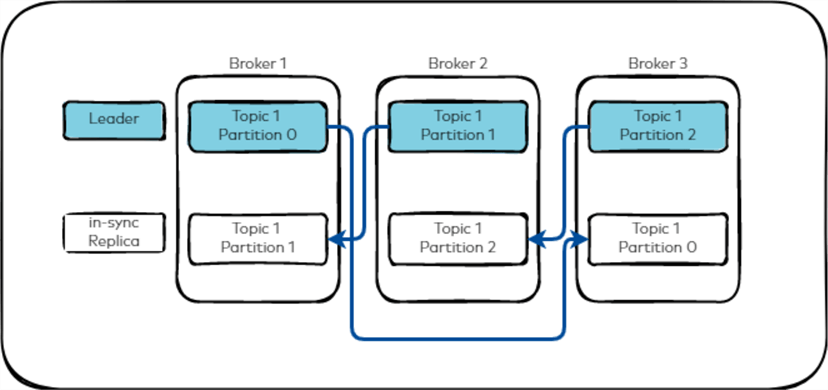
Kafka Replication. One important component that improves the resilience and accessibility of data in a Kafka cluster is Kafka. It permits the system to continue operating and guarantees that messages are not lost in the event of broker failures. This image is a description of the elements of Kafka replication and its importance.
Kafka Controller. An essential feature of an Apache Kafka cluster is the Kafka Controller, which oversees the status of replicas and partitions, supervises administrative duties, and guarantees the cluster's general health.
Section 2: Installation of Kafka and Kafka Basic
In this section, we will install Kafka and Zookeeper using the Docker container. We should note that a new feature Kafka is being released that requires less need for Zookeeper.
Note: With Kafka version 2.8, the KRaft (Kafka Raft) consensus mechanism will replace ZooKeeper, enabling Kafka to handle metadata natively without the requirement for ZooKeeper.
Prerequisite
To successfully configure and install Kafka and Zookeeper, the following are needed:
- Docker Container - for containerization
- Basic Python knowledge
- Basic understanding of command line prompt
- Virtual Environment (We are using Windows Server, but any OS will work fine.)
- Be open-minded and let's build something amazing.
- Your favorite Code ID (I will be using VSCode.)
What is a Docker Container?
A Docker Container is a lightweight, standalone virtualization technology that executes packages, including everything needed to run a piece of software: the code, runtime, libraries, and system tools. Docker images are the foundation upon which containers are constructed.
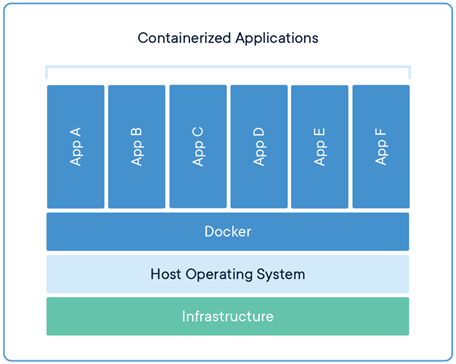
Characteristics of Docker Containers
- Isolation: Every Docker container operates independently in a separate setting. This indicates that a container's software doesn't affect other containers or the host system. Although they function separately, containers use the same operating system kernel.
- Portability: Regardless of the underlying hardware or operating system, Docker containers can operate on any machine that has the Docker engine installed. Because of this mobility, developers may create apps that work reliably in a variety of settings, such as cloud servers and local development PCs.
- Efficiency: Because containers do not need a whole operating system to function, they are lighter than conventional virtual machines (VMs). Rather, they share the host operating system kernel, which lowers resource usage and enables quicker startup times.
- Scalability: Docker containers work well with microservices architectures, which divide large programs into smaller, more manageable services that can be independently created, deployed, and scaled.
Components of Docker Container
Docker containers are made up of a few essential parts that combine to give apps a portable, isolated, and lightweight environment to execute.
- Docker Image. The application code, dependencies, libraries, and other files required to operate the application are all contained in a read-only template called a Docker image. Images are constructed using a Dockerfile, which contains the instructions for producing the image and is used to create containers.
- Container Layer. A writable layer is added on top of the image layers when a Docker image is used to create a container. This layer of the container allows modifications to be made to files and new installations to be made during the runtime of the container. The application runs at the container layer.
- Docker Daemon. A persistent process called Docker daemon (dockerd) oversees handling container objects and managing Docker containers. It runs commands to launch, control, and construct containers as it waits for requests from the Docker API.
- Docker Client. Users can communicate with the Docker daemon via the command-line interface (CLI) provided by the Docker client, or Docker. It offers instructions for creating, launching, and maintaining networks, images, and Docker containers.
- Docker Network. Virtual networks called Docker networks are used to link several containers. They make it possible for containers to talk to the host system and each other. A variety of network drivers, including bridge, host, and overlay, are offered by Docker to accommodate various networking needs.
- Docker Volume. Data created by a container is stored in Docker volumes. They are kept out of the writable layer of the container and are not affected by the lifecycle of the container. Volumes can be used to store data that must remain after the container is removed or to exchange data between containers.
- Docker Registry. A repository for sharing and keeping Docker images is called a Docker registry. Users can download (“pull”) and upload (“push”) images with it. Users can create private registries for their own images in addition to the public registry that is set up by default, Docker Hub.
- Dockerfile. An instruction script for creating a Docker image is called a Dockerfile. It creates the environment variables, installs dependencies, copies the application code, specifies the base image, and defines the command to launch the application. A Dockerfile can be used to create an image using the docker build command.
Installation of Docker Desktop (for Windows Server - Optional)
Before we start installing Docker on our Windows server, we need to set up some requirements.
Step 1: Install Windows Subsystem for Linux (WSL) Ubuntu for Windows
WSL is a feature introduced in Windows 10 that allows users to run Linux binaries directly within the Windows environment. It offers an effective and potent method of gaining access to Linux programs, tools, and CLI without requiring an additional Linux installation.
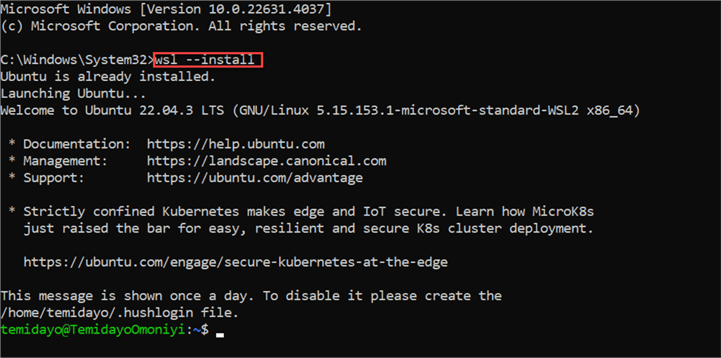
In your Windows Server, open your Command Prompt and select Run as administrator. This should open a command prompt for you.
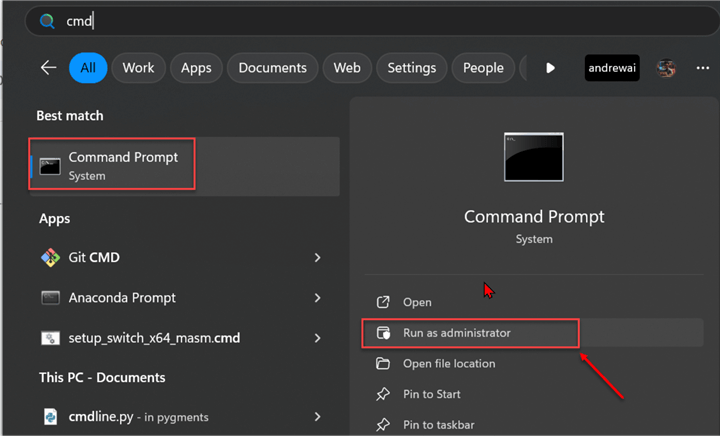
In the CMD, type the word wsl - -install. This will install the Ubuntu subnet on your Windows server. You will notice
from the image below that Ubuntu is already installed on my Windows server. If you
are installing it for the first time, it might take a couple of minutes to download.
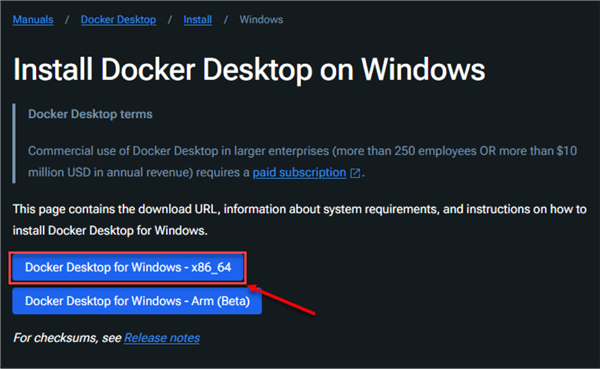
Step 2: Download Docker Desktop for Windows
Docker has different versions for different operating systems, but we will be using Docker Desktop for Windows. Follow the official link and download the .exe file. Then, follow the installation step.
If successfully installed, you should see the image below.
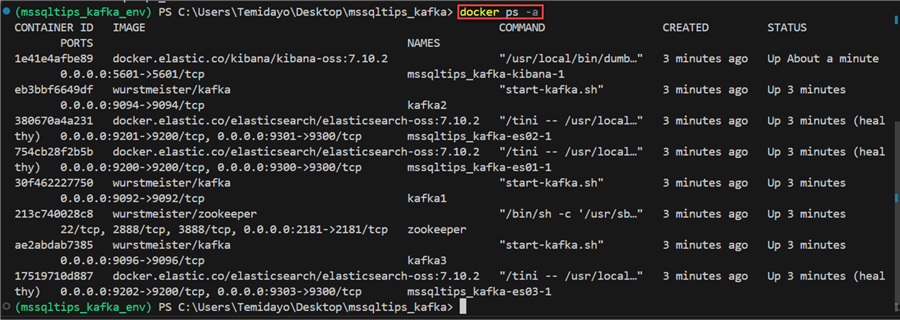
To perform further investigation using your command prompt, use the command below to list all containers, including those that are stopped or paused.
docker ps -a

The image above shows that no container is currently created, but Docker works as expected.
Install Kafka and Zookeeper in the Docker Container
The following steps should be taken to set up Apache Kafka and Zookeeper in the Docker container.
Step 1: Create a Project Virtual Environment
Creating virtual environments for Python projects is a best practice that helps to maintain project isolation, manage dependencies, ensure reproducibility, facilitate experimentation, and improve collaboration.
Let's start by navigating to the desired environment we want to do our project. Use the change directory (cd) command to go to your preferred directory on your Windows server.
cd desktop
On our desktop, create a folder to use for the entire project (mkdir mssqltips_kafka). After successfully creating the folder, change the directory to the folder.
In the folder, create the Python Virtual environment by using the command below.
python -m venv mssqltips_kafka_env
Lastly, activate the created virtual environment with this command:
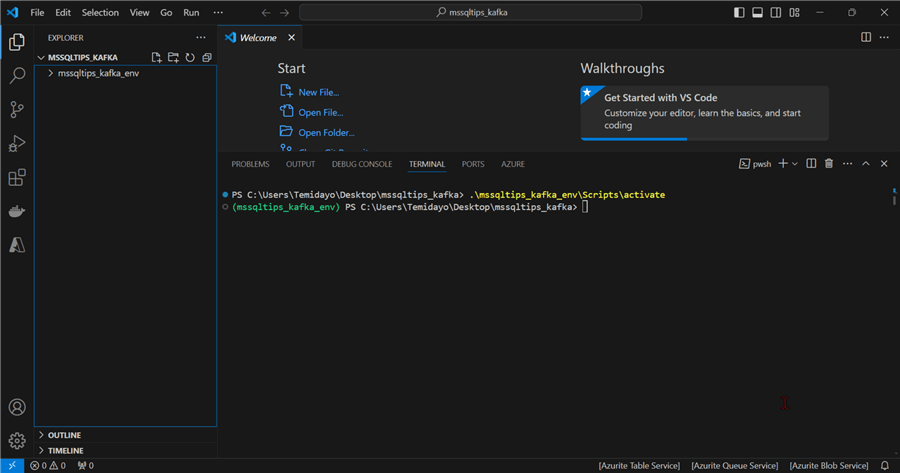
.\mssqltips_kafka_env\Scripts\activate
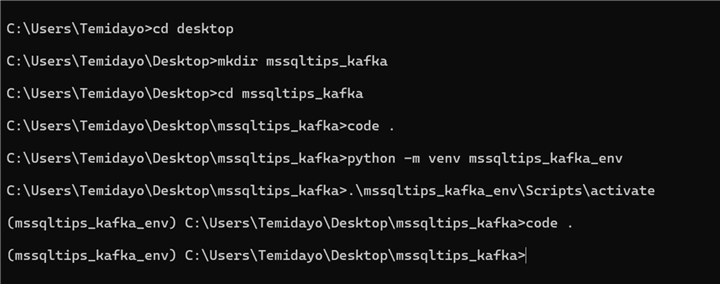
Open VSCode with this command code.
Step 2: Set Docker-compose YAML File
In the left pane of VSCode, let's create a docker-compose.yml file inside the folder directory. Docker Compose is a tool that allows you to define and run multi-container Docker applications. It makes use of a YAML file called docker-compose.yaml to specify the dependencies and services (containers) that comprise your application.
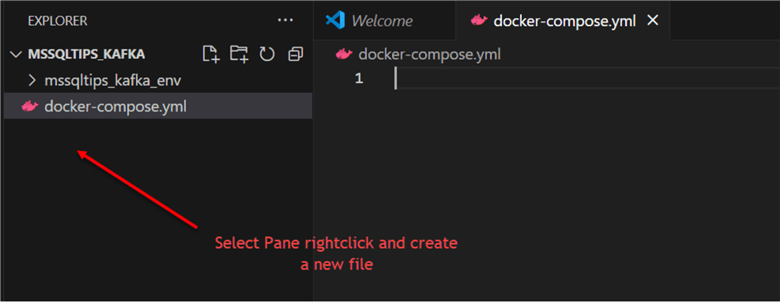
In the docker-compose.yml file, paste the command below.
version: '3.1'

services:

  zookeeper:
    image: wurstmeister/zookeeper
    container_name: zookeeper
    ports:
      - "2181:2181"

  kafka:
    image: wurstmeister/kafka
    container_name: kafka
    ports:
      - "9092:9092"
    environment:
      KAFKA_ADVERTISED_HOST_NAME: localhost
      KAFKA_ZOOKEEPER_CONNECT: zookeeper:2181
Explanation
This Docker Compose file is used to set up a Kafka cluster and a single instance of Zookeeper.
Service Section:
The services section defines the containers that will be created as part of this Docker Compose application. In this case, it includes one Zookeeper service and one Kafka service.
Zookeeper Service:
zookeeper:
   image: wurstmeister/zookeeper
   container_name: zookeeper
   ports:
     - "2181:2181"
- zookeeper: This is the term used to identify the defined service.
- image: Defines the Docker image that this service will utilize. In this case, it makes use of the well-liked Docker image wurstmeister/zookeeper, which runs Zookeeper.
- container_name: Assigns the container with a unique name that will facilitate future reference.
- ports: Connects host port 2181 to container port 2181. External apps can connect to the Zookeeper instance over this port, which is used by Zookeeper for client connections.
Kafka Service:
kafka:
   image: wurstmeister/kafka
   container_name: kafka
   ports:
     - "9092:9092"
   environment:
     KAFKA_ADVERTISED_HOST_NAME: localhost
     KAFKA_ZOOKEEPER_CONNECT: zookeeper:2181
- kafka: This designates the Kafka service that is being described.
- image: For the Kafka broker, use the wurstmeister/kafka image.
- container_name: Assigns the name “kafka” to the container.
- ports: Connects host port 9092 to container port 9092. The Kafka broker can be accessed from the outside using this port.
- environment:
Describes environment variables needed to set up the Kafka broker.
- KAFKA_ADVERTISED_HOST_NAME: This variable specifies how customers are advertised to by the Kafka broker. Since it is configured to localhost in this instance, clients establishing connections to Kafka will use localhost as the hostname.
- KAFKA_ZOOKEEPER_CONNECT: The address of the Zookeeper service, to which the Kafka broker will establish a connection, is specified by the variable. As it is configured to zookeeper:2181, the Kafka broker should establish a connection with the Zookeeper instance that is operating on port 2181 within the zookeeper service.
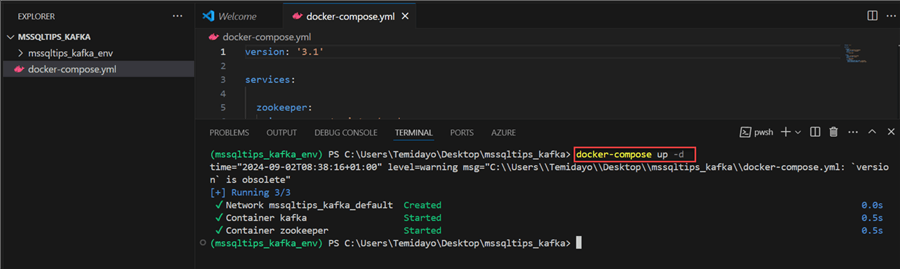
Step 3: Start Docker Compose Services
Use docker-compose up -d to start all the services defined in a docker-compose.yaml
file in detached mode.
In your command terminal, put in the docker command to start all services in the docker-compose.yml file. This should take a couple of minutes to download and start, depending on your internet speed.
Step 4: Test and Confirm Container Creation
One essential Docker command that lets users list and manage running containers is docker ps. It gives important details about the containers that are running on the Docker host currently. The docker ps command, its arguments, and how to understand its results are explained below.

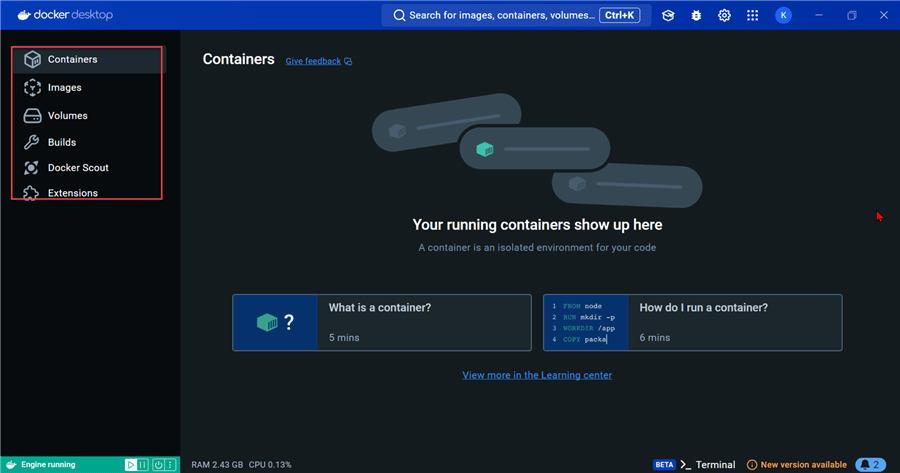
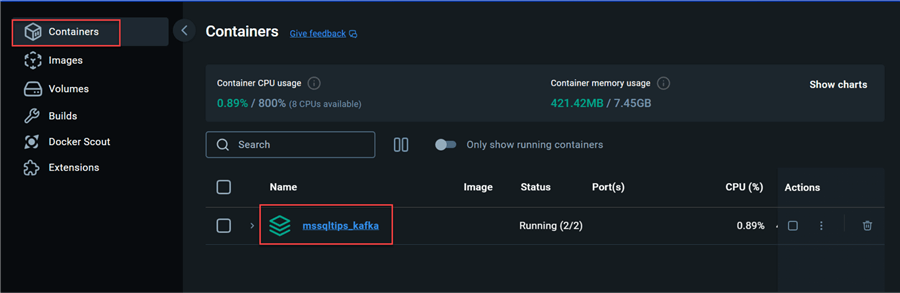
To get a visual confirmation, open your Docker Desktop and check the container tab. In the container tab, you will notice the container mssqltips_kafka running.
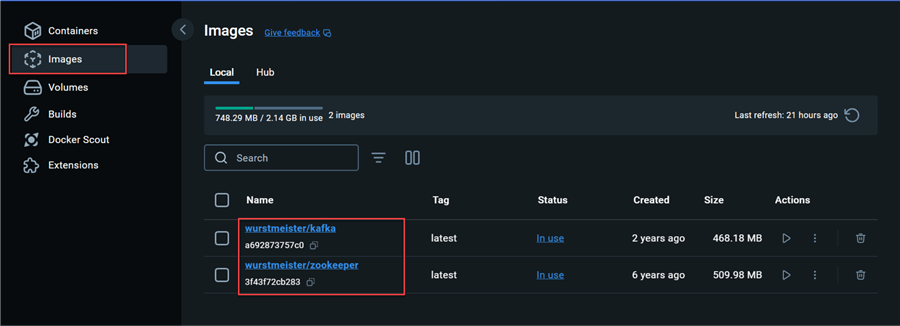
In the Images section, you will notice the two images created through the docker-compose.yml file.
Create a Simple Producer and Consumer from Terminal
The necessary setup is complete for Zookeeper and Kafka in our Docker container. Let's create a simple streaming process and test all connections.
Create Kafka Topics
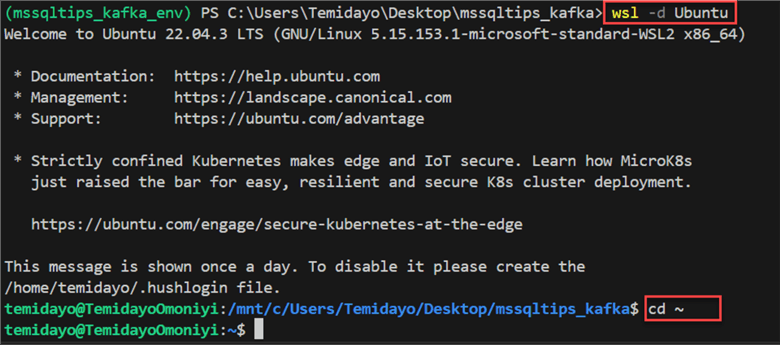
Step 1: Activate Windows Subsystem for Linux.
A named log that records a stream of messages or events is called a Kafka topic. It acts as a conduit for data between the topic's publishers and subscribers, who process and subscribe to the data.
In your VSCode terminal, write the wsl command for Ubuntu.
wsl -d Ubuntu
The wsl -d command Ubuntu is used to start a particular Linux distribution using WSL.
Step 2: Understand Kafka and Zookeeper Commands.
Let's go a step deeper by understanding the different Kafka and Zookeeper commands. Follow the numbered commands from the image below to log into the necessary folder path.
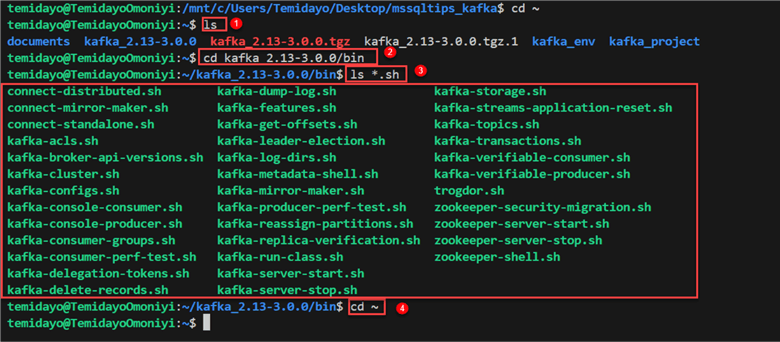
The commands listed in the red box above are the commands we will be using while working with Kafka from our terminal.
Step 3: Create Kafka Topic from Terminal
Using the terminal of VSCode or any terminal, let's create a topic by using the following command.
kafka-topics.sh --create --topic simplemssqltips-topic --bootstrap-server localhost:9092 --partitions 1 --replication-factor 1

- kafka-topics.sh: This is the script provided by Apache Kafka for managing topics.
- create: This option indicates that you want to create a new topic.
- topic simplemssqltips-topic: This specifies the name of the topic you want to create. In this case, the topic will be called test simplemssqltips-topic.
- server-bootstrap localhost:9092: The address of the Kafka broker to connect to is specified by this parameter. The broker is operating on the local computer and listening on port 9092, i.e., local host:9092. The first point of contact between the Kafka client and the Kafka cluster is the bootstrap server.
- partitions 1: The number of partitions for the new topic is indicated by this option. In this instance, 1 denotes the presence of a single partition for the topic. With partitions, Kafka can grow and disperse data over several brokers. However, if there is only one partition, all messages will be kept there.
- replication-factor 1: This option establishes the topic's replication factor. When the replication factor is 1, it indicates that the data will only be replicated once. Because it lacks fault tolerance, this is best suited for development or testing environments, but not recommended for production. Replication factors of two or three are typically required in a production environment to guarantee the durability of data.
Other commands that can be done on the topics created are:
- List All Topics
kafka-topics.sh --list --bootstrap-server localhost:9092
- Describe a Particular Topic
kafka-topics.sh --describe --topic simplemssqltips-topic --bootstrap-server localhost:9092

Create Kafka Producer
The Kafka producer is an application or service that sends data to a Kafka topic. It acts as the data source in a Kafka system. We will be sending data to the topic we created earlier with the command below.
kafka-console-producer.sh --topic simplemssqltips-topic --bootstrap-server localhost:9092
After writing this on your command terminal, you will be prompted to send a message, which will act as a producer being sent to the topic.

Create Kafka Consumer
To consume the information being sent to the topic by the producer, use the command below. You can either open a new shell terminal in VSCode or use your command prompt. This time I will use the command prompt from my Windows server.
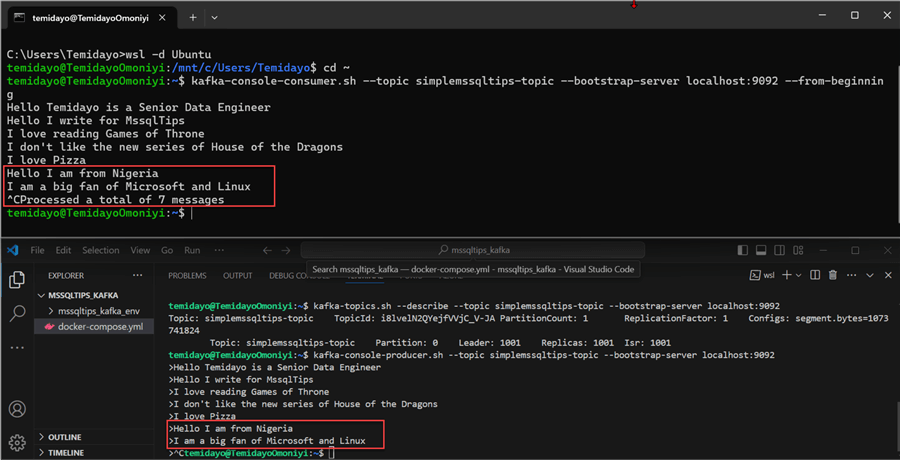
kafka-console-consumer.sh --topic simplemssqltips-topic --bootstrap-server localhost:9092 --from-beginning

From the image above, you will notice the consumer was able to consume the message from the topic.
Test Process
Let's view the terminal side-by-side to confirm the process. In the image below, the above view is the command prompt terminal and below is the terminal from VSCode. You will notice the message is received from the topic to the consumer as it is being produced.
Create a Simple Producer and Consumer Using Python Scripts
Creating Producer Script
The following steps will help us achieve this:
Step 1: Import All Necessary Libraries
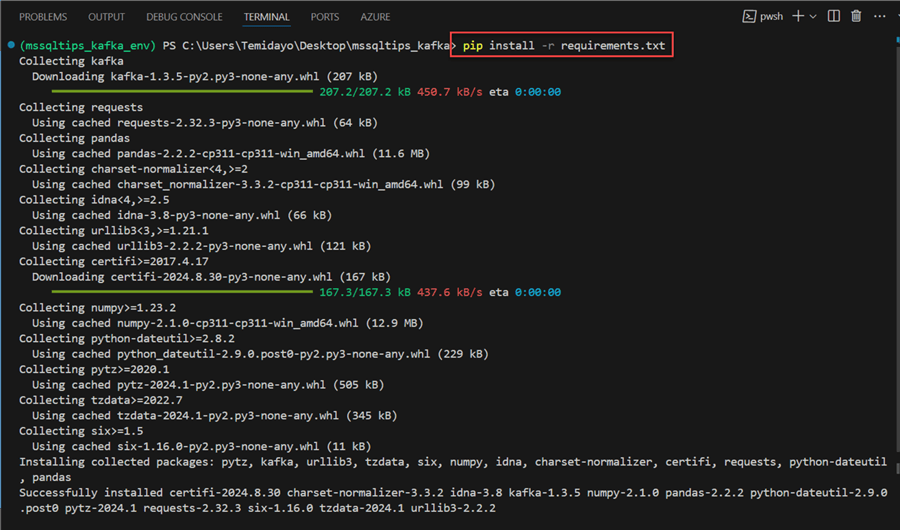
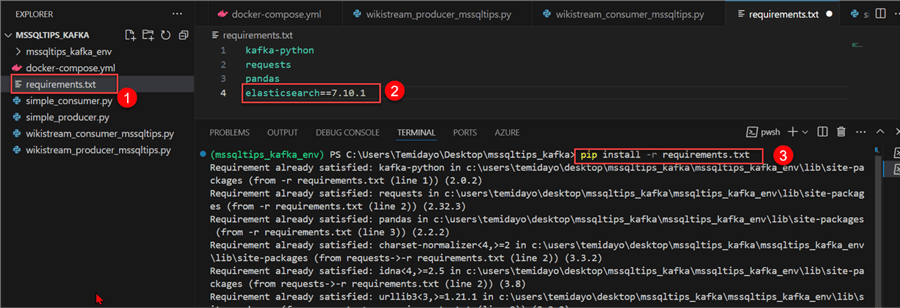
Before starting with the Python script, we need to install some libraries that will help to work better throughout the entire process. Start by creating a requirements.txt file in the same folder path as your docker-compose.yml.

Use the command below to install all the required libraries.
pip install -r requirements.txt
Step 2: Create Producer Script
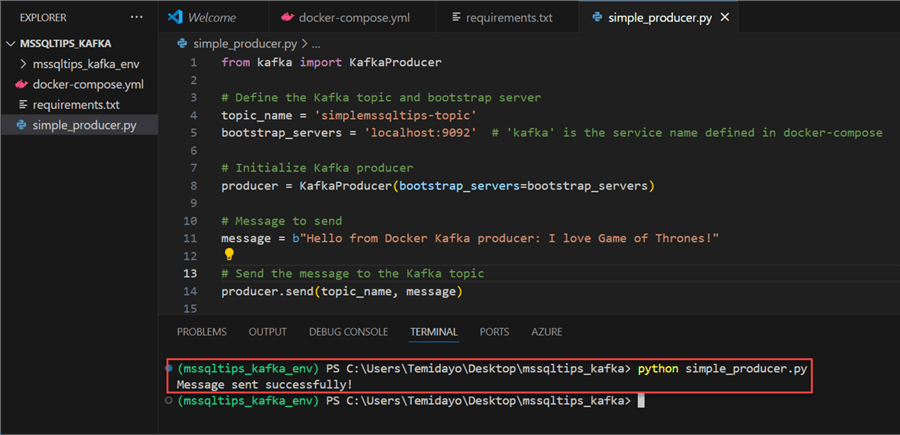
In the same folder path, create a new Python file named simple_producer.py. We will use this script to send data to the Kafka topic.
from kafka import KafkaProducer

# Define the Kafka topic and bootstrap server
topic_name = 'simplemssqltips-topic'
bootstrap_servers = 'localhost:9092'  # 'kafka' is the service name defined in docker-compose

# Initialize Kafka producer
producer = KafkaProducer(bootstrap_servers=bootstrap_servers)

# Message to send
message = b"Hello from Docker Kafka producer: I love Game of Thrones!"

# Send the message to the Kafka topic
producer.send(topic_name, message)

# Flush the producer to ensure all messages are sent
producer.flush()

# Close the producer connection
producer.close()

print("Message sent successfully!")
Code Breakdown:
Define Topic and Bootstrap Server
topic_name = 'simplemssqltips-topic'
bootstrap_servers = 'localhost:9092'
- topic_name: Specifies the name of the Kafka topic to which messages will be sent.
- bootstrap_servers: Defines the address of the Kafka broker (in this case, running on localhost at port 9092).
Initialize Kafka Producer and Define Message
producer = KafkaProducer(bootstrap_servers=bootstrap_servers)
message = b"Hello from Docker Kafka producer: I love Game of Thrones"
- Creates an instance of KafkaProducer, connecting it to the specified Kafka broker.
- Defines the message to be sent to the Kafka topic. The message is a byte string (indicated by the b prefix).
Send Message to Kafka Topic
producer.send(topic_name, message)
- Sends the defined message to the specified Kafka topic (simplemssqltips-topic).
Flush Producer and Close Producer Connection
producer.flush()
producer.close()
- Ensures that all buffered messages are sent to the Kafka broker. This is important for guaranteeing that the message is transmitted before closing the producer.
- Closes the connection to the Kafka broker, releasing any resources held by the producer.
Step 3: Run Python Script
After writing all necessary Python scripts, run the consumer script with the command below. You should get a success message if done correctly.
Creating Consumer Script
Using the same approach, we need to consume the message from the topic using a Python script.
Step 1: Create Python Consumer Script
Using the script below to read data from the kafka topic.
from kafka import KafkaConsumer

# Define the Kafka topic and bootstrap server
topic_name = 'simplemssqltips-topic'
bootstrap_servers = 'localhost:9092'  # Adjust as needed

# Initialize Kafka consumer
consumer = KafkaConsumer(
    topic_name,
    bootstrap_servers=bootstrap_servers,
    auto_offset_reset='earliest',  # Start reading from the beginning of the topic
    group_id='my-group'  # Consumer group ID (can be any string)
)

# Consume messages
print(f"Consuming messages from topic '{topic_name}'...")
for message in consumer:
    print(f"Received message: {message.value.decode('utf-8')}")
Code Breakdown:
Initialize Kafka Consumer
consumer = KafkaConsumer(
   topic_name,
   bootstrap_servers=bootstrap_servers,
   auto_offset_reset='earliest', # Start reading from the beginning of the topic
   group_id='my-group' # Consumer group ID (can be any string)
)
- Creates an instance of KafkaConsumer configured to read from the specified topic.
- Parameters:
- auto_offset_reset='earliest': This option makes sure that the consumer group will read from the beginning of the subject (i.e., the earliest messages) if there are no previously committed offsets.
- group_id='my-group': The customer group ID is specified by this argument. To ensure that only one member of the group processes each message, consumers who have the same group ID will divide up the reading load related to the topic.
Consume Message
print(f"Consuming messages from topic '{topic_name}'...")
for message in consumer:
    print(f"Received message: {message.value.decode('utf-8')}")
- To let the user know when they are beginning to read messages from the designated topic, a message is printed.
- The consumer: loops for message function never stops searching the Kafka
topic for fresh messages. The real content of a message is contained in
message.value when it is received.
- To produce a human-readable result, decode('utf-8') transforms the byte string message into a regular string using UTF-8 encoding.
- Every communication that is received is shown on the terminal.
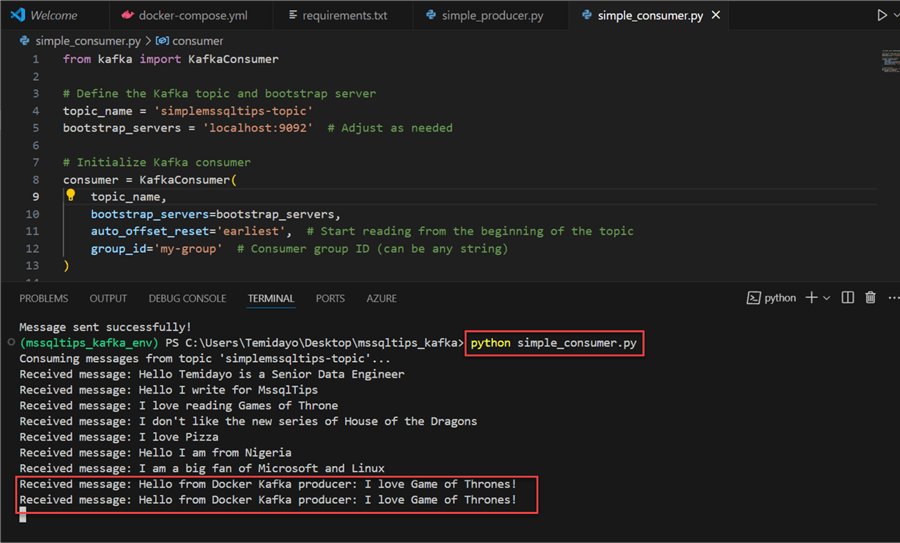
Step 2: Test Consumer Script
Using the script created above, run it in the VSCode terminal. You should get the message sent with the producer.
Section 3: Create a Mini Production Level Streaming Project with Apache Kafka
In this section, we are going to create a mini-streaming project using Apache Kafka.
Project Architecture
For this project, we will connect to Wikimedia Stream API, stream the data to Kafka Topic, and consume the data by storing it in ElasticSearch. ElasticSearch will serve as our storage layer where the stream of NoSQL data will be kept for faster query time. Lastly, we will use Kibana in ElasticSearch to visualize streamed data.

Project Architecture
Update Docker-Compose YAML File
Let's update the docker-compose.yml file in our VSCode with the necessary command. This will make our Kafka cluster production ready.
version: '3.1'
services:
  zookeeper:
    image: wurstmeister/zookeeper
    container_name: zookeeper
    ports:
      - "2181:2181"

  kafka1:
    image: wurstmeister/kafka
    container_name: kafka1
    ports:
      - "9092:9092"
    environment:
      KAFKA_ADVERTISED_LISTENERS: INSIDE://kafka1:9093,OUTSIDE://localhost:9092
      KAFKA_LISTENER_SECURITY_PROTOCOL_MAP: INSIDE:PLAINTEXT,OUTSIDE:PLAINTEXT
      KAFKA_LISTENERS: INSIDE://0.0.0.0:9093,OUTSIDE://0.0.0.0:9092
      KAFKA_INTER_BROKER_LISTENER_NAME: INSIDE
      KAFKA_ZOOKEEPER_CONNECT: zookeeper:2181
      KAFKA_BROKER_ID: 1

  kafka2:
    image: wurstmeister/kafka
    container_name: kafka2
    ports:
      - "9094:9094"
    environment:
      KAFKA_ADVERTISED_LISTENERS: INSIDE://kafka2:9095,OUTSIDE://localhost:9094
      KAFKA_LISTENER_SECURITY_PROTOCOL_MAP: INSIDE:PLAINTEXT,OUTSIDE:PLAINTEXT
      KAFKA_LISTENERS: INSIDE://0.0.0.0:9095,OUTSIDE://0.0.0.0:9094
      KAFKA_INTER_BROKER_LISTENER_NAME: INSIDE
      KAFKA_ZOOKEEPER_CONNECT: zookeeper:2181
      KAFKA_BROKER_ID: 2

  kafka3:
    image: wurstmeister/kafka
    container_name: kafka3
    ports:
      - "9096:9096"
    environment:
      KAFKA_ADVERTISED_LISTENERS: INSIDE://kafka3:9097,OUTSIDE://localhost:9096
      KAFKA_LISTENER_SECURITY_PROTOCOL_MAP: INSIDE:PLAINTEXT,OUTSIDE:PLAINTEXT
      KAFKA_LISTENERS: INSIDE://0.0.0.0:9097,OUTSIDE://0.0.0.0:9096
      KAFKA_INTER_BROKER_LISTENER_NAME: INSIDE
      KAFKA_ZOOKEEPER_CONNECT: zookeeper:2181
      KAFKA_BROKER_ID: 3
  es01:
    image: "docker.elastic.co/elasticsearch/elasticsearch-oss:7.10.2"
    ports:
      - "9200:9200"
      - "9300:9300"
    environment:
      node.name: es01
      discovery.seed_hosts: es01,es02,es03
      cluster.initial_master_nodes: es01,es02,es03
      cluster.name: mycluster
      bootstrap.memory_lock: "true"
      ES_JAVA_OPTS: -Xms256m -Xmx256m
    volumes:
      - "es-data-es01:/usr/share/elasticsearch/data"
    ulimits:
      memlock:
        soft: -1
        hard: -1
    healthcheck:
      test: ["CMD-SHELL", "curl http://localhost:9200"]
      interval: 10s
      timeout: 10s
      retries: 120
  es02:
    image: "docker.elastic.co/elasticsearch/elasticsearch-oss:7.10.2"
    ports:
      - "9201:9200"
      - "9301:9300"
    environment:
      node.name: es02
      discovery.seed_hosts: es01,es02,es03
      cluster.initial_master_nodes: es01,es02,es03
      cluster.name: mycluster
      bootstrap.memory_lock: "true"
      ES_JAVA_OPTS: -Xms256m -Xmx256m
    volumes:
      - "es-data-es02:/usr/share/elasticsearch/data"
    ulimits:
      memlock:
        soft: -1
        hard: -1
    healthcheck:
      test: ["CMD-SHELL", "curl http://localhost:9200"]
      interval: 10s
      timeout: 10s
      retries: 120
  es03:
    image: "docker.elastic.co/elasticsearch/elasticsearch-oss:7.10.2"
    ports:
      - "9202:9200"
      - "9303:9300"
    environment:
      node.name: es03
      discovery.seed_hosts: es01,es02,es03
      cluster.initial_master_nodes: es01,es02,es03
      cluster.name: mycluster
      bootstrap.memory_lock: "true"
      ES_JAVA_OPTS: -Xms256m -Xmx256m
    volumes:
      - "es-data-es03:/usr/share/elasticsearch/data"
    ulimits:
      memlock:
        soft: -1
        hard: -1
    healthcheck:
      test: ["CMD-SHELL", "curl http://localhost:9200"]
      interval: 10s
      timeout: 10s
      retries: 120
  kibana:
    image: docker.elastic.co/kibana/kibana-oss:7.10.2
    depends_on:
      es01:
        condition: service_healthy
      es02:
        condition: service_healthy
      es03:
        condition: service_healthy
    ports:
      - "5601:5601"
    environment:
      - 'ELASTICSEARCH_HOSTS=["http://es01:9200","http://es02:9200","http://es03:9200"]'
volumes:
  es-data-es01:
  es-data-es02:
  es-data-es03:
Code Breakdown:
- Zookeeper: The wurstmeister/zookeeper image is used to construct a single Zookeeper container. It uses port 2181 to listen.
- Kafka:
The wurstmeister/kafka image is used to build three Kafka containers. Every
Kafka container listens on a distinct port and is assigned a unique KAFKA_BROKER_ID:
- Ports 9092 (outside) and 9093 (inside) are where Kafka1 listens.
- Ports 9094 (outside) and 9095 (inside) are where Kafka2 listens.
- Ports 9096 (outside) and 9097 (inside) are where Kafka3 listens.
- Zookeepers can be accessed by all Kafka containers via zookeeper:2181.
- Elasticsearch: The docker.elastic.co/elasticsearch/elasticsearch-oss:7.10.2 image is used to build three Elasticsearch containers. They use ports 9200 (HTTP), 9300 (transport), and 9201/9202 (HTTP for es02 and es03) and construct a cluster called mycluster. Memory limitations and health checks are configured into the containers.
- Kibana: Using the docker.elastic.co/kibana/kibana-oss:7.10.2 image, a single Kibana container is created. It is set up to connect to the Elasticsearch cluster using the ELASTICSEARCH_HOSTS environment variable and listens on port 5601.
- Volumes: To store Elasticsearch data for every node, three named volumes (es-data-es01, es-data-es02, and es-data-es03) are defined.
Rebuild Docker
We need to rebuild the entire docker-compose.yml file. Let's start by stopping the entire docker running in the container.
Stop All Running Docker Containers.
docker stop $(docker ps -aq)
Remove Unused Docker Resources, Including Images, Containers, Networks, and Volumes.
docker system prune -a

Rebuild Docker Compose YAML File. This will take a couple of minutes depending on your internet speed.
docker-compose up -d
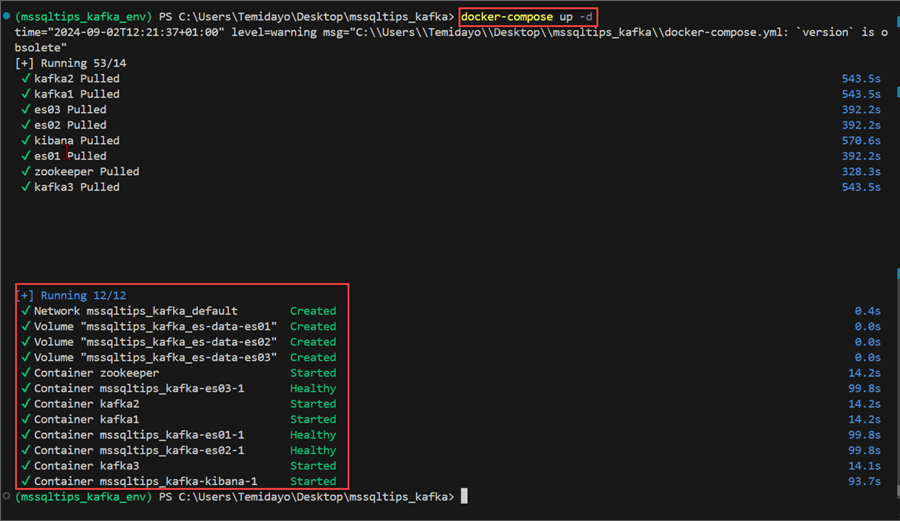
Check Running Docker Containers. This is to check all running containers in docker.
docker ps
Check All Images.
docker images

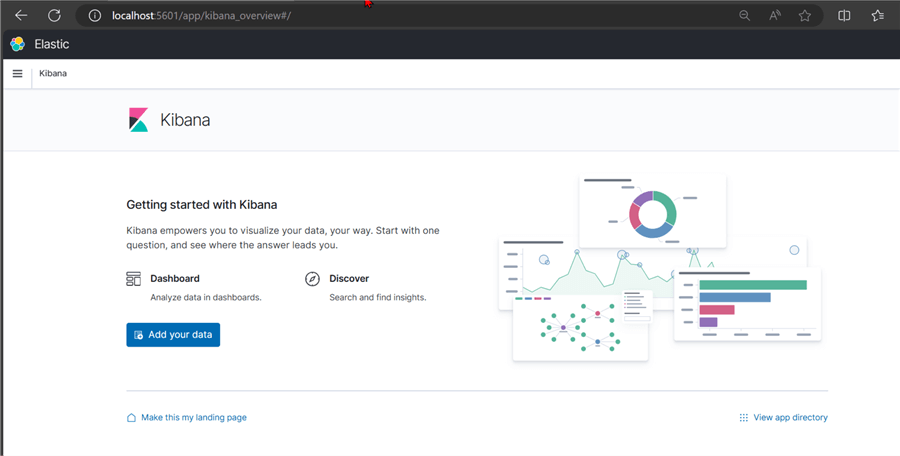
Test Kibana. Let's test the Kibana image that will be used for data visualization and querying of ElasticSearch. Open your browser and put in the link http://localhost:5601. The image indicates that Kibana works as expected in our local host.
Create Kafka Topic for Production
Option 1. Use the host machine's localhost address: Instead of using the internal Docker network hostnames, you can use the exposed ports on localhost:
kafka-topics.sh --create --topic wikimedia-mssqltips-topic --bootstrap-server localhost:9092,localhost:9094,localhost:9096 --partitions 3 --replication-factor 2

Option 2. Run the command from inside one of the Kafka containers. This way, you'll be inside the Docker network and can use the internal hostnames:
docker exec -it kafka1 kafka-topics.sh --create --topic wikimedia-mssqltips-topic --bootstrap-server kafka1:9093,kafka2:9095,kafka3:9097 --partitions 3 --replication-factor 2

Describe Kafka Topics. By using the command below, you can describe the Kafka topic to get more information.
kafka-topics.sh --bootstrap-server localhost:9092 --describe --topic wikimedia-mssqltips-topic
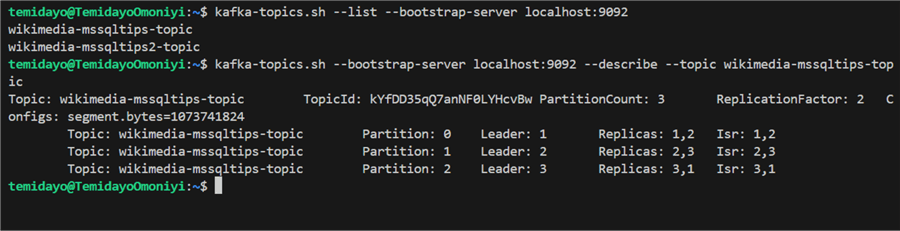
Delete Topics. You can delete unwanted topics in Kafka by using the following command:
kafka-topics.sh --delete --topic wikimedia-mssqltips2-topic --bootstrap-server localhost:9092

Create Producer Script
Now that we have our Kafka script up and running, we need to create a Python script that will be able to stream data from the WikimediaStream site and send it to the Kafka Cluster Topic.
import requests
import time
import json
from kafka import KafkaProducer
from kafka.errors import KafkaError

# Wikimedia Recent Changes Stream URL
url = 'https://stream.wikimedia.org/v2/stream/recentchange'

# Updated bootstrap servers to match the new Docker Compose configuration
# bootstrap_servers = ['kafka1:9093', 'kafka2:9095', 'kafka3:9097']
bootstrap_servers = ['localhost:9092', 'localhost:9094', 'localhost:9096']

topic_name = 'wikimedia-mssqltips-topic'

# Set up Kafka producer with JSON serialization and reliability features
producer = KafkaProducer(
    bootstrap_servers=bootstrap_servers,
    value_serializer=lambda v: json.dumps(v).encode('utf-8'),
    acks='all',  # Wait for all in-sync replicas to acknowledge the write
    retries=10,  # Number of retries if the initial produce request fails
    retry_backoff_ms=1000  # Wait 1 second between retries
)

def delivery_report(err, msg):
    if err is not None:
        print(f'Message delivery failed: {err}')
    else:
        print(f'Message delivered to {msg.topic()} [{msg.partition()}]')

def consume_stream(url, run_duration, pause_duration):
    try:
        while True:
            start_time = time.time()
            print(f"Starting stream consumption for {run_duration} seconds...")

            with requests.get(url, stream=True) as response:
                if response.status_code == 200:
                    print("Connected to the Wikimedia stream...")
                    for line in response.iter_lines():
                        # Stop after the run duration
                        if time.time() - start_time > run_duration:
                            break
                        if line:
                            try:
                                # Decode the line from byte to string
                                decoded_line = line.decode('utf-8')

                                # Process only 'data' lines that contain the JSON payload
                                if decoded_line.startswith("data:"):
                                    # Remove the leading 'data: ' and strip whitespace
                                    json_data = json.loads(decoded_line[5:].strip())

                                    # Print the JSON data for verification
                                    print(json_data)

                                    # Send JSON data to Kafka topic
                                    future = producer.send(topic_name, json_data)
                                    future.add_callback(delivery_report)

                            except json.JSONDecodeError as e:
                                print(f"Error decoding JSON: {e}")
                            except Exception as e:
                                print(f"Error processing line: {e}")
                else:
                    print(f"Failed to connect: {response.status_code}")

            print(f"Pausing for {pause_duration} seconds...")
            time.sleep(pause_duration)  # Pause for the specified duration

    except KeyboardInterrupt:
        print("Process terminated.")
    except Exception as e:
        print(f"An unexpected error occurred: {e}")
    finally:
        print("Exiting...")
        producer.flush()  # Ensure any buffered messages are sent
        producer.close()

# Start consuming the stream
consume_stream(url, run_duration=60, pause_duration=30)  # Run for 1 minute (60 seconds) and pause for 30 seconds
Code Breakdown
Kafka Producer Setup:
producer = KafkaProducer(
    bootstrap_servers=bootstrap_servers,
    value_serializer=lambda v: json.dumps(v).encode('utf-8'),
    acks='all',
    retries=10,
    retry_backoff_ms=1000
)
Sets up a Kafka producer initially with the following settings:
- bootstrap_servers: Ties in with the designated Kafka brokers.
- value_serializer: Encodes the message value into UTF-8 bytes and serializes it to JSON format.
- acks='all': This makes sure that the producer doesn't consider a message successfully transmitted until it has been acknowledged by every in-sync replica.
- Retries=10: Indicates how many times to try again in case the first send doesn't go through.
- Retry_backoff_ms=1000: Creates a one-second interval before trying again.
Delivery Report Callback Function:
def delivery_report(err, msg):
    if err is not None:
        print(f'Message delivery failed: {err}')
    else:
        print(f'Message delivered to {msg.topic()} [{msg.partition()}]')
Following the sending of a message to Kafka, this function is called. It prints the delivery status and does an error check.
Start Consuming:
consume_stream(url, run_duration=60, pause_duration=30)
The consume_stream function is called with the parameters to run for 60 seconds, pause for 30 seconds, and repeat.
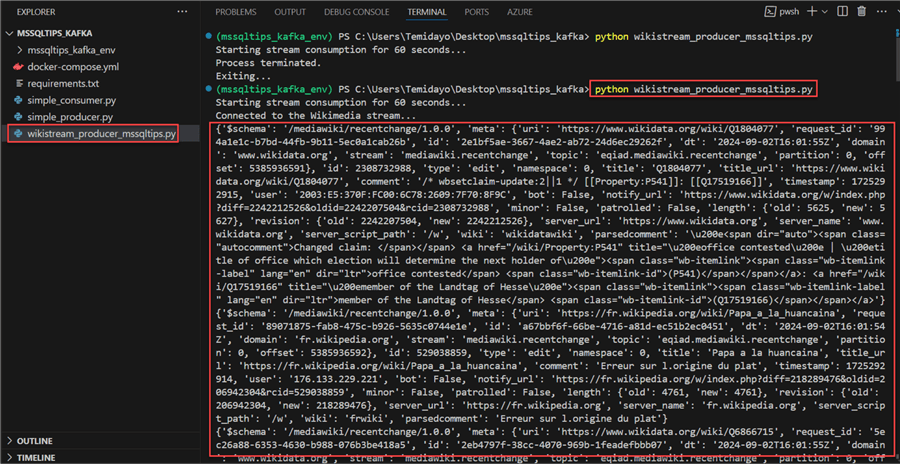
Run Producer Script. From the image, you will notice the data are being streamed in real-time and sent to the Kafka topic.
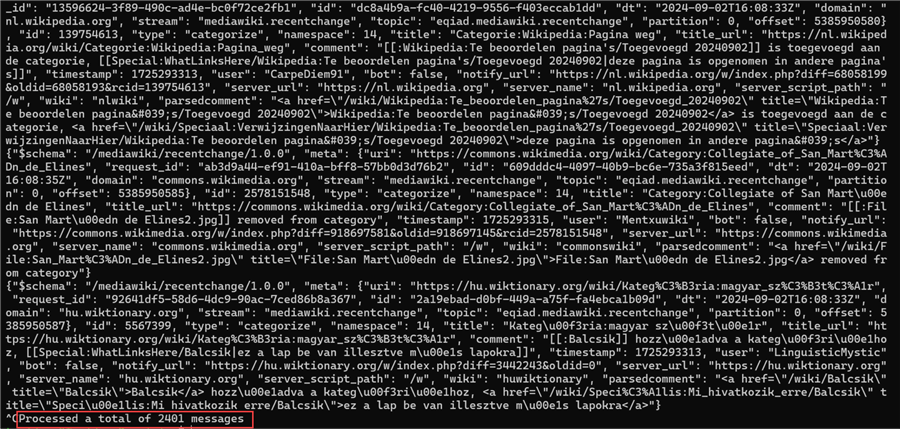
Confirm Streamed Data by Using CLI. Let's consume the data from the Kafka topic by using our CLI in our Windows server. You will notice from the image the total number of messages streamed was 2,401.
kafka-console-consumer.sh --topic wikimedia-mssqltips-topic --from-beginning --bootstrap-server localhost:9092,localhost:9094,localhost:9096
Create Consumer Script
This is the final step. We are going to create a consumer script and push the data to ElasticSearch for storage.
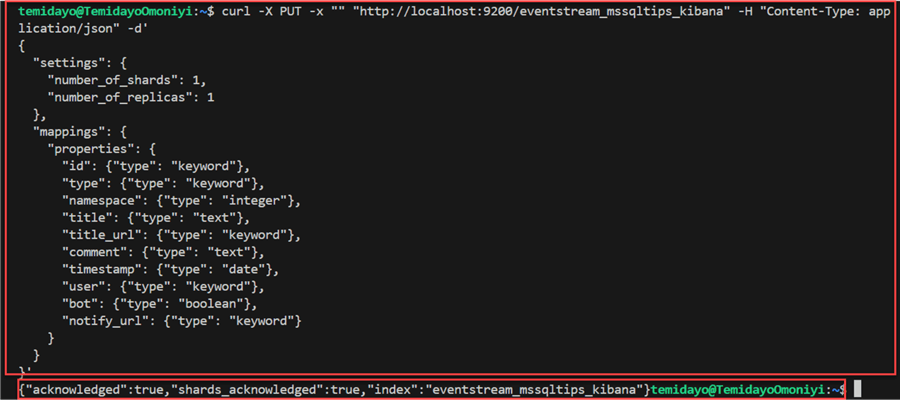
Create ElasticSearch Index. Creating an index in ElasticSearch is essential for efficient data management, search performance, and customization.
We created an index for ElasticSearch with the necessary mappings for data quality and checks.
curl -X PUT -x "" "http://localhost:9200/eventstream_mssqltips_kibana" -H "Content-Type: application/json" -d'
{
  "settings": {
    "number_of_shards": 1,
    "number_of_replicas": 1
  },
  "mappings": {
    "properties": {
      "id": {"type": "keyword"},
      "type": {"type": "keyword"},
      "namespace": {"type": "integer"},
      "title": {"type": "text"},
      "title_url": {"type": "keyword"},
      "comment": {"type": "text"},
      "timestamp": {"type": "date"},
      "user": {"type": "keyword"},
      "bot": {"type": "boolean"},
      "notify_url": {"type": "keyword"}
    }
  }
}'
Install Necessary Library. We need to install the ElasticSearch library before running the consumer script. See the numbered steps in the image below.
Consumer Script. Create a new Python file with the script below. The script is meant to filter out some necessary parts (mapping) and push them to the ElasticSearch Index.
from kafka import KafkaConsumer
import json
import time
import logging
from elasticsearch import Elasticsearch
from elasticsearch.helpers import bulk

logging.basicConfig(level=logging.INFO)
logger = logging.getLogger(__name__)

# Print versions for debugging
import elasticsearch
import kafka
logger.info(f"Elasticsearch version: {elasticsearch.__version__}")
logger.info(f"Kafka-python version: {kafka.__version__}")

bootstrap_servers = ['localhost:9092', 'localhost:9094', 'localhost:9096']

consumer = KafkaConsumer(
    'wikimedia-mssqltips-topic',
    bootstrap_servers=bootstrap_servers,
    auto_offset_reset='earliest',
    enable_auto_commit=True,
    group_id='python-consumer-group-1',
    value_deserializer=lambda x: json.loads(x.decode('utf-8')),
    api_version_auto_timeout_ms=60000,
    request_timeout_ms=65000
)

# Updated Elasticsearch client configuration
es = Elasticsearch(
    ['http://localhost:9200', 'http://localhost:9201', 'http://localhost:9202'],
    retry_on_timeout=True,
    max_retries=10,
    timeout=30
)

logger.info(f"Consumer created with configuration: {consumer.config}")

assignment_start_time = time.time()
assignment_timeout = 60

while not consumer.assignment():
    if time.time() - assignment_start_time > assignment_timeout:
        logger.error("Timed out waiting for partition assignment.")
        consumer.close()
        exit(1)
    time.sleep(1)
    consumer.poll(timeout_ms=1000)
    logger.info("Waiting for partition assignment...")

logger.info(f"Consumer assigned partitions: {consumer.assignment()}")

def generate_actions(messages):
    for message in messages:
        event_data = message.value
        filtered_data = {
            'id': event_data.get('id'),
            'type': event_data.get('type'),
            'namespace': event_data.get('namespace'),
            'title': event_data.get('title'),
            'title_url': event_data.get('title_url'),
            'comment': event_data.get('comment'),
            'timestamp': event_data.get('timestamp'),
            'user': event_data.get('user'),
            'bot': event_data.get('bot'),
            'notify_url': event_data.get('notify_url')
        }
        yield {
            "_index": "eventstream_mssqltips_kibana",
            "_source": filtered_data
        }

try:
    message_count = 0
    start_time = time.time()
    while True:
        message_batch = consumer.poll(timeout_ms=1000)

        if not message_batch:
            if time.time() - start_time > 60:
                logger.info("No messages received in the last 60 seconds. Still waiting...")
                start_time = time.time()
            continue

        for tp, messages in message_batch.items():
            message_count += len(messages)
            logger.info(f"Received {len(messages)} messages. Total count: {message_count}")

            try:
                actions = list(generate_actions(messages))
                success, _ = bulk(
                    es,
                    actions,
                    raise_on_error=False,
                    raise_on_exception=False
                )
                logger.info(f"Indexed {success} documents successfully.")
            except Exception as e:
                logger.error(f"Error during bulk indexing: {e}")

except KeyboardInterrupt:
    logger.info("Consumer stopped by user.")
except Exception as e:
    logger.error(f"An unexpected error occurred: {e}")
finally:
    consumer.close()
    logger.info("Consumer closed.")
Test Consumer Script. We have all the requirements done. Let's run the Python script and confirm if it is sending to ElasticSearch Index.
python WikimediaStream_consumer_mssqltips.py
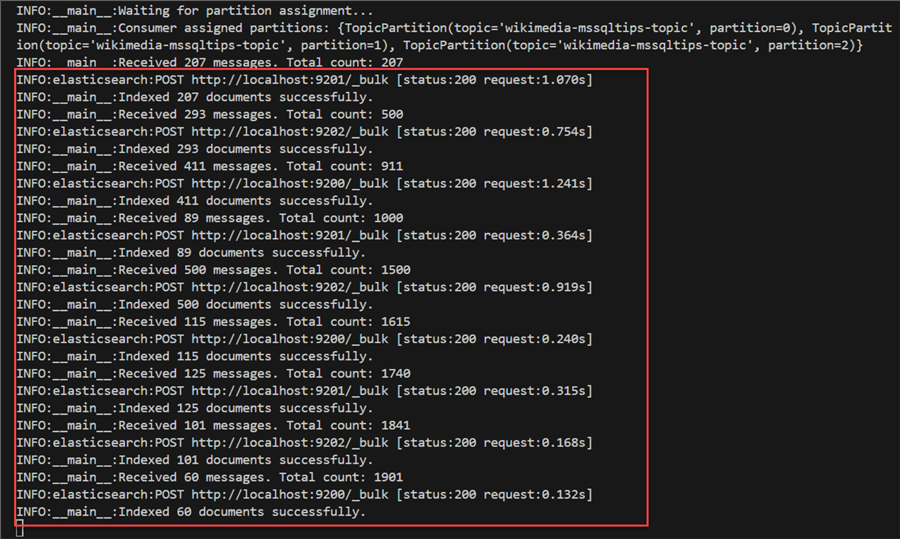
From the image above, we can confirm the producer successfully got the data from the Kafka topic and sent it to the ElasticSearch Index.
ElasticSearch Command
In your ElasticSearch http://localhost:5601, let's write the following command and explore the stored data.
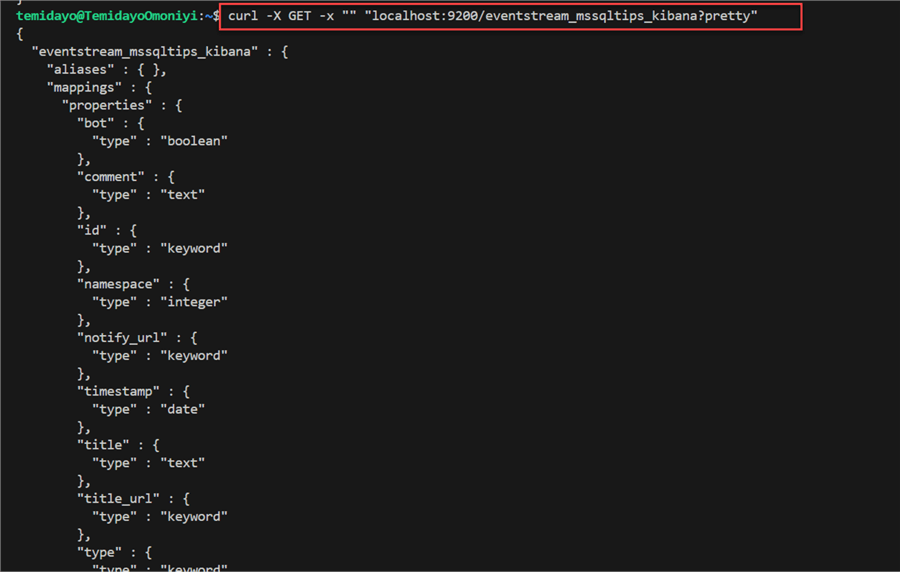
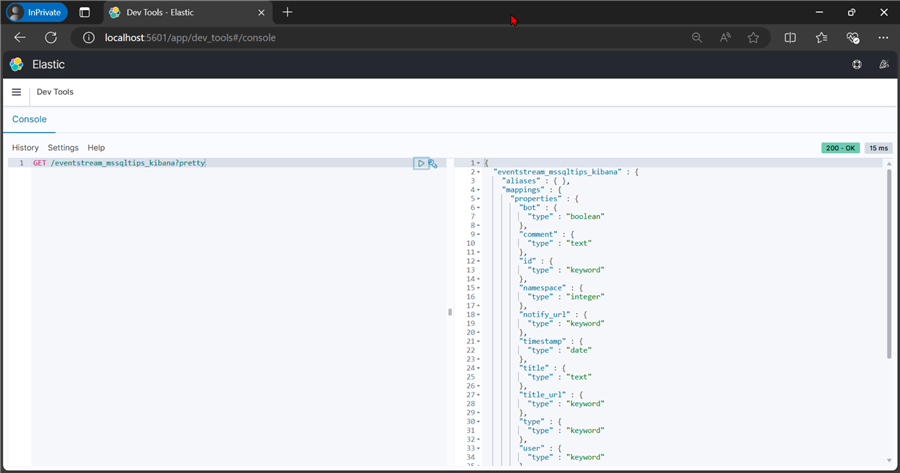
Get Index Information. You can either use the VSCode terminal or navigate to the ElasticSearch URL.
curl -X GET -x "" "localhost:9200/eventstream_mssqltips_kibana?pretty"
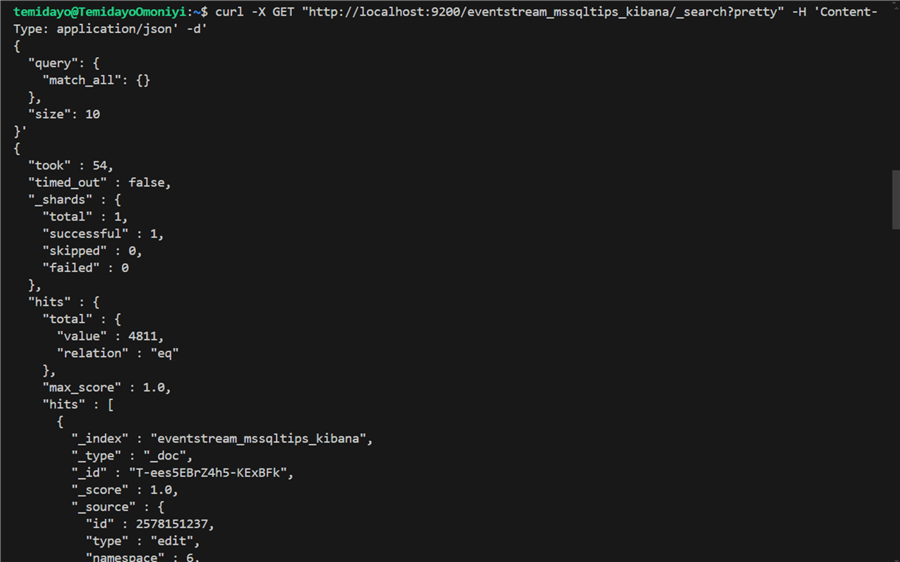
Get 10 Records.
curl -X GET "http://localhost:9200/eventstream_mssqltips_kibana/_search?pretty" -H 'Content-Type: application/json' -d'
{
  "query": {
    "match_all": {}
  },
  "size": 10
}'

Conclusion
In this article, we have learned all about Apache Kafka, including setting up Apache Kafka and Zookeeper in a Docker container. We covered different concepts varying from basic to intermediate.
A mini project was completed to pull live data from a streaming platform, like Wikimedia Stream, taking the data through Kafka Cluster to ElasticSearch for storage and querying. This article is the first part of a three-part series, and we will be continuing onto other streaming projects in our next article. All code and resources used for this project will be made available via this Zip file.
Next Steps
- Apache Kafka Quickstart
- Outputs from Azure Stream Analytics - Azure Stream Analytics | Microsoft Learn
- Apache Kafka for Beginners: A Comprehensive Guide
- Apache Kafka® Tutorials
- Event Streams for Persistent and Asynchronous Microservice Communication
- Reading Data from Event Hubs into Event Stream and a Lakehouse Table - Part 2


About the author
 Temidayo Omoniyi is a Microsoft Certified Data Analyst, Microsoft Certified Trainer, Azure Data Engineer, Content Creator, and Technical writer with over 3 years of experience.
 This author pledges the content of this article is based on professional experience and not AI generated.
View all my tips
Article Last Updated: 2024-10-29