By: Temidayo Omoniyi | Updated: 2024-11-11 | Comments | Related: > Cloud Strategy
Problem
Billions of data get generated on a data basis. Having a system that captures this generated data in real-time and migrates it to its respective location is of high importance. This has led to heavy investment in different data infrastructures, either enterprise-based or modern data platforms. In this article, we look at how to use Apache Kafka and Zookeeper to process and load streaming data.
Solution
The introduction of Apache Kafka has made real-time data streaming possible for most organizations. As data are being generated from different producers, they get to their various destinations in real-time where business decisions can be made.
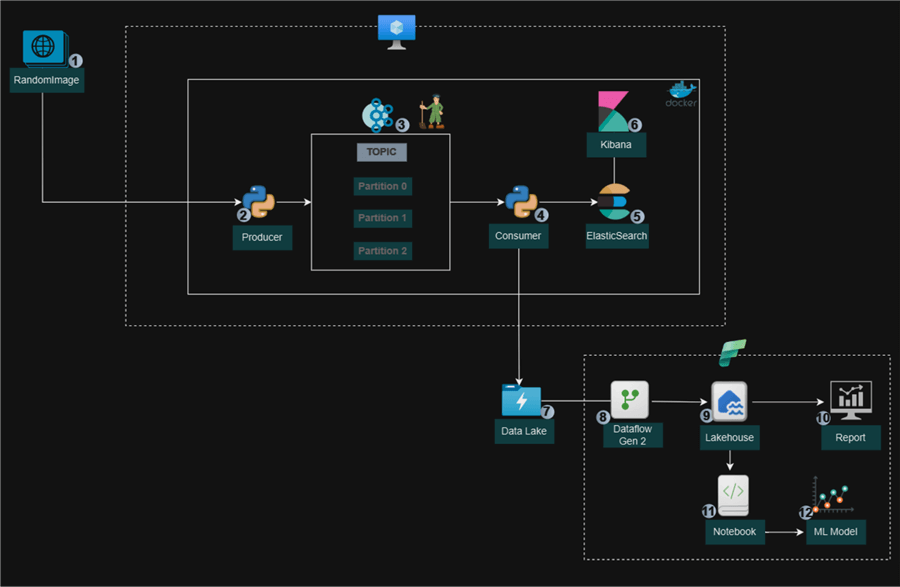
Project Architect
This article is purely project-based. To fully grasp the different concepts covered here, I recommend reading the previous article titled Understanding Apache Kafka for Streaming, which covers the installation of Docker Desktop, the importance of Kafka, and how it is used in today's industry.
In this project, we will be streaming data in real time from a site called Random Information to Apache Kafka, which is also managed by Zookeeper. We will then create a consumer script that deserializes the data from the Kafka topic and sends it to both Elasticsearch Index and Azure Data Lake Gen 2. This is where the data team consumes the data and makes descriptive and predictive analyses.
Prerequisite
To get a full grasp of the project, the following requirements are needed from our reader:
- Basic Python knowledge.
- Docker Desktop and WSL (Windows Users) installed.
- Basic understanding of Docker.
- Basic understanding of Azure.
- Read our previous article on Apache Kafka.
Preparing Project Environment
Before we get started, we need to set up the environment to have a seamless process all the way through.
Step 1: Create a Python Virtual Environment
This is an isolated environment that handles dependencies for several projects independently, which is a segregated setting that makes sure every project has its libraries and versions.
The following steps should be followed in setting up the virtual environment.
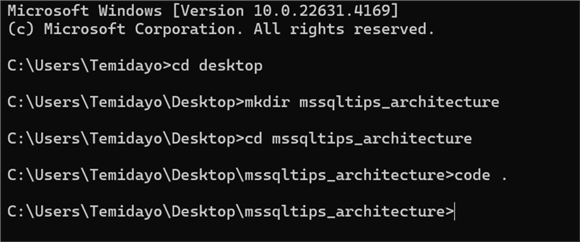
Step 1.1: Create Necessary Directory. In your command prompt on your Windows Desktop Server, search for cmd.
In your CMD, follow the command from the image below. The last command would be used on your favorite code editor (I'm using VS Code).
Step 1.2: Create Virtualenv. In your VS Code, open a new terminal and write in the following command to create your virtual environment: virtualenv architecture_env. After successfully creating a virtual environment, let's activate it with this command: architecture_env\Scripts\activate.

Step 2: Create Docker-Compose.yml File
Docker Compose makes it easier to manage Docker applications with multiple containers. It enables you to use a single configuration file (often called docker-compose.yml) to define and execute several containers simultaneously as a single application.
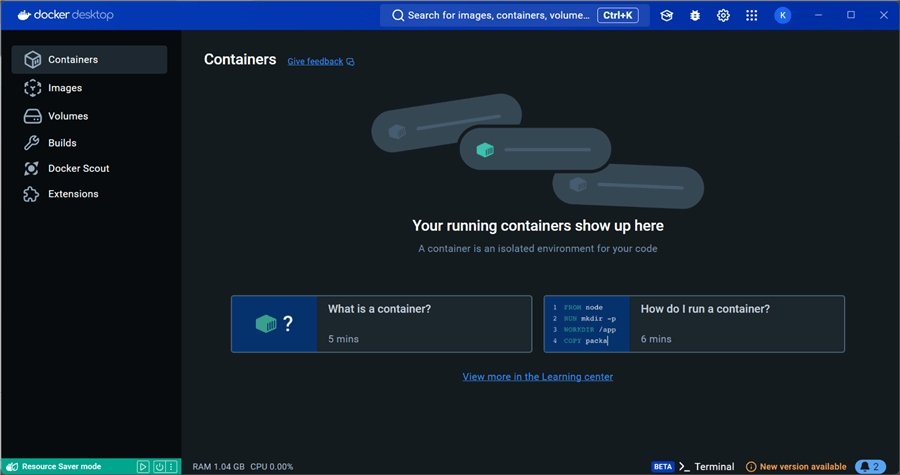
Step 2.1: Start Docker Desktop. Part of the prerequisites was the installation of Docker Desktop on your operating system. We are using a Windows server for this project. The Docker Desktop application needs to be on to create a necessary image for this project.
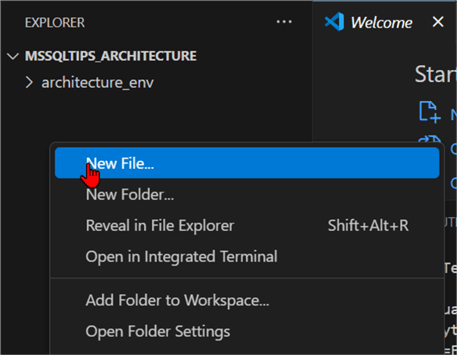
Step 2.2: Create Docker Images. To create all the necessary images, we need to create a file in our project directory. Right-click inside the project folder and select a new file. Name the file: docker-compose.yml.
The docker-compose.yml will be used to set all necessary instructions for our docker images. Based on the above architecture, the following images are needed to execute successfully: Zookeeper, Kafka, Elasticsearch, and Kibana.
version: '3'

services:
  zookeeper:
    image: wurstmeister/zookeeper:latest
    ports:
      - "2181:2181"
    volumes:
      - zookeeper_data:/data

  kafka:
    image: wurstmeister/kafka:latest
    ports:
      - "9092:9092"
    environment:
      KAFKA_ADVERTISED_HOST_NAME: localhost
      KAFKA_ZOOKEEPER_CONNECT: zookeeper:2181
      KAFKA_CREATE_TOPICS: "mssqltips-topic:3:1"
    volumes:
      - kafka_data:/kafka
    depends_on:
      - zookeeper

  elasticsearch:
    image: docker.elastic.co/elasticsearch/elasticsearch:7.17.9
    environment:
      - discovery.type=single-node
    ports:
      - "9200:9200"
      - "9300:9300"
    volumes:
      - elasticsearch_data:/usr/share/elasticsearch/data

  kibana:
    image: docker.elastic.co/kibana/kibana:7.17.9
    ports:
      - "5601:5601"
    environment:
      ELASTICSEARCH_HOSTS: http://elasticsearch:9200
    depends_on:
      - elasticsearch

volumes:
  zookeeper_data:
  kafka_data:
  elasticsearch_data:

networks:
  default:
     driver: bridge
Docker Breakdown
Services: This section defines the individual containers that will be created and managed.
Zookeeper
zookeeper:
  image: wurstmeister/zookeeper:latest
  ports:
    - "2181:2181"
  volumes:
    - zookeeper_data:/data
- Image: Makes use of the most recent Wurstmeister Zookeeper picture.
- Ports: Allows external access by mapping port 2181 on the host to port 2181 on the container.
- Volumes: Zookeeper data is preserved in a volume called zookeeper_data.
Kafka
kafka:
  image: wurstmeister/kafka:latest
  ports:
    - "9092:9092"
  environment:
    KAFKA_ADVERTISED_HOST_NAME: localhost
    KAFKA_ZOOKEEPER_CONNECT: zookeeper:2181
    KAFKA_CREATE_TOPICS: "mssqltips-topic:3:1"
  volumes:
    - kafka_data:/kafka
  depends_on:
    - zookeeper
- Image: The most recent iteration of the Wurstmeister Kafka picture is used.
- Ports: For Kafka communication, map port 9092.
- Environmental Variables:
- KAFKA_ADVERTISED_HOST_NAME: Sets the hostname that is promoted to clients under.
- KAFKA_ZOOKEEPER_CONNECT: Indicates the connection string for Zookeeper.
- KAFKA_CREATE_TOPICS: mssqltips-topic, a topic with three partitions and a replication factor of one, is automatically created.
- Volumes: Kafka data is stored in a volume called kafka_data.
- Depends_on: Makes sure Zookeeper launches ahead of Kafka.
ElasticSearch
elasticsearch:
  image: docker.elastic.co/elasticsearch/elasticsearch:7.17.9
  environment:
    - discovery.type=single-node
  ports:
    - "9200:9200"
    - "9300:9300"
  volumes:
    - elasticsearch_data:/usr/share/elasticsearch/data
- Image: Makes use of a certain Elasticsearch version.
- Environment: Sets up Elasticsearch to operate as a cluster with just one node.
- Ports: Maps HTTP and transport communication to ports 9200 and 9300, respectively.
- Volumes: Elasticsearch data is stored in a volume called elasticsearch_data.
Kibana
kibana:
  image: docker.elastic.co/kibana/kibana:7.17.9
  ports:
    - "5601:5601"
  environment:
    ELASTICSEARCH_HOSTS: http://elasticsearch:9200
  depends_on:
    - elasticsearch
- Image: Makes use of a certain Kibana version.
- Ports: The Kibana web interface can be accessed by mapping port 5601.
- Environment: Sets up Kibana to establish a connection with Elasticsearch.
- Depends_on: Makes sure Kibana launches after Elasticsearch.
Volumes: To ensure that data is kept safe even if containers are stopped or removed, this section defines named volumes for persistent storage.
volumes:
  zookeeper_data:
  kafka_data:
  elasticsearch_data:
Networks: This describes the services' default network type. To facilitate communication between the containers, the bridge driver establishes a private internal network.
networks:
  default:
    driver: bridge
Step 2.3: Start Docker-Compose.yml File. Using the docker-compose up -d command to start all services defined in the Docker compose file in a detached mode.
The detached mode means that you can continue working in your terminal without being dependent on the output of the containers because the command will run the containers in the background and return right away.

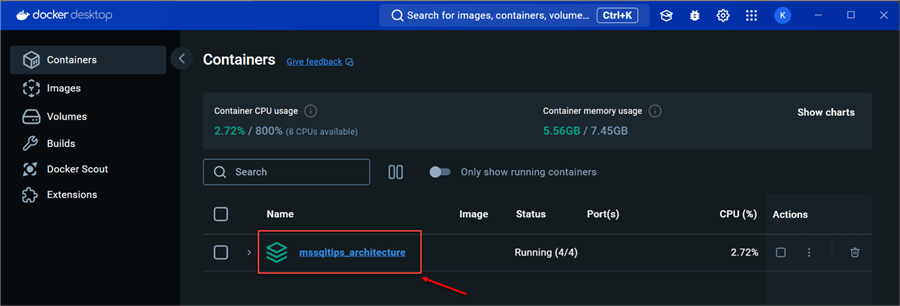
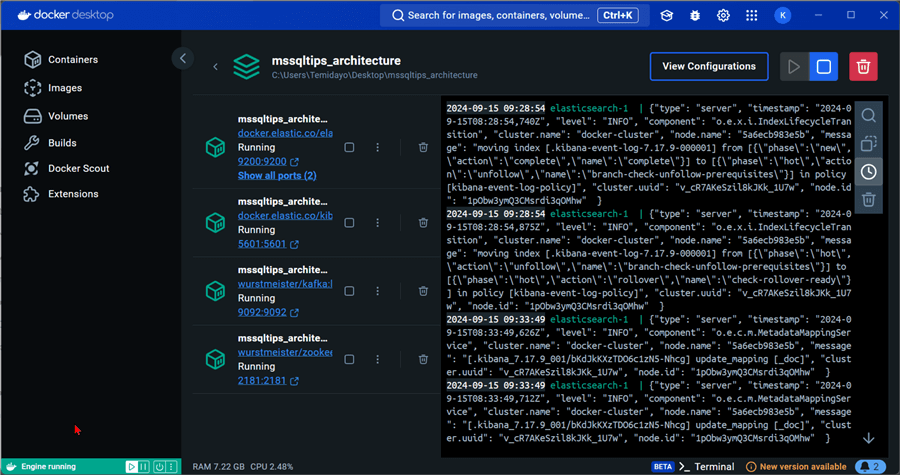
Step 2.4: Confirm Images. After successfully creating all the necessary images using the docker-compose.yml file, head to Docker Desktop to confirm if it was provisioned as expected. Click on the container; this will take you to all the images in the container.
You will notice the major images setup in the docker-compose.yml file are made available.
Streaming, Processing, and Ingestion
In this section, we will be focused more on coding and creating the producer and consumer scripts.
Step 1: Create a Producer Script
For this project, we will be streaming data from an API called random user. In this API, data are generated randomly, which is not real and no sensitive information is disclosed.
The following steps should be followed in creating this:
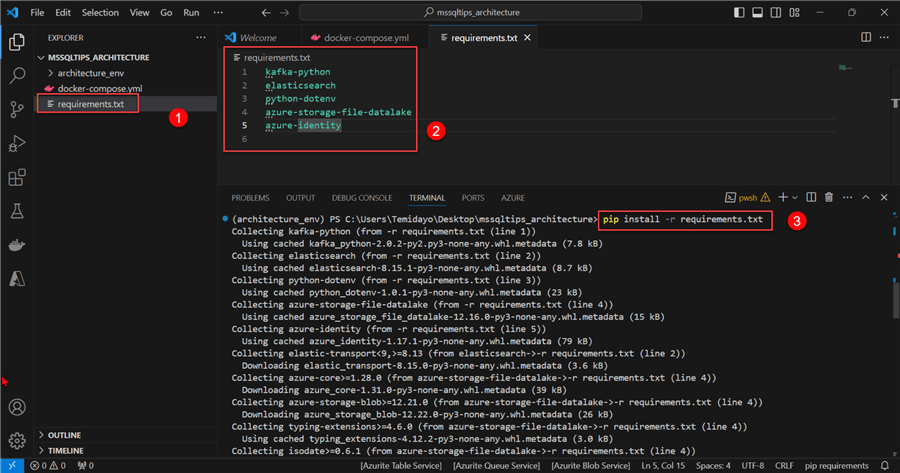
Step 1.1: Install Necessary Python Libraries. Before we get started, let's create a file in our project folder called requirements.txt and put in the following requirements libraries:
kafka-python
elasticsearch
python-dotenv
azure-storage-file-datalake
azure-identity
Step 1.2: Create Kafka Topic. Kafka Topics are essential components of the distributed streaming platform for data organization. They function similarly to channels or feeds where subscribers can publish and receive messages.
To get started, let's enter the Windows Subsystem for Linux (WSL) by creating a new terminal and writing the command in the image below.
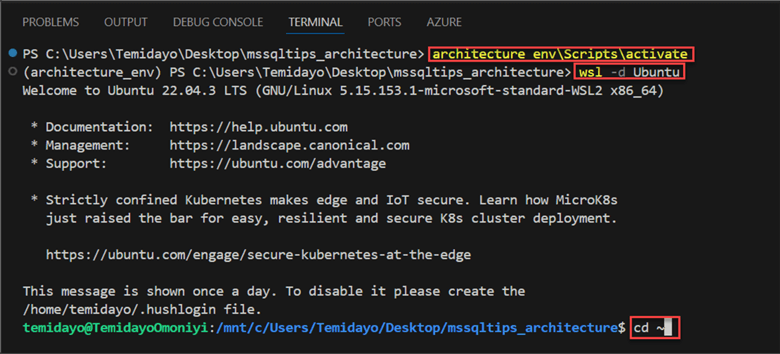
Now that we are in the WSL environment, let's create a topic named mssqltipsrandomuser with three partitions and one replication factor.
kafka-topics.sh --create --topic mssqltipsrandomuser-topic --partitions 3 --replication-factor 1 --bootstrap-server localhost:9092

- --partitions 3: This specifies that the topic will have 3 partitions.
- --replication-factor 1: This sets the replication factor for the topic to 1, meaning there will be one copy of each partition.
Step 1.3: Understand Topic Created.
List All Topics. By connecting to the broker running at localhost:9092, this command will show all the topics in your Kafka instance.
kafka-topics.sh --list --bootstrap-server localhost:9092

Describe the Created Topic. This command gives comprehensive details about the given topic, such as the replication factor, number of partitions, and current leader of each partition.
afka-topics.sh --describe --topic mssqltipsrandomuser-topic --bootstrap-server localhost:9092

Step 1.4: Python Producer Script. In the project folder directory, create a new file called producer.py and write the following lines of code in it.
Let's start by viewing the random user API site we want to pull data from. This will give a better understanding on how to go about the entire process and the required data mapping to pull.
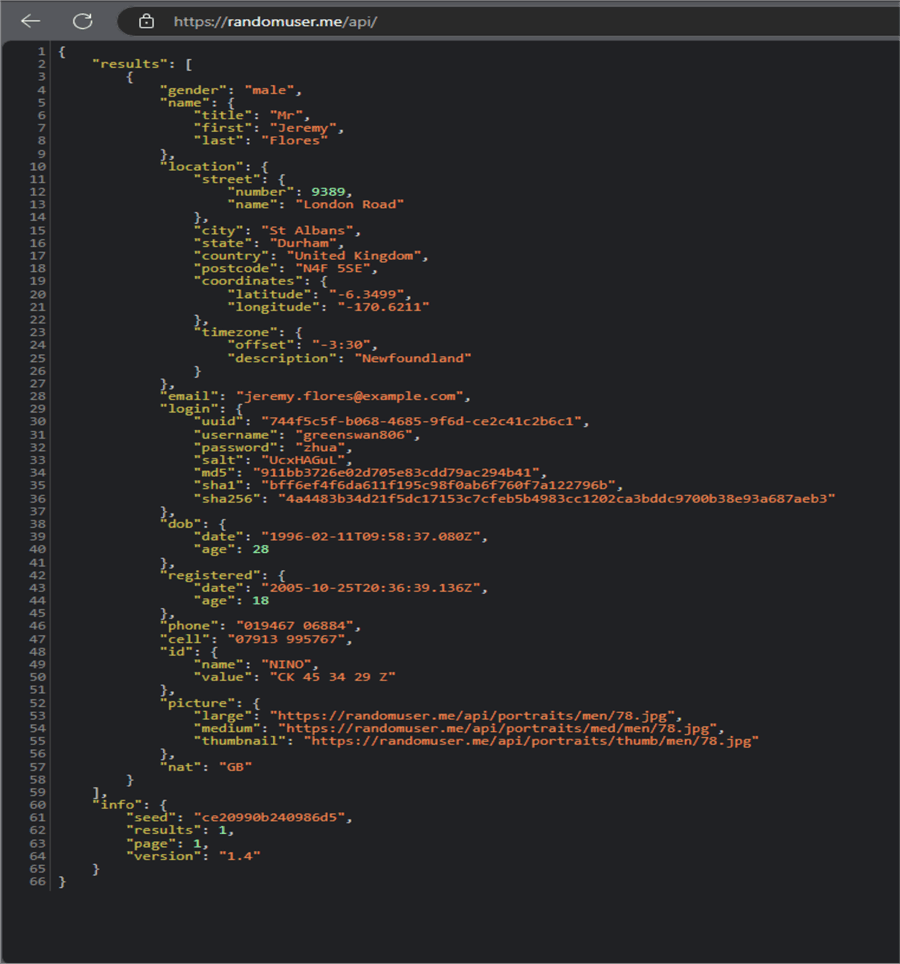
Write the Python script below of what the producer is expected to look like.
import requests
import json
from kafka import KafkaProducer
from kafka.errors import KafkaError
import time
import logging

# Set up logging
logging.basicConfig(level=logging.INFO, format='%(asctime)s - %(levelname)s - %(message)s')

# Function to fetch user data from the API
def fetch_user_data(api_url):
    try:
        response = requests.get(api_url)
        response.raise_for_status()  # Raises an HTTPError for bad responses
        data = response.json()
        user = data['results'][0]
        user_data = {
            "Name": f"{user['name']['title']} {user['name']['first']} {user['name']['last']}",
            "Gender": user['gender'],
            "Address": f"{user['location']['street']['number']} {user['location']['street']['name']}, {user['location']['city']}, {user['location']['state']} - {user['location']['country']} {user['location']['postcode']}",
            "Coordinates": f"Latitude {user['location']['coordinates']['latitude']}, Longitude {user['location']['coordinates']['longitude']}",
            "Timezone": f"{user['location']['timezone']['description']} (Offset {user['location']['timezone']['offset']})",
            "Email": user['email'],
            "Phone": user['phone'],
            "Cell": user['cell'],
            "Date of Birth": f"{user['dob']['date']} (Age: {user['dob']['age']})",
            "Registered": f"{user['registered']['date']} (Age: {user['registered']['age']})",
            "Picture": user['picture']['large']
        }
        return user_data
    except requests.RequestException as e:
        logging.error(f"Failed to fetch data: {str(e)}")
        return None

# Function to serialize data
def json_serializer(data):
    try:
        return json.dumps(data).encode('utf-8')
    except (TypeError, ValueError) as e:
        logging.error(f"JSON serialization error: {str(e)}")
        return None

# Kafka producer configuration
def create_producer():
    try:
        return KafkaProducer(
            bootstrap_servers=['localhost:9092'],
            value_serializer=json_serializer
        )
    except KafkaError as e:
        logging.error(f"Failed to create Kafka producer: {str(e)}")
        return None

# Main function to fetch data and send to Kafka
def main():
    api_url = "https://randomuser.me/api/"
    producer = create_producer()
    if not producer:
        logging.error("Exiting due to Kafka producer creation failure")
        return

    try:
        while True:
            logging.info("Fetching and sending data to Kafka...")
            start_time = time.time()
            # Fetch and send data for 1 minute
            while time.time() - start_time < 60:
                user_data = fetch_user_data(api_url)
                if user_data:
                    logging.info(f"Sending user data to Kafka: {user_data}")
                    future = producer.send('mssqltipsrandomuser-topic', user_data)
                    try:
                        record_metadata = future.get(timeout=10)
                        logging.info(f"Message sent to topic {record_metadata.topic} partition {record_metadata.partition} offset {record_metadata.offset}")
                    except KafkaError as e:
                        logging.error(f"Failed to send message to Kafka: {str(e)}")
                time.sleep(5)  # Slight pause between requests within the minute
            logging.info("Pausing for 10 seconds...")
            time.sleep(10)  # Pause for 10 seconds
    except KeyboardInterrupt:
        logging.info("Process terminated by user. Exciting...")
    finally:
        if producer:
            producer.close()

if __name__ == "__main__":
    main()
Code Breakdown
Libraries Import
import requests
import json
from kafka import KafkaProducer
from kafka.errors import KafkaError
import time
import logging
- requests: An HTTP request library to retrieve data from APIs.
- json: A module that handles serialization and deserialization of JSON data.
- Sending messages to a Kafka topic is possible with the KafkaProducer class, which is part of the Kafka library.
- An exception class for managing Kafka-related failures is called KafkaError.
- time: A module that manages time-related operations, including measuring intervals of time or going to sleep.
- logging: A message-logging module that aids with debugging and application flow tracking.
Logging Configuration
logging.basicConfig(level=logging.INFO, format='%(asctime)s - %(levelname)s - %(message)s')
This configures logging to contain the timestamp, log level, and message in a predetermined manner. Since the log level is set to INFO, only messages that fall under this category will be shown.
Function to Fetch Data
def fetch_user_data(api_url):
    try:
        response = requests.get(api_url)
        response.raise_for_status()  # Raises an HTTPError for bad responses
        data = response.json()
        user = data['results'][0]
        user_data = {
            "Name": f"{user['name']['title']} {user['name']['first']} {user['name']['last']}",
            ...
        }
        return user_data
    except requests.RequestException as e:
        logging.error(f"Failed to fetch data: {str(e)}")
        return None
This function is used in fetching data from a specific URL.
Function to Serialize Data
def json_serializer(data):
    try:
        return json.dumps(data).encode('utf-8')
    except (TypeError, ValueError) as e:
        logging.error(f"JSON serialization error: {str(e)}")
        return None
The goal of this method is to encode the user data in UTF-8 and serialize it into JSON format.
- Error Handling: An error message is logged if serialization fails.
Kafka Producer Configuration
def create_producer():
    try:
        return KafkaProducer(
            bootstrap_servers=['localhost:9092'],
            value_serializer=json_serializer
        )
    except KafkaError as e:
        logging.error(f"Failed to create Kafka producer: {str(e)}")
        return None
The goal of this function is to establish a connection between a localhost:9092 Kafka broker and a producer.
- Value Serializer: Before delivering messages to Kafka, it serializes them using the json_serializer function.
- Error Handling: The producer logs an error if it is unable to create.
Main Function
def main():
    api_url = "https://randomuser.me/api/"
    producer = create_producer()
    if not producer:
        logging.error("Exiting due to Kafka producer creation failure")
        return

    try:
        while True:
            logging.info("Fetching and sending data to Kafka...")
            start_time = time.time()
            while time.time() - start_time < 60:
                user_data = fetch_user_data(api_url)
                if user_data:
                    logging.info(f"Sending user data to Kafka: {user_data}")
                    future = producer.send('mssqltipsrandomuser-topic', user_data)
                    try:
                        record_metadata = future.get(timeout=10)
                        logging.info(f"Message sent to topic {record_metadata.topic} partition {record_metadata.partition} offset {record_metadata.offset}")
                    except KafkaError as e:
                        logging.error(f"Failed to send message to Kafka: {str(e)}")
                time.sleep(5)  # Slight pause between requests within the minute
            logging.info("Pausing for 10 seconds...")
            time.sleep(10)  # Pause for 10 seconds
    except KeyboardInterrupt:
        logging.info("Process terminated by user. Exiting...")
    finally:
        if producer:
            producer.close()
- Goal: The primary function coordinates the user data gathering and sending to the Kafka topic.
- API endpoint to retrieve user data is specified by the API URL.
- Producer Creation: If the Kafka producer is not successful, it departs.
- Infinite Loop: The procedure can continue running indefinitely because of the outer while True loop.
- Data Fetching: For 60 seconds during the loop, user data is fetched and sent to Kafka every five seconds.
- Data Sending: It logs the metadata of the transmitted message and sends the fetched user data to the Kafka topic mssqltipsrandomuser-topic.
- Error Handling: An error is logged if transmitting is unsuccessful.
- Pausing: It takes a 10-second break after every 60-second fetch cycle.
- Graceful Exit: The keyboard interrupt (Ctrl+C) can be used to end the script.
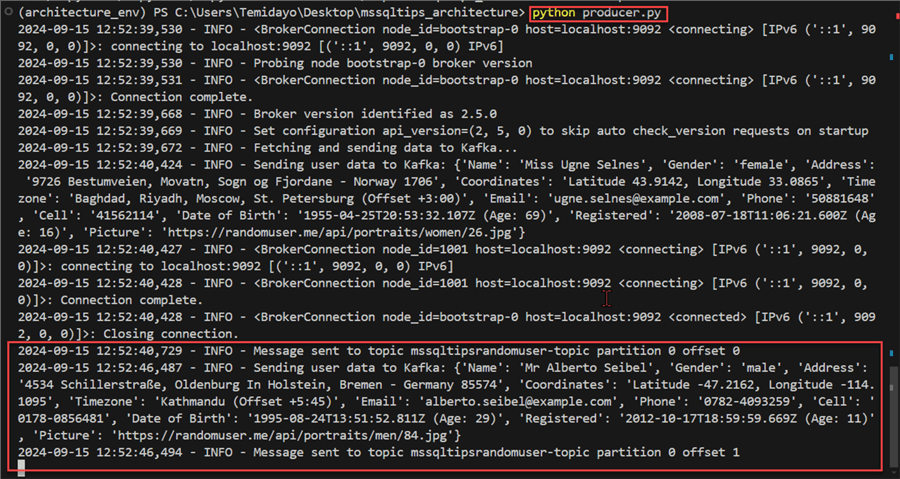
Step 1.5: Test Producer Script. In your command prompt, use the command python producer.py to run the script.
From the image below, we can confirm that Kafka topic mssqltipsrandomuser is currently receiving a message.
Step 1.6: Confirm Message using Kafka CLI.To confirm if the message has been sent as expected, let's run the following command prompt in our Kafka CLI by creating a consumer that would listen to the Kafka topic.
In the WSL command prompt, write the command below, which will be use in consuming data directly from Kafka topics:
kafka-console-consumer.sh --topic mssqltipsrandomuser-topic --bootstrap-server localhost:9092 --from-beginning
Breakdown
- The Kafka console consumer is a command-line utility that lets you read data from a Kafka topic and output it to the standard output (console). The script that runs it is called kafka-console-consumer.sh.
- mssqltipsrandomuser-topic --topic: This option designates the Kafka topic name from which the recipient will receive messages. It is mssqltipsrandomuser-topic in this instance.
- --server-bootstrap localhost:9092: The address of the Kafka broker to connect to is specified by this parameter. This establishes a connection to a broker that is using port 9092 on localhost. For the user to connect to the Kafka cluster, the bootstrap server is required.
- --starting at the beginning: By selecting this option, the user is directed to begin reading messages from the beginning of the topic's message log instead of beginning with the most recent message.
During this short period, a total of 54 messages were processed.

Create a Consumer Script and Push to ElasticSearch
Now, we can confirm our Producer is working as expected, we need to create a consumer script that would pick the data from Kafka topics and send it to ElasticSearch Index for storing purposes.
Elasticsearch is an open-source search engine that is very scalable for real-time search, analytics, and log management. It is constructed on top of the robust text search engine library Apache Lucene.
Step 1: Create ElasticSearch Index
Firstly, we need to create an ElasticSearch Index, which is a logical container for collecting related documents.
To create an Elasticsearch index with the name randomuser_index with certain mappings and settings, use the supplied curl command.
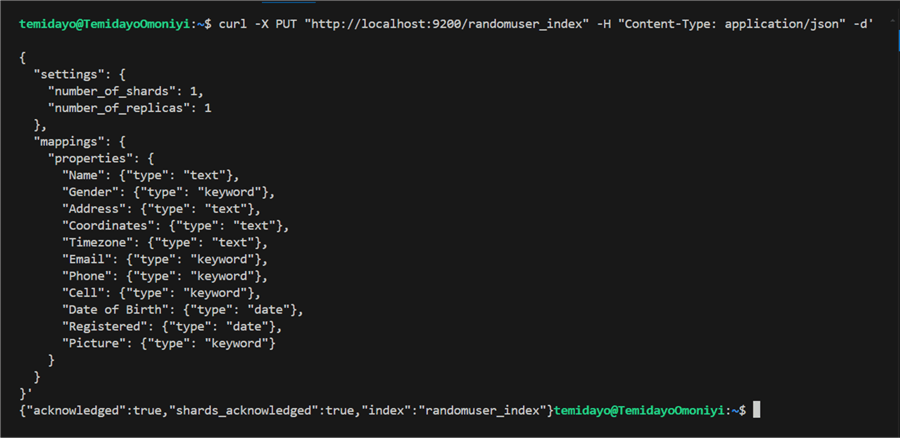
curl -X PUT "http://localhost:9200/randomuser_index" -H "Content-Type: application/json" -d'
{
  "settings": {
    "number_of_shards": 1,
    "number_of_replicas": 1
  },
  "mappings": {
    "properties": {
      "Name": {"type": "text"},
      "Gender": {"type": "keyword"},
      "Address": {"type": "text"},
      "Coordinates": {"type": "text"},
      "Timezone": {"type": "text"},
      "Email": {"type": "keyword"},
      "Phone": {"type": "keyword"},
      "Cell": {"type": "keyword"},
      "Date of Birth": {"type": "date"},
      "Registered": {"type": "date"},
      "Picture": {"type": "keyword"}
    }
  }
}'
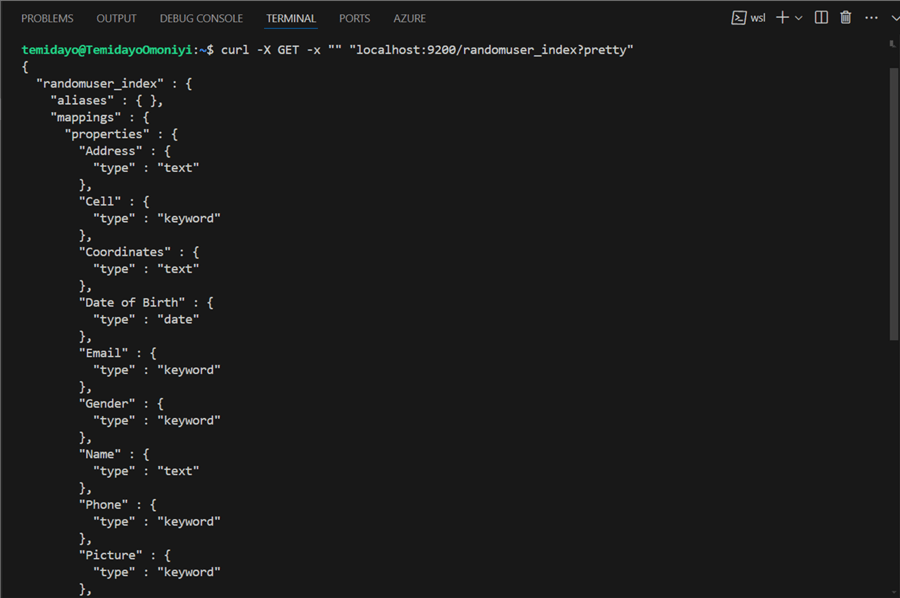
After successfully creating the ElasticSearch, we can get more information about the index created by following this line of code below.
curl -X GET -x "" "localhost:9200/randomuser_index?pretty"
Step 2: Create Consumer Python Script
Create a new Python file and put in the following consumer code in it.
import json
from kafka import KafkaConsumer
from elasticsearch import Elasticsearch
from elasticsearch.helpers import bulk
import logging
from datetime import datetime

# Set up logging
logging.basicConfig(level=logging.INFO, format='%(asctime)s - %(levelname)s - %(message)s')
logger = logging.getLogger(__name__)

# Kafka Configuration
KAFKA_BOOTSTRAP_SERVERS = ['localhost:9092']
KAFKA_TOPIC = 'mssqltipsrandomuser-topic'
KAFKA_GROUP_ID = 'python-consumer-group-randomuser'

# Elasticsearch Configuration
ES_HOSTS = ['http://localhost:9200']
ES_INDEX = 'randomuser_index'

def create_kafka_consumer():
    return KafkaConsumer(
        KAFKA_TOPIC,
        bootstrap_servers=KAFKA_BOOTSTRAP_SERVERS,
        auto_offset_reset='earliest',
        enable_auto_commit=True,
        group_id=KAFKA_GROUP_ID,
        value_deserializer=lambda x: json.loads(x.decode('utf-8')),
        api_version_auto_timeout_ms=60000,
        request_timeout_ms=65000
    )

def create_elasticsearch_client():
    return Elasticsearch(
        ES_HOSTS,
        retry_on_timeout=True,
        max_retries=10,
        timeout=30
    )

def parse_date(date_string):
    return datetime.strptime(date_string.split('(')[0].strip(), "%Y-%m-%dT%H:%M:%S.%fZ")

def generate_actions(messages):
    for message in messages:
        user_data = message.value
        user_data['Date of Birth'] = parse_date(user_data['Date of Birth'])
        user_data['Registered'] = parse_date(user_data['Registered'])
        yield {
            "_index": ES_INDEX,
            "_source": user_data
        }

def main():
    consumer = create_kafka_consumer()
    es_client = create_elasticsearch_client()

    logger.info(f"Consumer created with configuration: {consumer.config}")

    try:
        message_count = 0
        while True:
            message_batch = consumer.poll(timeout_ms=1000)

            if not message_batch:
                continue

            for tp, messages in message_batch.items():
                message_count += len(messages)
                logger.info(f"Received {len(messages)} messages. Total count: {message_count}")

                try:
                    actions = list(generate_actions(messages))
                    success, _ = bulk(
                        es_client,
                        actions,
                        raise_on_error=False,
                        raise_on_exception=False
                    )
                    logger.info(f"Indexed {success} documents successfully.")
                except Exception as e:
                    logger.error(f"Error during bulk indexing: {e}")

    except KeyboardInterrupt:
        logger.info("Consumer stopped by user.")
    except Exception as e:
        logger.error(f"An unexpected error occurred: {e}")
    finally:
        consumer.close()
        logger.info("Consumer closed.")

if __name__ == "__main__":
    main()
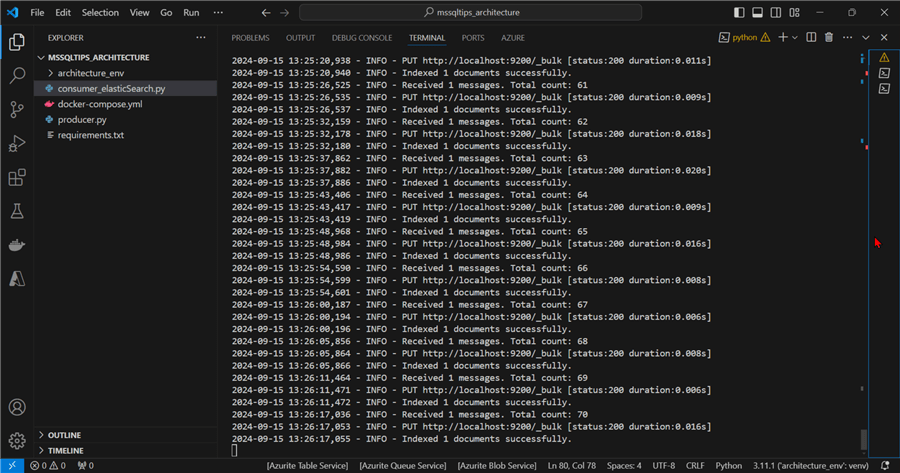
Code Breakdown
Kafka Configuration
KAFKA_BOOTSTRAP_SERVERS = ['localhost:9092']
KAFKA_TOPIC = 'mssqltipsrandomuser-topic'
KAFKA_GROUP_ID = 'python-consumer-group-randomuser'
- KAFKA_BOOTSTRAP_SERVERS: The Kafka broker or brokers to connect to are specified.
- KAFKA_TOPIC: The Kafka topic name that messages will be derived from.
- KAFKA_GROUP_ID: This Kafka consumer's consumer group ID, which permits several consumers to split the workload.
ElasticSearch Configuration
ES_HOSTS = ['http://localhost:9200']
ES_INDEX = 'randomuser_index'
- The Elasticsearch server or servers to connect to are specified by ES_HOSTS.
- ES_INDEX: The index name in Elasticsearch that will hold the data.
Create Kafka Consumer Function
def create_kafka_consumer():
    return KafkaConsumer(
        KAFKA_TOPIC,
        bootstrap_servers=KAFKA_BOOTSTRAP_SERVERS,
        auto_offset_reset='earliest',
        enable_auto_commit=True,
        group_id=KAFKA_GROUP_ID,
        value_deserializer=lambda x: json.loads(x.decode('utf-8')),
        api_version_auto_timeout_ms=60000,
        request_timeout_ms=65000
    )
The goal of this function is to generate a Kafka consumer that is ready to read from the given topic and return it.
Setting parameters:
- auto_offset_reset='earliest': This indicates that the consumer group will begin reading from the earliest message in the subject if no committed offsets exist.
- enable_auto_commit =True: The offsets of processed messages are committed automatically.
- value_deserializer: The JSON-formatted message value is deserialized using this lambda function.
Create Elasticsearch Client Function
def create_elasticsearch_client():
    return Elasticsearch(
        ES_HOSTS,
        retry_on_timeout=True,
        max_retries=10,
        timeout=30
    )
The goal of this method is to generate an Elasticsearch client that is ready to connect to the given hosts.
Setting parameters:
- Retries the request in the event of a timeout (retry_on_timeout=True).
- max_retries=10: Indicates the most requests that can be made again.
- timeout=30: Defines the timeout for every Elasticsearch request.
Parse Data Function
def parse_date(date_string):
    return datetime.strptime(date_string.split('(')[0].strip(), "%Y-%m-%dT%H:%M:%S.%fZ")
The goal of this function is to create a datetime object by parsing a date text in ISO format. It parses and removes any extra formatting (like parenthesis) from the date string.
Generate Action Bulk Index Function
def generate_actions(messages):
    for message in messages:
        user_data = message.value
        user_data['Date of Birth'] = parse_date(user_data['Date of Birth'])
        user_data['Registered'] = parse_date(user_data['Registered'])
        yield {
            "_index": ES_INDEX,
            "_source": user_data
        }
The objective of this function is to produce a series of steps for bulk indexing into Elasticsearch.
- Processing: It retrieves the user information from each message, parses the date fields, and produces a dictionary with the index and document source information.
Main Function
def main():
    consumer = create_kafka_consumer()
    es_client = create_elasticsearch_client()

    logger.info(f"Consumer created with configuration: {consumer.config}")

    try:
        message_count = 0
        while True:
            message_batch = consumer.poll(timeout_ms=1000)

            if not message_batch:
                continue

            for tp, messages in message_batch.items():
                message_count += len(messages)
                logger.info(f"Received {len(messages)} messages. Total count: {message_count}")

                try:
                    actions = list(generate_actions(messages))
                    success, _ = bulk(
                        es_client,
                        actions,
                        raise_on_error=False,
                        raise_on_exception=False
                    )
                    logger.info(f"Indexed {success} documents successfully.")
                except Exception as e:
                    logger.error(f"Error during bulk indexing: {e}")

    except KeyboardInterrupt:
        logger.info("Consumer stopped by user.")
    except Exception as e:
        logger.error(f"An unexpected error occurred: {e}")

    finally:
        consumer.close()
        logger.info("Consumer closed.")
The primary goal of this function is to coordinate the ingestion of Kafka messages and their subsequent indexing into Elasticsearch.
Creation of Consumers and Clients: It logs the configuration of the consumers and creates Elasticsearch and Kafka consumers.
- Message Polling: It starts a never-ending loop to check every second for new messages from Kafka.
- It logs the count and processes any messages that are received.
- Using the bulk helper function, it creates actions for bulk indexing and tries to index them into Elasticsearch.
- The error is logged if it happens while indexing.
- Exit: By pressing the keyboard shortcut CTRL + C, you can end the script gracefully by closing the consumer and logging a termination message.
Step 3: Visualize Data in Kibana
Now that the consumer is working as expected, let's confirm our configuration in Kibana. In your Windows browser, open the URL http://localhost:5601/. To confirm the index was created, use the command prompt.
curl -X GET -x "" "localhost:9200/randomuser_index?pretty"
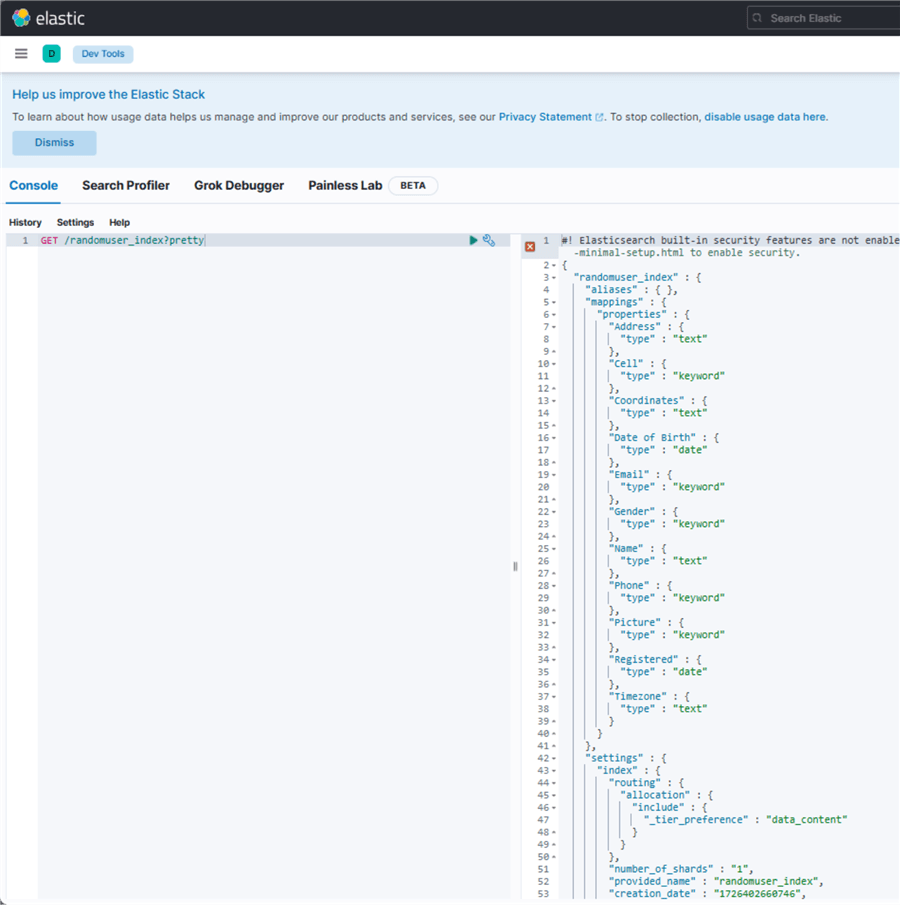
Ensure both Producer and Consumer Python scripta are running now before performing our test.
Return 10 Documents from Index. Use the command below to return 10 records from the ElasticSearch index.
GET /randomuser_index/_search?pretty
{
  "query": {
    "match_all": {}
  },
  "size": 10
}
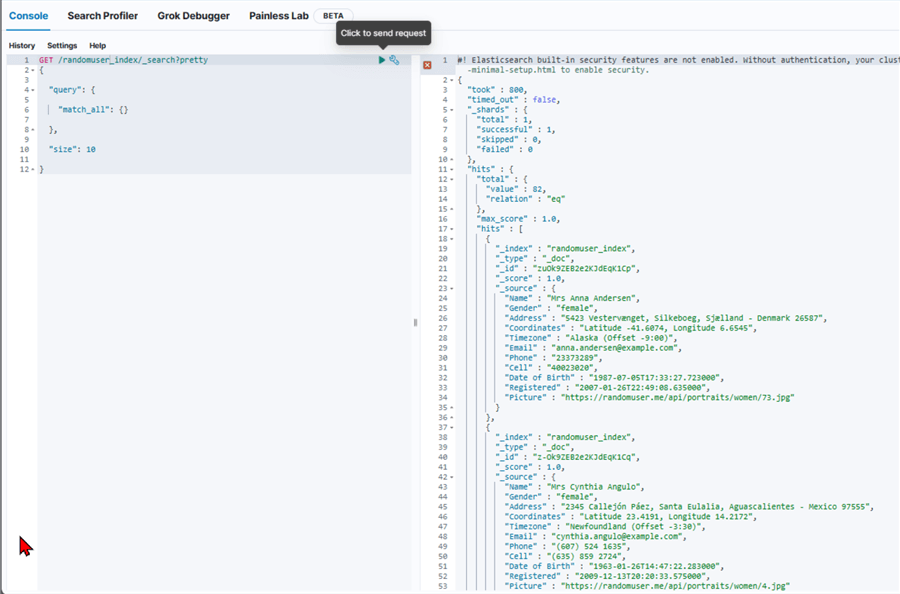
Count Records. Using the count, we can get the total number of records currently available in our index. You will notice a total of 127 records are currently in the ElasticSearch index.
GET /randomuser_index/_count?pretty

After a couple of minutes, you will notice the record has increased to 153 in the ElasticSearch index.

Create a Consumer Script and Push to Azure Data Lake Gen 2
We also need to store the messages from the Kafka topic to Azure Data Lake Gen 2 as a JSON file format. This will be used by the data scientist and data analysis of the team.
Step 1: Set App Registry and Service Principal
Azure's Set App Registry and Service Principal are fundamental ideas that enable safe resource access for automated tools and apps.
In our previous article, Provisioning Azure Resources with Azure CLI, we went deep in provisioning and configuring Azure App Registry and Service Principal. I advise going through this article as more concepts were covered in setting the necessary securities.
Step 2: Set Security File
Create a new file in the project folder and name it .env, which is a configuration file that stores environment variables for your application. The .env file contains the following security information that will be used in our Python code.

In the Azure Data Lake Gen 2, notice the storage account name and file system name, which is the container.
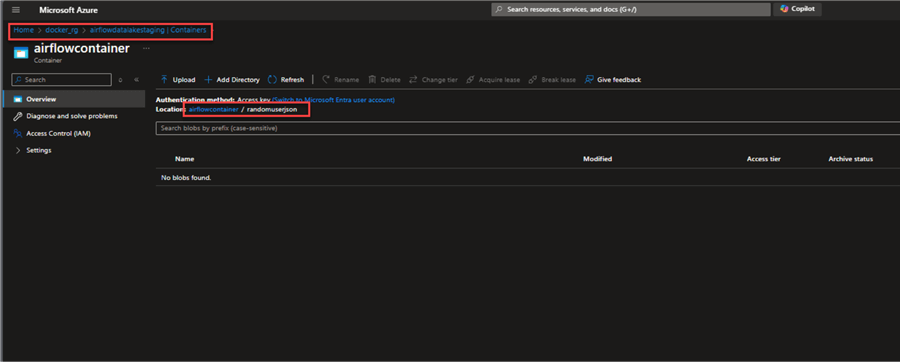
Step 3: Consumer ADLS Python Script
In your VS Code, create a new Python script called consumeradls.py. Write the line of code below, which is a consumer that picks data from Kafka topics, deserializes it, and loads it to a folder in Azure Data Lake Gen 2 in real time as a JSON file.
import os
import json
import logging
from kafka import KafkaConsumer
from azure.identity import ClientSecretCredential
from azure.storage.filedatalake import DataLakeServiceClient
from kafka.errors import KafkaError

# Set up logging
logging.basicConfig(level=logging.INFO, format='%(asctime)s - %(levelname)s - %(message)s')

# Function to create a Kafka Consumer
def create_kafka_consumer(topic):
    try:
        consumer = KafkaConsumer(
            topic,
            bootstrap_servers=['localhost:9092'],
            auto_offset_reset='earliest',  # Adjust as per use case
            enable_auto_commit=True,
            group_id='my-group-id',  # Adjust to your specific group
            value_deserializer=lambda x: json.loads(x.decode('utf-8'))
        )
        logging.info("Kafka Consumer created successfully.")
        return consumer
    except KafkaError as e:
        logging.error(f"Failed to create Kafka consumer: {str(e)}")
        return None

# Function to upload the JSON file to Azure Data Lake Gen 2 using Service Principal
def upload_to_datalake_gen2(json_data, filename):
    try:
        # Service Principal credentials from environment variables
        account_name = os.getenv("account_name")
        file_system_name = os.getenv("file_system_name")  # Equivalent to the container name in Data Lake Gen 2
        client_id = os.getenv("client_id")
        client_secret = os.getenv("client_secret")
        tenant_id = os.getenv("tenant_id")

        # Authenticate using Service Principal
        credential = ClientSecretCredential(tenant_id=tenant_id, client_id=client_id, client_secret=client_secret)

        # Create DataLakeServiceClient object
        service_client = DataLakeServiceClient(account_url=f"https://{account_name}.dfs.core.windows.net", credential=credential)

        # Get the file system (container) client
        file_system_client = service_client.get_file_system_client(file_system=file_system_name)

        # Create a new file in the specified directory
        file_path = f"randomuserjson/{filename}"
        file_client = file_system_client.get_file_client(file_path)

        # Upload the JSON data to the file
        file_contents = json.dumps(json_data)
        file_client.upload_data(file_contents, overwrite=True)

        logging.info(f"File {file_path} uploaded to Azure Data Lake Gen 2 successfully.")
    except Exception as e:
        logging.error(f"Failed to upload to Azure Data Lake Gen 2: {str(e)}")

# Main function to consume messages from Kafka and send them to Azure Data Lake
def main():
    topic = "mssqltipsrandomuser-topic"
    consumer = create_kafka_consumer(topic)
    if not consumer:
        logging.error("Exiting due to Kafka consumer creation failure.")
        return

    try:
        for message in consumer:
            user_data = message.value
            logging.info(f"Received user data: {user_data}")

            # Generate a unique filename using timestamp or UUID
            filename = f"user_data_{message.timestamp}.json"

            # Upload to Azure Data Lake Gen 2
            upload_to_datalake_gen2(user_data, filename)

    except KeyboardInterrupt:
        logging.info("Process terminated by user.")
    finally:
        consumer.close()

if __name__ == "__main__":
    main()
Code Breakdown
Kafka Consumer Creation Function
def create_kafka_consumer(topic):
    try:
        consumer = KafkaConsumer(
            topic,
            bootstrap_servers=['localhost:9092'],
            auto_offset_reset='earliest',
            enable_auto_commit=True,
            group_id='my-group-id',
            value_deserializer=lambda x: json.loads(x.decode('utf-8'))
        )
        logging.info("Kafka Consumer created successfully.")
        return consumer
    except KafkaError as e:
        logging.error(f"Failed to create Kafka consumer: {str(e)}")
        return None
- For a given topic, this function builds a Kafka consumer.
- It establishes a connection with the localhost:9092 Kafka server.
- If an offset cannot be identified, it begins reading from the earliest message and commits offsets automatically.
- The incoming message is converted from bytes to a JSON object via the value_deserializer.
- It logs the success if it works, and the error if it doesn't.
Uploading to Azure Data Lake Gen 2
def upload_to_datalake_gen2(json_data, filename):
    try:
        # Service Principal credentials from environment variables
        account_name = os.getenv("account_name")
        file_system_name = os.getenv("file_system_name")
        client_id = os.getenv("client_id")
        client_secret = os.getenv("client_secret")
        tenant_id = os.getenv("tenant_id")

        # Authenticate using Service Principal
        credential = ClientSecretCredential(tenant_id=tenant_id, client_id=client_id, client_secret=client_secret)

        # Create DataLakeServiceClient object
        service_client = DataLakeServiceClient(account_url=f"https://{account_name}.dfs.core.windows.net", credential=credential)

        # Get the file system (container) client
        file_system_client = service_client.get_file_system_client(file_system=file_system_name)

        # Create a new file in the specified directory
        file_path = f"randomuserjson/{filename}"
        file_client = file_system_client.get_file_client(file_path)

        # Upload the JSON data to the file
        file_contents = json.dumps(json_data)
        file_client.upload_data(file_contents, overwrite=True)

        logging.info(f"File {file_path} uploaded to Azure Data Lake Gen 2 successfully.")
    except Exception as e:
        logging.error(f"Failed to upload to Azure Data Lake Gen 2: {str(e)}")
- JSON data is uploaded using this function to Azure Data Lake Storage Gen 2.
- It obtains the credentials required for authentication from environment variables.
- To communicate with Azure storage, a DataLakeServiceClient is created.
- It creates the directory for the new file, overwrites any existing files with the same name, and then uploads the JSON data.
- The upload's success or failure is noted appropriately in the log.
Main Function to Consume Messages and Upload Data
def main():
    topic = "mssqltipsrandomuser-topic"
    consumer = create_kafka_consumer(topic)
    if not consumer:
        logging.error("Exiting due to Kafka consumer creation failure.")
        return

    try:
        for message in consumer:
            user_data = message.value
            logging.info(f"Received user data: {user_data}")

            # Generate a unique filename using timestamp or UUID
            filename = f"user_data_{message.timestamp}.json"

            # Upload to Azure Data Lake Gen 2
            upload_to_datalake_gen2(user_data, filename)

    except KeyboardInterrupt:
        logging.info("Process terminated by user.")
    finally:
        consumer.close()
- The Kafka consumer for a given topic is initialized by the main function.
- It loops through incoming messages.
- It records the user data it receives for every transmission.
- Uses the message timestamp to generate a unique filename.
- To upload this data as a JSON file, use the upload_to_datalake_gen2 function.
It makes sure that the consumer is closed correctly and elegantly responds to keyboard disruptions.
Step 4: Test Consumer
Now that we have completed the consumer script, let's run it and see if it works as expected.
You will notice this success message from the terminal.
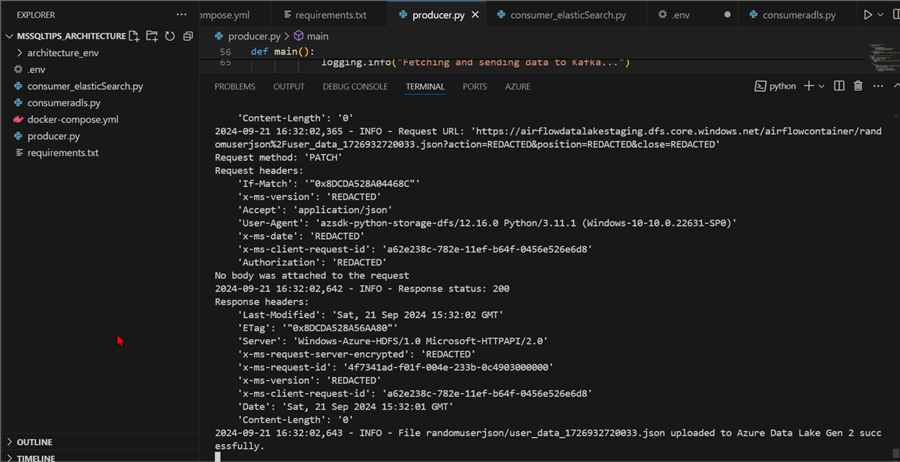
Next, head to Azure Storage Account (Data Lake Gen 2) and confirm if data is uploaded to Folder in the Container. You will notice the JSON files are being uploaded to the storage account.
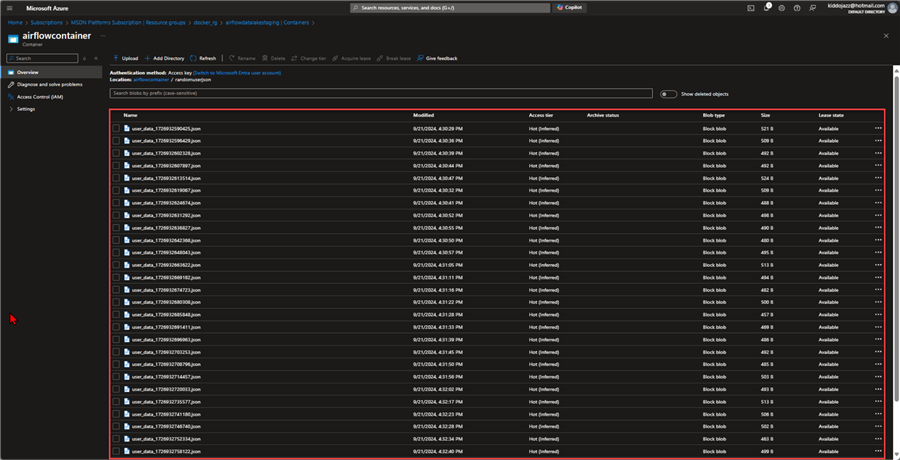
Let's view one of the JSON files to confirm. You will notice that the data is being captured as expected in the storage account.

Connect Power BI to Azure Data Lake Gen 2
The Azure Data Lake Storage (ADLS) is a complete cloud-based storage system created especially for big data analytics. It improves performance and scalability while incorporating capabilities from the previous Azure Data Lake Storage Gen1 to build upon Azure Blob Storage.
The following steps should be followed to connect Power BI to Azure Data Lake Gen 2.
Step 1: Get Data Lake Endpoint
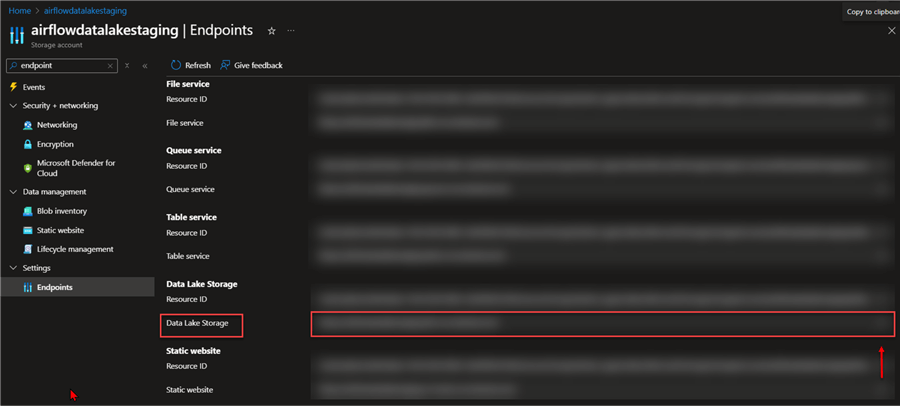
ADLS endpoint is a URL by which you can access the data that is kept in your Azure Data Lake Storage Gen2 account. It acts as a portal for you to use different tools and programs to interact with your data.
In your Azure storage account, search for endpoints. This should take you to another window.
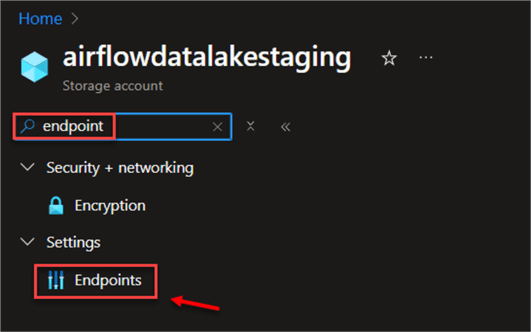
In the new Window, copy the endpoint for Data Lake Storage.
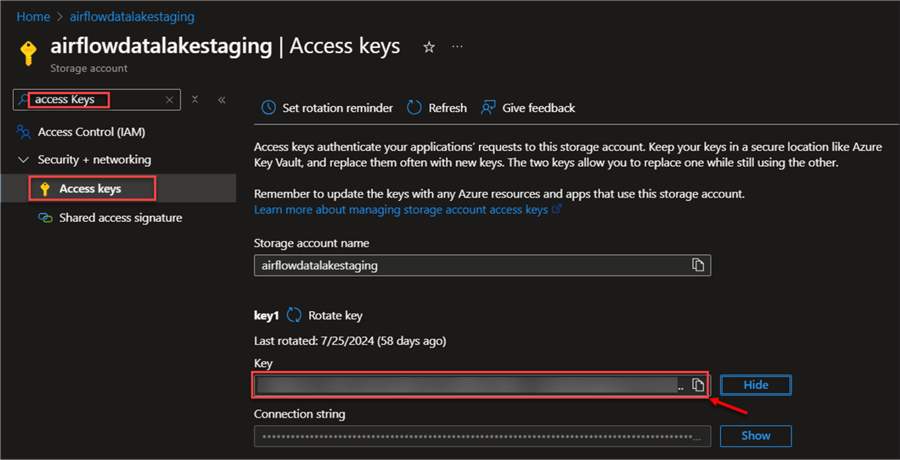
Step 2: Get Access Key
The ADLS Access Keys are security credentials used to validate and grant access to your Azure Data Lake Storage Gen2 account. They provide the ability to manage who has access to your data and what they can do with it.
In your Azure storage account, search for Access keys, then copy the key to be used for connecting with Power BI.
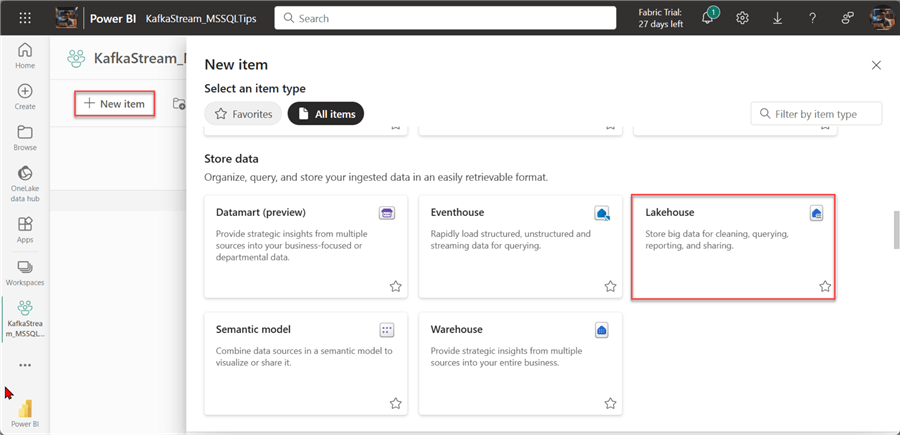
Step 3: Connect Fabric Dataflow Gen 2
In your Power BI portal, create a new Workspace that will be used to house all our resources. In your workspace, click on New item and select Lakehouse.
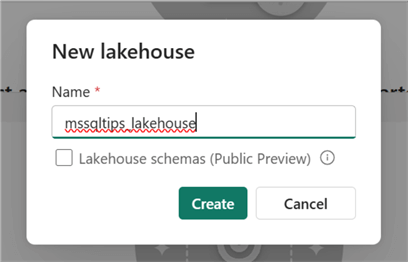
In the new window, put in the Lakehouse name you want to use and click Create.
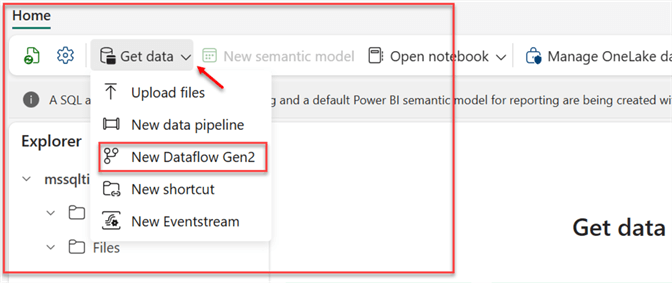
In your Lakehouse environment, select Get data and then click New Dataflow Gen2. This will open a new window where you are expected to select the type of data to use.
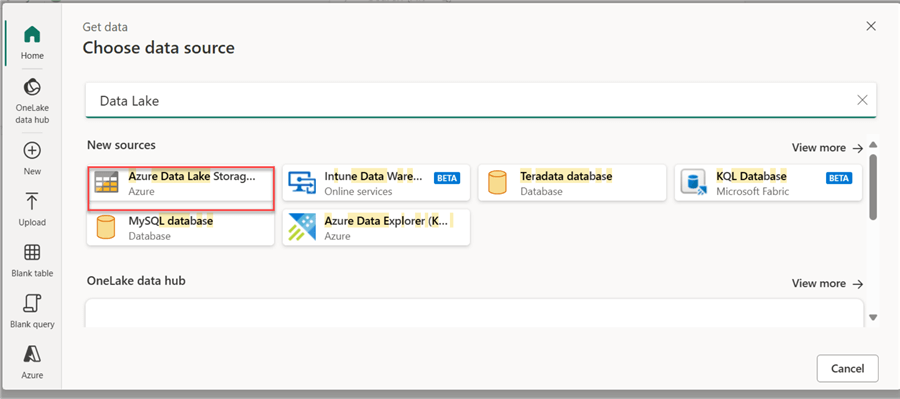
In the Data Flow Gen 2 Get Data, search for Azure Data Lake Storage Account.
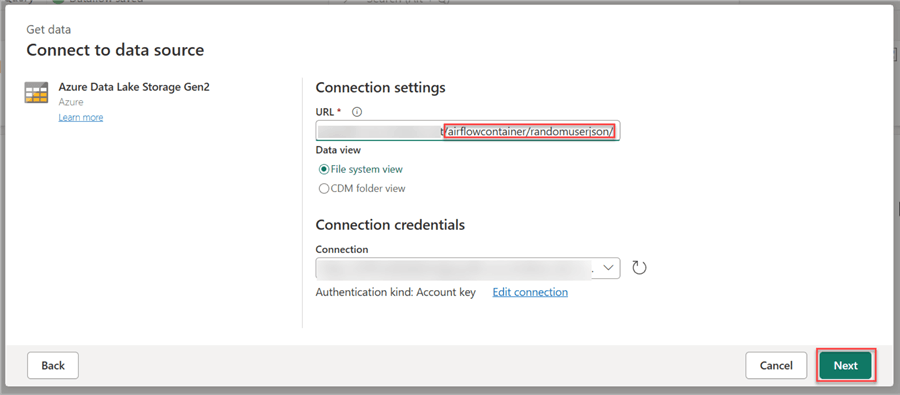
You are expected to paste the Azure Data Lake Endpoint to the URL and add the folder directory to the link.
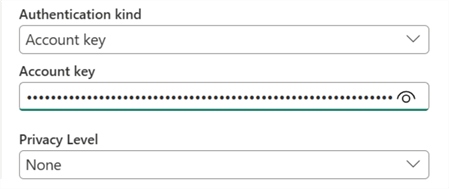
Change the Authentication kind to Account key, paste the Access key, then click Next.
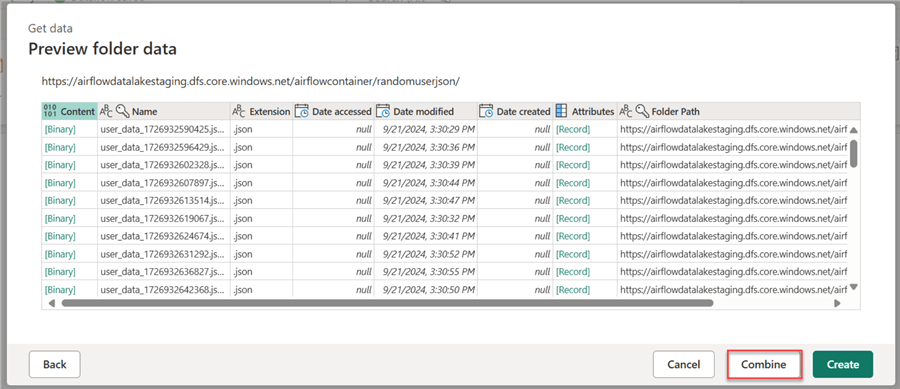
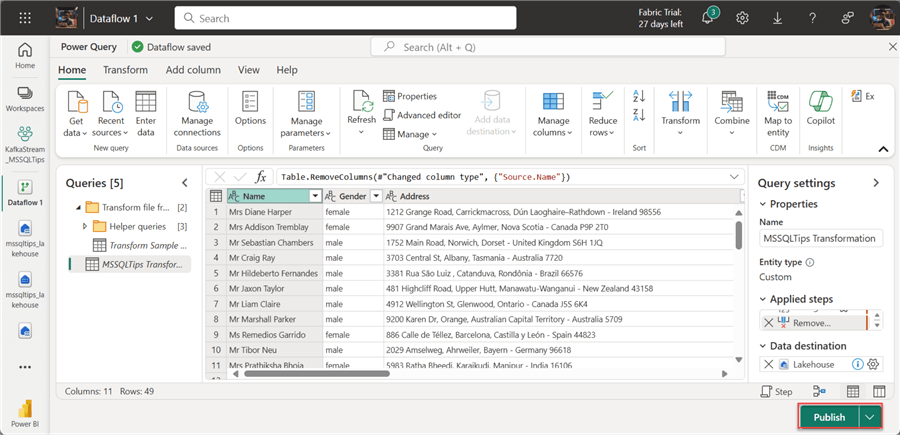
In the Power Query Preview for Data Flow Gen 2, click Combine. This will automatically append all the data in the ADLS folder.
In your Power Query Editor, you can perform the needed transformation and click Publish. This will publish the transformed data to the Lakehouse we created earlier.
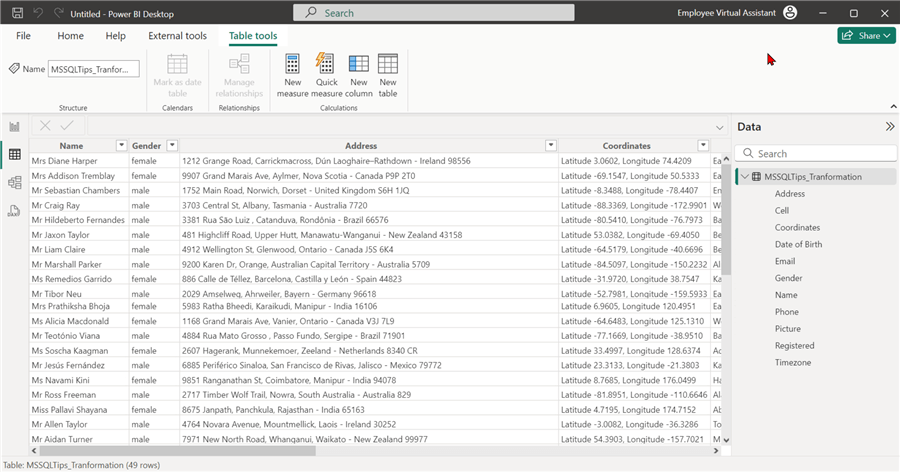
You can also view the report in Power BI Desktop by connecting with the Dataflow created.
Conclusion
This is the first part of a two-part series. This article covered all the processes in creating a real-time streaming architecture using Apache Kafka. We started by creating a producer that pulls data from a fake URL site to a Kafka topic. We then created a consumer script that moves data to Elasticsearch for storage and Azure Data Lake Gen 2.
The data stored in ADLS was then used in Microsoft Fabric for analytic purpose using the Data Lake Gen 2 to perform ETL from the cloud level on the Azure Data Storage. For the Microsoft Fabric section, it is more of a batch process involved in getting data from ADLS using Dataflow Gen 2. In a future series, I will explain how to stream data directly to Microsoft Fabric using EventStream in Fabric.
Download the code for this article.
Next Steps
- Apache Kafka QuickStart
- Outputs from Azure Stream Analytics - Azure Stream Analytics | Microsoft Learn
- Apache Kafka for Beginners: A Comprehensive Guide
- Apache Kafka Tutorials
- Check out related articles:
About the author
 Temidayo Omoniyi is a Microsoft Certified Data Analyst, Microsoft Certified Trainer, Azure Data Engineer, Content Creator, and Technical writer with over 3 years of experience.
 This author pledges the content of this article is based on professional experience and not AI generated.
View all my tips
Article Last Updated: 2024-11-11


