By: Jared Westover | Updated: 2024-11-20 | Comments | Related: > Microsoft Fabric
Problem
After a two-year break, I started working with Azure Data Factory again, now part of the Fabric family. I quickly adapted to Data Factory since it closely resembled SQL Server Integration Services (SSIS), a tool with which I had a love-hate relationship. For my new mission, I set out to convert a list of files from Excel to comma-separated values (CSV). We upload the original Excel files to a Data Lake in Fabric. We then need to convert a specific worksheet and move the CSV files to a different folder in Data Lake.
Solution
In this article, I'll explain how to convert a list of Excel files to CSV and move them to a separate folder with a Data Factory pipeline in Fabric's Data Lake. First, I'll explore what Data Factory offers and review a few use cases. Next, I'll explain why I'm converting the files in the first place. I'll also highlight any pitfalls I faced along the way. By the end of this article, you'll be ready to start converting Excel files to CSV today.
Exploring Data Factory in Fabric
If you come from a SSIS background, you can think of Data Factory as the Azure version of it. Some may disagree, but I like comparing cloud technologies to on-premises tools I've used for decades. Microsoft officially defines Azure Data Factory (ADF) as a tool that empowers you with a modern data integration experience to ingest, prepare, and transform data from rich data sources. To me, ADF sounds like SSIS.
ADF is useful when you need to pull in data from multiple sources, perform transformations, and work inside a visual interface. You can still execute stored procedures if you prefer using T-SQL for transformation. Three of the most popular activities include:
- Copy Data - Allows you to copy data and files from one location to another.
- Get Metadata - Gets information about data stored in folders, files, etc.
- ForEach - Iterates over a collection of items and performs some activity on each.
Why Convert the Files?
For this project, I need to load the files directly into a managed Delta Lake Table. Based on my testing and research, as of this writing, you can only do this directly after converting the file to a format like CSV or Parquet. I don't expect the business team to create and convert these files. Feel free to share if someone knows of a different method in the comments below.
Delta Lake tables are a storage layer in a Fabric Lakehouse that provides some of the functionality of a relational database. I say some of the functionality because I've seen people claim that these tables are just like tables from a relational database like SQL Server; they're not. However, they come with a guarantee of ACID compliance. Since I come from a SQL Server background, I equate them to external PolyBase tables.
With those details covered, let's look at the steps to convert these files.
Step-by-Step Guide
As we go along, I'll make some assumptions. For example, I assume you have either signed up for a free trial or already have a workspace with Fabric enabled.
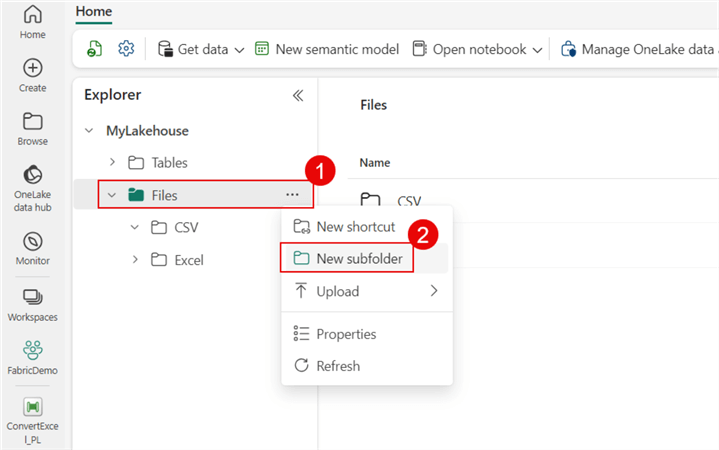
I created a Lakehouse named MyLakehouse and added two folders (CSV and Excel) under the Files folder.
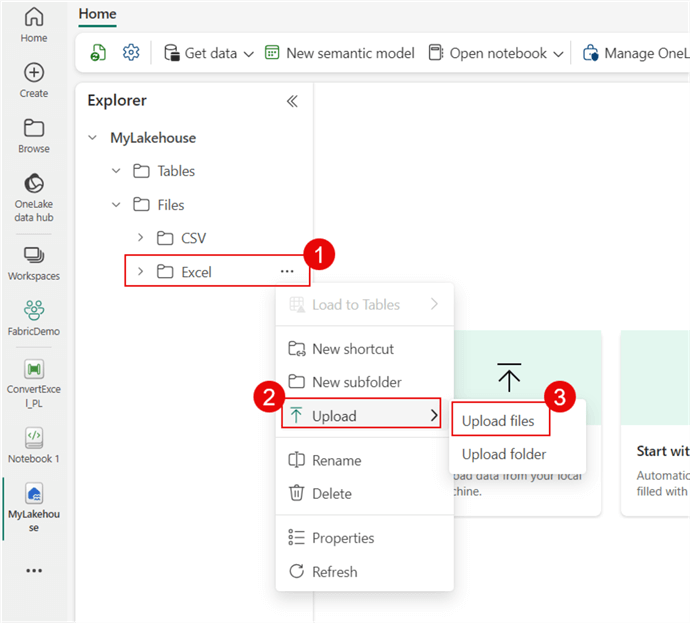
Let's upload three Excel workbooks that you can download from here into the Excel folder.
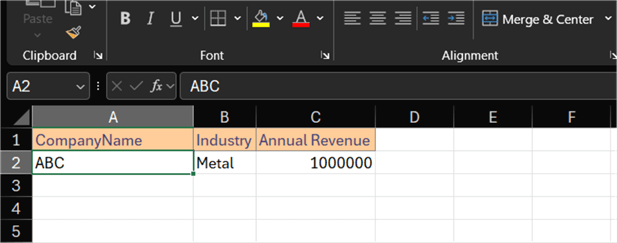
The workbooks contain three columns (CompanyName, Industry, and Annual Revenue) and two rows, including the header, which I want to load into the Delta table we'll create in the next section.
Create the Delta Table
Next, I'll create a Delta Table to hold the contents of our Excel workbooks. The table will consist of three columns, and let's name it company.
Under the Open notebook option, choose New notebook. The syntax is straightforward. Since I'm a SQL Server guy, I'll use a magic command (%%sql) for a T-SQL-like experience. To run the code, click the Run Cell button. After a few seconds, we will have a new table under our Lakehouse.

CREATE syntax:
%%sql
DROP TABLE IF EXISTS MyLakehouse.company;
CREATE TABLE Company (CompanyName STRING, Industry STRING, Revenue INTEGER);
Creating the Data Pipeline
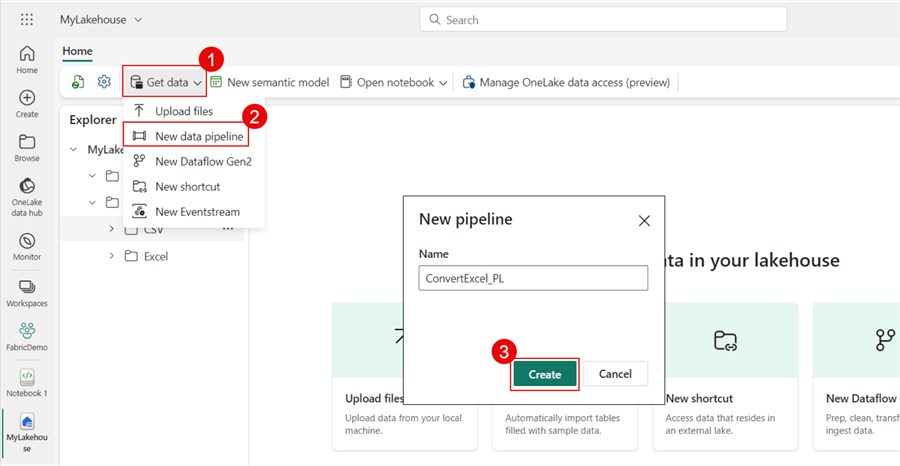
Next, click Get data, then New data pipeline, and name the pipeline ConvertExcel_PL.
Get the File List
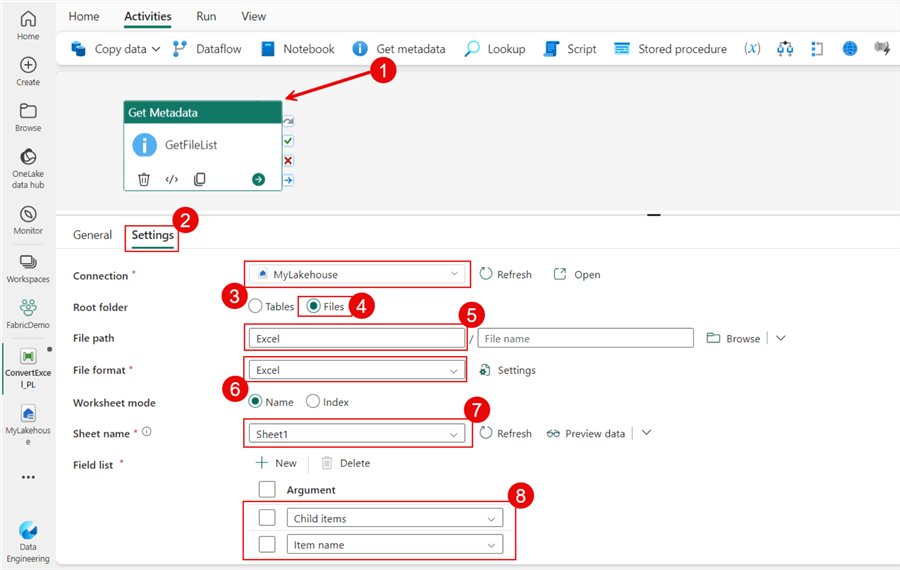
I could add a Copy data activity if we only needed to pull in one workbook. However, life is more complex, and so is the process we are building. First, I need to gather a list of files in my Excel folder. To create the list, I'll add a Get metadata activity.
The screenshot below highlights my options after clicking on the Settings tab. It's important to note that I added the Child items and Item name to the field list so it can retrieve the file names within the folder. I included the output of this activity in the code block below.
Output:
{
  "itemName": "Excel",
  "childItems": [
    {
      "name": "Company-1.xlsx",
      "type": "File"
    },
    {
      "name": "Company-2.xlsx",
      "type": "File"
    },
    {
      "name": "Company-3.xlsx",
      "type": "File"
    }
  ],
  "executionDuration": 2
}
Iterate Over the Files
With our list generated, we need to iterate over each file and perform at least a Copy data activity. To accomplish the iteration, add a ForEach activity. After connecting the success output of the Get Metadata activity, add the following expression to the Items text box under Settings:
@activity('GetFileList').output.childItems
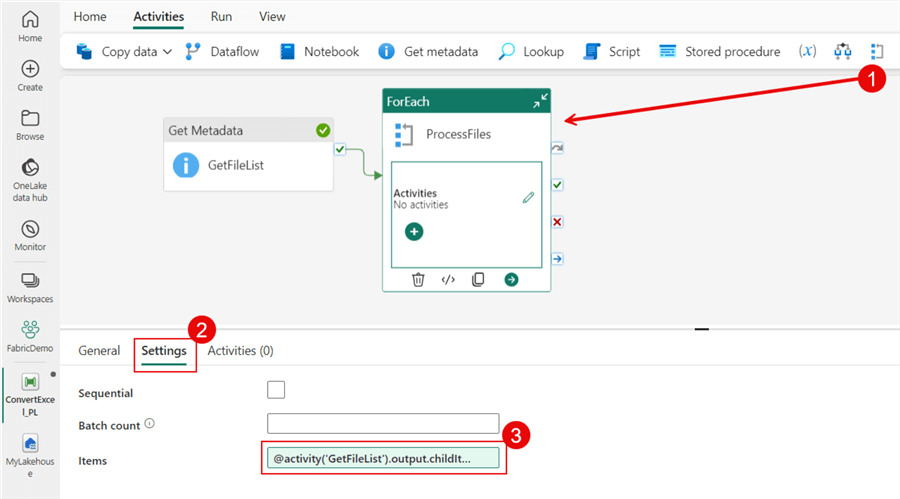
Inside the ForEach, I'll add a Copy data activity and name it ConvertToCSV. The screenshot below highlights the options I chose on the Source tab. Under File format settings, check the First row as the header box. The expression I used for the file path is below.
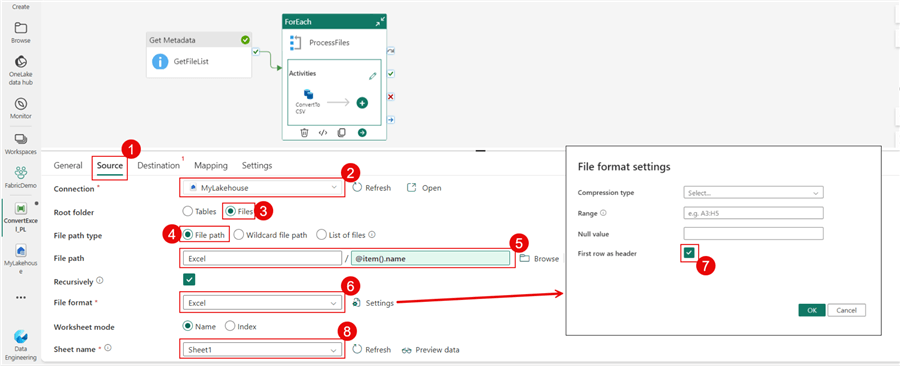
@item().name
Next, the most crucial element on the Destination tab is the file name, where I'm adding an expression to replace the extension .xlsx with .csv. Let's also add a timestamp to the end. This one is tricky, but I'll use the concat and replace functions.
I've included both options below if you don't want the timestamp.
Without timestamp:
@{replace(item().name,'.xlsx','.csv')}
With timestamp:
@{concat(replace(item().name,'.xlsx',''),'-',formatDateTime(utcNow(), 'yyyyMMddHHmmss'),'.csv')}
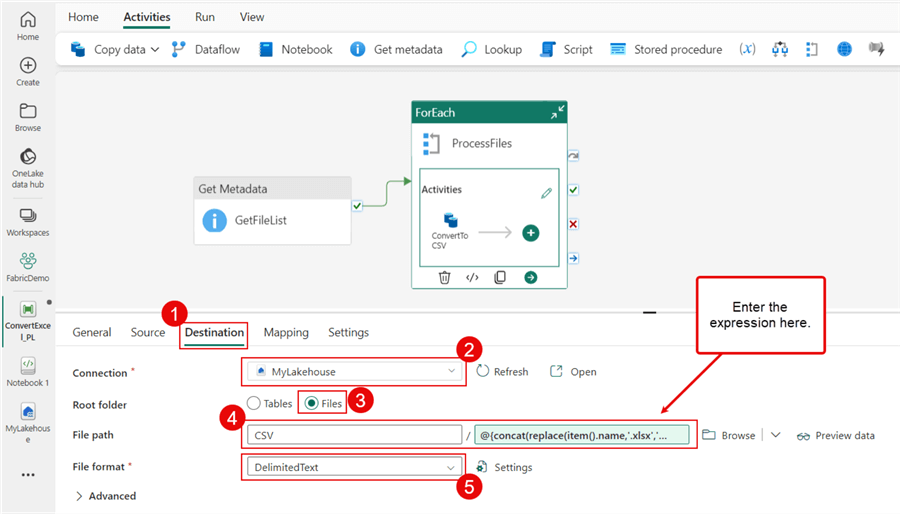
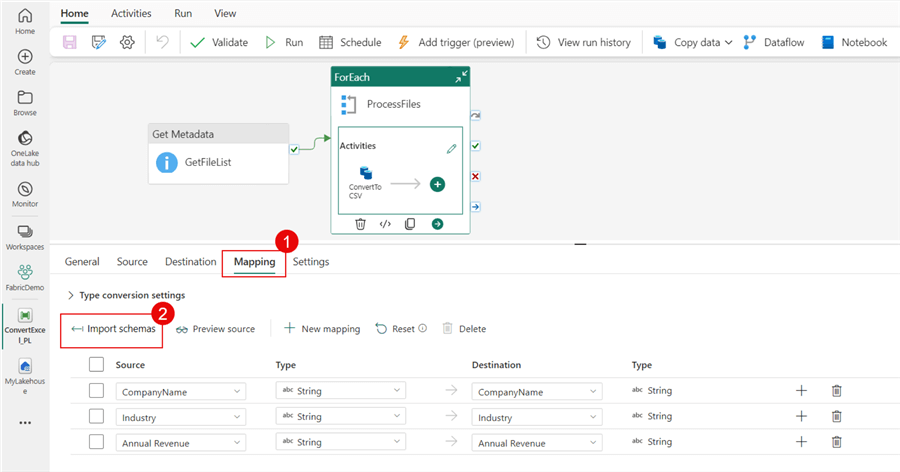
While mapping is not required for this activity, click the Mapping tab. Then click the Import schemas button.
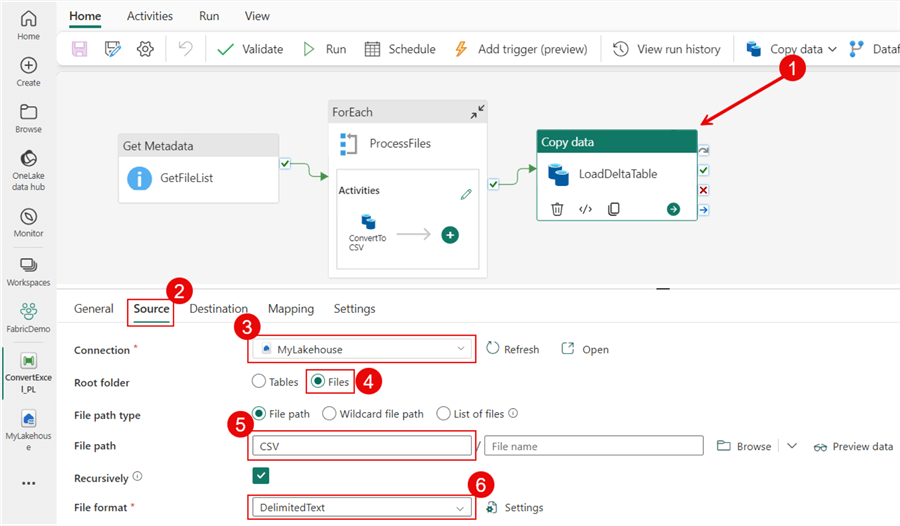
To complete the task, I want to add one additional Copy data activity to move the data from our CSV files into the company Delta table. I've outlined the Source and Destination tab settings in the screenshots below.
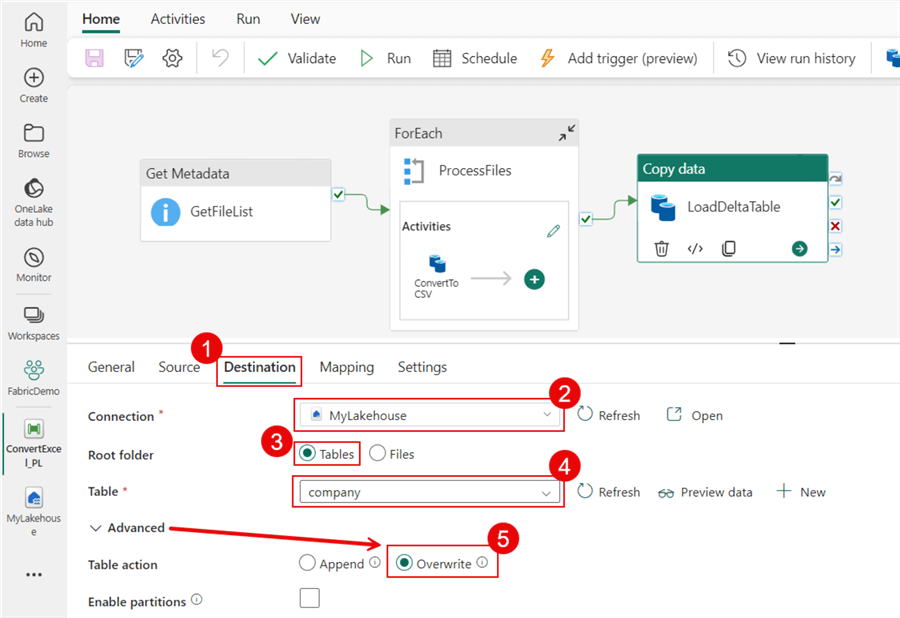
The screenshot below shows the values I used for the Destination tab.
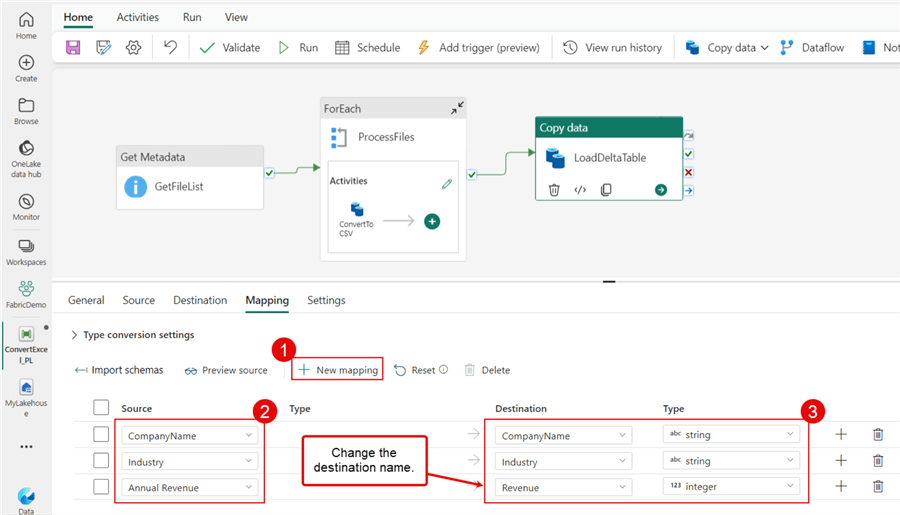
Let's finish this activity by clicking on the Mapping tab. First, click New mapping and add each source and destination below. Since our column name in the Excel workbook is Annual Revenue, we need to change the destination name to Revenue so that we don't experience a failure. Additionally, I changed the data type of Revenue to integer.
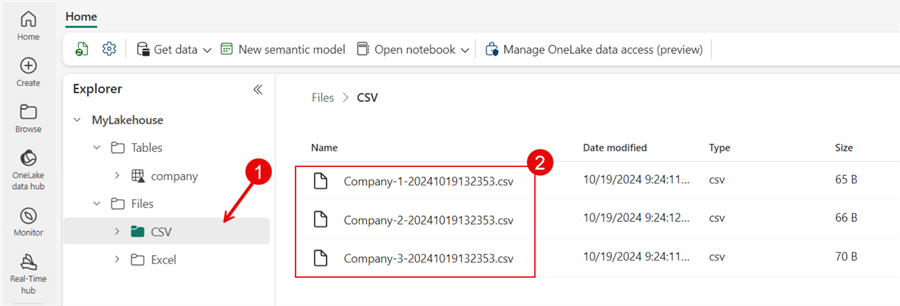
After making the changes above, click Save, Validate, and Run to see your pipeline execution in action. My pipeline executes without failure, and I hope you experience the same. Now, go back to the Lakehouse Explorer.
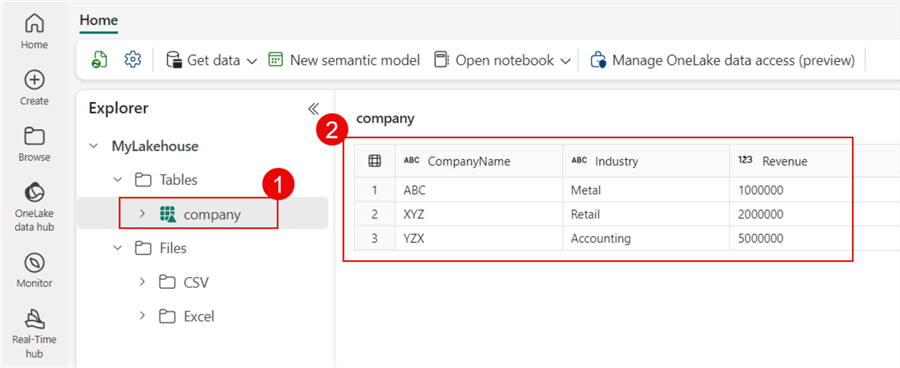
The Explorer displays the three records after you click on the company table. With our files converted and loaded into a Delta table we can say mission accomplished.
Clean Up
The easiest way to clean up is to delete the demo workspace. With the demo workspace selected, click Workspace settings. Then, scroll to the bottom of the tab. Here, you can click Remove this workspace.
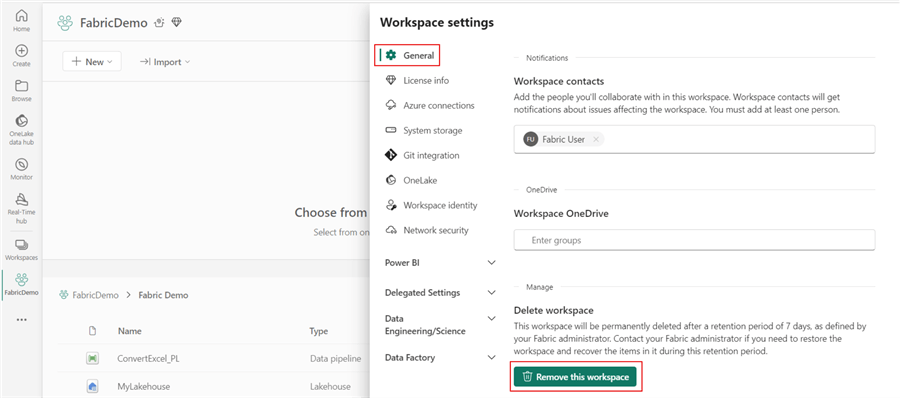
If you can delete the workspace, you must remove the artifacts individually.
Summary
In this article, we walked through each step to create a Delta table and a pipeline to convert the .xlsx workbooks the business provided into comma-delimited format. What are some other ways to improve this process? We could move the Excel files into a processed folder so they don't keep getting converted. Some error handling might also go a long way. I plan to explore converting the files using a notebook and PySpark in a future article.
What other strategies or improvements would you recommend for this process? Please leave your comments below.
Next Steps
- To learn more about Delta tables, check out Nikola Ilic's article, "Working with tables in Microsoft Fabric Lakehouse—Everything you need to know!" Nikola has several articles for in-depth reading on various experiences in Fabric.
- Another great resource on Microsoft Fabric is Koen Verbeeck. If you don't know where to start, check out Koen's article, "What is Microsoft Fabric?"
- One of my favorite Azure data and Fabric resources is the "Tales From the Field" YouTube channel. Check out the Fabric playlist featuring Bradley Ball and Daniel Taylor.
About the author
 Jared Westover is a passionate technology specialist at Crowe, helping to build data solutions. For the past two decades, he has focused on SQL Server, Azure, Power BI, and Oracle. Besides writing for MSSQLTips.com, he has published 12 Pluralsight courses about SQL Server and Reporting Services. Jared enjoys reading and spending time with his wife and three sons when he's not trying to make queries go faster.
This author pledges the content of this article is based on professional experience and not AI generated.
View all my tips
Article Last Updated: 2024-11-20


