By: Arshad Ali | Updated: 2012-10-02 | Comments (24) | Related: More > Integration Services Excel
Problem
In my last tip, "Importing Data From Excel Using SSIS - Part 1" we found out that the SSIS Excel Connection Manager determines the data type of each column of the worksheet on the basis of data for that particular column from the first 8 rows. This is the default behavior and connection manager uses a value in the registry key to consider the number of rows for data type determination. We also saw that the data import fails if the data in others rows (other than first 8 rows) is not compatible or has a longer length than the data in the first 8 rows. I talked about different ways to handle this to make the data import succeed. I also talked about the easiest solution which is to change the registry key value, but this has its own implications and hence the question; what other options are there without creating too much additional overhead?
Solution
In my last tip, the easiest solution was to make a change in the registry but in many scenarios you might not have control to make this change for varous reasons. Even if you have control in changing this setting, this change might cause your other SSIS packages to perform poorly (based on the amount of data you have in an Excel worksheet) and it may impact other systems as well wherever this registry key is being referenced. So I have another solution for this issue.
The basic idea of this solution is to convert the Excel worksheet to CSV file and use the Flat File Connection Manager/Source adapter to import data from the CSV file. With the Flat File Connection Manager/Source Adapter we have more control to define the data type and length of each column.
These are questions that come to mind when thinking about converting an Excel worksheet to a CSV file:
- When saving an Excel worksheet using a csv extension does this make it a CSV file?
- A CSV file uses a comma as column separator, but what if there are commas in the data itself?
- What is the impact of converting an Excel worksheet to CSV file?
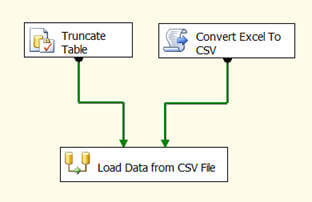
Well, simply saving the Excel worksheet using a CSV extension will not make it CSV file as the storage format is different for both of these file types. Rather we can use the Excel Object Library to save the Excel worksheet as a CSV file using the Script Task in SSIS and then we can import the data directly from the CSV file as shown below.
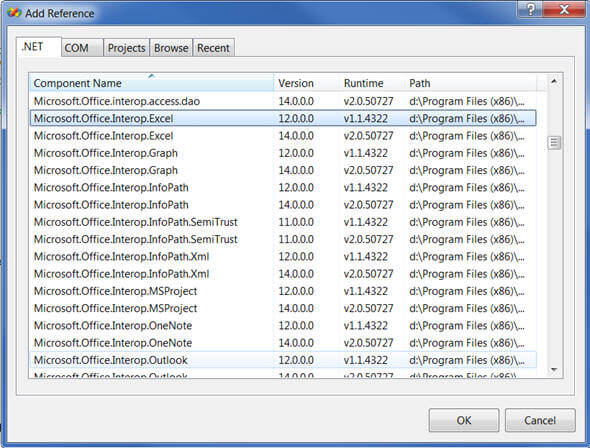
In the Script Task, when writing code for conversion, first of all you need to add a reference to Microsoft.Office.Interop.Excel under .NET components as shown below:
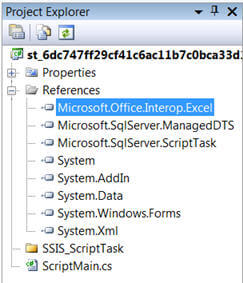
After adding the required reference, the References node in the Solution Explorer will look like this:
Once you have added the required reference, you can add these lines of code. The complete list of code for converting Excel worksheet to CSV file is provided below. You need to provide the location and name of the Excel worksheet along with the name of the worksheet itself and then the location and name for the CSV file which will be created:
/*
   Microsoft SQL Server Integration Services Script Task
   Write scripts using Microsoft Visual C# 2008.
   The ScriptMain is the entry point class of the script.
*/
using System;
using System.Data;
using Microsoft.SqlServer.Dts.Runtime;
using System.Windows.Forms;
using Excel = Microsoft.Office.Interop.Excel;
using Microsoft.Office.Interop.Excel;
namespace ST_6dc747ff29cf41c6ac11b7c0bca33d19.csproj
{
    [System.AddIn.AddIn("ScriptMain", Version = "1.0", Publisher = "", Description = "")]
    public partial class ScriptMain : Microsoft.SqlServer.Dts.Tasks.ScriptTask.VSTARTScriptObjectModelBase
    {
        #region VSTA generated code
        enum ScriptResults
        {
            Success = Microsoft.SqlServer.Dts.Runtime.DTSExecResult.Success,
            Failure = Microsoft.SqlServer.Dts.Runtime.DTSExecResult.Failure
        };
        #endregion
        /*
  The execution engine calls this method when the task executes.
  To access the object model, use the Dts property. Connections, variables, events,
  and logging features are available as members of the Dts property as shown in the following examples.
  To reference a variable, call Dts.Variables["MyCaseSensitiveVariableName"].Value;
  To post a log entry, call Dts.Log("This is my log text", 999, null);
  To fire an event, call Dts.Events.FireInformation(99, "test", "hit the help message", "", 0, true);
  To use the connections collection use something like the following:
  ConnectionManager cm = Dts.Connections.Add("OLEDB");
  cm.ConnectionString = "Data Source=localhost;Initial Catalog=AdventureWorks;Provider=SQLNCLI10;Integrated Security=SSPI;Auto Translate=False;";
  Before returning from this method, set the value of Dts.TaskResult to indicate success or failure.

  To open Help, press F1.
 */
        private static Workbook mWorkBook;
        private static Sheets mWorkSheets;
        private static Worksheet mWSheet1;
        private static Excel.Application oXL;
        private static string ErrorMessage = string.Empty;
        public void Main()
        {
            try
            {
                string sourceExcelPathAndName = @"D:\Excel Import\Excel Import.xls";
                string targetCSVPathAndName = @"D:\Excel Import\Excel Import.csv";
                string excelSheetName = @"Sheet1";
                string columnDelimeter = @"|#|";
                int headerRowsToSkip = 0;
                if (ConvertExcelToCSV(sourceExcelPathAndName, targetCSVPathAndName, excelSheetName, columnDelimeter, headerRowsToSkip) == true)
                {
                    Dts.TaskResult = (int)ScriptResults.Success;
                }
                else
                {
                    Dts.TaskResult = (int)ScriptResults.Failure;
                }
            }
            catch (Exception ex)
            {
                Dts.TaskResult = (int)ScriptResults.Failure;
            }
        }
        public static bool ConvertExcelToCSV(string sourceExcelPathAndName, string targetCSVPathAndName, string excelSheetName, string columnDelimeter, int headerRowsToSkip)
        {
            try
            {
                oXL = new Excel.Application();
                oXL.Visible = false;
                oXL.DisplayAlerts = false;
                Excel.Workbooks workbooks = oXL.Workbooks;
                mWorkBook = workbooks.Open(sourceExcelPathAndName, 0, false, 5, "", "", false, XlPlatform.xlWindows, "", true, false, 0, true, false, false);
                //Get all the sheets in the workbook
                mWorkSheets = mWorkBook.Worksheets;
                //Get the specified sheet
                mWSheet1 = (Worksheet)mWorkSheets.get_Item(excelSheetName);
                Excel.Range range = mWSheet1.UsedRange;
                //deleting the specified number of rows from the top
                Excel.Range rngCurrentRow;
                for (int i = 0; i < headerRowsToSkip; i++)
                {
                    rngCurrentRow = range.get_Range("A1", Type.Missing).EntireRow;
                    rngCurrentRow.Delete(XlDeleteShiftDirection.xlShiftUp);
                }
                //replacing ENTER with a space
                range.Replace("\n", " ", Type.Missing, Type.Missing, Type.Missing, Type.Missing, Type.Missing, Type.Missing);
                //replacing COMMA with the column delimeter
                range.Replace(",", columnDelimeter, Type.Missing, Type.Missing, Type.Missing, Type.Missing, Type.Missing, Type.Missing);
                mWorkBook.SaveAs(targetCSVPathAndName, XlFileFormat.xlCSVMSDOS,
                Type.Missing, Type.Missing, Type.Missing, Type.Missing, Microsoft.Office.Interop.Excel.XlSaveAsAccessMode.xlExclusive,
                Type.Missing, Type.Missing, Type.Missing,
                Type.Missing, false);
                return true;
            }
            catch (Exception ex)
            {
                ErrorMessage = ex.ToString();
                return false;
            }
            finally
            {
                if (mWSheet1 != null) mWSheet1 = null;
                if (mWorkBook != null) mWorkBook.Close(Type.Missing, Type.Missing, Type.Missing);
                if (mWorkBook != null) mWorkBook = null;
                if (oXL != null) oXL.Quit();
                System.Runtime.InteropServices.Marshal.ReleaseComObject(oXL);
                if (oXL != null) oXL = null;
                GC.WaitForPendingFinalizers();
                GC.Collect();
                GC.WaitForPendingFinalizers();
                GC.Collect();
            }
        }
    }
}
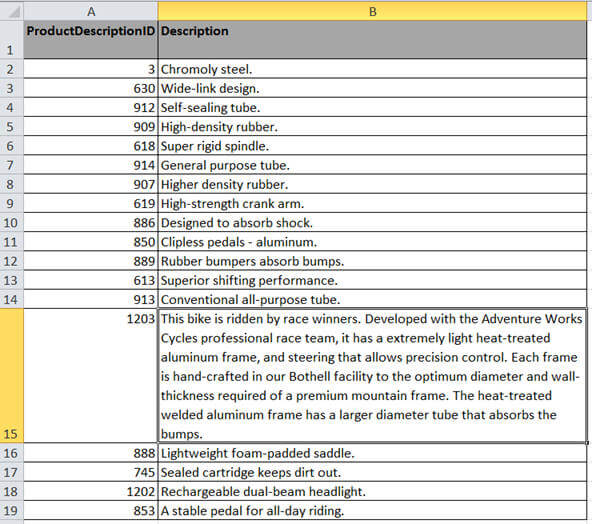
Below you can see the Excel worksheet which I am using as the source file for conversion. You will notice row number 15 has a long string and also the description of this row contains commas in it as well.
After the conversion, the CSV file will look like this. You will notice where there were commas we now have some special characters "|#|":
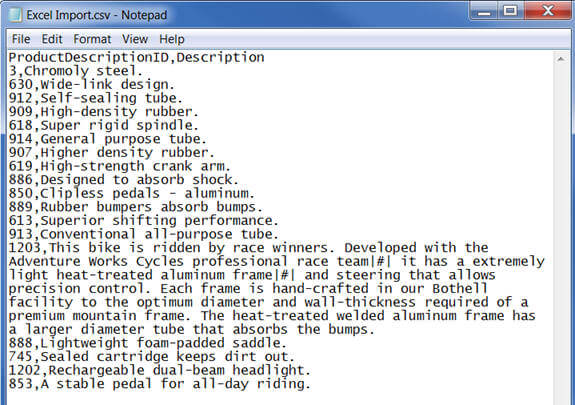
The idea behind this is, before conversion replace all the commas with some special characters and after importing the data from the CSV file update the special characters back to a comma. This can be done using code such as this.
SELECT * FROM [dbo].[ProductInformation]
UPDATE [dbo].[ProductInformation]
SET [Description] = REPLACE([Description], '|#|', ',')
SELECT * FROM [dbo].[ProductInformation]
In order to use this approach, we need to have extra storage space for having both a CSV file along with an Excel file. Apart from that, the Excel object library will take a few seconds to save the file as a CSV file. I haven't tried it on very large file, though I think this should not take much longer. Once you have the data loaded you can do anything else you need to at that point.
Next Steps
- Review Importing Data From Excel Using SSIS - Part 1 tip
- Review Integration Services and Excel Tips.
- Review Import Excel unicode data with SQL Server Integration Services tip
About the author
 Arshad Ali is a SQL and BI Developer focusing on Data Warehousing projects for Microsoft.
This author pledges the content of this article is based on professional experience and not AI generated.
View all my tips
Article Last Updated: 2012-10-02


