By: Edwin Sarmiento | Updated: 2014-09-04 | Comments | Related: 1 | 2 | 3 | 4 | > Clustering
Problem
In a previous tip, Install SQL Server 2008 on a Windows Server 2008 Cluster Part 2, we've seen how to install and configure a Windows Server 2008 Failover Cluster in preparation for installing a SQL Server 2008 failover clustered instance. This time, I wanted to use Windows PowerShell to install, configure and manage a Windows Server Failover Cluster from the command-line or remotely from my workstation. How do I do it?
Solution
To continue this series on Installing, Configuring and Managing Windows Server Failover Cluster using PowerShell, we will look at some of the different PowerShell cmdlets that we can use to perform common administration tasks.
List Nodes In The Cluster
Let's start by listing the nodes in our cluster using the Get-ClusterNode cmdlet.
PS C:\> Get-ClusterNode

My cluster currently has two nodes, WS-CLUSTER3 and WS-CLUSTER4 (NOTE: this is not the same cluster as what was used in the previous tip.) By default, the Get-ClusterNode cmdlet will return the names of the nodes, the ID value and their corresponding state. If you run this cmdlet on any of the nodes in your cluster, it will automatically retrieve the cluster running on the local node. However, you can install the Remote Server Administration Tools (RSAT) on your local workstation and run this cmdlet passing the cluster virtual network name.
PS C:\> Get-ClusterNode -Cluster WINCLUSTER2

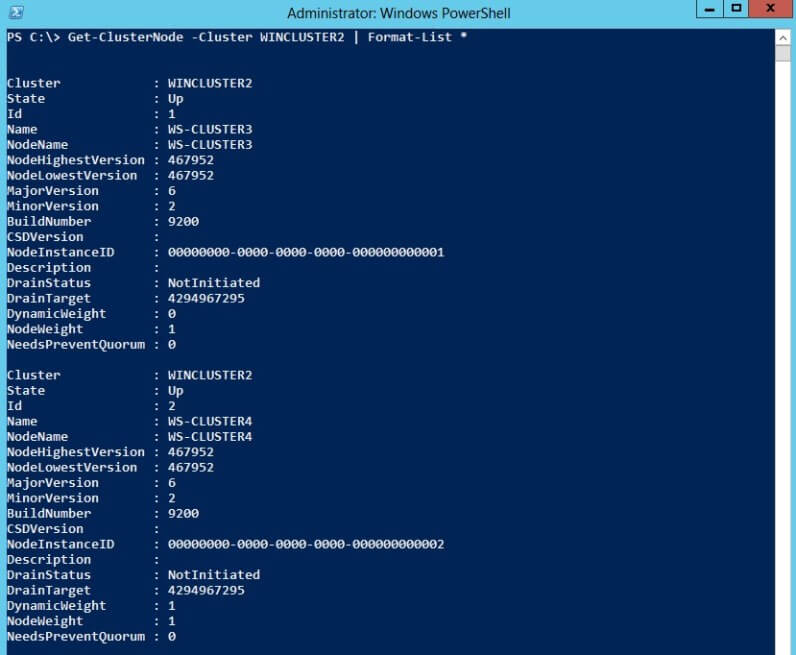
We can find out more about the different properties of the cluster nodes by using the Format-List cmdlet similar to what we did in the previous tip.
PS C:\> Get-ClusterNode -Cluster WINCLUSTER2 | Format-List *
List Information About Cluster Quorum
The reason I listed out all of the properties of the nodes in the cluster is because I wanted to know how I can change their properties to properly configure the cluster. For example, by default, all of the nodes in the cluster have a vote in the quorum. The concept of a quorum is explained in this TechNet article (I also discussed it briefly in this tip.) This is confirmed by looking at the NodeWeight property of both cluster nodes. Both have a value of 1. Since we're already discussing the concept of a quorum, let's check the cluster quorum configuration by using the Get-ClusterQuorum cmdlet.
PS C:\> Get-ClusterQuorum

Notice that my cluster quorum configuration is NodeMajority with no QuorumResource property value. Using the concept of a quorum, since I have two nodes in my cluster with a NodeMajority quorum configuration, if I lose a node in my cluster, I will have no quorum majority and, therefore, will cause the cluster to go offline (the concept of Dynamic Quorum was introduced in Windows Server 2012 so if your cluster is running on Windows Server 2012 and higher, you will no longer experience this behavior). We need to fix this by modifying our cluster configuration and introduce another voting member to achieve a majority of votes. This can be done by configuring a quorum disk or using a file share as a witness. For this example, since I haven't added my clustered disks yet, let's use a file share winess to properly configure the quorum. We'll use the Set-ClusterQuorum cmdlet for this purpose.
PS C:\> Set-ClusterQuorum -NodeAndFileShareMajority \\AD-DC1\ClusterFSW

Get Information About Cluster Disks
Let's say that my storage engineers have already provisioned storage for my cluster. We can use the Get-Disk cmdlet to list all of the available disks in our cluster node. Note that the Get-Disk cmdlet is not specific to failover clustering, but rather a native PowerShell v4 cmdlet that you can use even on workstations. We can compare the results of the Get-Disk cmdlet to the results of the Get-ClusterAvailableDisk cmdlet to identify which disks on the cluster nodes support failover clustering, but are not yet added to the cluster.
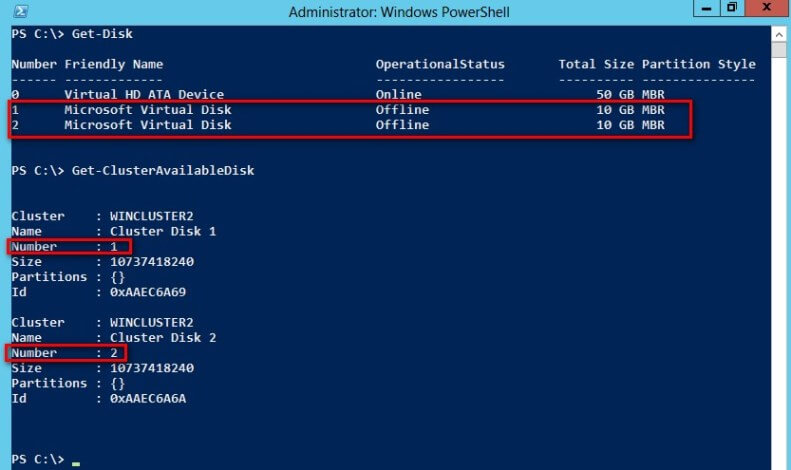
Notice that disk numbers 1 and 2 between the two results match. Therefore, I can add those disks to my cluster using the Add-ClusterDisk cmdlet. But instead of adding the disks one at a time, I will use PowerShell's pipeline feature to add both disks in a single line. Besides, we've been using the pipeline with the Format-List cmdlet (and the fact that I'm just lazy to write two lines of code instead of just one).
PS C:\> Get-ClusterAvailableDisk | Add-ClusterDisk

Get Information About Cluster Resources
As a best practice, make sure that you rename all of your cluster resources properly so as not to get confused when you start performing administrative tasks. Let's do that with the clustered disks that we've added. For example, if we want to change the name of Cluster Disk 1 to something like F_Drive, we can use the Get-ClusterResource cmdlet and change the Name property of our clustered disks.
PS C:\> (Get-ClusterResource "Cluster Disk 1").Name = "F_Drive"
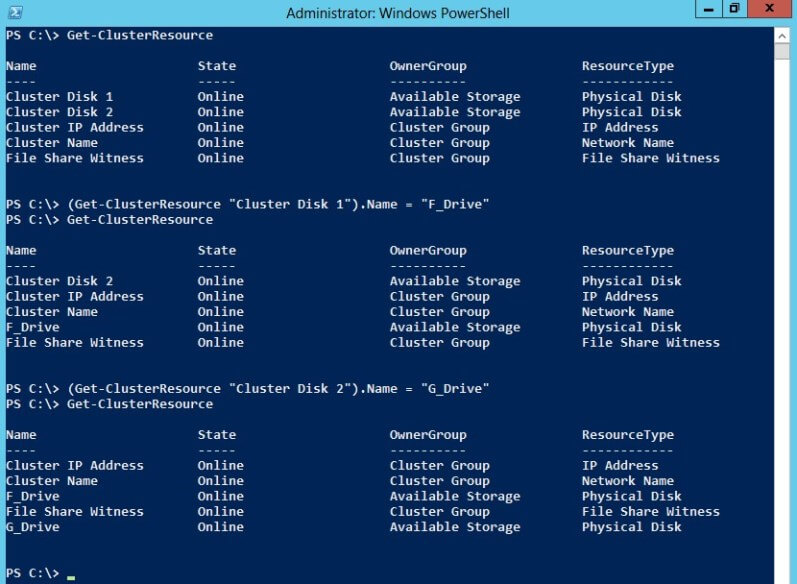
I didn't just guess the names of my clustered drives. By default, they will have the name Clustered Disk X where X is a numeric value that increases depending on the sequence of how you have added your clustered drives. To be sure, run the Get-ClusterResource cmdlet to know the exact names.
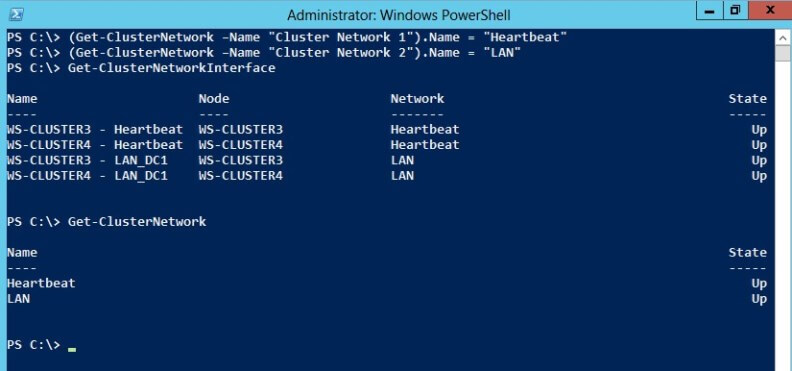
Let's continue with renaming the other cluster resources like the network interfaces. We can use the Get-ClusterNetworkInterface cmdlet to list network adapters that are mapped to the cluster network adapter. Since I have renamed my network adapters properly, it's easier to identify which one I use for heartbeat and for public communications. I can, then, use the Get-ClusterNetwork cmdlet to list all of the cluster network adapters available.
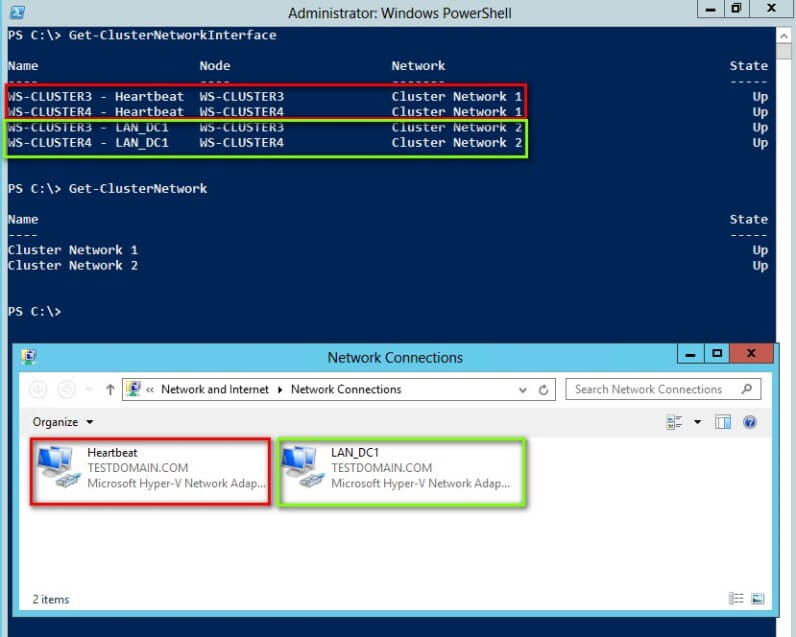
Using the same approach as we used in renaming the clustered drives, we can use the Get-ClusterNetwork cmdlet to change the Name property of our cluster network adapters.
PS C:\> (Get-ClusterNetwork –Name "Cluster Network 1").Name = "Heartbeat"
In this tip, we used Windows PowerShell to retrieve the different properties of objects in our cluster, modified our cluster quorum settings, added clustered drives and renamed cluster resources. In the next tip, we will look at the other Failover Clustering PowerShell cmdlets to manage cluster resources and set parameter values. We will keep our focus on running SQL Server clustered resources like a failover clustered instance and AlwaysOn Availability Groups.
Next Steps
- Review the previous tips on Install SQL Server 2008 on a Windows Server 2008 Cluster Part 1, Part 2, Part 3 and Part 4. This will help you map the Failover Clustering PowerShell cmdlets with their corresponding actions on the Failover Cluster Management console.
- Review the first tip in this series
About the author
 Edwin M Sarmiento is a Microsoft SQL Server MVP and Microsoft Certified Master from Ottawa, Canada specializing in high availability, disaster recovery and system infrastructures.
This author pledges the content of this article is based on professional experience and not AI generated.
View all my tips
Article Last Updated: 2014-09-04


