By: Gauri Mahajan | Comments (1) | Related: > SQL Server Management Studio
Problem
Tables are one of the most-used database objects in SQL Server databases and their design is fundamental to both DBAs and database developers. These tables are the building blocks of the majority of the SQL databases and the appropriate table structure ensures correct data is stored in the database. Let's address the topic of creating tables in SQL Server in this tip using the SQL Server Management Studio (SSMS) GUI.
Solution
As far as a table in SQL Server is concerned, there are a few options available to create a table. We can create a table using SQL Server Management Studio (SSMS) Table Designer or T-SQL in SQL Server. This tip aims to serve as a step-by-step guide to create a table with the Table Designer using SSMS.
The SSMS GUI serves as a powerful tool to create and update a table, customize column properties, managing relationships, constraints and much more. Let's go ahead and see this in action.
Pre-requisites
For this illustration, all we need is a SQL Server and SSMS. I am using SQL Server 2017 and SSMS v18.1, in case you don't have it, download SSMS from here.
Let's head over to SSMS, I have created a database named, DemoDB (for demo purposes). You can refer to any existing database that you have or can create a new database.
Let's go over steps to create a table in the database DemoDB using SSMS Table Designer. It lets you design (create, alter or delete) several database objects like tables, columns, indexes and constraints, etc.
Check Database Permissions Before Creating a Table
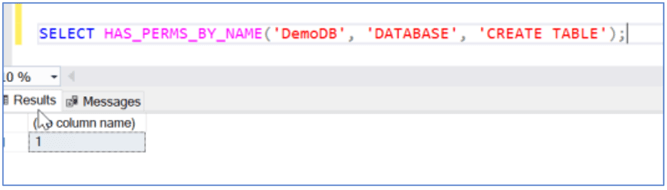
Quick note – To keep away from any permission issues, make sure you have CREATE TABLE permission in the database. You can check it using the below T-SQL statement, 1 in the output means, you have the permission to CREATE TABLE in the DemoDB database.
SELECT HAS_PERMS_BY_NAME ('DemoDB', 'DATABASE', 'CREATE TABLE');
In case, you don't have the above permissions, go here, and search for GRANT CREATE TABLE To, in order to grant this permission. Alternatively, you can also run SSMS as an administrator to rule out any permission concerns. Also, you can check with your database administrator to make sure you have permissions to create tables.
SQL Column Names Best Practices
The naming convention of database objects is a really important step for a well-built data model, and we as SQL developers often get confused on what should be the best practices to consider while selecting both table and column names. Here, I list a few things that come to my mind:
- Try to keep the column name relatively short and it should be descriptive about what your column/attribute represents.
- I always keep the singular name for columns and plural names for tables, e.g. for a Garment company that stores orders of various customers, I would keep table names as Orders & Customers and column names as OrderId, OrderDate, etc. This rule helps me to distinguish between a table name and column name just by looking at it.
- Using Pascal Case (every word starts with an uppercase letter, e.g. FirstName, LastName) to name columns in the table is a good method than using an underscore (_) between each word in the name.
- It is also good practice to avoid spaces in column names. If you do have column names with spaces, you need to always use [] brackets around the name when referencing the column. For example: [Head of Department].
- It is not recommended to use SQL database keywords (such as SELECT, GO, CREATE, etc.) in the names of columns.
Please note - These practices hold true for naming convention for tables as well and can be followed while creating a table name.
Key takeaway – It is a good habit to follow naming convention guidelines for your database objects, whatever you decide on the naming conventions for column or table names, you need to ensure it is applied consistently throughout the model for better legibility and uniformity.
Check out this tip - Use Consistent SQL Server Naming Conventions.
SQL Data Types
The data type of a column in SQL Server specifies what kind or type of data a column can hold. We are required to specify the data type while defining columns. SQL Server supports many data types. Commonly used ones are numeric (int, decimal, numeric, float, money, etc.), character strings (char, varchar, nvarchar, text, etc.), date and time (datetime, date, year, etc.), Unicode (nchar, nvarchar, ntext) and many more.
For character data types, we declare them using a length, like varchar(20) or char(20). The number indicates the maximum number of characters (20) that can be stored in a column. You should use the char data type, when you know you are going to store a fixed number of bytes in a column versus a varying length of bytes.
Some bad data types to avoid - I usually steer clear of the SQL_Variant data type, though this data type can accommodate different data types in the same column, there are a lot of reservations with this (we cannot use it with the wildcard 'LIKE' and on computed columns, etc.) and we have to perform explicit conversions on this data type.
Additionally, it is also not a good idea to use the money data type because of its rounding error. It is better to use decimal or numeric instead. Also, if you are only going to use the date part of date/time value, it is always good to use the smalldatetime instead of datetime. This will save you space and also helps in increase efficiency.
Create SQL Server Table with SSMS Table Designer
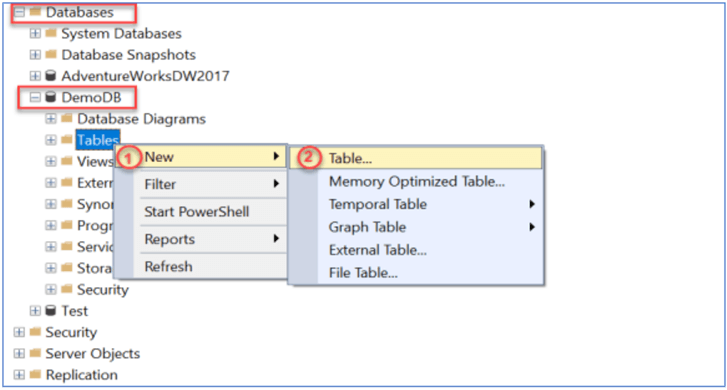
Expand Databases and DemoDB, right-click the Tables folder, select New > Table… as shown below.
You will see a new table template in the design view as shown in the screenshot below. To create a basic SQL table, we need to provide a Column Name, Data Type and if the column will Allow Nulls.

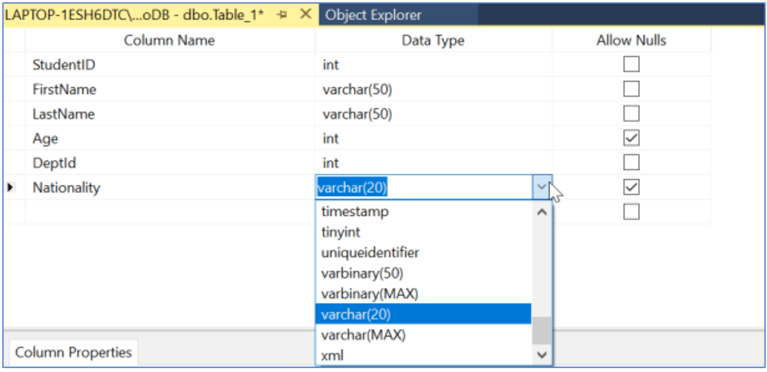
Let's create a table named Students. We will add columns that would give basic information about Students like Student Id, First Name, Last Name, Age, etc., assign the appropriate data types and also if the columns allows nulls.
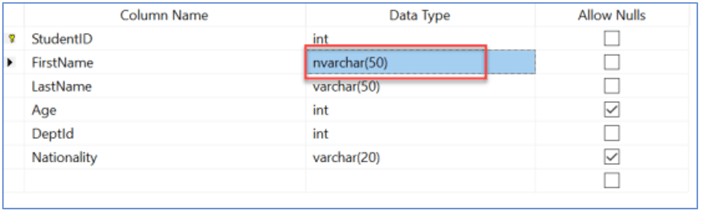
The following picture shows an example where we can select a data type from the drop-down values and also have allowed nulls for columns Age and Nationality.
At this point we could click Ctrl + S to save the table, but first we will add some other components to the table as shown below.
Create Primary Key in a SQL table using SSMS Table Designer
The foundation of a good database design always depends on a good primary key. As the name suggests, the Primary key is the most important column that uniquely identifies each row in a database table. Knowingly or unknowingly, we all deal with a primary key concept in any business or organization, take school or any company for instance, we always have unique IDs (as StudentId /EmployeeId / CustomerId as Primary Key) allotted to personnel to uniquely identify their records in the table. With this setup, every time, a new student, employee or a customer is added, unique identification is always guaranteed.
Please note, a table can have one and only one primary key, and it may consist of either a single or multiple columns. This column rejects null values.
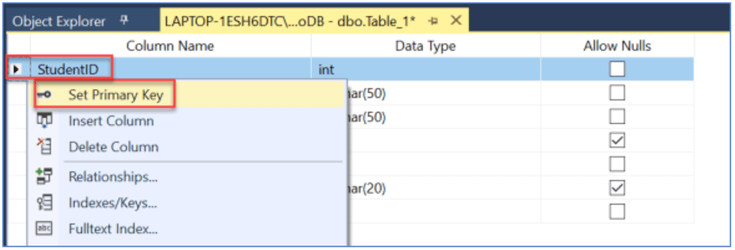
In our scenario, the StudentID column makes the best choice for a primary key, usually it is good to have a primary key constraint on number data type columns, as they are faster to process and you can also implement identity property on it. To set StudentID as a primary key, right-click the column and select Set Primary Key from the contextual menu as shown below.
The StudentID column is recognized by a primary key symbol in its row selector as shown in the below illustration.
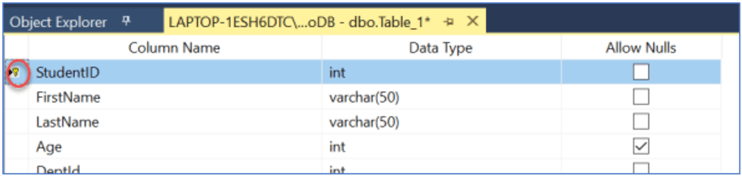
Table Column Properties Using SSMS Table Designer
We can specify various properties like Identity, Primary Key, computed column values, etc. for a column in the Table Designer in SSMS. You can see these properties at the bottom pane of the Table Designer and appropriate properties appear for the selected column depending on the data type of the column.
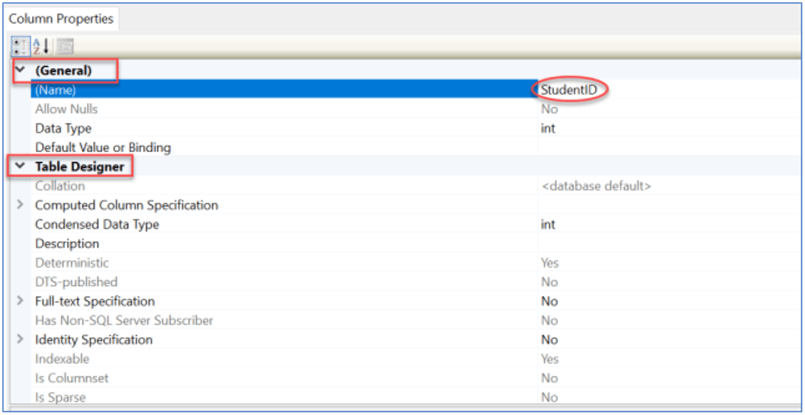
We need to select a column in the Table Designer first to edit any of its properties. Look at the below screenshot of column properties for your reference, here I have selected StudentID column. These properties are broadly classified into two categories - General and Table Designer as shown below.
Column properties in the General section allow you to edit the name of the column and its data type. You can also change if the column will allow Nulls or not.
Default Value or Binding - This property lets you enter the new default value in the selected column if nothing is specified in an INSERT statement. This will also create a default constraint automatically.
There are a good number of commonly used column properties that we can set or edit using SSMS. You can set Collation at the column level using Collation property. With Computed Column Specification property, you can type or edit any formula for the computed column.
You can also set RowGuid property of a column (with a data type as a unique identifier) to Yes. Once this property is set, it populates the columns with unique Guids.
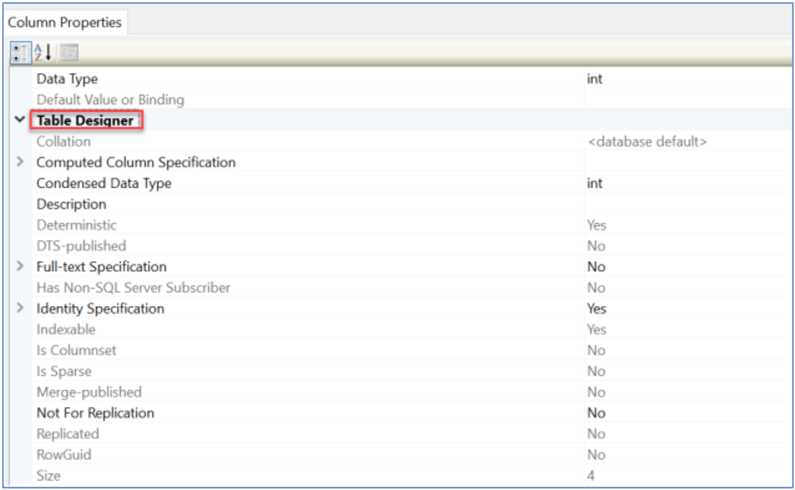
Below is the summary of Column Properties of a SQL Server table:
Identity Specification column property – Identity column (Identity (seed, increment)) of a table is a column whose values automatically, with a given starting position and increment value. Let's go ahead and try to set column StudentID as an Identity column.
Follow the below steps to set a column as an Identity column:
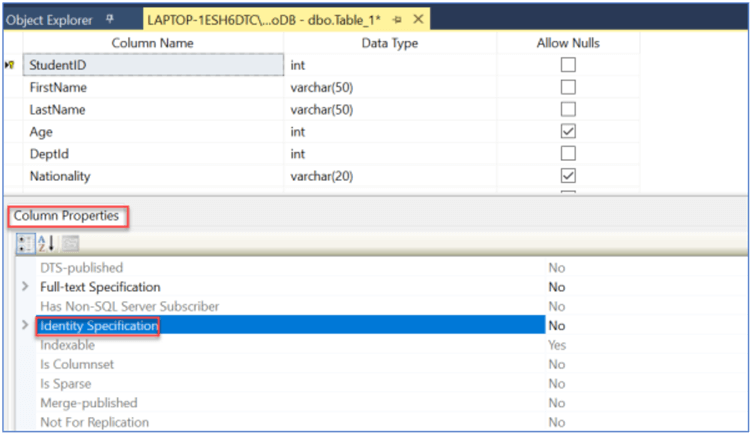
Click on the column, StudentID and scroll to the property Identity Specification in the Column Properties tab as shown below. You can see Identity is disabled for this column and its status is No.
Expand it by clicking greater than symbol (>), and select Yes from the drop-down list. This column StudentID is now identified as an Identity column with both Increment and Seed = 1, i.e. Identity(1,1).
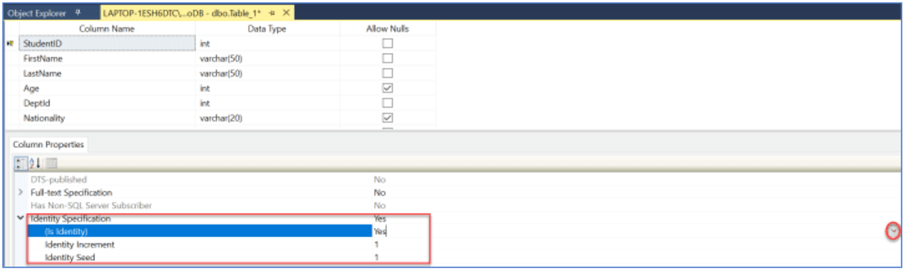
StudentID column is successfully set up as an Identity column with starting position 1 and increment value 1.
You can refer to this in-depth article, Column Properties of a SQL table, to learn about all of the different column properties shown above.
At this point we can save the table by selecting File > Save Table and provide a name for the table. You can also use Ctrl + S to save the table. For this table we are going to save it as Students.
Creating a SQL Server Foreign Key Relationship
Working with relationships is a big part of SQL relational databases and foreign key is an attribute that enforces referential integrity by linking two tables together. Foreign Key is a column or a combination of columns that refers to the Primary Key of another table.
If you notice the Students table above, it has a column DeptId, which implies that each student is associated with an appropriate Department. To enforce this logic, we can set a foreign key on this column in the Students table and have it reference the primary key of the master table (with DeptId as a primary key).
For this implementation – We will make DeptId column as a foreign key in the Students table, let's quickly create the parent table, named, Departments that will have a DeptId as a Primary Key and DepartmentName column as shown below and press Ctrl + S to save as Departments.

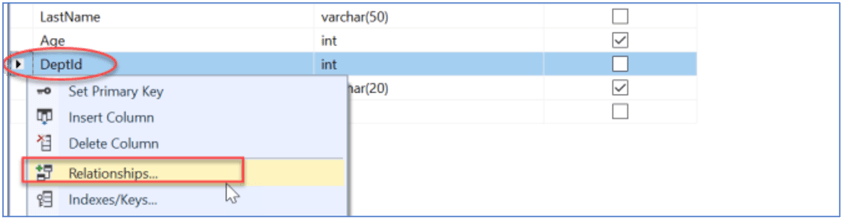
To set up a relationship, open the Students table by right clicking on the table name and selecting Design. In the Table Designer pane of the Students table, right-click on the column DeptId and select Relationships.
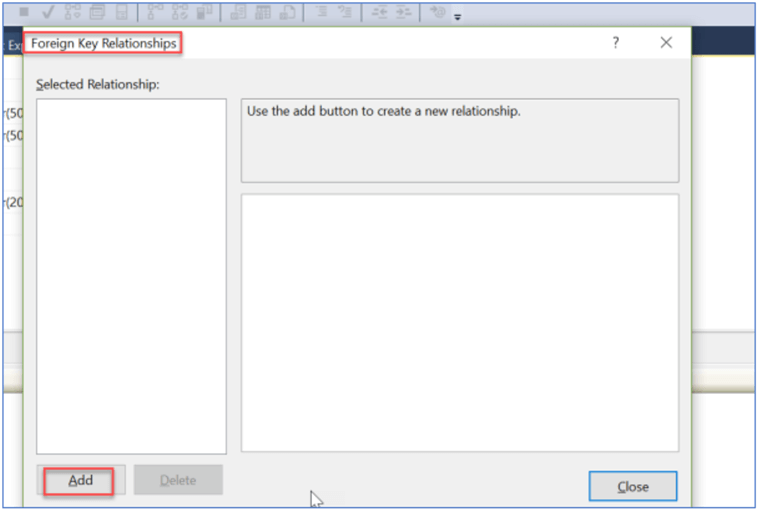
Click Add on the Foreign-Key Relationships dialog box as shown below.
 ,
,
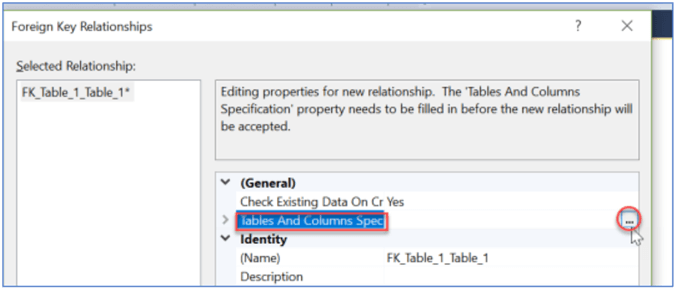
Click on the ellipse (…) next to Tables And Columns Spec.
A new dialog box named, Tables and Columns will open. For the Primary key table, I have selected the Departments table and underneath is the DeptId. On the right side, for the foreign key table, our table is already selected and we can provide DeptId as the foreign key underneath. Hit OK.
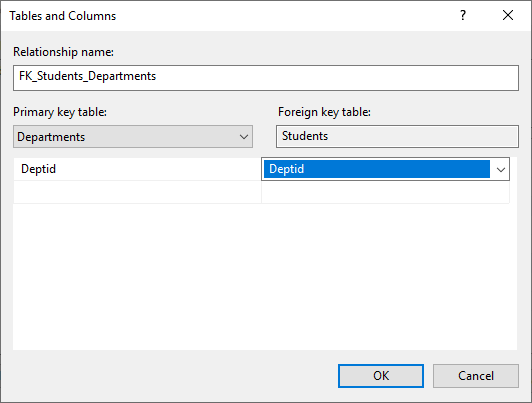
Click OK to close the Foreign-Key Relationships dialog box. A primary-foreign key relationship is established between these two tables.
Now it's time to save this new table. Click on the Save icon in the toolbar
or Ctrl + S or File > Save Students to save this table.
You can learn more about creating SQL Server Foreign Keys in this article using the SSMS GUI and T-SQL.
Verifying the New Table
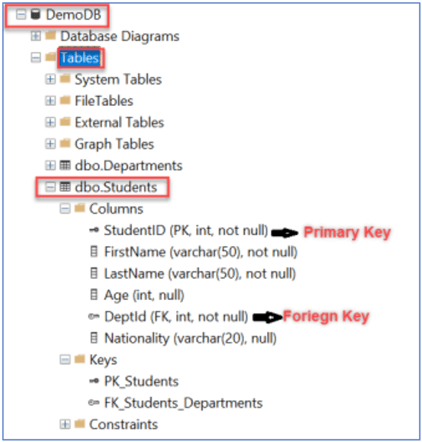
Let's quickly check this newly created table in the database. Go to the Object Explorer, and expand the DemoDB database. Refresh the Tables node by right-clicking on it and selecting Refresh from the contextual menu. Expand nodes to find dbo.Students table, Columns, Keys and Data Types as shown below.
Inserting Data into the Table Using SSMS Table Designer
There are several methods to insert data into the table. We will continue with the table we just created above and insert data into it using the Table Designer in SSMS.
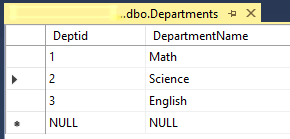
Right click on the Departments table and select Edit Top 200 Rows and enter 1 Math, 2 Science and 3 English. Then click the X to close and save the records.
Now right-click on the Students table and select Edit Top 200 Rows and enter the following.
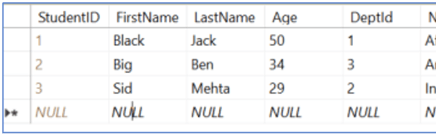
When done click on the X for the Students table to save the changes.
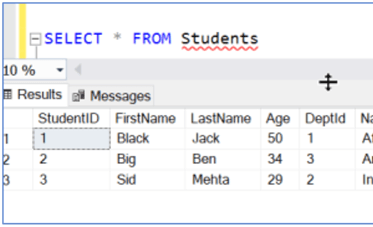
Let's quickly verify that these values are inserted into the table by using our very own SELECT clause.
SELECT * FROM dbo.Students
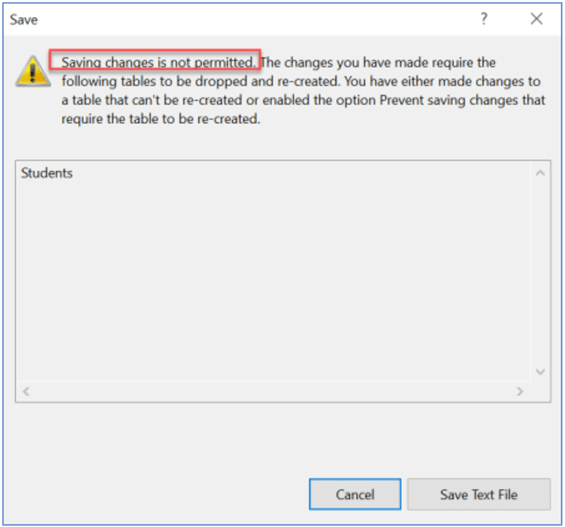
Saving changes is not permitted. The changes you have made require the following tables to be dropped and re-created.
Let's say there is a new entry of a student with Chinese characters in the first name, so we have this requirement to modify the data type of the Column FirstName varchar(50) to nvarchar(50) to support Chinese characters. To do so, go to the table, dbo.Students, right-click on it and select Design. Change Data Type from varchar(50) to nvarchar(50) in the design mode and hit the Save button. You might get the following error message:
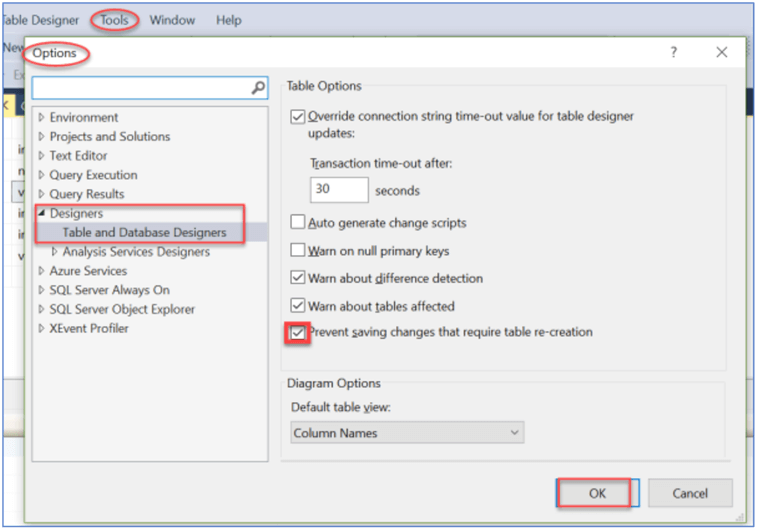
As a workaround to disable this message, go to Tools > Options > Designers and select Table and Database Designers and uncheck the option Prevent saving changes that require table re-creation as shown below and click OK.
Now, if you try to save these changes, you can save them as shown below.
Caution - Once this option to 'Prevent saving changes' is unchecked, you will not be informed of these metadata changes when you save the table.
Summary
We walked through the steps of creating a table with Table Designer in SQL Server Management Studio in this tip. We also demonstrated, how this process comes in handy for both Database Developers and DBAs with having to write a single line of code.
Next Steps
- Follow the above steps and try to create tables using SQL Server Management Studio that would save both your time and effort.
- Stay tuned to my forthcoming tip on how to create a table using T-SQL.
- To continue your learning on several SQL Server Database Design concepts, check out these database design tips.


About the author
 Gauri Mahajan is very passionate about SQL Server Reporting Services, R, Python, Power BI, the Database engine, etc. and enjoys writing.
This author pledges the content of this article is based on professional experience and not AI generated.
View all my tips