By: Ron L'Esteve | Updated: 2020-08-04 | Comments (3) | Related: > DevOps
Problem
There are many unique methods of deploying Azure Data Factory environments using Azure DevOps CI/CD. These options include a variety of source control repos and various architectures that can be both complex and challenging to set-up and configure. What is a good method of getting started with deploying Azure Data Factory environments with Azure DevOps CI/CD?
Solution
There are a few methods of deploying Azure Data Factory environments with Azure DevOps CI/CD. Source control repository options can range from GitHub to DevOps Git and implementation architectures can range from utilizing adf_publish branches to using working and master branches instead. In this demo, I will demonstrate an end-to-end process of how to create an Azure Data Factory multi-environment DevOps CI/CD by using GitHub for source control repos synced to working and master branches. Also, Azure DevOps Build and Release pipelines will be used for CI/CD, and a custom PowerShell based code-free Data Factory publish task will be used for deploying the CI/CD Data Factory resources all within the same Resource Group.

Pre-requisites
1) GitHub Account: For more information on creating a GitHub Account, see How to Create an Account on GitHub.
2) Azure Data Factory V2: For more information on creating an Azure Data Factory V2, see Quickstart: Create an Azure data factory using the Azure Data Factory UI.
3) Azure DevOps: For more information on creating a new DevOps account, see Sign up, sign in to Azure DevOps.
Create a GitHub Repository
After the GitHub account has been created from the pre-requisites section, a new Git repository will also need to be created.
To get stared, navigate to Repositories in the newly created GitHub account, and click New.

Next enter the new Repository name, select a Visibility option Public vs. Private, enable 'initialize this repository with a Readme', and click Create Repository.

Once the repository has been created, the Readme file will be viewable and the master branch will be associated with the repo.

Create a Data Factory
While creating the new Data Factory from the pre-requisites section, ensure that GIT is Enabled.
Enter the necessary details related to the GIT account and Repo.
Click Create to provision the DEV Data Factory.

Navigate to the newly created DEV Data Factory in the desired resource group.
Click Author & Monitor to launch the Data Factory authoring UI.

Log into GitHub from Data Factory
When the DEV Data Factory is launched, click Log into GitHub to connect to the GitHub Account.

Next, Click the Git repo settings.

Click Open management hub. See 'Management Hub in Azure Data Factory' for more information on working with this hub.

Next click the Git configuration section of the connections to either Edit, Disconnect, or Verify the Git repository. We can verify Git repo connection details from this tab.

Finally, we can also see that the GitHub master branch has been selected in the top left corner of the Data Factory UI.

Create a Test Data Factory Pipeline
Now that the Data Factory has been connected to the GitHub Repo, let's create a test pipeline.
To create a pipeline, click the pencil icon, next click the plus icon, and finally click Pipeline from the list of options.

Select an activity from the list of options. To keep this demo simple, I have selected a Wait activity.
Click save and publish to check in the pipeline to the Master GitHub branch.

Once the ADF pipeline has been checked in, navigate back to the GitHub account repo to ensure that the pipeline has been committed.

Create a DevOps Project
After creating an Azure DevOps Account from the pre-requisites section, we'll need to creating a DevOps project along with a Build and Release pipeline.
Let's get started by creating a new project with the following details.

Create a DevOps Build Pipeline
Now it's time to create a DevOps Build Pipeline. This can be done by navigating to Pipelines tab of the project.
Select Pipelines from the list of options.

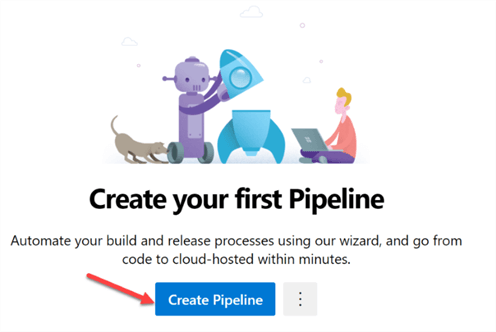
Create your first project pipeline by clicking Create Pipeline.

When prompted to select where your code is, click Use the classic editor toward the bottom.

Select the following GitHub source, enter the connection name and click Authorize using OAuth.

Authorize Azure Pipelines using OAuth will display a UI for further verification. Once the authorization verification process is complete, click Authorize Azure Pipelines.

After the Azure Pipelines are authorized using OAuth, the authorized connections along with the repo and default branch will be listed as follows and can be changed by clicking the … icon.
Click Continue to proceed.

When prompted to choose a template, select Empty job.

The Build Pipeline tab will contain the following details.
Configure and select the Name, Agent pool and Agent Specification.

Click the + icon by Agent job 1 to add a task to the job.

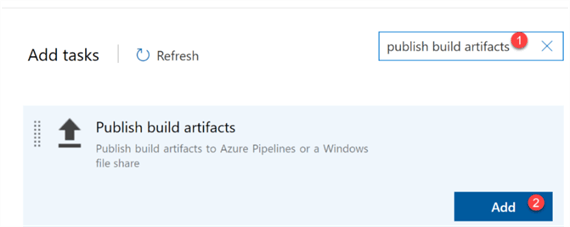
Search for 'publish build artifacts' and add the task to the Build pipeline.

In the Publish build artifacts UI, enter the following details.
Also browse and select the path to publish.

Click OK after the path is selected.

Click Save & queue to prepare the pipeline to run.

Finally, run the Build pipeline by clicking Save and run.

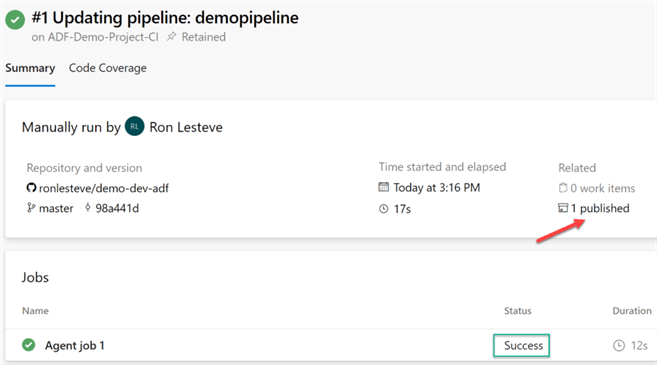
Note the pipeline run summary which indicates the repo, run date/times, and validation that the pipeline has been successfully published.
Click the following published icon for more detail.

Notice that the demopipeline has been published in JSON format, which confirms that the build pipeline has successfully been published and is ready for release.

Create a DevOps Release Pipeline
Now that the Build Pipeline has been created and published, we are ready to create the Release pipeline next.
To do this, click the pipelines icon, and select Releases.

Azure DevOps will let you know that there a no release pipelines found.
Go ahead and click New Pipeline.

When prompted to select a template, click Empty job.

Enter a Stage name and verify the Stage Owner. For my scenario, I will select PROD.

Next, let's go ahead and Add an artifact.

Ensure that the source time is Build and that the correct Source (build pipeline) is selected.
Click Add to add the selected artifact.

In the Stages section where we have the PROD stage which was created earlier, notice that there is 1 job and no tasks associated with it yet.
Click to view the stage tasks.

Search for adf and click Get it free to download the Deploy Azure Data Factory task.

You'll be re-directed to the Visual Studio marketplace.
Once again, click Get it free to download the task.
For more information on this Deploy Azure Data Factory task, see this PowerShell module which it is based on, azure.datafactory.tools.

Select the Azure DevOps organization and click Install.

When the download succeeds, navigate back to the DevOps Release pipeline configuration process.

Add the newly downloaded Publish Azure Data Factory task to the release pipeline.

The Publish Azure Data Factory task will contain the following details that will need to be selected and configured.
For a list of subscription connection options, select Manage.
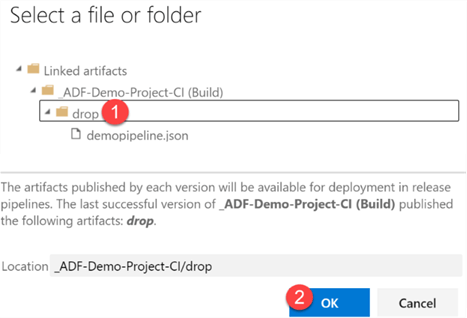
Click the … icon to select the Azure Data Factory Path.

After the file or folder is selected, click OK.

As you scroll through the task, ensure the additional selection details are configured accurately.

Also ensure that the release pipeline is named appropriately, click Save.

Click Create release.

Finally, click Create one last time.

Once the release has been created, click the Release-1 link.

View the adf release pipeline details and note that the PROD Stage has been successfully published.

Verify the New Data Factory Environment
After navigating back to the Portal, select the resource group containing the original dev Data Factory.
Notice that there is now an additional Data Factory containing the prod instance.

As expected, notice that the prod instance of the data factory also contains the same demopipeline with the Wait activity.

Summary
In this article, I demonstrated how to create an Azure Data Factory environment (PROD) from an existing Azure Data Factory environment (DEV) using a GitHub Repo for source control and Azure DevOps Build and Release pipelines for a streamlined CI/CD process to create and manage multiple Data Factory Environments within the same Resource Group.
Next Steps
- For more detail on setting up a GitHub Repository, see 'How to Properly setup your GitHub Repository'
- For more information on researching and resolving errors when deploying Data Factory using DevOps, see 'Fix DevOps Errors when deploying to Azure'
- For more information on configuring and managing pipeline releases to multiple stages such as development, staging, QA, and production stages; including requiring approvals at specific stages, see 'Define your multi-stage continuous deployment (CD) pipeline'.
- For more information on configuring a Git-Repo with Azure Data Factory, see 'Source Control in Azure Data Factory.'
- For more information on Azure pipelines, see 'Azure Pipelines documentation'.
- Read 'Continuous integration and delivery in Azure Data Factory'.
- For alternative methods of setting Azure DevOps Pipelines for multiple Azure Data Factory environments using an adf_publish branch, see 'Azure DevOps Pipeline Setup for Azure Data Factory (v2)' and 'Azure Data Factory CI/CD Source Control'.
- For a comparison of Azure DevOps and GitHub, see 'Azure DevOps or GitHub?' and 'Azure DevOps vs. GitHub'.
- Explore variations of this architecture to deploy multiple Data Factory environments to multiple corresponding resource groups.
About the author
 Ron L'Esteve is a trusted information technology thought leader and professional Author residing in Illinois. He brings over 20 years of IT experience and is well-known for his impactful books and article publications on Data & AI Architecture, Engineering, and Cloud Leadership. Ron completed his Master�s in Business Administration and Finance from Loyola University in Chicago. Ron brings deep tec
This author pledges the content of this article is based on professional experience and not AI generated.
View all my tips
Article Last Updated: 2020-08-04


