By: Koen Verbeeck | Updated: 2021-01-07 | Comments (2) | Related: 1 | 2 | 3 | > DevOps
Problem
When working on the same project with multiple developers, a conflict may arise when developers check their code into the git repository. In this part of the tip series, we'll show you how to simulate a merge conflict in an Integration Services project.
Solution
In part 1 of the tip, the basics of branching in git was described, as well as some guidelines for using git in Integration Services (SSIS) projects. If you haven't already, please read part 1 before proceeding with this part of the tip. To recap, two developers working on two different branches can have the following structure:

When branch 2 is checked into the dev branch, it's possible a conflict will arise if the two developers have been working on the same objects.
Merge Conflict in Git
Let's illustrate the concept of a merge conflict. Let's assume we have a sample project with one package in it:

Two developers of the team have been given assigned to two work items:
- Add a new package, performing some task.
- Add an extra task to an existing package.
The guideline "do not work on the same package by multiple developers" is followed, but both developers will be working inside the same SSIS project.
Each developer creates his own branch. The first developer creates a new branch called "feature/add-package". To create a new branch, go to the Team Explorer tab and click the home button. Next, click on Branches in the Project section.

Click on New Branch, supply a name. Make sure the dev branch is selected as the source for the new branch.

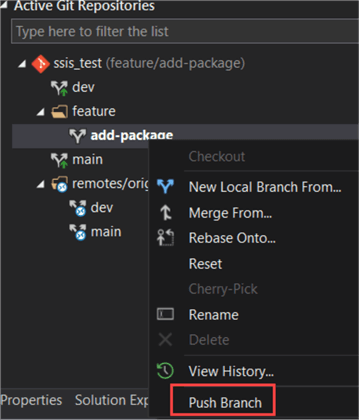
This will create a new branch in the local repo. To sync it to the remote repo, right-click the newly created branch and select "Push Branch".

Repeat the same process to create a new branch "feature/add-task" for the second developer.

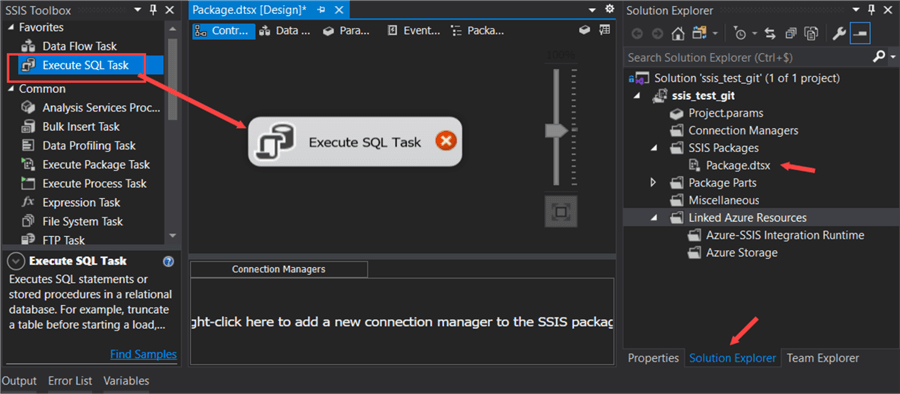
Make sure the "add-package" branch is checked out (displayed in bold). Open up the package in Solution Explorer and add a new package to the project:

Save the entire project and commit the changes by right-clicking the package/project and selecting "commit".

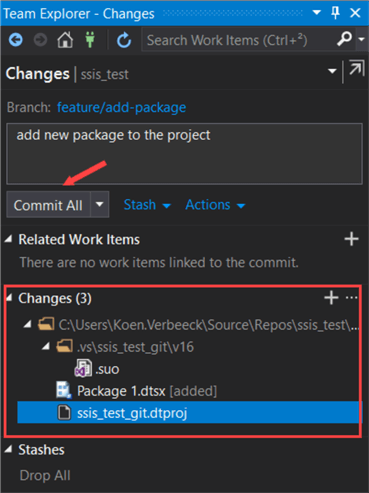
Another method to commit is to go to Team Explorer and then to the Changes section.

There you have a full list of all the changes in the project which haven't been committed yet.

In the list of changes, you can see the SSIS project file (with the extension.dtproj) has also been changed. This is because the project file keeps a list of packages that are included in the project.
Supply a meaningful commit message and hit Commit All. When the changes are committed, they are only saved to the local repository. We still need to push them to the remote repository. When you commit in Visual Studio, you'll get an information message with a link to sync your changes to the server.

This will lead you to the Synchronization menu where you can also explicitly push your changes to the remote server.

If you want to verify this in Azure Devops, make sure to select the correct branch:

If you select a different branch, you will not see the new package in the project because these branches have a different snapshot of the repository.
The work of the first developer is now done and the branch can be merged into the dev branch. To do this, a pull request needs to be created. A pull request will take the code from a source branch and merge it into a destination branch.
In Team Explorer, you can go to the Pull Requests section and click on "New Pull Request".

This will open Azure Devops in a new browser tab where you can actually create the pull request.

You need to specify a name (it sometimes is automatically filled in if you work with work items) and a description. You can assign a reviewer who can either approve or decline the pull request. You can also make a link to existing work items and add tags. At the top, make sure you have selected the dev branch as the destination branch. When you click on Create, git will automatically check if any of the commits on the source branch will cause a merge conflict in the destination branch.

Any reviewers can approve the branch (or reject it). By clicking on Complete, you get the following pop-up:

Typically, you'll want the source branch to be deleted since the work is done. If you keep branches open for too long, they will become more and more out of sync with the dev branch. This will make merging harder and more complex.
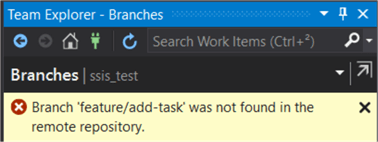
When looking at branches in Visual Studio, it's possible the deleted branch is still shown due to a bug. You are still able to fetch (although it shouldn't be possible), but when you do a pull on the local branch, an error will be shown:

You can delete the local branch "feature/add-package" after you have checked out the other branch "feature/add-task". This is the current state of our repo:

We have one commit on the add-package branch, no commits on the add-task branch, and the right branch has been successfully merged back into the dev branch.
The second developer can now work on the other branch and add a new task to the SSIS package. Check out the "feature/add-task" branch. If you open up the project, you see the package we just added is not there. This is because the work was done in another branch which is not visible in the current branch.
Add a new task to the control flow of the existing package:

Since the sample package is only needed to demonstrate the git capabilities, the new task doesn't need to be configured. Commit and push the change just as we did before.

Since the work on this branch is now done, a pull request can be created to merge the branch with the dev branch.

When the merge is created, a conflict is now detected:

You can ignore the .suo file since it is a user file and not important to the project. To ignore further conflicts in this file, you can add it to the git.ignore file.
The status of the repo is now like this:

We have now successfully simulated a merge conflict. Be sure to check out part 3 where we will propose multiple solutions to resolve this conflict!
Next Steps
- When creating a pull request, you have additional tabs with the commits contained in the pull request and a list of the files that have changed. For each file, you get a comparison between the old and new version. Familiarize yourself with the layout.
- If you haven't already, check out part 1 of this tip!
- Basics of Gitflow Workflow for SQL Database Projects Part 1
- For more SSIS tips, check out this overview.
About the author
 Koen Verbeeck is a seasoned business intelligence consultant at AE. He has over a decade of experience with the Microsoft Data Platform in numerous industries. He holds several certifications and is a prolific writer contributing content about SSIS, ADF, SSAS, SSRS, MDS, Power BI, Snowflake and Azure services. He has spoken at PASS, SQLBits, dataMinds Connect and delivers webinars on MSSQLTips.com. Koen has been awarded the Microsoft MVP data platform award for many years.
This author pledges the content of this article is based on professional experience and not AI generated.
View all my tips
Article Last Updated: 2021-01-07


