By: Fikrat Azizov | Updated: 2022-02-18 | Comments (1) | Related: 1 | 2 | 3 | 4 | 5 | 6 | 7 | 8 | 9 | 10 | 11 | 12 | 13 | 14 | 15 | 16 | 17 | > Azure Synapse Analytics
Problem
This tutorial is part of the series of posts, dedicated to the building of end-to-end Lakehouse solutions, based on Azure Synapse Analytics. In the previous tutorial (see Implement Surrogate Keys Using Lakehouse and Synapse Mapping Data Flow), we've built an ELT pipeline with surrogate key generation logic. This work has laid the ground for building Slowly Changing Dimensions (SCD) logic, which we're going to discuss in this tip.
Solution
High-level transformation logic
Out of all SCD types, type -1 SCD dimensions are easiest from the implementation point, as they require a simple overwrite logic. The type -2 SCD dimensions, on the other hand, are more difficult to implement-they require additional columns to indicate the lifespan of the dimension rows (see Common Data Warehouse Development Challenges for more details). I'll be focusing on type -2 SCD dimensions in this tip.
On a high-level, type -2 SCD dimensions require the following transformation steps:
- Read from the source table and try finding their matches in the destination table, based on the natural key.
- Treat the rows having no matches as new rows and mark them active.
- For those rows that have matches, validate if any essential attributes have changed.
- Perform the following actions against the changed rows that have
matches:
- Update their SCD columns in the destination table, to mark them inactive (i.e. retire those rows)
- Add new rows against each retired row with the attribute values and mark them as active.
- Generate surrogate keys for any rows to be inserted into the destination table.
Note that this logic only handles the new and changed rows- unchanged rows will not be written into the destination, to avoid unnecessary versioning.
Also, it's worth mentioning that step #3 above can be implemented in different ways. One way of doing this is to compare each attribute from the source against their counterpart from the destination. The alternative approach is to calculate row signatures for the source and compare them against the signatures from the destination table. The solution described here uses the row signatures approach and leverages a hash function to achieve that.
The starting data flow design
I'm going to use the data flow we built in the Implement Surrogate Keys Using Lakehouse and Synapse Mapping Data Flow tip. This flow contains the dimension denormalization and surrogate key generation logic for the Product table and looks like this so far:
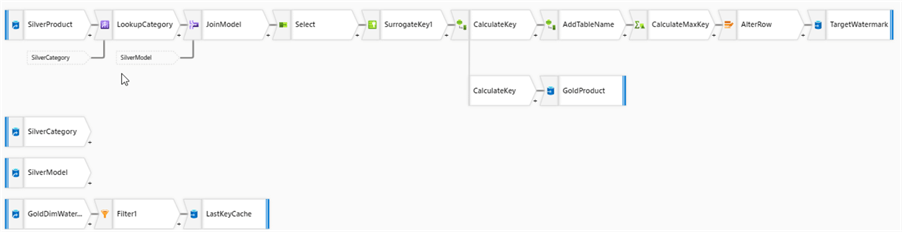
Figure 1
Although this data flow brings data into the DimProduct table, its schema doesn't include the columns required for SCD support, so we'll need to recreate this table with the new schema.
Preparation work
First of all, let's navigate to the storage account and remove all the files from the folder /delta/gold/DimProduct/. Next, create a notebook with Spark SQL language and following code to re-create DimProduct table:
CREATE TABLE DimProduct (
    ProductID int,
    Name string,
    ProductNumber string,
    Color string,
    StandardCost decimal(19,4),
    ListPrice decimal(19,4),
    Size string,
    Weight decimal(8,2),
    ModifiedDate timestamp,
    DateInserted timestamp,
    ProductCategory string,
    ProductModel string,
    RowSignature bigint,
    EffectiveFromDate timestamp,
    EffectiveToDate timestamp,
    IsActive int,
    ProductKey bigint
    )
    USING DELTA
    LOCATION  '/delta/gold/DimProduct/'
Notice that I've done some remodelling with this script- removed some non-essential columns and added SCD columns. Here is the description of the extra columns added for type-2 SCD tracking purposes:
- RowSignature - this column is a hash value from the combination of a few attributes from the Product table. We'll use this column to determine the rows that have changed in the source Silver table.
- EffectiveFromDate– this column determines the beginning of the lifespan for each row version.
- EffectiveToDate - this column determines the end of the lifespan for each row version.
- IsActive – active/non-active status of dimension rows.
- ProductKey -surrogate key
So, execute the above script, followed by the following command to add a dummy record to this table:
INSERT INTO DimProduct  VALUES (-1,'Unknown',NULL,NULL,NULL,NULL,NULL,NULL,NULL,NULL,NULL,
NULL,NULL,CURRENT_TIMESTAMP(),cast('9099-01-01' as timestamp),1,-1)
The SCD data flow design
The transformation logic outlined above require data from the target dimension table, so let's add a source transformation with the Delta format and point it to the storage location where we created the DimProduct table, as follows:
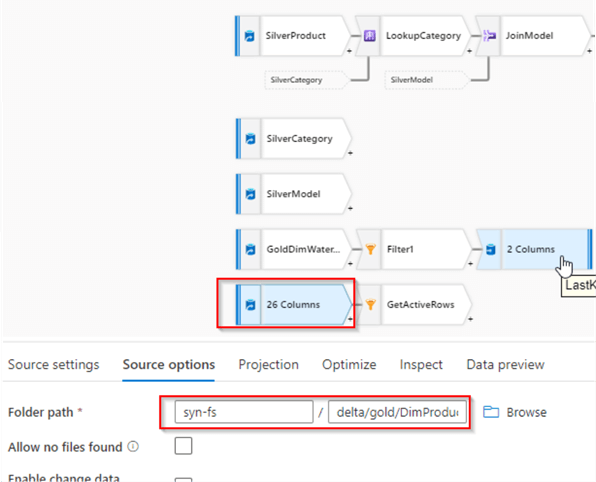
Figure 2
We'll need the table schema for this source, so navigate to the Projection tab and import the schema.
Next, add a filter transformation to fetch active rows, and configure it as follows:
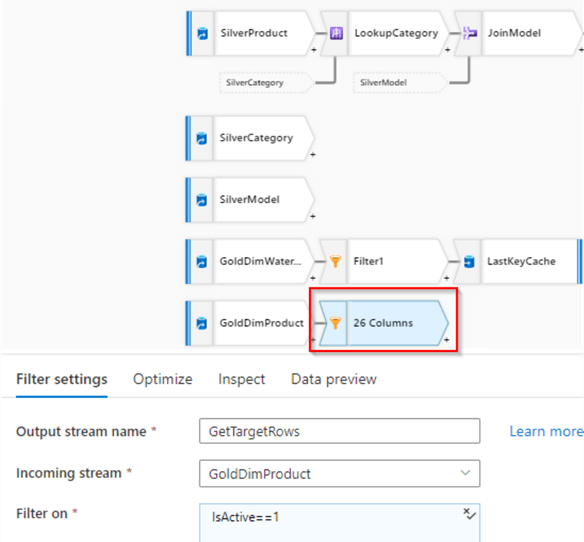
Figure 3
Note I've named this transformation GetTargetRows- we'll use the results of this transformation down the road.
Now, let's switch to the main data flow and add a Derived column transformation after the JoinModel transformation. Add RowSignature column with the following expression:
crc32(256,SilverProduct@Name,ProductNumber,Color,StandardCost,ListPrice,Size,Weight,
SilverCategory@Name,SilverModel@Name)
The first parameter in this expression determines the length of the hashing, while the remaining parameters include the list of source column values. Here's the screenshot:
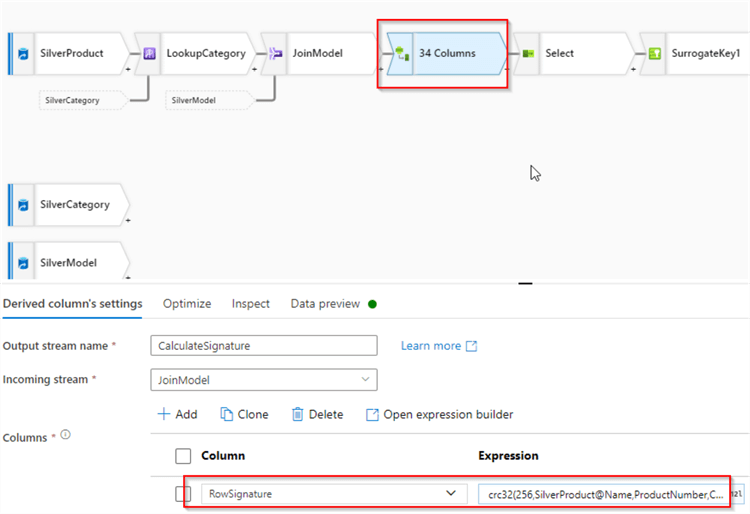
Figure 4
Next, let's add a lookup transformation, select GetTargetRows as a lookup stream and ProductID column as a key, under the Lookup conditions section. This transformation will match rows from the source stream against the rows from the target table. Here's the screenshot:
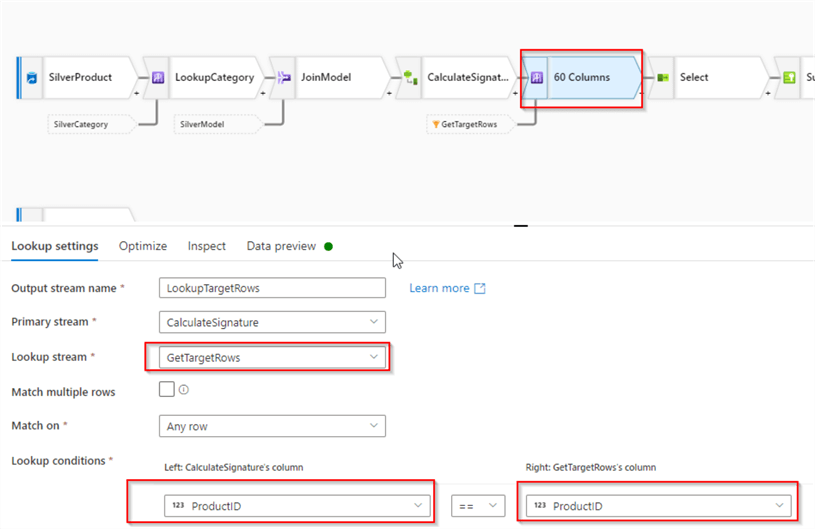
Figure 5
Next, we need to add columns from the target table, so let's open pre-existing Select transformation, and use Add mapping button to add a few fixed mappings. Add RowSignature column from the source stream and RowSignature, EffectiveFromDate, EffectiveToDate, IsActive and ProductKey columns from the target stream, as follows:
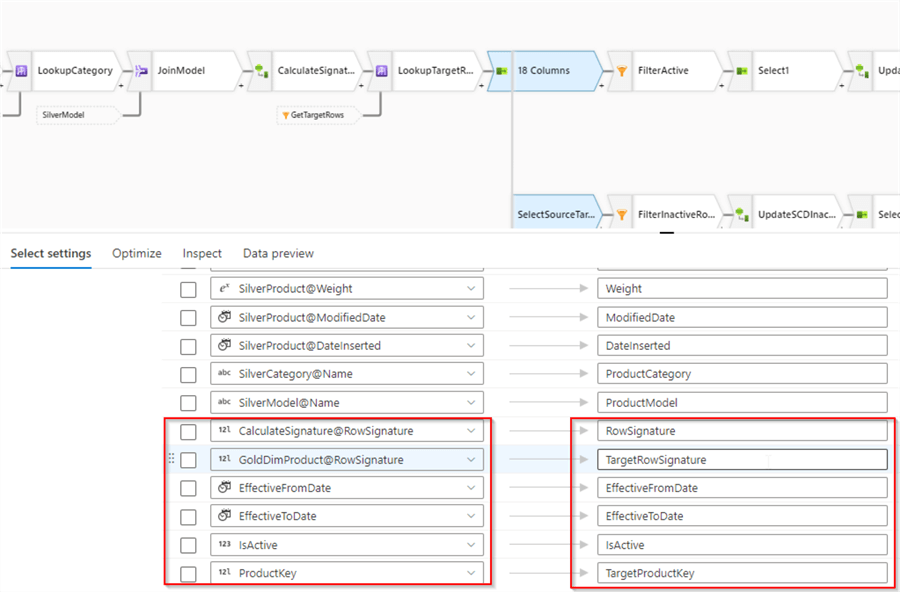
Figure 6
Notice I've aliased RowSignature and ProductKey columns, to avoid column name duplications. I also renamed this transformation as SelectSourceTarget to ensure the data flow design is easily readable.
We'll need to fork the stream at this point-one branch will be responsible for the rows with active status, while the other branch will handle dimension retiring logic for existing rows in the target. I'll call these branches active/inactive row branches accordingly, in the next few sections.
So, let's add a New branch transformation, after the SelectSourceTarget transformation, as follows:
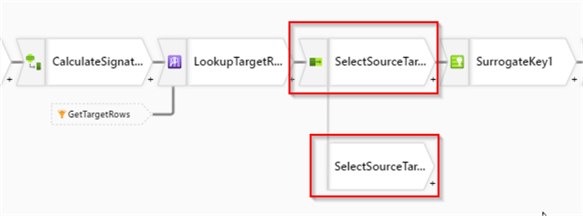
Figure 7
Building inactive rows sub-branch
We'll designate the new branch for inactive rows. Let's add a filter transformation to that branch with the following condition:
TargetRowSignature!=RowSignature
This expression compares signatures between the source and target rows and filters out any unchanged rows. Here's the screenshot:
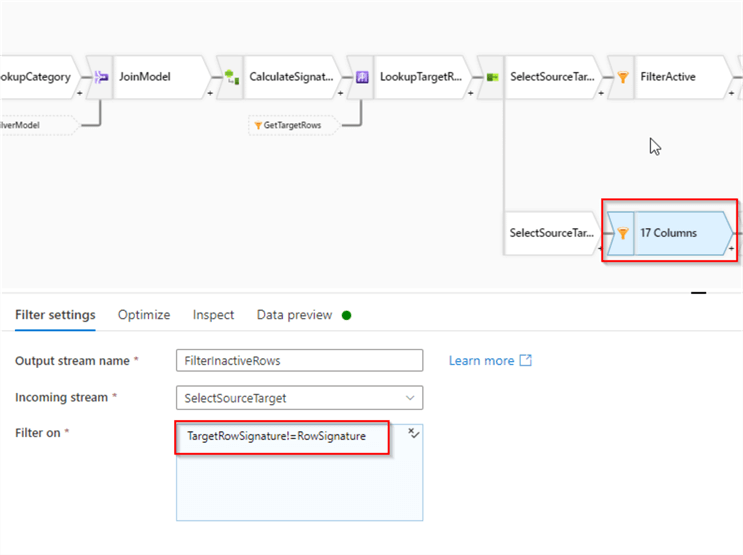
Figure 8
Next, add a Derived column transformation with the following column definitions:
| Column name | Expression |
|---|---|
| EffectiveToDate | currentTimestamp() |
| IsActive | 0 |
These expressions will end the lifespans of the rows at the execution time and change their statuses to inactive.
Note I've named this transformation UpdateSCDInactive. Here's the screenshot:
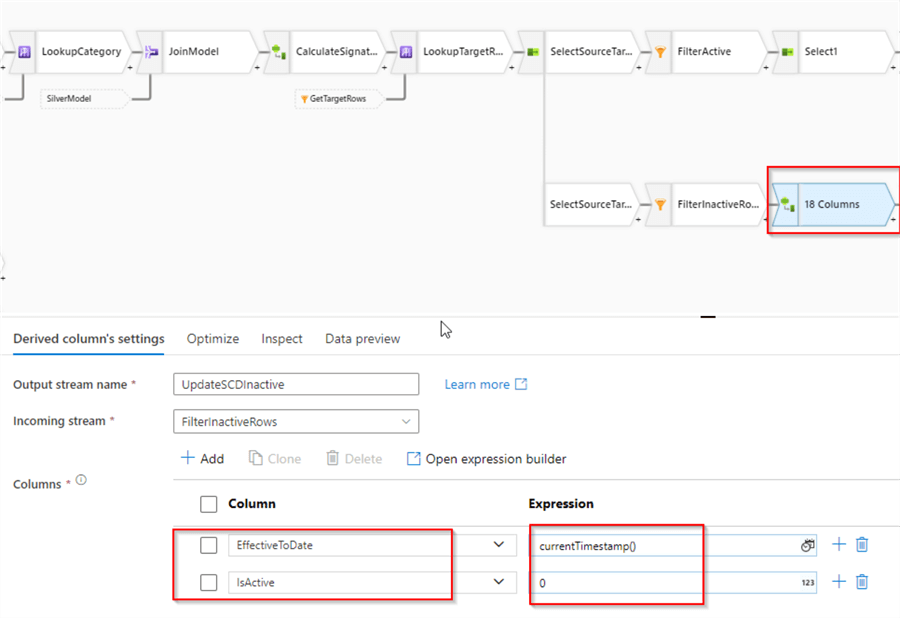
Figure 9
Since we only need to update a few SCD specific columns to retire rows, let's add another Select transformation, and remove all columns, except SCD and key columns, as follows:
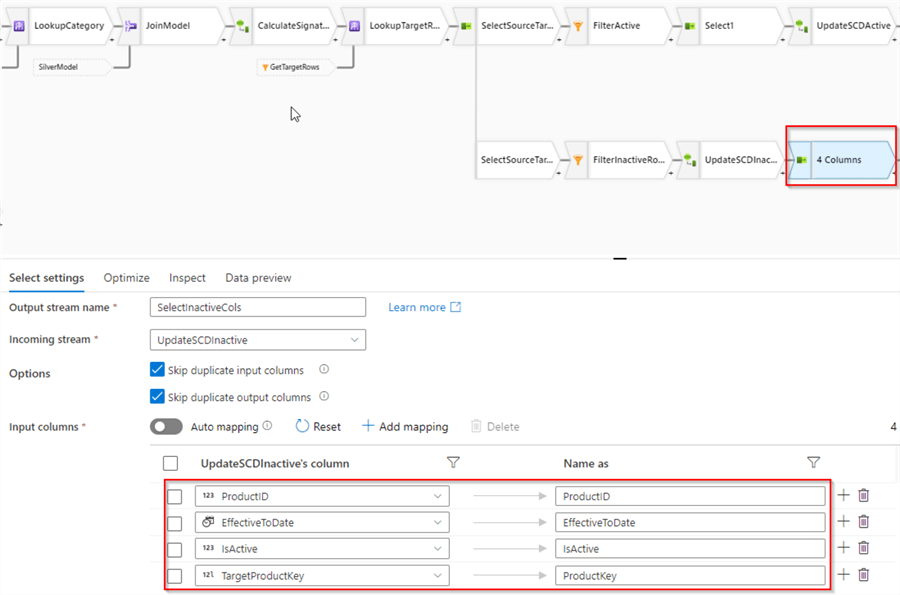
Figure 10
Notice I've renamed the TargetProductKey column to ProductKey, to ensure the schema of this stream is compatible with the target table.
Next, since retiring dimension rows involves updating them in the target table, we'll need an Alter row transformation. Let's add and configure it as follows:
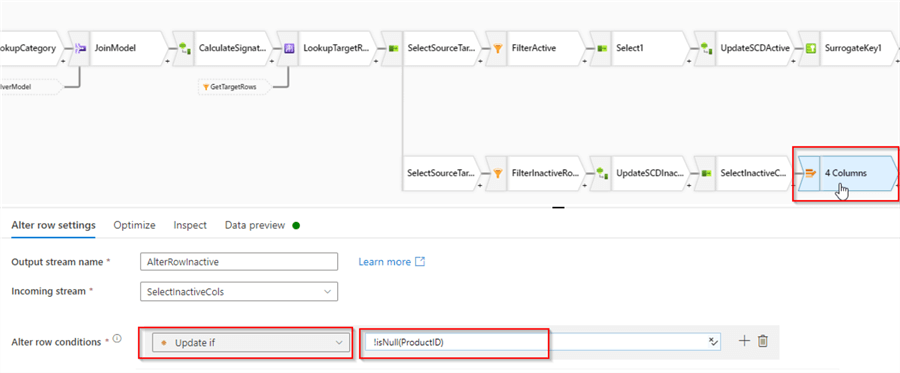
Figure 11
Finally, let's add Sink transformation with Delta format, pointing to DimProduct table's storage location delta/gold/DimProduct. Since this branch will only perform updates, enable Allow update, disable Allow insert checkboxes, and select ProductKey column as a key, as follows:
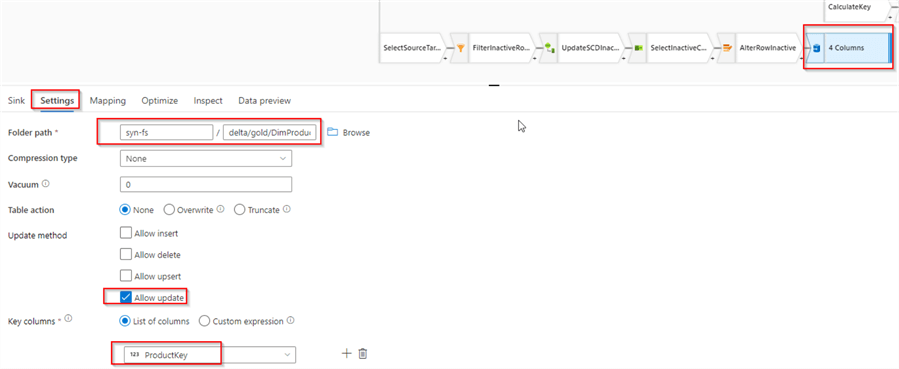
Figure 12
Building active rows branch
The active rows branch will require a filter transformation to limit the output to new, as well as changed rows, so let's add a filter with the following condition:
isNull(TargetRowSignature) || TargetRowSignature!=RowSignature
The first part of this expression will cover brand new rows, while the second part will cover existing changed rows. Here's the screenshot:
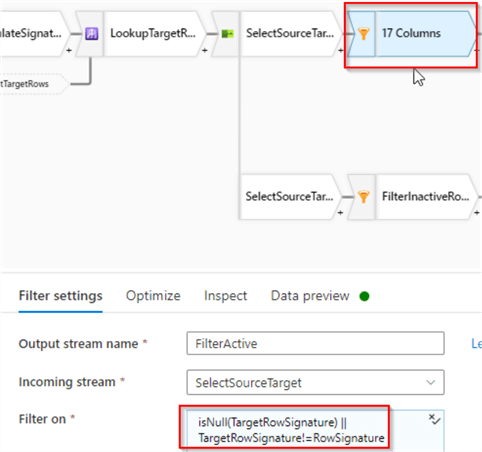
Figure 13
The column TargetRowSignature added earlier is no longer required, so let's add Select transformation to remove that column, as follows:
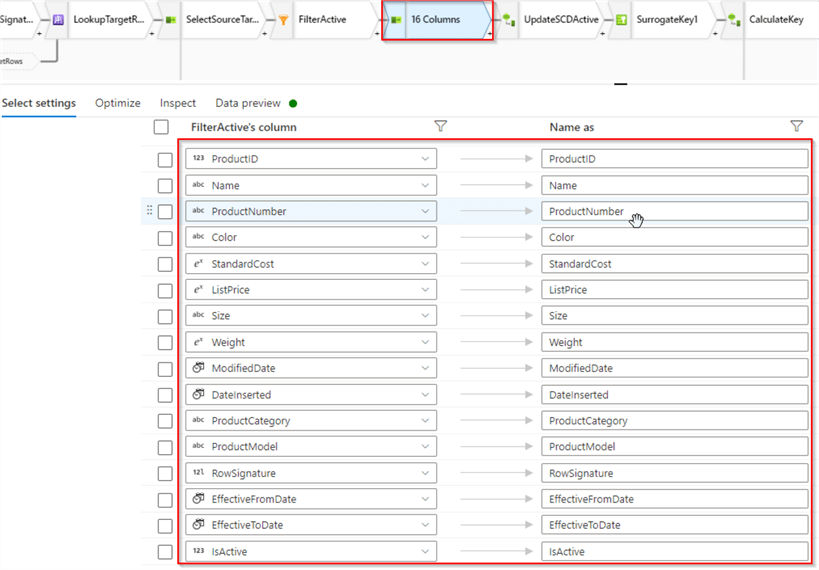
Figure 14
Next, let's add a Derived column transformation, and configure SCD columns as follows:
| Column name | Expression |
|---|---|
| EffectiveFromDate | currentTimestamp() |
| EffectiveToDate | toTimestamp('9099-01-01', 'yyyy-MM-dd') |
| IsActive | 1 |
These expressions will set the beginning of the row lifespan to the flow execution time and ending to the point in time in future. Here's the screenshot:
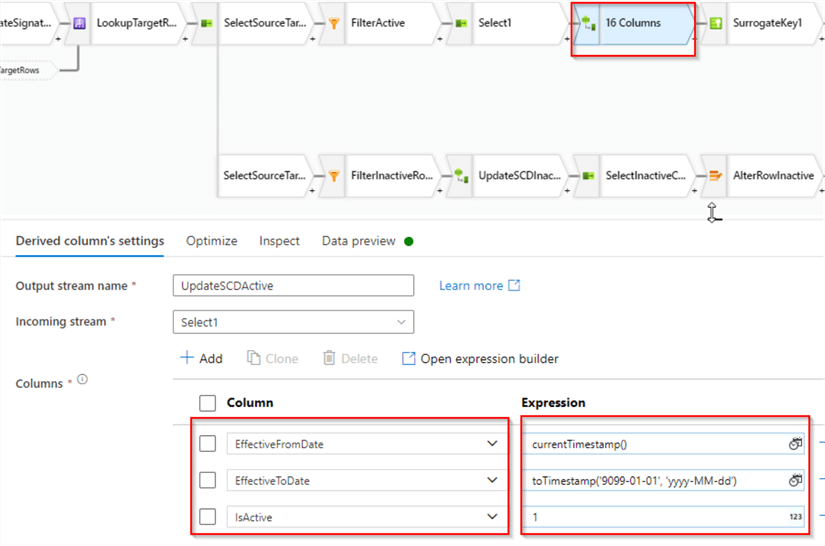
Figure 15
Since we already have the sink transformation to write into the target dimension rows, the rest of the data flow will remain unchanged.
Validation
I'll perform the validation twice. First validation will be done after initial execution, which will populate an empty target table. Then we will update some source rows, execute an end-to-end pipeline and validate the destination table again, to see how the pipeline handles rows changed in the source.
During the initial execution, this data flow should mark all the rows as active. Let's kick off the parent data integration pipeline responsible for this data flow, and validate the results using the following SQL script:
SELECT
    TOP 100 ProductID,Name,RowSignature,EffectiveFromDate,EffectiveToDate,IsActive,ProductKey
FROM
    OPENROWSET(
        BULK 'https://synstg.blob.core.windows.net/syn-fs/delta/gold/DimProduct/',
        FORMAT = 'DELTA'
    ) AS [result]
where ProductId<707 order by ProductId,dateinserted desc
As you can see from the query output below, all the rows in the target table are active:
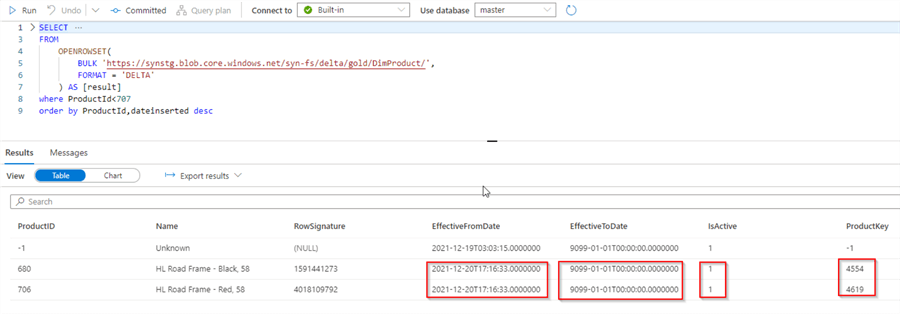
Figure 16
Next, let's see how our data flow handles changes in the source. Connect to Azure SQL DB and update a few rows in the source AdventureWorks database, using the following query:
update SalesLT.Product set ListPrice=ListPrice*2 where ProductId<707
And run all of the data integration pipelines we built, bringing data from Azure SQL DB up until the gold layer. Once it's done, we can validate the table using the same query. As you can see from the below figure, the data flow correctly retired previously active rows and created active rows:
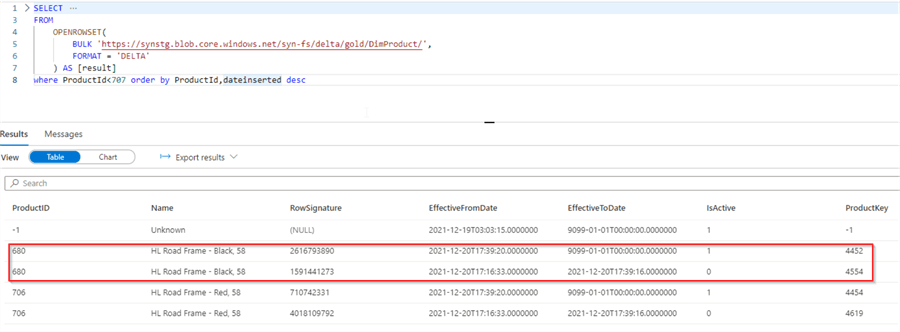
Figure 17
Conclusion
In this tip, we've enhanced our data flow completed SCD logic. A typical data warehousing solution involves a few other dimension processing tasks, which I'll be covering in the next posts, so stay tuned.
Next Steps
- Read: Common Data Warehouse Development Challenges
- Read: Implement Surrogate Keys Using Lakehouse and Synapse Mapping Data Flow
- Read: Implement Dimension Denormalization Using Synapse Mapping Data Flow
- Read: Implementing data deduplication in Lakehouse using Synapse Analytics Mapping Data Flow
- Read: Data enrichment in Lakehouse using Synapse Mapping Data Flow
- Read: Mapping data flows in Azure Data Factory


About the author
 Fikrat Azizov has been working with SQL Server since 2002 and has earned two MCSE certifications. He’s currently working as a Solutions Architect at Slalom Canada.
This author pledges the content of this article is based on professional experience and not AI generated.
View all my tips
Article Last Updated: 2022-02-18