By: Manvendra Singh | Updated: 2023-05-11 | Comments | Related: 1 | 2 | 3 | 4 | > Azure SQL Database
Problem
This article explains the process to change the secondary region of a failover group created as a business continuity solution for Azure SQL Databases.
Solution
Business continuity is a feature that enables Azure SQL Databases to continue functioning with minimum impact in case of any disruption or disaster to the source system. Auto-failover groups are a business continuity feature that enables us to group more than one SQL Database and fail them all over as a single unit. It supports manual and automatic failover modes.
For this article, we will change the secondary region of a failover group. Before we proceed, let me brief you on my existing setup that will be used for this demonstration.
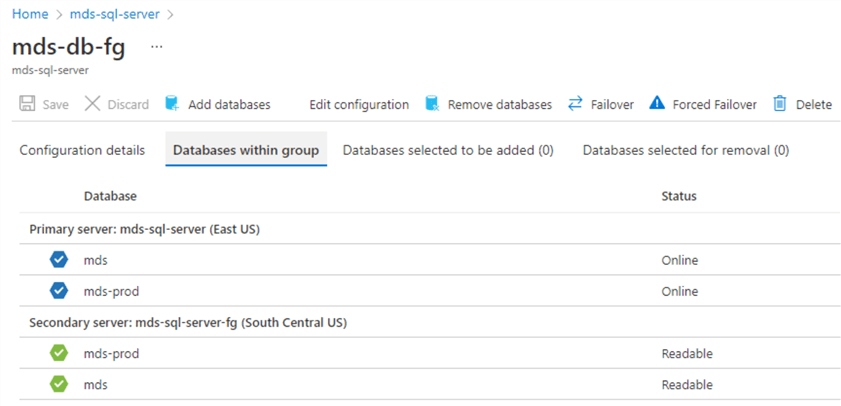
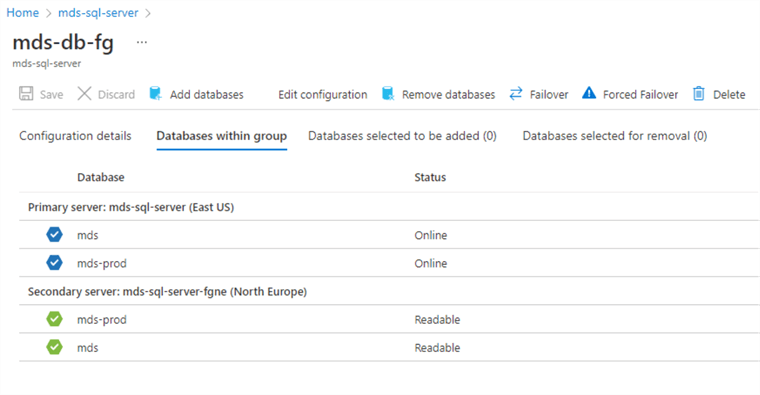
To access this data in Azure, log in to the Azure portal, jump to the dashboard page of the primary SQL server mds-sql-server, and click on the Failover groups tab under Data management in the left pane. You will get the failover group name and details in the right pane. Click on the failover group name to open its configuration page, and click on the Databases within group tab to see all databases and other details of the failover group.
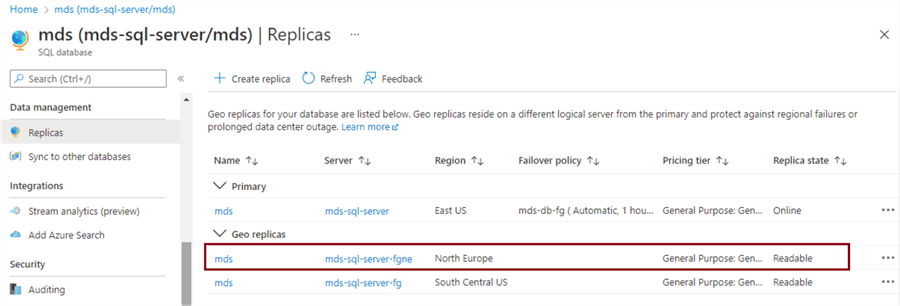
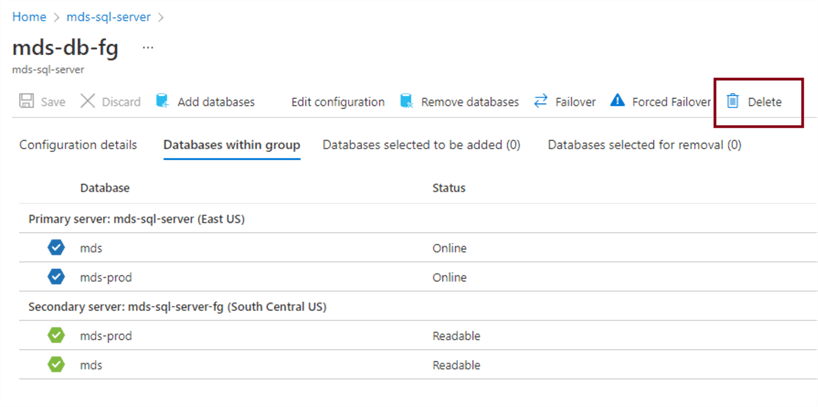
I have two Azure SQL databases, mds and mds-prod, hosted on a SQL Server mds-sql-server in the East US region. I also have configured a failover group named mds-db-fg between the primary SQL Server mds-sql-server and the secondary SQL Server named mds-sql-server-fg hosted in the South Central US region. Both databases are added to this failover group to achieve business continuity capability. Review this configuration below.
The business has decided to change the secondary region of the mds-db-fg failover group from South Central US to North Europe. We need to follow these high-level steps to complete this change.
- Create active geo-replication of all SQL Databases to a new region, i.e., North Europe.
- Remove existing failover group configuration between server mds-sql-server hosted in East US and mds-sql-server-fg hosted in South Central US.
- Reconfigure the failover group between SQL Server mds-sql-server hosted in East US and mds-sql-server-fgne hosted in North Europe.
- Validate and test failover.
- Decommission older secondary servers and databases hosted in the South Central US region.
Let's discuss each step in further detail.
1 - Creation of Active Geo-replication for All Azure SQL Databases
We will create a geo-replication of each database in the failover group mds-db-fg. You can read this article that gives a step-by-step process of how to configure active geo-replication for an Azure SQL database.
Log in to the Azure portal and access the overview page of Azure SQL database mds. Click on the Replicas tab under Data management in the left pane to see its geo replicas in the right pane. This database is already added to the failover group mds-db-fg, so we can see its geo replica in the right pane. You can verify other details of this configuration from the below screenshot.
We will also create active geo-replication of this database to ensure data protection during the transition to the secondary region to our desired location. Both Azure SQL databases would have two geo replicas during this exercise: one through the failover group and the other through active geo-replication.
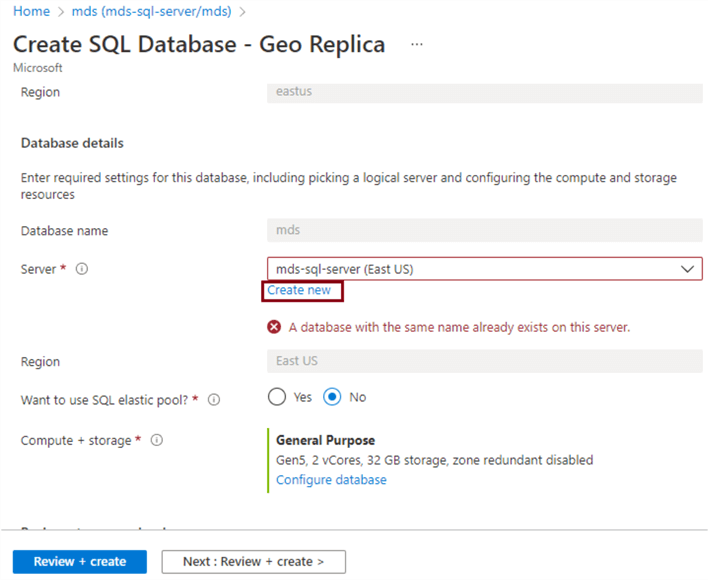
Click + Create replica, seen in the dark red rectangle below, to launch the active geo-replication page.

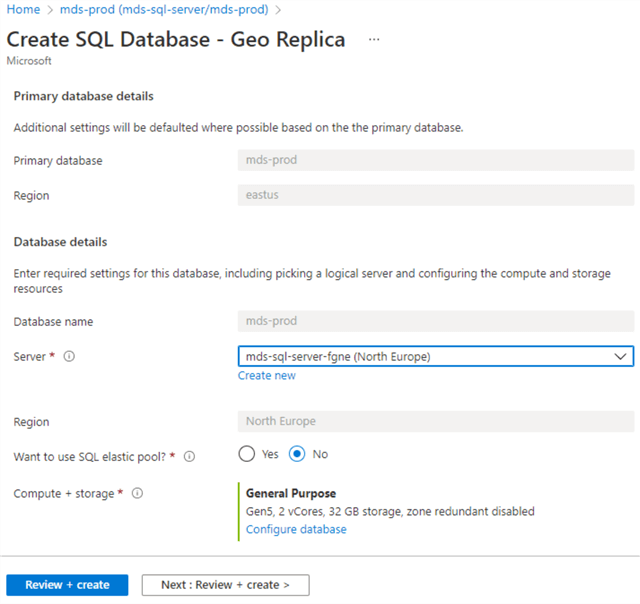
Verify the primary database, server details, subscription, and resource group here. Then choose the secondary SQL Server and your desired region where it will be hosted. If you already have a secondary server, click on the drop-down menu to select it. Otherwise, click the Create new link (seen below, highlighted in red) to configure the new secondary SQL Server.
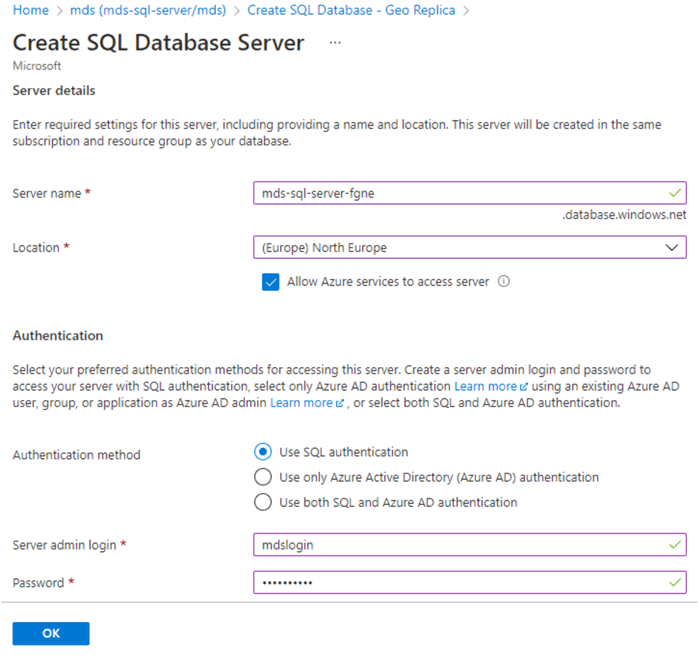
The screen below will appear when you click the Create new link. Enter the server name and its location. Since we want to change the secondary region from South Central US to North Europe, we will choose it as the secondary region in the following screenshot. Choose an Authentication method and provide a Server admin login and Password. Click OK.
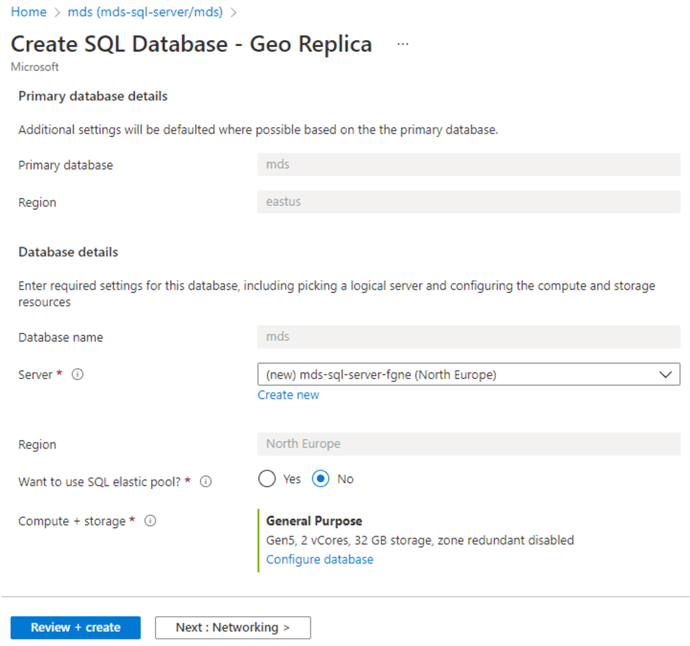
You will return to the active geo-replication creation page, where you previously selected your desired secondary server and the location where you want to move the secondary server. Configure the remaining details, including compute sizes and type of server as per primary SQL Server to keep both SQL Servers identical. I kept all settings similar to the primary server.
Click on the Review + create button to deploy this active geo-replication creation.
Once completed, you can verify it by accessing the Replicas page of this database. There are two geo replicas for database mds in the right pane, as seen in the image below. The geo replica we created as part of geo-replication is highlighted in the dark red rectangle.
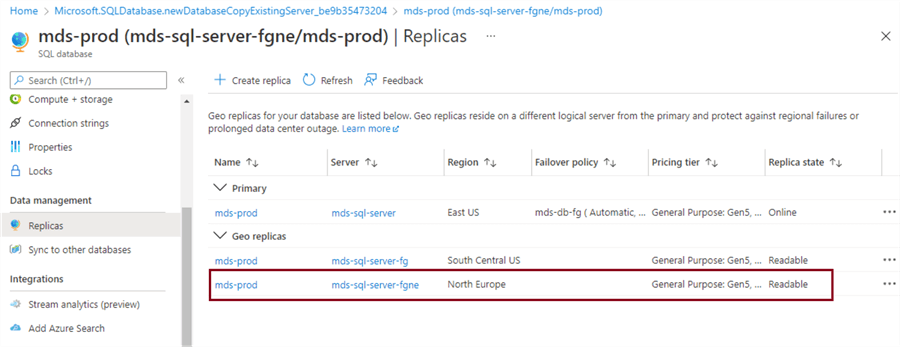
Similar steps are needed to create an active geo-replication for Azure SQL database mds-prod. It is recommended to keep the secondary SQL Server the same as used for previous database mds in the steps above. You can see it in the screenshot below, where we chose the secondary SQL Server as mds-sql-server-fgne from North Europe. Follow the remaining steps used to create the active geo-replication for database mds.
Once deployed, you can verify it by accessing its Replicas page. In the image below, we can see that geo-replication has also been created for this Azure SQL database.
We have successfully created active geo-replication for all Azure SQL databases added in the failover group to ensure data is protected during this exercise. Depending on your database size, syncing to the other region may require some wait time.
2 - Remove Existing Failover Group Configuration
The next task in changing the secondary region of a failover group is to remove the existing failover group, making sure to capture and save failover group configuration values (read/write failover policy and read/write grace period). Each will be used later when we create the new secondary region and recreate this failover group.
Go to the overview page of the primary SQL Server mds-sql-server. Click on the Failover groups tab under Data management from the left pane. The failover group will appear in the right pane. Click on the name of the failover group to access its configuration page.
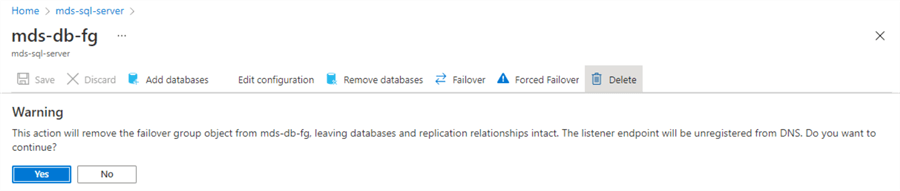
The image below will appear. Click Delete to initiate the failover group removal process.
A warning popup window will appear stating that the failover group and listener endpoints will be removed, but replication between Azure SQL databases will continue. Since listener endpoints will be unregistered from DNS, your application connections will fail after this step.
Click Yes to proceed with this removal.
The failover group will disappear along with all its details, as shown in the image below.
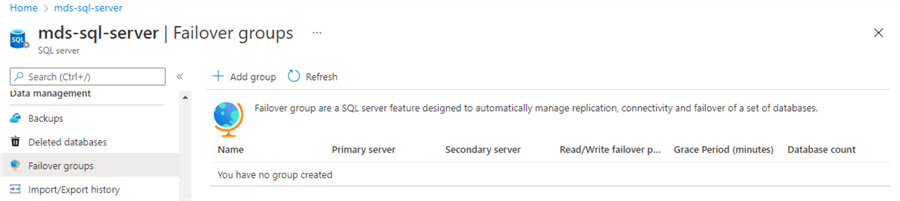
As you can see, there is no failover group in the right pane of the above screen, whereas data replication will continue flowing between their primary and secondary databases. We can verify this by accessing the Replicas tab of any databases added to the failover group.
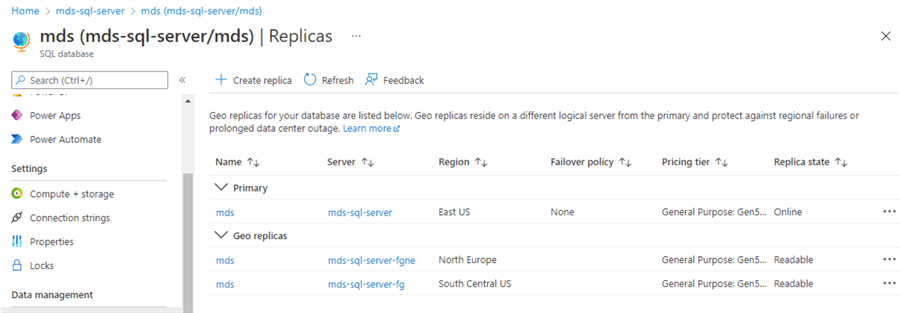
We can see two geo replicas of Azure SQL database mds below. You can validate its details, like server name and location, to ensure they are the same databases added to the failover group.
3 - Recreate the Failover Group with the Same Name
As part of the sequential process, we have,
- Created active geo replica of all failover group databases to replicate these databases to our desired region on SQL Server mds-sql-server-fgne hosted in North Europe
- Removed failover group that was configured between SQL Server mds-sql-server hosted in East US and mds-sql-server-fg hosted in South Central US region
Now, we will recreate the failover group with the same name between the primary SQL Server mds-sql-server hosted in the East US region and the newly created secondary SQL Server mds-sql-server-fgne hosted in North Europe.
The following will describe the high-level steps of creating a failover group. However, if you want to learn the detailed steps to configure a failover group, I recommend reading my article, How To Configure Azure SQL Auto Failover Groups.
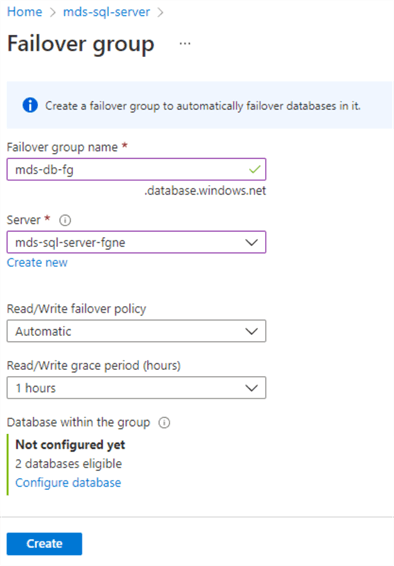
Log in to the Azure portal and access the primary SQL Server overview page. The names of my primary and secondary SQL Servers are mds-sql-server and mds-sql-server-fgne. Click on the Failover group tab under Data management from the left pane of the overview page of the primary SQL Server mds-sql-server. Click + Add group from the right pane, as shown in the image above. The screen below will appear to configure the failover group.
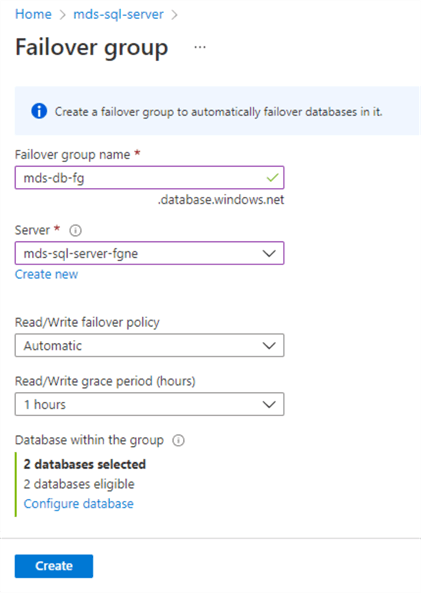
Enter the same failover group name as it was before. Keeping the same name will ensure a successful connection, as listeners will be created with the same name, and you will not need to make any changes in connection strings for applications. Next, choose the newly created secondary SQL Server named mds-sql-server-fgne from the server drop-down menu. Configure the read/write failover policy along with its grace period as it was before or as per your newly defined policy.
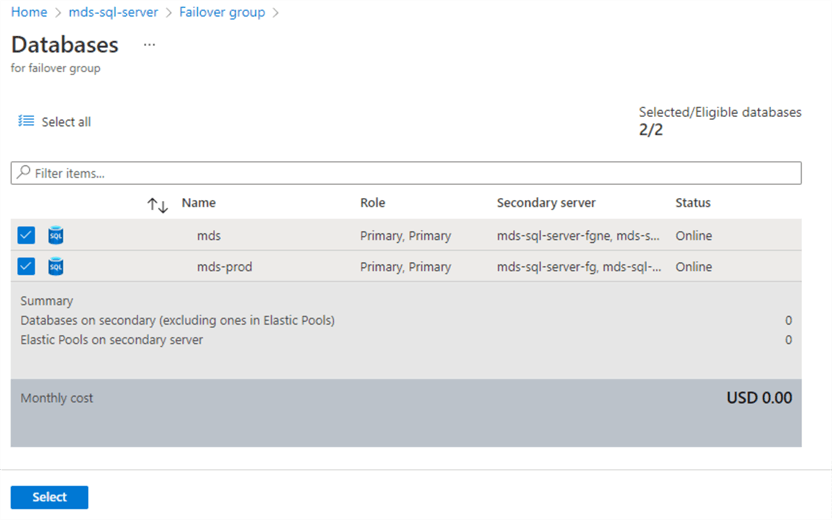
Next, click the Configure database link to add databases to the failover group. The screen below will appear. Select each Azure SQL database by clicking on the corresponding check box. You will notice there is no additional cost for adding these databases because both databases are already replicated to target servers in the secondary region. Click Select to proceed.
You will return to the failover group creation window. Click Create to start the deployment of this failover group creation.
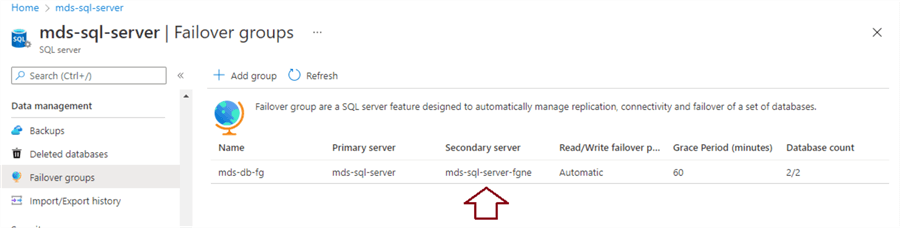
Returning to the failover groups dashboard page, you will see a new failover group along with all its parameters. If you still don't see it, click Refresh to reflect the changes. The secondary server is showing as mds-sql-server-fgne in the image below. Your application connection will get access as the listener is created during the failover group creation.
Further validation can be made by accessing the failover group configuration page, where you can validate listener endpoints. Since the failover group name is the same, the listener endpoints will remain the same. You can also see the primary and secondary SQL Servers and the region where they are hosted.
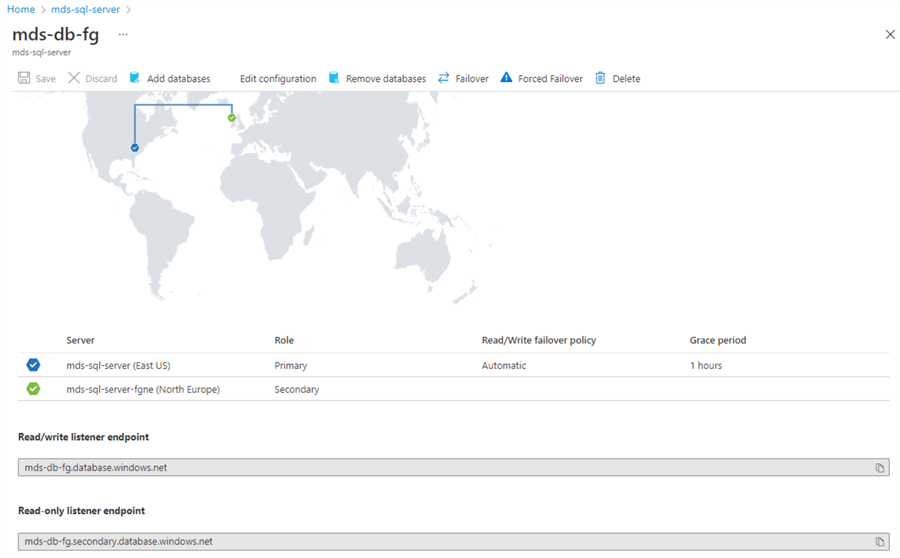
Additionally, by accessing Databases within group tab, you can further verify Azure SQL databases participating in the failover group, including their status, region, and server roles.
We have now changed the secondary region of an Azure SQL databases-based failover group. We still need to perform some steps to close this activity, like testing a failover of the above configuration and decommissioning earlier secondary SQL Server mds-sql-server-fg hosted in the South Central US region. Next, we will conduct a failover test to ensure the above configuration works fine.
4 - Test Failover
Let's test the failover of the newly configured failover group. Click the Failover option shown in the above screenshot. A popup window will appear stating that failover is in progress (below).
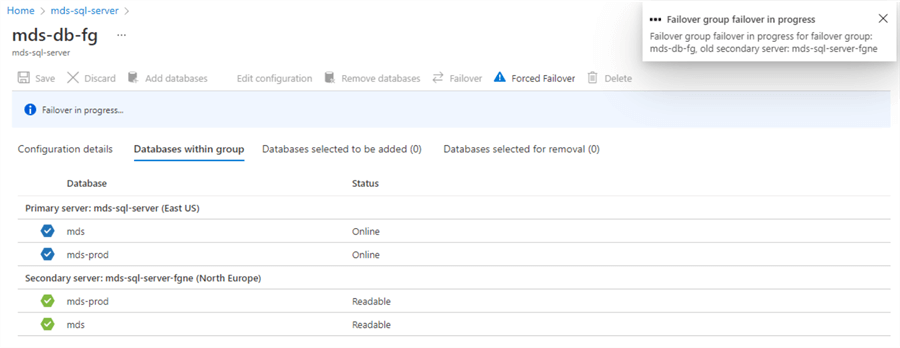
Application connections will be dropped when the failover group transitions to the new secondary region, making it primary. Don't do this often, and always plan failovers during change windows or weekends to prevent any outage or data loss.
After the failover, the image below shows that the server roles have been changed, and now the newly created secondary SQL Server mds-sql-server-fgne has become the primary server.
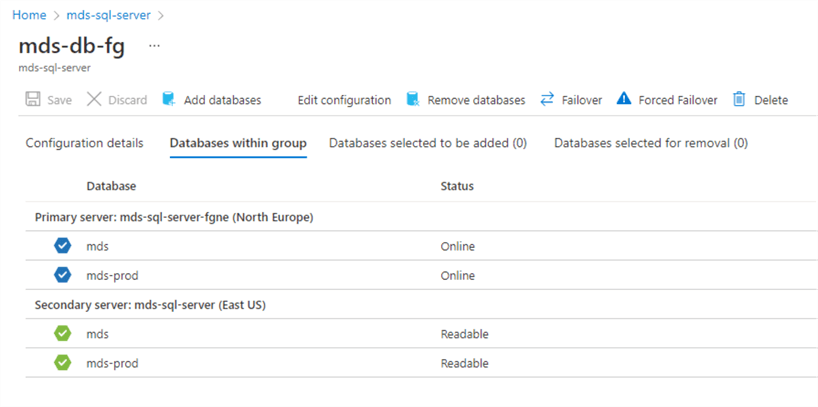
This test ensured that the newly configured failover group works and is healthy.
5 - Drop or Decommission Older Secondary Servers and Databases
The last step of this activity is to initiate the decommissioning process of the previous secondary server and database hosted in the South Central US region. Since two copies of the databases, mds and mds-prod, exist, you can directly drop the secondary server mds-sql-server-fg, which will also remove both Azure SQL databases from this server.
If you have other databases hosted on this server apart from these two databases (mds and mds-prod) and want to keep this server alive, then you can drop both databases keeping other databases as is. Note: Data replication continues for these databases. First, you must stop replication and remove these databases from this server. You can also keep a backup of both databases by securing the backup copies and removing the databases hosted on mds-sql-server-fg. Always go with your specific requirement.
Both replicas for each Azure SQL database on database mds are still present and can be accessed and verified in the screen below.
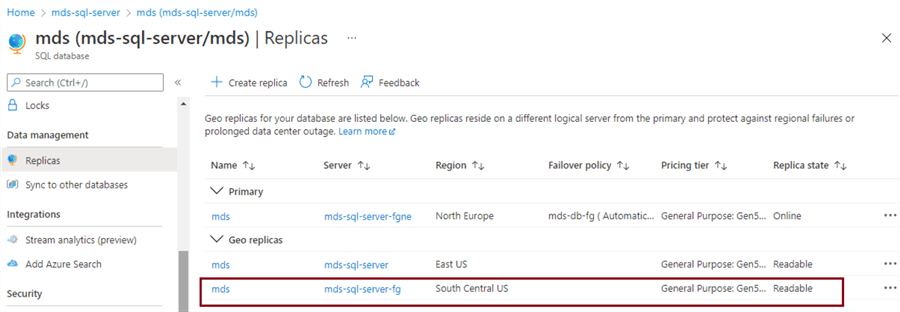
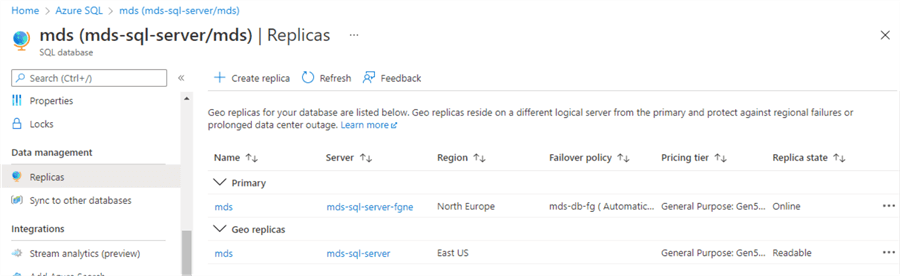
I will drop the secondary server as I don't need it anymore because we already have an additional copy of these databases. Follow the decommissioning process to remove the earlier secondary server, mds-sql-server-fg, and once it is dropped, you can verify geo replicas for each database. The image below shows only one geo replica for database mds. If you want to make mds-sql-server primary again, initiate a failover to make it primary (it changed to secondary during our failover testing).
Next Steps
- This article has explained the step-by-step process to change the secondary server and secondary region of a failover group configured for Azure SQL databases. Stay tuned for my next article, where I will demonstrate how to change the primary region of a failover group.
- Check out these related articles:


About the author
 Manvendra Singh has over 5 years of experience with SQL Server and has focused on Database Mirroring, Replication, Log Shipping, etc.
This author pledges the content of this article is based on professional experience and not AI generated.
View all my tips
Article Last Updated: 2023-05-11