By: Rick Dobson | Updated: 2023-07-14 | Comments | Related: > Python
Problem
BeautifulSoup can be used for screen scraping web page content and in this tutorial, we will take a look at different examples of scraping a web page using Python code and BeautifulSoup.
Solution
BeautifulSoup (sometimes referred to as Beautiful Soup library) is one of several widely used screen scraping packages for a web page. It is highly regarded for its ease of use and power. Other popular screen scraping packages include Selenium and Scrapy.
Screen scraping enables developers to create solutions that permit comparative analyses from all over the internet, such as web applications that look for the best price on an item from many different online stores.
Screen scraping with BeautifulSoup works for a moment in time. When a website revises the content in its web pages over time (as is often the case), this permits you to save and track selected content from a web page for a time series by comparing content for different time series values for successive scrapings of a web page.
This tutorial will demonstrate the basics of scraping a web page with BeautifulSoup. This tip starts by scraping a whole page and reviewing HTML tags from a common type of page at the MSSQLTips.com website. Excerpts from the sample page will be reviewed and described to highlight the use of selected HTML tags on a sample web page. Without understanding the basics of HTML programming, it will be exceedingly difficult to scrape meaningful content from a web page.
An internet search discovered four previous articles on MSSQLTips.com that presented coverage of how to use BeautifulSoup. Two articles were authored by Nai Biao Zhou ("Using Python to Download Data from an HTML Table to an SQL Server Database" and "Using Advanced Python Web Scraping to Conduct a Web Content Audit"). Two were authored by me ("Web Screen Scraping with Python to Populate SQL Server Tables" and "Scraping HTML Tables with Python to Populate SQL Server Tables"). The BeautifulSoup Documentation presents and demonstrates the complete array of features and capabilities of the BeautifulSoup web scraper.
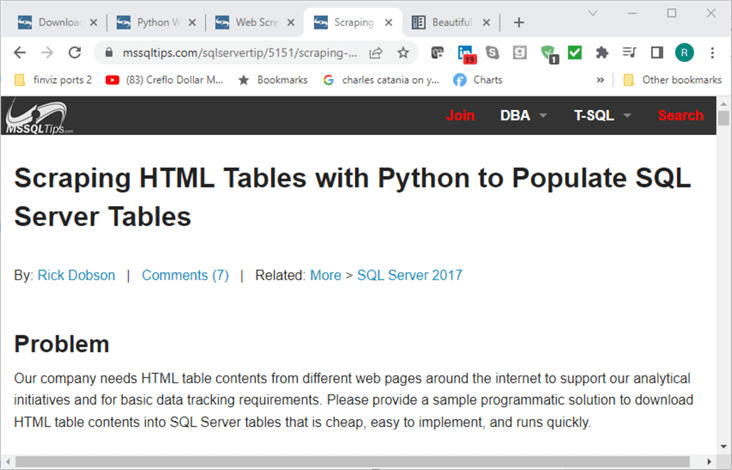
Here is an image of the title, author name, and problem statement from a browser session for one of the five resources referenced above.
Loading the Software Used in this Tip
The source code implementing the Python programming language is regularly updated and available without charge from Python.org and other sources. For this tip, a stand-alone version of Python (version 3.10) was downloaded from Python.org onto a computer running Windows 10. You can also obtain Python as a component of Condor or SQL Server 2019 (and subsequent versions). This approach bundles Python with other non-core Python software.
Python is one of the most popular programming languages for its ease of use as well as its power, which is derived, in part, from the many modules that can be installed along with it. These packages are for web scraping and other functional areas, including web development, statistics, and data science.
When you download Python from Python.org, it comes with an integrated development environment called IDLE and another stand-alone program known as the Package Manager for Python, more commonly called pip. The IDLE application for Python is roughly analogous in function to SSMS for T-SQL in SQL Server.
Pip is particularly valuable because you can use it to selectively install packages, such as BeautifulSoup, to extend the core Python capabilities that you download from Python.org. After downloading and installing Python from Python.org, you can download and install BeautifulSoup by running the following line of code in a command window from the directory containing Python. This tip uses beautifulsoup4 (version 4.11.1).
pip install bs4
BeautifulSoup can run with a built-in Python parser known as html.parser. This parser is for parsing HTML documents. BeautifulSoup can also run with the lxml parser for HTML and XML documents. The pip to install lxml for use with Python appears below. The lxml parser is widely considered to be faster and more efficient than the Python built-in html parser. For the documents in this tip, the two parsers are interchangeable.
pip install lxml
Reading and Displaying Your First Page with Python and BeautifulSoup
The following Python script requests a web page from the MSSQLTips.com site.
- The script begins with references for the requests and bs4 libraries.
- The requests library allows Python to send HTTP requests, such as GET, for retrieving a web page from a website on a web server. The requests() function from the requests library takes a URL as an argument. The requests library is built into Python 3.7 and above. When working with earlier Python versions, you can add the requests library via pip.
- The from clause for importing the bs4 library assigns the alias name BeautifulSoup to the library.
- An assignment expression sets the myURL string variable to the URL for the web page to be read from the MSSQLTips.com site. The assignment references the sample web page for this tip. The sample page contains my author profile at MSSQLTips.com and other content. If you want to inspect the page from a browser, copy the myURL string value to the address box in your browser.
- The requests() function with the get HTTP command returns the web page content
from myURL to r, which contains the response to the HTTP request
- r.content is the content from the request in bytes
- html.parser is the name of the parser for formatting the bytes returned to Python
- soup is the name of the BeautfulSoup object with the formatted content from r.content
- You can display the contents of soup with a standard Python print() function
statement or by adding the BeautifulSoup prettify() function to the Python print
function.
- The statement for referencing the standard Python print() function is commented out with a preceding comment marker (#). If the statement were not commented out, the print function would display the soup object content as one long string.
- The last statement in the script shows the syntax for using the prettify() function. This function displays the soup content in a format that makes it easier to identify the tags on a web page. This can, in turn, make it easier to locate tags from which you want to extract content.
#Prepared by Rick Dobson for MSSQLTips.com

#reference libraries
import requests
from bs4 import BeautifulSoup


#assign a url to myURL
myURL = "https://www.mssqltips.com/sqlserverauthor/57/rick-dobson/"

#get url content
r = requests.get(myURL)

#parse HTML code
soup = BeautifulSoup(r.content, 'html.parser')

#print (soup)

#pretty print the page
print(soup.prettify())
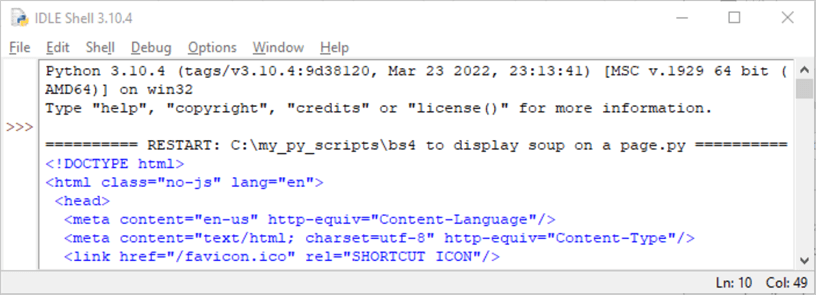
Over 5,750 lines within the soup object are displayed by the final print statement in the preceding script. The following screenshot shows the top several lines of HTML extracted by the requests() function and formatted with the html.parser module from the URL at myURL. This excerpt appears in an IDLE Shell window; recall that IDLE is the Python-integrated development application that downloads from Python.org.
- The output commences with <!DOCTYPE html>, which is a declaration to inform browsers and other HTML readers, such as Python’s requests library, that the following text is in an HTML document. The declaration statement is not part of the HTML document.
- The html tag is the first statement in the document. The html tag
appears with class and lang attributes.
- The class="no-js" attribute assignment allows the use of CSS (cascading style sheets) for styling JavaScript free pages
- The lang="en" assignment indicates the language for the document is English
- The head tag trails the html tag to mark the start of the head section in an HTML page: the head section of an HTML document resides between the starting (<head) and ending head (</head>) section tags. The head section contains metadata about the HTML document. Head sections are for a document, but the head section content does not appear within a document when a browser displays the web page. BeautifulSoup can display the head section of a web page along with its body section.
- The first two tags after the head tag are meta tags nested within the head
section.
- The first meta tag defines the web page’s language as en-us for US-style English in contrast to the more generic language reference of en in the html tag
- The second meta tag specifies the character set for the document as utf-8.
- The link tag following the first two meta tags is for setting the small
identifier logo, a favicon, on a browser tab for a web page. When multiple
sources are referenced in a browser session, favicons can indicate the origin
of the source for a browser tab.
- Most browsers and languages allow multiple ways of specifying the same thing.
- There are several different ways to assign favicons:
- Favicon.ico is a common name for the image of a favicon.
- The file with the name favicon.ico is in the root directory of the website.
- This resource has additional detail on different ways to set favicons for web pages
- The screenshot at the end of the Solution section shows a browser session
with five tabs – one for each of the web pages referenced in the session.
- The first four tabs are for web pages from the MSSQLTips.com site. Each of these four tabs has the same image on its left edge. This image is the favicon for the site.
- The fifth tab is for the website with the BeautifulSoup documentation. Notice that its favicon looks like a web page with a navigation bar on the left side of the page and web content on the right side of the page.
The following screenshot shows the last tag in the head section, followed by the first tag in the body section of the web page. Web pages can have both sections.
- The ending tag for the head section is </head>
- The beginning tag for the body section starts with <body followed with a style attribute assignment. An angle bracket (>) pointing right terminates the starting body tag
- Subsequent tags in the body section specify the content and style or content in the remainder of the body section

The following screenshot illustrates the tags to end a web page at https://www.mssqltips.com/sqlserverauthor/57/rick-dobson/; this URL specifies the name and location of the sample page for this tip on the mssqltips.com website.
- The first tag (</body>) closes the body section of the HTML code for the page
- The second tag (</html>) closes the HTML code for the page. This tag matches the html tag (<html>) just before the <head> tag

Separating and Displaying the Head and Body Sections of a Web Page
The preceding section shows how to create the soup for a web page at a URL. It also reveals that the HTML document has outer tags of <html> and </html> for the beginning and end of the web page. Nested within the HTML tags are start and end tags for head and body sections within the sample web page for this tip. Each of the nested sections has its starting and ending tags of <head> and </head> for the head section and <body> and </body> for the body section. The preceding section shows and discusses some tags in the head section. However, it did not show any content for the body section. This section illustrates how to extract and print to the IDLE shell window the head section, the body section, or both sections together. In addition, this section shows and discusses a segment of HTML code from within the body section.
An HTML page can be thought of as a tree. For example, the html tag serves as a root node for the other tags on an HTML page. The html node in this tip has two child nodes called head and body. Within each of these nodes, there are many more tree nodes.
- The first several lines of code for this tip section are identical to the
preceding tip section
- The same two libraries (requests and bs4) are referenced at the beginning of the script
- The next line assigns a URL for the web page. The get function from the requests library extracts the web page code and assigns it to the r Response object; the page code, along with other values, are deposited in r by the get() function
- The BeautifulSoup function extracts the content for the page at myURL to create a BeautifulSoup soup object
- The second set of lines extracts the contents within the head and body sections
and displays the contents in each HTML document section
- The soup.head.contents syntax in the first line of the second section extracts the contents within the head section; the assignment statement on the line deposits its contents as a Python list object named head_contents
- The soup.body.contents syntax in the second line of the second section extracts the contents within the body section; the assignment statement on the line deposits its contents as a Python list object named body_contents
- The w3schools.com website defines a Python list object as one that stores multiple items, which are frequently starting and ending HTML tags for nodes on a web page
- The print() function displays the items in a list object on the standard
output device, such as the IDLE shell window
- The * in the print() function instructs Python to print all the list items in the object named after the asterisk
- The sep = "\n" parameter assignment within the print() function instructs Python to end each list item with a line feed
#Prepared by Rick Dobson for MSSQLTips.com

#reference libraries
import requests
from bs4 import BeautifulSoup


#assign a url to myURL
myURL = "https://www.mssqltips.com/sqlserverauthor/57/rick-dobson/"

#get url content
r = requests.get(myURL)

#parse HTML code
soup = BeautifulSoup(r.content, 'html.parser')

#create head and body HTML segments

#get all the tags in the head section of myURL
#contents returns a Python list object
head_contents = soup.head.contents

#get all the tags in the body section of myURL
#contents returns a Python list object
body_contents = soup.body.contents

#display the list elements in head_contents
print(*head_contents, sep = "\n")

#display the list elements in body_contents
print(*body_contents, sep = "\n")
Recall that the preceding section shows a screenshot with an excerpt from the soup object for the whole HTML document in the myURL string object. The first excerpt displayed in the prior section is for the top of the document. Recall also that the sample document for this tip has two sections named head and body.
The head_contents list object in the preceding script contains just the tag items within <head> and </head> tags as opposed to tags from the whole HTML document, namely <html> and </html>.
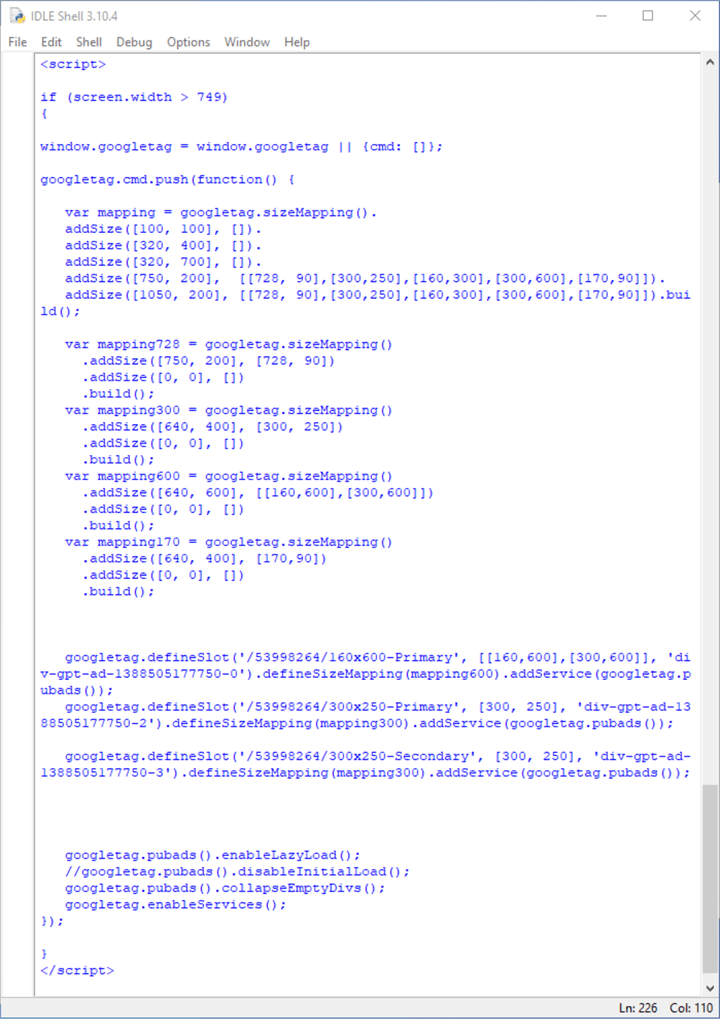
The following screenshot displays the last tag item in head_contents.
- Notice that there is no <\head> tag at the end of the screenshot. This is because the soup.head.contents syntax returns only the tags within a section – namely, a head section. As a result, both the head_contents and body_contents list objects omit the beginning and ending tags for their respective sections
- The following screenshot displays a screenshot that shows the last tag within
the head section, which is some HTML code in a script block from <script>
through </script>
- The first line in the script block is an if statement. This statement runs the code in the braces ({}) below it if the screen’s width is greater than 749 pixels
- The first and second lines in the braces below the if statement contains "window.googletag" and "googletag.cmd.push(function()". If you perform an internet search for these terms, you can discover that they pertain to the loading and refreshing of advertisements on a web page URL, such as the one at myURL
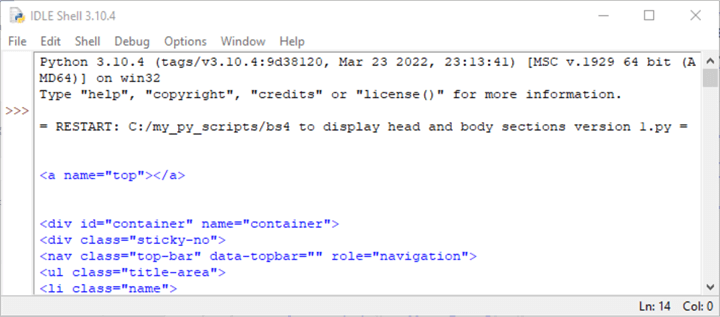
If you comment out with a hash sign (#) the print() function statement for the head_contents list object in the preceding Python script, and run the modified code, you can return to the IDLE shell window all the tags just for the body section of the web page at the myURL location.
Here is a screenshot with the first six tags in the body section from the body_contents Python list object.
- The first tag (<a name="top"></a>) is for an anchor that points at the top of the current page
- The sixth tag is for an HTML unordered list item (li) whose class attribute is "name") in an HTML list of items with a starting tag of (ul) for the overall list
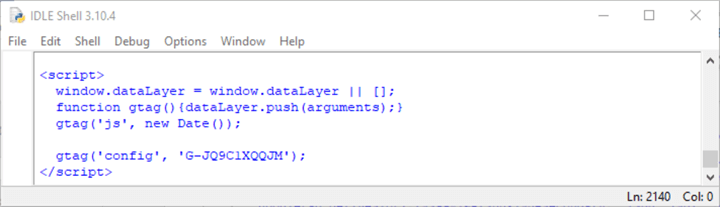
Here is a screenshot with the last six tags in the body section.
- The first (<script>) and last (</script>) tags indicate that the code segment is for an HTML script
- The gtag() function and window.dataLayer are for the Google Tag Manager. Google Tag Manager is a popular package for tracking the usage of pages within a website
Coordinating Tag Content to a Segment of a Web Page
The previous section shows how to isolate the body section of an HTML document and how to display all the code within it. The contents of the body section are the list of tags from within the section. This section shows one approach for extracting a subset of the list of tags from the body section of a page that matches the content showing in a browser.
Recall that the list of tags for the body section can be displayed in an IDLE shell window. The IDLE application you can download from Python.org offers an Edit, Find command for searching text that displays in the IDLE shell window.
- As you have seen in earlier sections, you can read and display the HTML for a web page on a website with BeautifulSoup and Python
- You can also open a web page in your favorite browser, such as Microsoft Edge or Google Chrome, to discover a segment within a web page whose HTML you want to examine and/or save for downstream processing
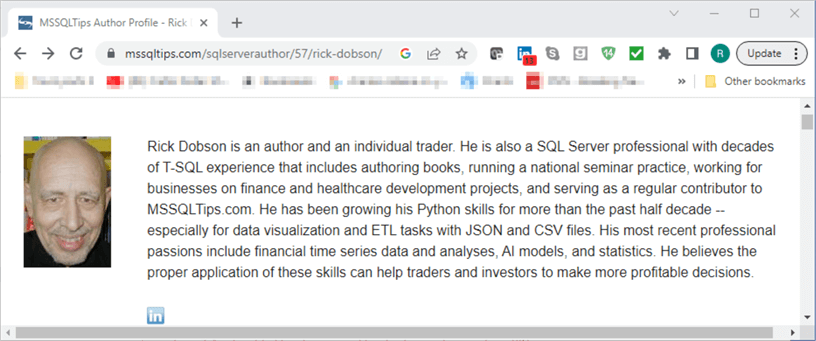
The web page at the myURL location has a segment that provides background information for a contributing author. In fact, there is a separate page for each contributing author to MSSQLTips.com. Here is an excerpt from the page that illustrates the kinds of content found in the author background segment of the page. The excerpt has three key types of information: an image of the author, a short author summary for sharing with MSQLTips.com visitors, and an image with a hyperlink to the author’s page on the LinkedIn website.
Some readers may be interested in learning how to display just the content behind this page segment from the HTML for the whole author profile page. In any event, this kind of task is web scraping. The approach to scraping this author profile information is performed with the IDLE application for a session that contains just the body_contents list object developed with Python and BeautifulSoup in the previous section. As you will recall, Python can display the output from a print function statement in the IDLE shell window.
As you can see, the background information for the author starts with the name Rick Dobson. The Edit, Find command in the IDLE shell window lets you search the text in the body_contents list object for all the instances of Rick Dobson, and there are multiple instances for a variety of different reasons. The Edit command is a top-level menu item, and the Find menu item is a child-level menu item below Find.
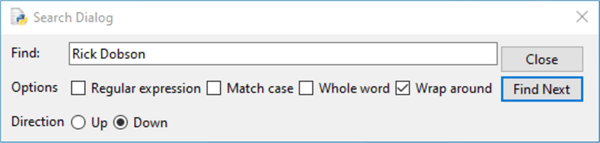
By successively searching for the list object text for Rick Dobson, you can find the HTML that generates the preceding excerpt from the text in a browser window. A search dialog like the one below appears when you invoke the Edit, Find command from the IDLE shell window menu. The text Rick Dobson was typed into the Find: dialog box. For the web page in this tip, I had to press the Find Next button three times before I arrived at the code segment for the author’s background information.
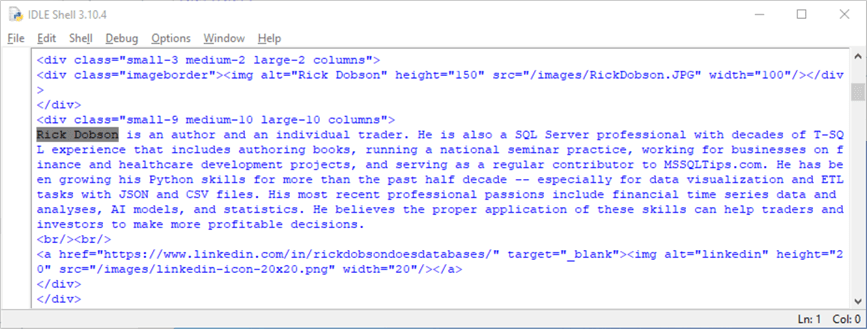
Here is an HTML code segment for the content that appears in the preceding browser image. The following bullet points offer highlights about how the code works.
- The first line of code is for the opening of a div tag with a class attribute
- Opening and closing div tags serve as a container for a collection of other tags and/or text from the web page
- The div tag’s class attribute value references the HTML grid programming feature, which helps to control the position of tag elements on a web page
- The final line in the shell window is </div>; this line closes the opening div tag in the excerpt in the browser window
- The next line is for the author image in another nested <div> tag with a matching </div> tag at the end of the line. The code within this div container designates a .jpg file for the author’s image as well as a width and height for the displayed image
- The next line opens another nested div tag (<div> and </div>)
for a container with a class attribute value that references a different grid
programming specification than the preceding one. This div container includes
the following three items
- a text string containing an author summary
- a couple of <br/> tags; each of these tags is for a line break on the web page
- an anchor tag for jumping to the author’s LinkedIn page; the anchor
tag contains
- an href attribute value that points at the URL for the author’s Linkedin page
- and an image for the icon denoting the Linkedin website
Next Steps
The next steps suggested by this tip can take you in at least two different directions.
- First, you can search for different content on the sample page within this tip. For example, the sample page contains a list of articles by the author. You can return the full list or a subset from the full list of articles.
- Second, you can search other web pages besides the sample one for this tip. Pick a page you regularly visit with a browser, and then use the techniques covered in this tip to learn about the HTML tags controlling the page's appearance.


About the author
 Rick Dobson is an author and an individual trader. He is also a SQL Server professional with decades of T-SQL experience that includes authoring books, running a national seminar practice, working for businesses on finance and healthcare development projects, and serving as a regular contributor to MSSQLTips.com. He has been growing his Python skills for more than the past half decade -- especially for data visualization and ETL tasks with JSON and CSV files. His most recent professional passions include financial time series data and analyses, AI models, and statistics. He believes the proper application of these skills can help traders and investors to make more profitable decisions.
This author pledges the content of this article is based on professional experience and not AI generated.
View all my tips
Article Last Updated: 2023-07-14